• Blog
  • About
  • Press
  • Privacy

Let’s be social!

  • Skip to primary navigation
  • Skip to main content
  • Skip to primary sidebar
  • Skip to footer
Sawdust 2 Stitches

Sawdust 2 Stitches

  • Tutorials
    • Around the House
    • Organization
    • Wall Decor
    • Sewing
  • Makeovers
    • R.V.
    • Room Makeover
    • Furniture Makeover
    • Decor Makeover
  • Build Plans
    • Small Builds
    • Wall Decor
    • Dresser
    • Tables
    • Seating
    • Shelving
    • Hidden Compartment
  • Seasonal
    • Summer
    • Spring
    • Fall
    • Winter
  • Home Tours
    • First Home
    • Current Home
    • 70’s Ranch Home
  • Workshop

Chalkboard Organizer

January 18, 2017

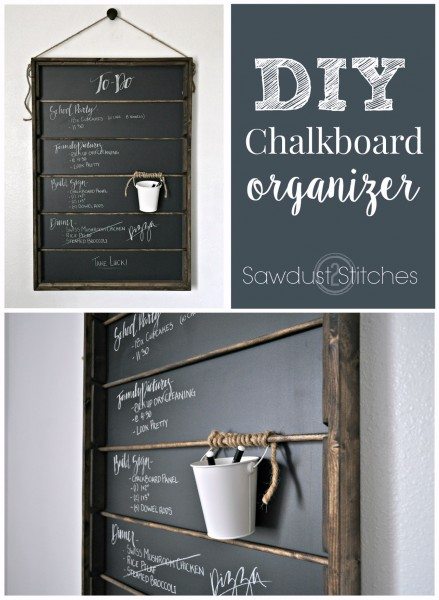
I hope I am not alone in my need to have reminders largely displayed in my home.  I swear I would forget to pick up my kids from school if I did not write it down. Okay, that may be a bit of an exaggeration, but you get my point.  I need large constant reminders to keep me on track.   Here is the other thing,  I am not a fan of the old school white erase board. Effective?  Yes.  Ugly ? YOU BET! So here is my compromise of form and function… build this chalkboard organizer for around $25 (and less if you have scraps!) Enjoy!
chalkboard organizer by sawdust2stitches


DIY Chalkboard Organizer


-the ultimate DIY chalkboard organizer. Cute and functional ! by sawdust2stitches

 How to Build A Wall-Mount Chalkboard Organizer

Tools Suggested:

  • Table Saw
  • Miter Saw
  • Nail Gun
  • Drill

Materials Used:

  • (x2)  1×3″ Pine Board
  • (x1) 1×2″ Pine Board
  • 2×4′ Chalkboard Handy Panel (or use chalkboard paint on a scrap piece)
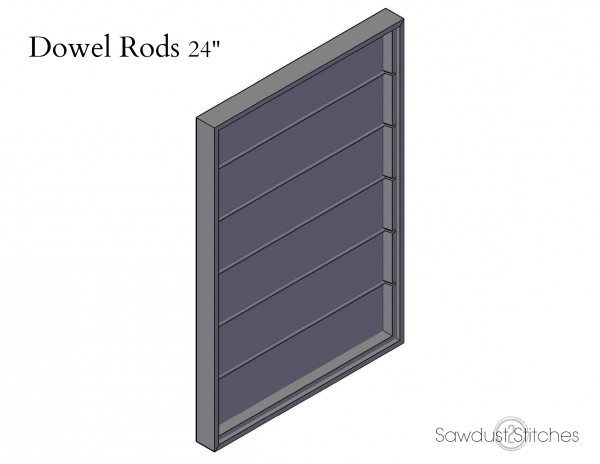
  • (x5)- 1/2″ Dowel Rods (24″)
  • Stain
  • 1″ and 2″ 16 gauge finish nails

Cut List:

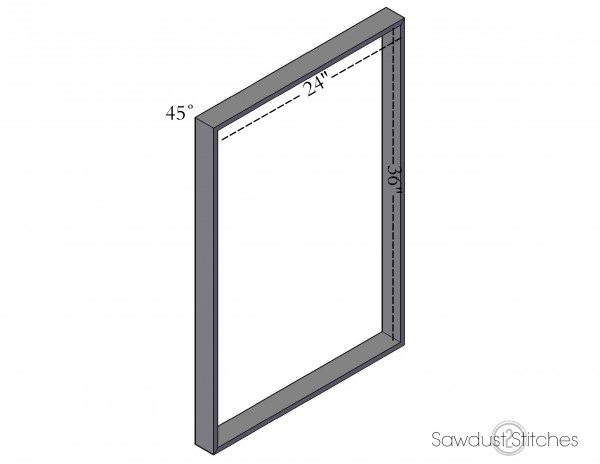
  • (x2) 1″x 3 ” @ 25 1/2″ (w/ 45 degree cuts on ends)
  • (x2) 1″x 3 ” @ 37 1/2″ (w/ 45 degree cuts on ends)
  • (x2) 1″x 2 ” @ 24″ (w/ 45 degree cuts on ends)
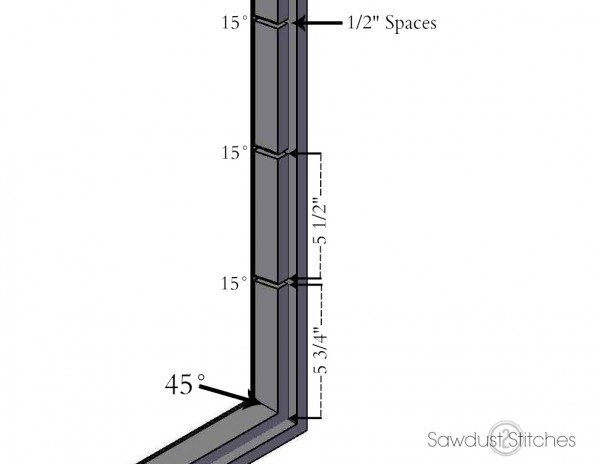
  • (x8) 1″ x 2″  @ 5 1/2″ (w/15 degree cuts on ends) REFERENCE  “Step 2.” for clarification.
  • (x4) 1″ x 2″  @ 5 1/2″ (w/15 degree cuts on end one end and 45 degree on other) REFERENCE  “Step 2.” for clarification.
  • (x5) 1/2″ Dowel Rods @ 24″
  • Chalkboard Paneling @ 24″x 36″

Disclosure: Some of the links provided  are affiliate links. By purchasing through these links it supports this site and helps keep content free. You can read more about how we do this with no extra cost to you.
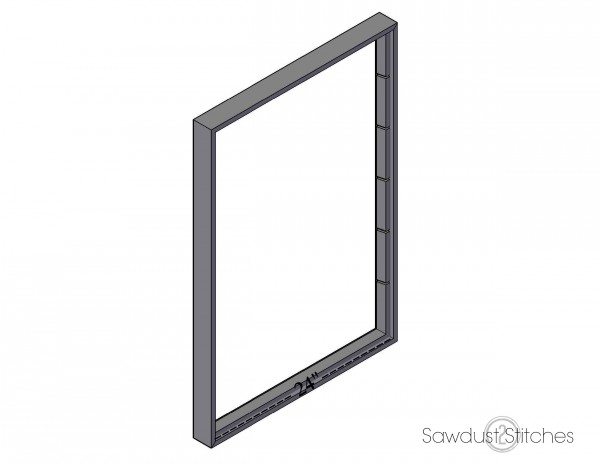
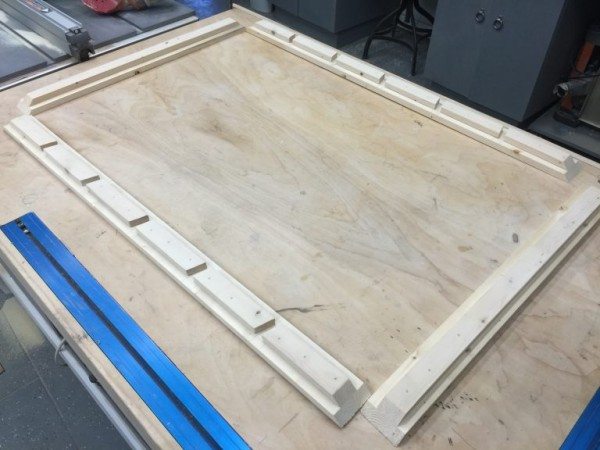

Step 1. Build Frame

Using the 1″x 3″ boards  construct a frame. I  used wood glue on my corners and reinforced with 2″ finish nails.

how-to-build-a-wall-mount-chalkboard-organizer-with-storage-@ sawdust 2 stitches 2


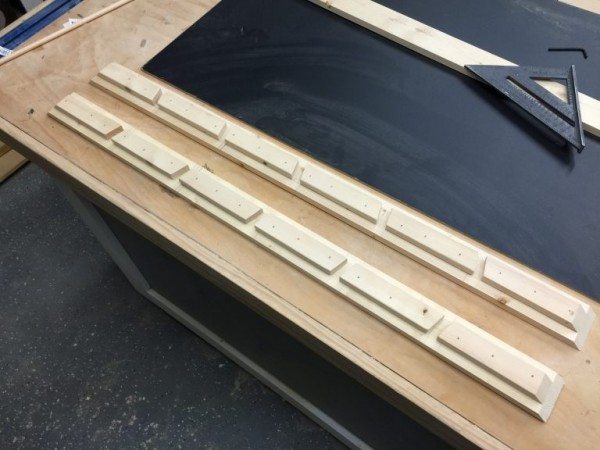
Step 2. Install Spacers

Next we will be be cutting and installing the brackets. These will all be made from the 1×2″ boards.   These are a little tricky, so PLEASE reference the diagrams below.  Notice they are not 45 degree angles, they are 15 degree cuts, (with 1/2″ spaces in between boards, this is where the dowel rods will rest) and the boards that meet in the corners are 45 degree miter cuts.

*When installing, center the 1×2″ boards on the 1×3″ board.  ( This should create a 1/2″ gap on either side of the 1″×2″, so you can install your chalkboard backing.)

I installed my 1×2″ boards using wood glue and 1″ 16 gauge finish nails.

how-to-build-a-wall-mount-chalkboard-organizer-with-storage-@ sawdust 2 stitches 3

 how-to-build-a-wall-mount-chalkboard-organizer-with-storage-@ sawdust 2 stitches


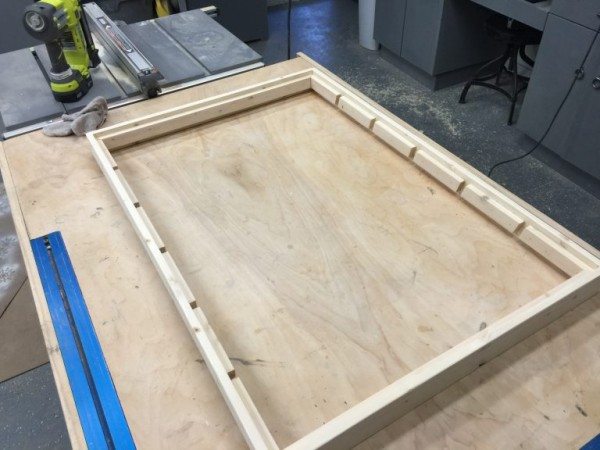
Step 3. Add Top & Bottom Supports

Now you can add your remaining 1″x 2″ boards.  Again, I used glue and reinforced  with nails.  (REMEMBER to leave the 1/2″ gap in the back  to allow for the chalkboard panel.)

 how-to-build-a-wall-mount-chalkboard-organizer-with-storage-@ sawdust 2 stitches 4  
how-to-build-a-wall-mount-chalkboard-organizer-with-storage-@sawdust 2 stitches


Step 4.  Add Chalkboard

STOP!  If you are planning to add a stain/paint finish,  then I would suggest doing that now! ( I used Jacobean by Minwax)

 You are in the home stretch!  To secure the chalkboard panel I  just added small amounts of wood glue to the back of the inner frame. ( All the 1″x 2″ boards) how-to-build-a-wall-mount-chalkboard-organizer-with-storage-@ sawdust 2 stitches 5


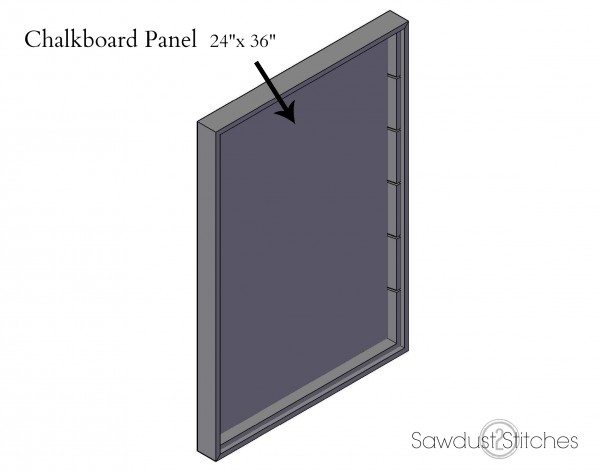
Step 5. Add Dividers

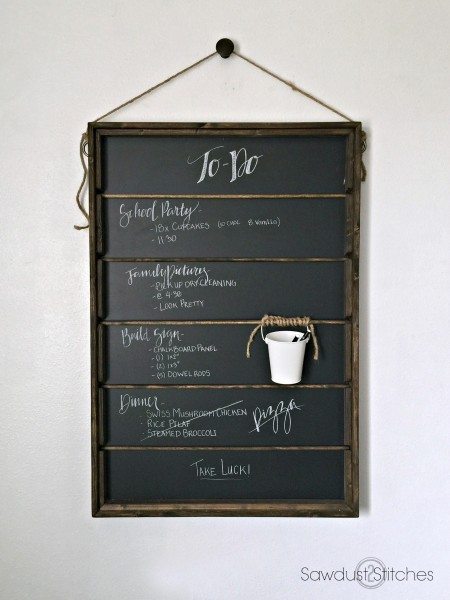
All you have to do for this step is drop in the dowel rods!  They are removable so that you can divide up your board however you please!

how-to-build-a-wall-mount-chalkboard-organizer-with-storage-@ sawdust 2 stitches 6


Step 6.  Finishing Touches

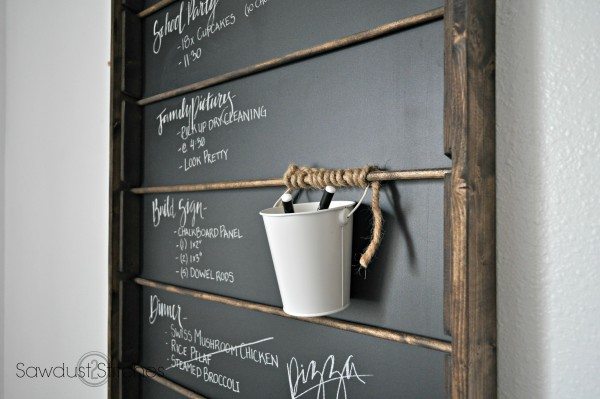
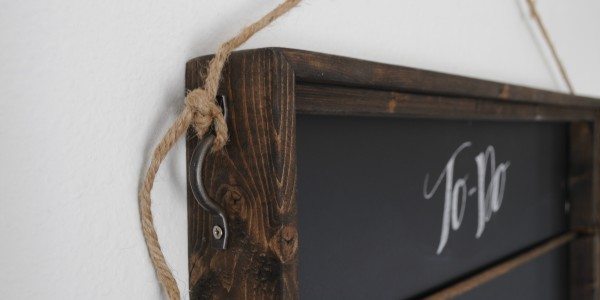
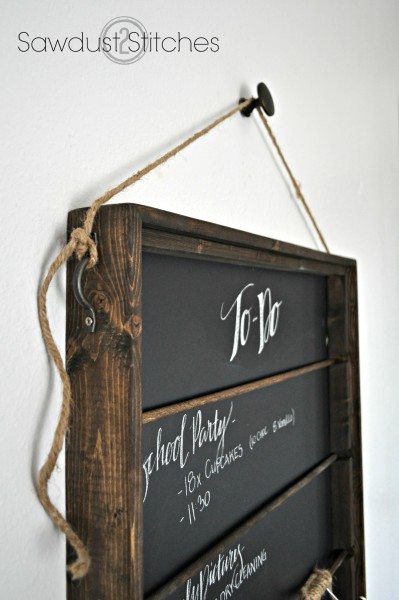
I wanted to add some character to mine so I added some brackets to the sides!  I wanted to be able to use a rope to tie it up and this would allow me to do that.


chalkboard 400x800 There you have it, now it’s up  to you to use it,  personalize, and love it!  Hopefully it helps you stay organized… or… it will just make any room look  cuter.

  Take Luck,

 Corey

Chalkboard organization by sawdust2stitches.com  chalkboard organizer by sawdust2stitches

Digiprove sealCopyright secured by Digiprove © 2017

More from my site

  • The Home Depot DIH Workshop:  Jewelry OrganizerThe Home Depot DIH Workshop: Jewelry Organizer
  • Workshop Update with Genie MachForce OpenersWorkshop Update with Genie MachForce Openers
  • Dresser Makeover into a Mini MudroomDresser Makeover into a Mini Mudroom
  • Suspended ShelvingSuspended Shelving
  • How to: Give a Gift Card (Like a Boss)How to: Give a Gift Card (Like a Boss)
  • Under Sink OrganizationUnder Sink Organization

in Build Plans, Organization, Small Builds, Wall Decor

Reader Interactions

you may also like
Kids Closet Makeover (Using IKEA Furniture)
Add Character by Adding a Gorgeous DIY Garage Trellis
Hot Tool Storage/Organization Drawer
Built-in Pantry Makeover

Comments

  1. Luna says

    January 18, 2017 at 8:09 am

    Thank you for sharing this, it’s just the project I’ve been looking for and I love your style. ❤️

  2. Dyan says

    January 18, 2017 at 11:44 am

    This is beautiful! Had to read the “15 degree cuts” section a few times but I got it and it looks very do-able. I agree – like this MUCH more than a whiteboard.

  3. Erin says

    January 18, 2017 at 1:44 pm

    You are the coolest!! Everything you do is the coolest!

Primary Sidebar

  • Facebook
  • Instagram
  • Pinterest
  • Twitter
  • YouTube
IMG_9167 (1).jpg fd

Popular Projects

  • How to: Faux Brick Wall
  • Cheap White Curtains
  • Ikea Cubbies into a Rustic Apothecary
  • Cabinet Transformed Into A Kitchen Island
  • R.V. Makeover
  • How to: R.V. Curtains
DIY & Design

Meet Corey

Hi everyone, my name is Corey, and I have a problem. I can’t leave well enough alone… The best therapy usually involves a variety of power tools. So, in the few “spare” moments I am not entertaining my two beautiful, rambunctious, boys, I can typically be found hunched over a sewing machine and/or covered in sawdust. All in the efforts to create a perfect balance of aesthetics and practicality in our home.
read more

Join our mailing list!

DIY & design ideas - right in your inbox!

Top Hits!

  • How to: Faux Brick Wall
  • Cheap White Curtains
  • Ikea Cubbies into a Rustic Apothecary

Featured

Back of Door Spice Rack

Categories

  • 70's Ranch Home
  • Around the House
  • Build Plans
  • Crafts
  • Current Home
  • Decor Makeovers
  • Dresser
  • Exterior
  • Fall
  • First Home
  • Furniture Makeover
  • Hidden Compartment
  • Kitchen
  • Lighting
  • Makovers
  • Master Closet
  • Organization
  • R.V.
  • Room Makeovers
  • Seasonal
  • Seating
  • Sewing
  • Shelving
  • Small Builds
  • Smart Home
  • Spring
  • Summer
  • Tables
  • Tablescape
  • Tutorials
  • Uncategorized
  • Wall Art
  • Wall Decor
  • Winter
  • Workshop

Footer

Contact Me: Corey@Sawdust2Stitches.com

Latest ‘Grams

Follow on Instagram
2020 © Your Blog Name
theme by soleilflare
Enter your name and email and get the weekly newsletter... it's FREE!
Your information will *never* be shared or sold to a 3rd party.