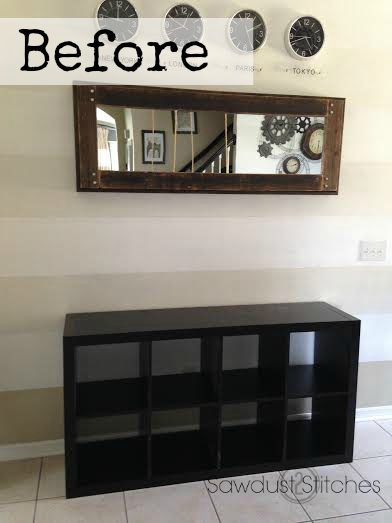
Not too long ago I completed an Ikea makeover that I absolutely loved! (See that awesome project here.) That makeover got my brain ticking… Let me introduce you to my newest makeover conquest turning Ikea cubbies into a rustic apothecary. Just to keep it real, this post does contain affiliate links. However, I never promote a product I do not personally use and love. Thanks.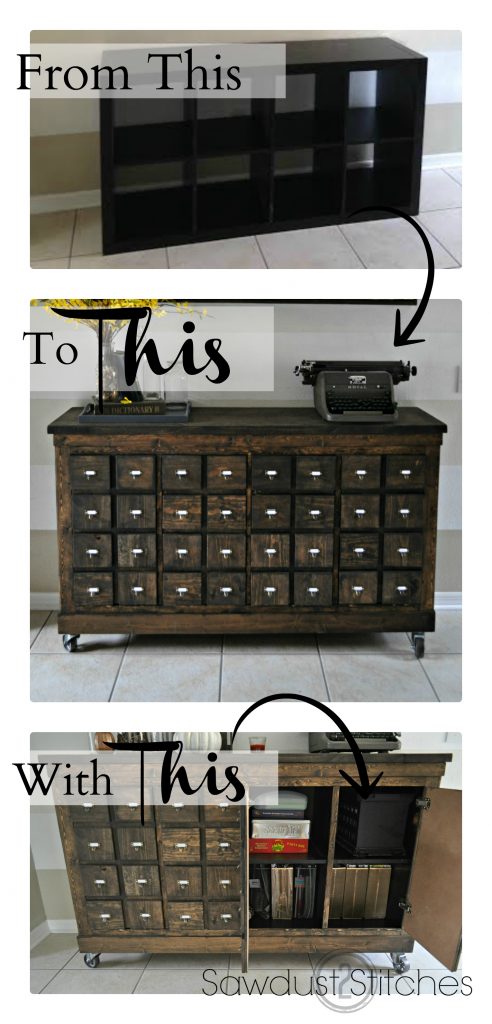
Ikea Cubbies into a Rustic Apothecary
Materials Used:
- Old Ikea shelf or something similar
- 1×2’s
- 1×4’s
- 2×4’s
- 2×10’s
- Wood Trim
- Gorilla Wood Glue
- Minwax Stain
- Foam Brushes
- Drawer Pulls
- Flush Mount Hinges 4(sets) total of 8
- Casters (4)
Tools Suggested :
- Nail Gun
- Compressor
- Table Saw
- Miter Saw
- Sander
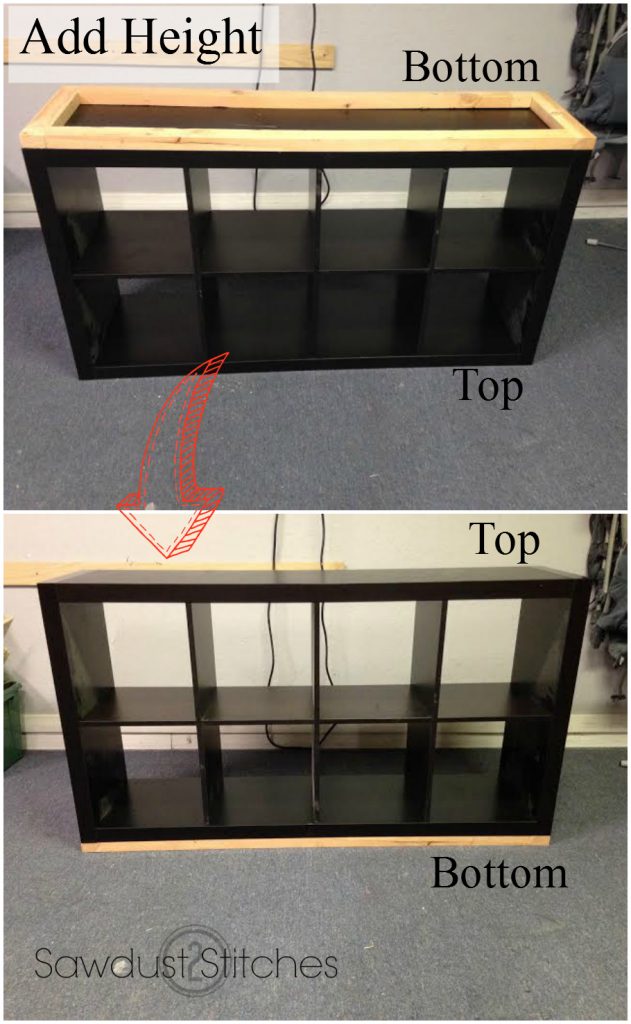
1.) Build Up the Base-
I began turning my Ikea cubbies into a rustic apothecary by adding 2×4’s as a base. This will give it an additional 1.5″ in the overall height, and give the base some visual weight.
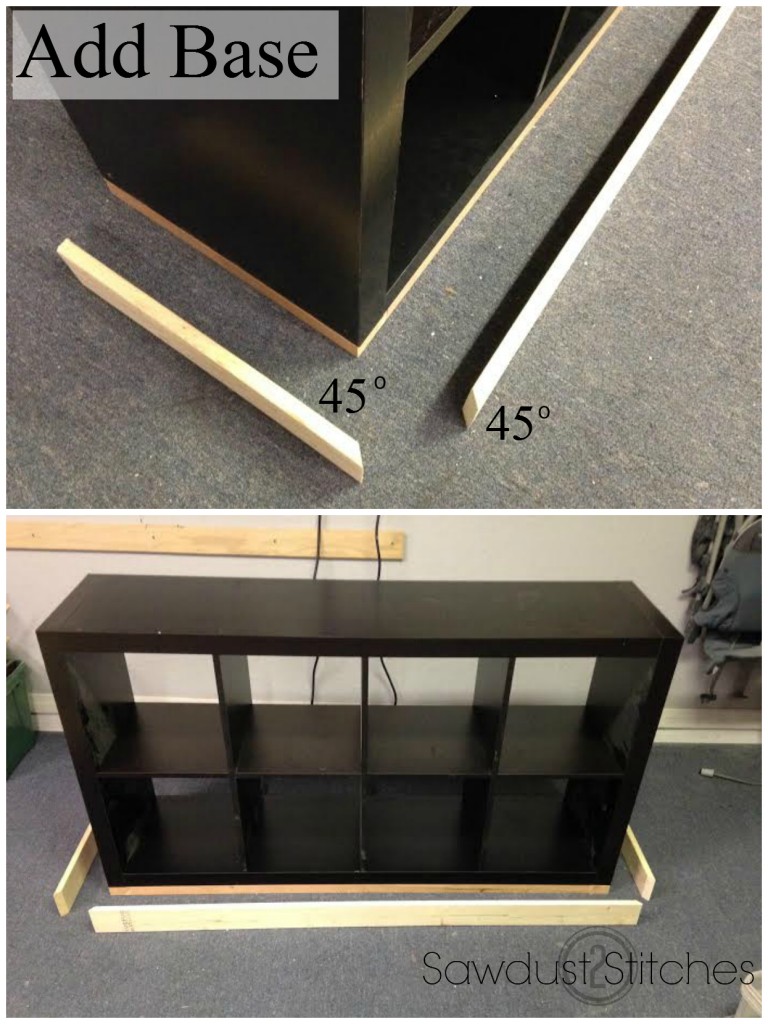
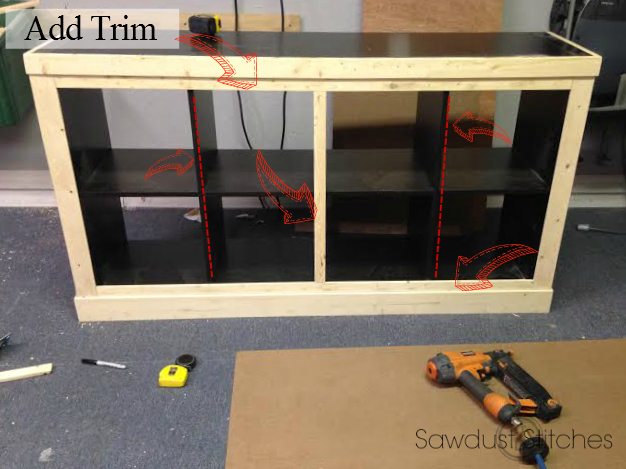
2.) Trim Out Base–
I added trim around the base, I made the trim pieces wide enough to completely cover the edge of the cabinet as well as the 2×4. When adding trim I would suggest creating mitered joints. Secure in place by gluing and reinforce with nails.
3. Trim Out Top-
Repeat the same process on the perimeter of the top edge. Again, miter the corners, Gorilla Glue’d that sucker in place, and then reinforced with nails.

4.) Add Corner Trim Pieces-
Cut trim pieces to fit. Beginning with the front edges, and following on the side trim pieces. Again, glue and then nail in place. I then added paneling on the side.

5.) Trim Out Remaining Edges-
At this point I covered all the remaining exposed laminate edges.
6.) Add Top –
I used 2×10’s on the top. I decided to rip down the 2×10’s so there would not be as much over hang. By using 2×10’s it will give the top and additional 1.5″ and give the piece visual balance. 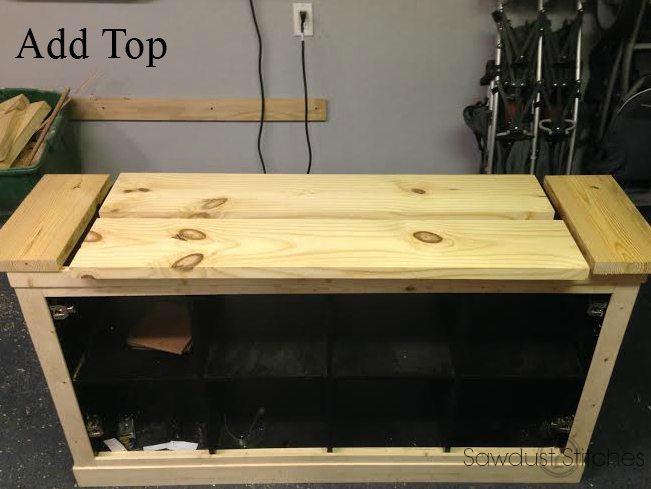
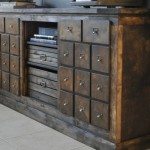
Ikea Cubbies into a Rustic Apothecary – The Doors
7. ) Make Doors-
I used a 1/2″ plywood for my doors. The doors will need to be able to sit WITHIN the opening. I simply measured from the edge of the opening to the support/divider

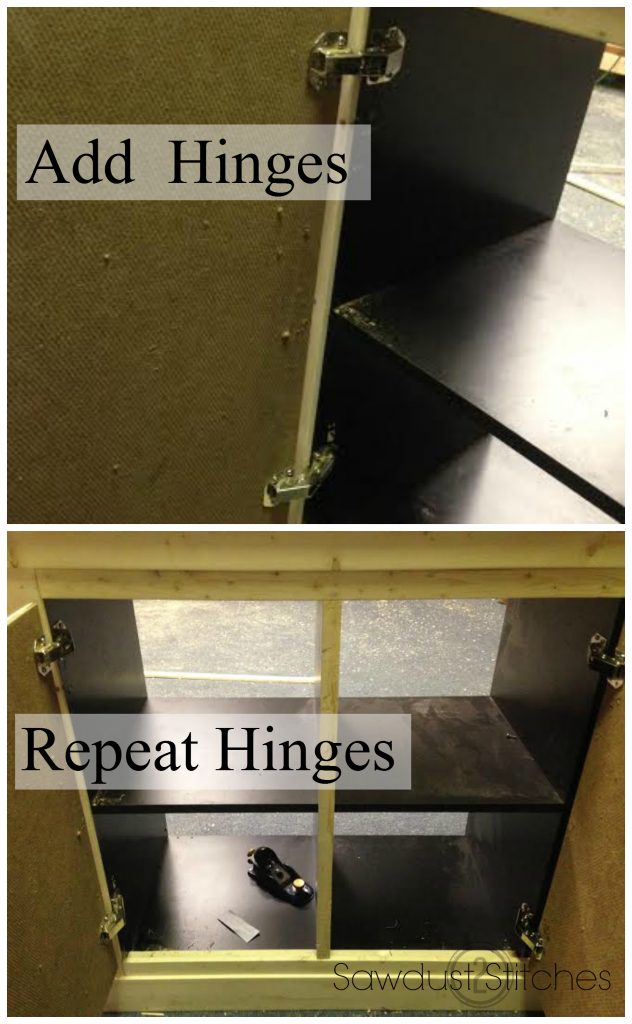
8.) Attach Doors-
I wanted my doors to be inset ( flush with trim) so that it would not really look like a door. In order to achieve this look I needed to use these : 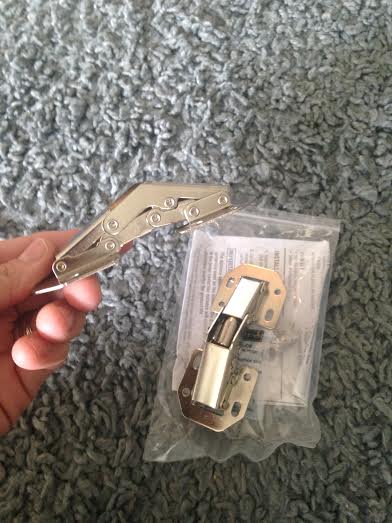
I am not going to sugar coat it, I have only used these one other time. They are a little tricky when it comes to getting everything perfectly aligned. I don’t have any great words of wisdom, except persevere!
Ikea Cubbies into a Rustic Apothecary – Staining
9.) Stain/Polyurethane –
A big thanks to the folks over at Minwax! I use their Jacobean Stain and finish with their Clear Satin polyurethane. I love this finish!

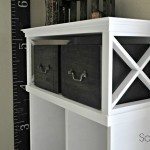
10.) Add Hardware-
When it came to picking hardware I knew I wanted the traditional “Label Pull”, but they don’t really sell them at most hardware stores. Lucky for me I was in the wood craft section of Michaels and lo and behold, look what I found!
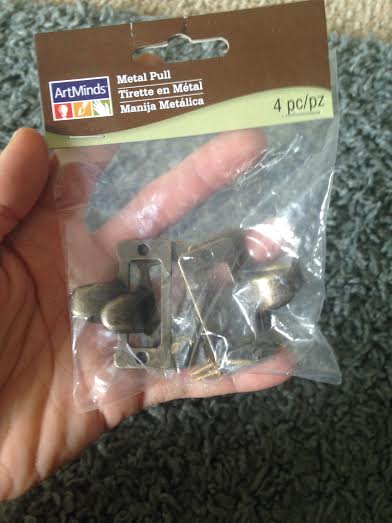
They carry a 4 pack for only $1.99! Seriously, I was ecstatic!
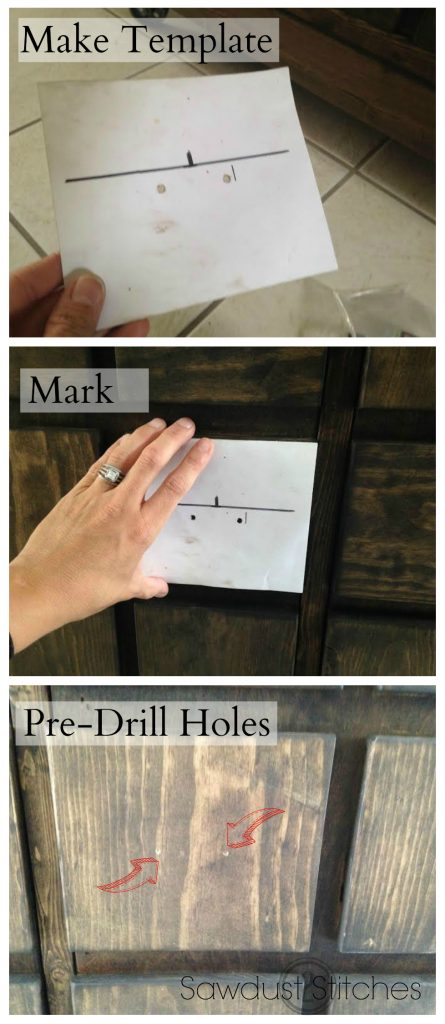
There were a LOT of pulls to install so I made a template. I HIGHLY recommend it. The last thing you want after all the time and effort is for your hardware to be installed all wonky. The template will help keep everything aligned. I just cut a piece of card stock to the dimensions of the drawer fronts. I then found the desired placement for the pulls and punched two small holes where the screws would go. Easy peasy.
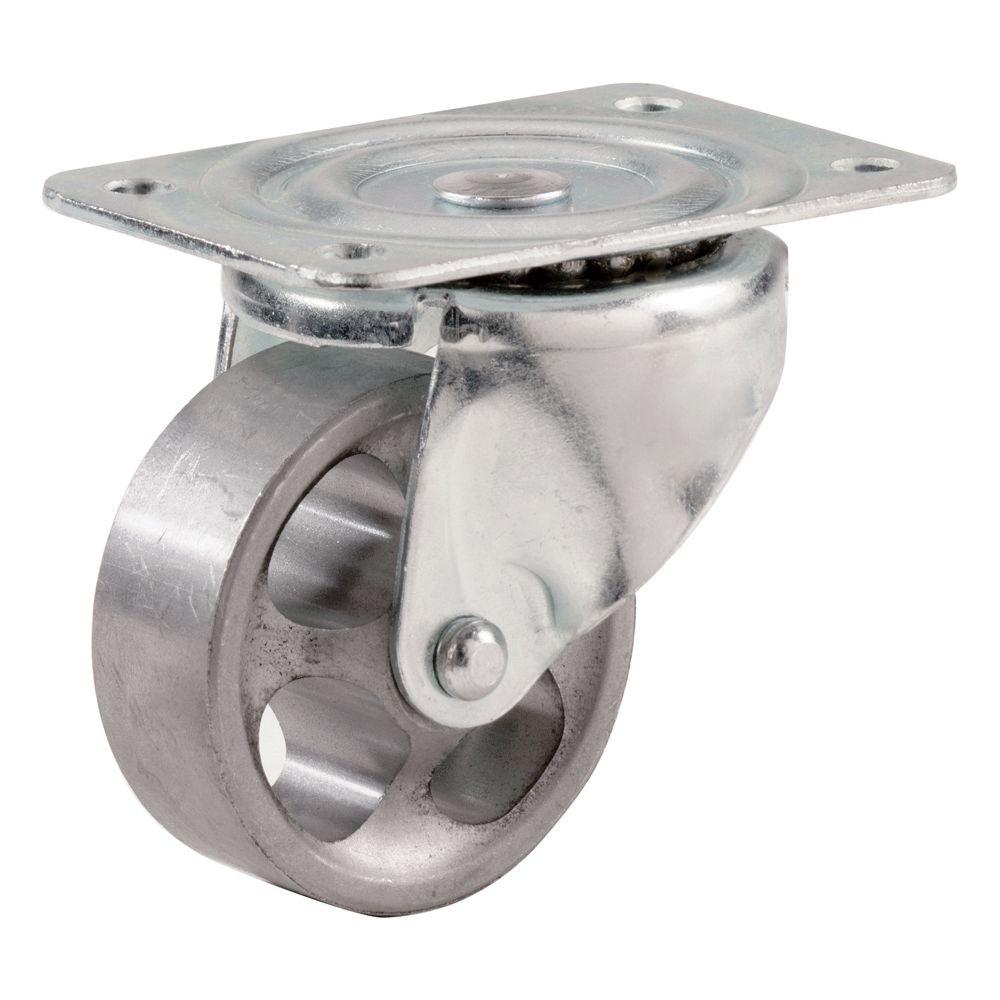
 The last thing I added for aesthetics was metal castors. I found these ones at Home Depot for just over $5.00 a piece. I was in love. They were a little too bright for my taste, so I dusted them with some Oil Rubber Bronze Spray Paint, and they came out perfect! I did make this a while ago, and I believe they still carry them at Home Depot, if not they have them on Amazon.
 Overall, I LOVE the way it turned out.
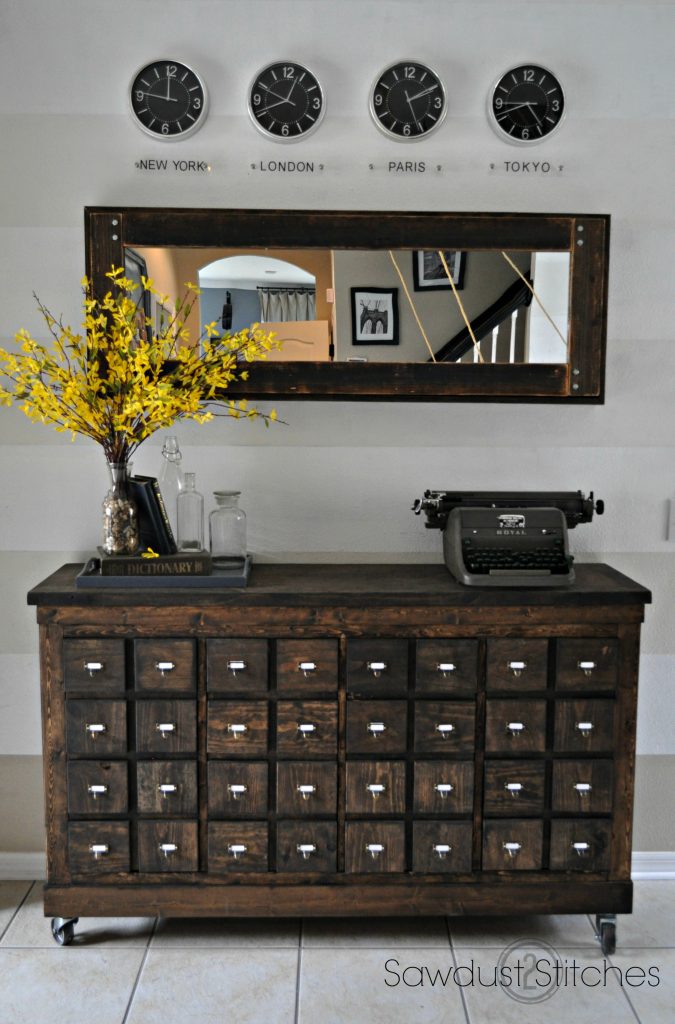
So pretty. 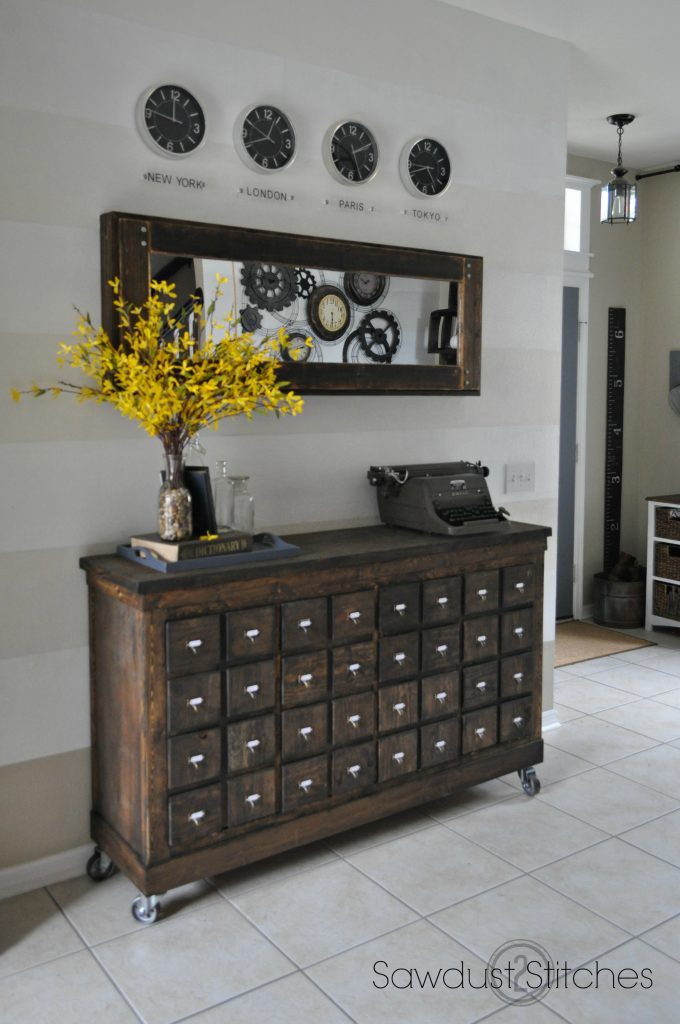
Thanks for reading!
 Copyright secured by Digiprove © 2015


What a transformation! Everyone has one of these cubbies and this is such an awesome way to transform it!! Thanks!
Thank you! I can’t help but show everyone who comes to the door! Pretty sure the Fedex guy thinks I’m nuts. 😉
Seriously love this.
Thank you so much Kay, I LOVE it too!
Oh my goodness, this is so amazing. What an awesome job!
Thank you so much!
What a transformation, this is genius!! Thanks for sharing at Think and Make Thursday!
My pleasure, thanks for hosting!
NO WAY! I cannot believe that started off as a simple Ikea cubbies. You’ve transformed it into an AMAZINGLY GORGEOUS piece of furniture. Thank you so much for sharing at Think and Make Thursday this week!
Ikea: Who knew right !? Happy to share, thanks for hosting!
Oh my gosh, this is incredible! Thank you so much for your simple steps on how you did it! I am totally going to do this now, it looks awesome!!!
Do it, you will love it! Thanks so much for reading and your comment!
GENIUS project, Corey! I absolutely love this Ikea hack! Thanks so much for linking up to Think & Make Thursdays!
This is amazing!!! I have that same IKEA piece. I think I have to do this with it 🙂
wowza, this is crazy awesome!!! seriously amazing, just shared on my FB page!!!
Thanks so much for sharing! Mind blown right !?!
The “ah-ha” deliciousness of the creative mind is remarkable. You can see with the engineer’s eye the other side of the mountain. Creative people bless the world and, best of all, their own selves. Be grateful for your gift. I am.
Allison Moyet said “When you have a creative mind it doesn’t stop going.” hahah I am INDEED grateful, and coincidentally sleep deprived, but very grateful! Thanks for taking the time to read and comment!
Absolutely gorgeous!!!! I love your creativity & vision!
Thank you so much for taking the time to say so! Happy reading!
This is amazing!!! Wow!!! I showed it to my husband and he said “they made that from THAT?” 🙂 Would love for you to share this or any of your DIY at our link up party on my blog please 🙂
Haha that is what I like to hear! I love achieving the “wow factor”. Thanks so much for reading and taking the time to comment!
Wow! Fantastic! I have the same Expedit. Lady, I like the way your mind works. 😉
Thanks Julie! You should give it a go, make sure you send pictures if you do!
Oh, you should totally send all your Ikea hacks to Jules at Ikeahackers.net. 🙂
I do have one up over there! Haha, I have been trying to get this one up over there as well! Great minds think a like! Thank you!
Oh my goodness! This turned out just fantastic! WoW! Nice job!
Thanks so much, I was pretty dang excited. Thanks for reading!
That’s a toughie, I used a lot of spare wood I had lying around. If I were to take a guess on overall, I would GUESS somewhere around 45-60 ish? It all depends on the lumber yard you go to, and what they have available too. Good luck!
This has to be my absolute favorite Ikea hack! You did such an amazing job! I have the exact same Ikea shelf that I’ve been trying to figure out how to makeover and now I know what I’m doing. Thanks so much for the inspiration! I would LOVE for you to link this awesome project up to Your Designs This Time!
Thanks Katie! I most definitely will. Thanks for reading!
Holy Cow. This is incredible. We are featuring it Monday at YDTT! 🙂 Thanks for linking up!
My pleasure, I look forward to it! Thanks for hosting.
Thanks so much for linking up to Your Designs This Time! I’ve pinned this amazing project to our favorites and features board. Have a great weekend 🙂
Thanks so much! Look forward to it. Thank you for hosting!
Very beautiful and inspirational.
The only thing is that I do not understand the inch – feet measurements – but I guess there are some sites that can convert these into the metric system.
Thanks a lot for your tutorial.
Valeria thanks for reading! Hopefully the conversion process goes smoothly. They probably have an ap for that!
Hi,your project looks amazing.im on a similar project for my ikea furniture.you really are an inspiration to all of us moms that cant afford expensive furniture but love the style of it.can you please tell me what kind of wood did you use for little squares you glued to doors?and what kind of glue did you use and how long it took to dry?thanks
Thank you so much! I would love to see what you come up with! I ended up using a 1×8 pine board for the doors and I used my planer to make them a lower profile. I used gorilla glue to attach them and I let them sit over night. I don’t think over night is necessary but I think it was 2 in the morning when I finished gluing them in place… It was a good stopping point… 😉
Wow! This is an amazing transformation! Love this! Thanks for sharing with us at Your Designs This Time.
Emily & Erin
My pleasure Emily! Thanks so much for reading and taking the time to comment!
Holy great balls of fire this is amazing! I have two of these in our house and they need a makeover like this. Pinned.
Haha this is the 2nd one that I have in my house as well, I love them both! Thanks for reading!
I have a question. What size are your square boards?
representing the doors?
I love this look!
Thank you! Concerning the drawer fronts, they are 6″ wide and 5.25″ tall. Good luck!
I love it!
Do you have an overall idea of how much you spent on the whole project?
Thanks Bia, sorry that’s a really tricky question, I used A LOT of extra materials I had on hand. The hardware was really my only cost and it was about $20 in castors (wheels) $18 in pulls, and $20 in hinges. The hardware was by far the more expensive aspect of this. If you have a Ikea cabinet I would GUESS you come make this for about $100. Sorry I don’t have more specifics for you. Thanks for reading.
How much did this project cost in total?
Jordy,
“sorry that’s a really tricky question, I used A LOT of extra materials I had on hand. The hardware was really my only cost and it was about $20 in castors (wheels) $18 in pulls, and $20 in hinges. The hardware was by far the more expensive aspect of this. If you have a Ikea cabinet I would GUESS you come make this for about $100” Sorry I don’t have more specifics. Unfortunately when brainstorming a project I go through my scrap pile and come up with the dimensions etc based on my leftovers. I don’t typically start from scratch on projects. Thanks for reading.
Genius, pure genius!!
I wasn’t able to find the pulls at our local Michaels, but have online. There are differing sizes, however, so do you know the size of yours?
Vicki,
I didn’t know they carried other sizes! That’s awesome! Mine are about 2″wide and 3/4″ high. Would love to see pictures when you are done! Thanks for reading and your question!
Beautiful. I have a wood cubby similar to this that I will try this on. The funny thing about my cubby is that someone had set it out for trash down the street from me. I convinced my husband to help me drag it home. Right now, I use it on the porch for shoes. It will be so cool to do this to it and really turn “trash” into “treasure”. I appreciate the clear pictures and step-by-step instructions. Many sites have great ideas, but the pictures are not as clear as they could be and the directions are vague. So thank you for your excellent tutorial.
Thank you so much for taking the time to comment, seriously the feedback is my favorite part of writing the posts. Thanks, and good luck!
What can I say?? I just love it!! Great idea to turn ordinary Ikea furniture into something special. Thanks for sharing, I keep your tutorial 🙂
That is my favorite aspect of DIY too! Taking something ordinary and making it awesome! Thanks for taking the time to read and comment!
congradulations from your job its perfect!
WoW LOVE this,such a great idea.
Thank you so much for showing us.
Love love it.
Thank you so much for taking the time to comment! It is my pleasure!
This is an amazing transformation! I have two of these ikea shelves as my media center and I have been HATING them lately. This tutorial is perfect, I can’t wait to make them pretty! Thank you!
How perfect! Good luck, and I would love to see pictures!
Just wondering what the dimensions are for the drawer fronts. Also, I didn’t see where you used the 1×2’s and 1×4’s. Thanks, it looks great!
The drawer fronts a 6″x 5.25″. The 1×4’s are used as the trim around the top and the bottom of the cabinet. I used the 1×2’s as trim on the sides. Thanks so much for reading and good luck!!
Thank you so much for your quick reply!! I have an old ikea bookcase I will try this on this weekend. Can’t wait to try my hand at it 🙂
OMG AMAZING! By far one of the best IKEA makeovers I’ve seen. I have the same black shelf, but it no longer fits my decor. Going to try this! THANKS!
That is awesome! Good luck and I would love to see pictures when you are done!
Awesome Job…Thanks for sharing. #ithinkican
Absolutely beautiful!!
One last questions, which wood did you use for the drawer fronts? was it the 1×4 or plywood or something else? Thanks!
I was wondering what you made the drawer fronts from- was it the plywood? Thanks!!
Thank you for bringing that to my attention. You can use a 1/4″ plywood, if it has a nice finish, or I used a 1×8 and planed it down so it was a little thinner. Hopefully that helps, and don’t hesitate to ask questions.
Thanks for reading.
This is beautiful!! I am planning on building one. Did you use a finishing nailer for this project? Also what are the dimensions for the doors? Thanks. Excited to get started.
Sarah, Thanks for reading! Honestly with the doors I would suggest cutting it to fit. I planed all my boards first so the dimensions would differ. Sorry, I know that isn’t very helpful, but I would hate to steer you wrong! Good luck, and I would love to see if when you are finished!
This piece is so classic and beautiful. Without having seen your informing tutorial I would have never guessed it was a hack. What a great way to upcycle.
Thank you so much Heather! I love that people would never suspect, until I show them how it opens! Thanks for reading and taking the time to comment!
GIRL !! You are crazy good.
Haha, thank you! I will go ahead and put an emphasis on “crazy”. Thanks Lady!
hey corey,
i love how it turned out, i showed it to a freind and she was like WHAT?! how can an ikea expedit become this beautifull? i have 2 of these in my room and they need a make over! so thank you for this perfect toturial, i do have 1 question in what do you measure? i am from the netherlands (sorry if my english is a little sloppy), we measure in centimeters, i can translate it from your measuring but i don’t know what, ‘s, means… is it something with inch? but really, it is amazing!
Your English is excellent. The ” ‘s” just means it’s plural, meaning more than 1. Just convert to centimeters and you will be fine. Thanks for reading!
What an awesome project! I actually gasped when I saw this, it is exactly what I have been looking for for a fraction of the price! I do have a question, did you miter the corner trim pieces?
I do miter the corner trim piece. You could easily do a straight edge if you don’t have access to the right tools though! Thanks so much for reading and good luck!
Corey, great work! So creative! Thank you for sharing the step by step process. I have 2 questions:
1. Did you alter the original cubbys at all? It looks like you may have cut a notch out of the top and bottom corners of the middle partitions to make the inside trim sit back from the 1×4 that you used as the top and bottom outside trim.
2. I am attempting to do your process using the Target equivalent of the IKEA cubbys. On my cubby, the boards that form the sides, base and top are only half the thickness of the boards on your cubby. Do you think I should add plywood squares to the sides and the top and bottom of the cubby holes to make the walls thicker? What would you do? Any thoughts are appreciated!
Thanks!
Abby, Sorry for the delayed response. For your first question, I don’t quite understand where you were questioning,but, no I didn’t cut into the original cubbies. Secondly, I don’t think you need to bulk up the sides, unless you want to. So long as the cubbies are sturdy as they are. You could probably use a 1×2 on the side trim instead of the 1×3 if you wanted too. Hopefully that helps, and I would love to see what you come up with.
This is CRAZY awesome! I am not that handy yet with the measuring and the cutting of wood trims, but this has definitely motivated me to do something about that! Well done!
Hi,
i was wondering how you applied the stain? did you apply more coats to the top and the lil mini drawers?
thanks
Yes, I did apply stain. You can use any number of techniques. I brushed it on with foam brush, and then wipe off the excess with a rag.
A-MAZE-ing!!! Personally I’m totally obsessed with little drawers (maybe because I bead) but this is to DIE for! Sadly, I’m just not that handy. I’ve been totally wanting one of those cubby cases for AGES to sort my craft supplies. I guess I really need one room just floor to ceiling storage, and then the roomie needs one too…
Thank you! A genuine apothecary would be amazing for bead storage!I dream of a room of nothing but pretty storage!
This is truly amazing! So inspiring and the entire wall is dorated so gorgeously. Did you also make the mirror? I love the clocks and typewriter too. So cute. Looks just like an old library! Thank you.
Karen, Thank you, I did make the mirror. Want to know a little secret? It is actually a gun safe!
Hi Corey
The corner trim pieces(step 4) what size wood was used for front and for the sides?
Thanks
Vanessa
This is incredible. I absolutely adore it!
Brilliant! I don’t think I’ve ever seen a better Ikea hack than this one! Well done! Just liked you on Facebook and following you on Pinterest and Google+. (not that I’m a DIY stalker or anything-lol!) Loving your amazing ideas!
Are you kidding ? As a blogger we LOVE social media stalkers! Thank you for reading!
WOW! I am blown away on how awesome that cabinet/console turned out. I have been looking for plans to build a new TV console in my room because the old Ikea cubbies i have currently looks messy and unorganized. You have given me a great idea in transforming that cubbie into a apothecary cabinet with doors. Hooray!! I can’t wait to get started working on this project. Thanks for sharing.
Thanks Mary, I totally agree, unless it can HIDE things, it is pretty useless for actually organizing! Good luck, and I would love to see pictures of what you create!
This is astounding! And you make it look easy enough to actually try. Just wish I had space in my one-room apartment for the requisite saws!
Thanks Teddee, hahah I agree I don’t think I would attempt this with a handsaw :). Thanks for reading!
Do it! I love it when I have cheap finds! I can go into it with the mindset “what have I got to lose?!” Good luck, and I would love to see pictures when you do!
Great finished piece!
I did have a suggestion: It’s not too difficult to find antique casters (if you want it on casters) to replace those new ones.
All metal, wood wheel, ceramic wheel… either way, it would really finish the piece out and tie it all together.
I totally agree with you! I was searching flea markets and trying to find some really ornate ones! I got a little impatient, and those ones had to make due.
I am in love with the original mirror above the cabinet. Does it have hidden storage as well? Thinking about it being used for jewelry storage…etc. The cabinet turned out beautiful. I wish I had some cubbies to convert.
You are right! That was the original gun case! He just got the upgrade for Christmas. 🙂
Hey Corey! Quick question for ya. I’m thinking of doing this apothecary effect on my bathroom cabinets. What sort of wood did you use for square fake apothecary drawers? Is that 1’2″ plywood cut into squares too or a different size? Thanks!
That would work! I used 1×6, and used my planer to thin it down a little bit. But, I have no doubt a decent piece of 1/2 plywood would work. Just sand the edges well and maybe use wood grain filler on the edges. I want to see your bathroom if you do it!
Questions, questions as I want to try this but it will be a first!
Was there a back on the original unit and did you put one on the finished piece?
It appears that you stained everything after attaching, does that make it more difficult to access the interior pieces for staining such as the interior of the doors and visible strips of pine?
You stated that you covered the remaining laminate but I only see the vertical pieces covered, did you also cover the horizontal strips so the doors close firmly?
If a back was attached, what size/thickness plywood was used and was it stained before being attached?
Last question, are the original cubbies the same size after the redo or did any of the added trim diminish the size of the cubbies, wondering in case I use baskets. Thanks for a gorgeous piece and incredible tutorial and I apologize if any of my questions were answered and I just missed it…
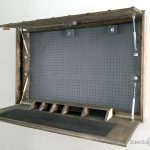
The Ikea cubbies do not come with backing on them, I added a piece of paneling. The paneling is fairly thin, about 1/8″ thick. I just used a composite panel, so I did not bother to stain it, seeing as it would not be visible.
I didn’t stain it during, simply because it is easier to show for a tutorial. Feel free to stain it in any order you would like. Professionals usually wait until the piece is completely finished, but I don’t necessarily follow that rule.
If I understand your question correctly, no I did not cover the horizontal cross sections of the cubbies. The cabinet doors are inset, so the door sits against the horizontal laminate dividers.
The cubbies opening are covered partially. So you would not be able to fit the traditional ikea cubbies. Hopefully that helps a little?! Good luck!
I just found your website & I LOVE your projects! You have really inspired me to get moving! Of course, I adore your cabinet makeover….but I was wondering about your clock display, particularly about the name plates underneath. The clocks look like I could find them at Walmart or a type of dollar store, perhaps even spray paint with brushed bronze spray paint?, but I have no clue how to make those name plates. Could you please tell me how you did that? Thanks so much!
Christie, would love to share. Just for you, I will make up a post for it this week! Stay tuned!
This is the most awesome upcycle ever!
If you ever happen to not want this anymore, please for the love of God sell it to me. I’m trying to make my bedroom more Steampunk-y and that would look AMAZING!!!
Hahah, NOTED. 🙂
This is incredible! Totally love this! I luv the look of it. Apothecary cabinets are so beautiful, but to make a bookshelf into a replica is brilliant. I might have to try this!
Thanks so much, it is definitely one of my favorite pieces!
I have this cabinet and consider it an eye sore. I am so excited to do try this. Thank you for sharing.
my pleasure! Thanks for reading!
Looks great! Did you have any issues with attaching the hinges to the hollow core? And have they held up so far? I am always nervous to hang any weight on the sides of the expedit pieces.
I haven’t has any issues. Knock on wood. 😉
Hi Corey!
Love this beautiful project! Did you publish the measurements anywhere that I’m missing? I have the same ikea piece and was hoping to do something like this when serendipitously I found your article! Let me know.
Thanks so much and great job, your work is beautiful!
Cheers,
Lauren
Sorry no, I didn’t. I used a lot of customized boards ( using a planer etc.) So I made the tutorial as more of a step by step guideline. I would strongly suggest cutting all boards to fit anyways. Hopefully the tutorial helps. Thanks for reading.
Wow how ridiculously good!! Found your picture on pinterest and had to comment!
wow! this is stunning!
Has the glue held up? This is such a fantastic idea…. was just worried about using glue! I have a couple green ikea kallax units that I probably won’t use as such in our new house… but something like this would be PERFECT!!
I haven’t had any issues with them holding up!