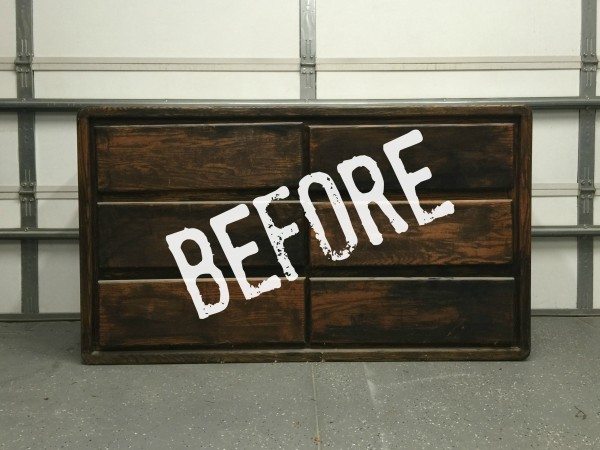
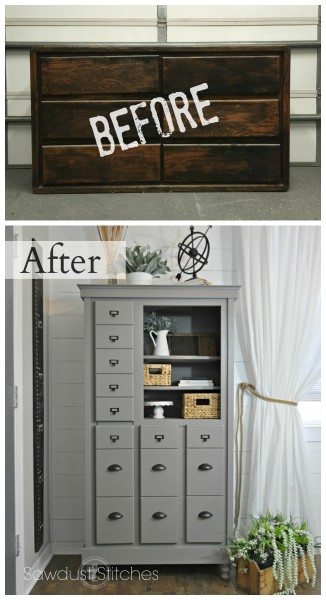
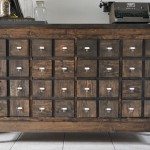
It all started on a HOT Fall Florida day. My good friend Sara and I went and hit up the community garage sale. Let me tell you, we were victorious! I found this wood dresser in decent condition and they only wanted $15 for it. SOLD! 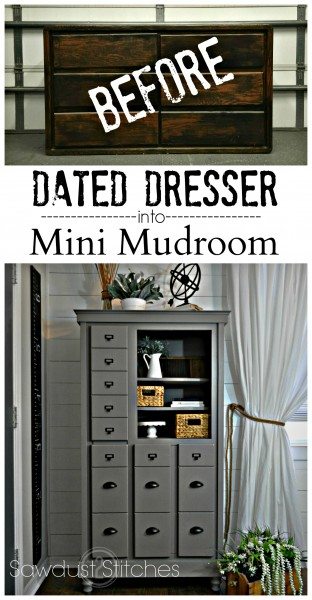
What intrigued me about this piece is that it was symmetrical, (the sides naturally) but also the top and the bottom of the unit were the same! Peculiar right?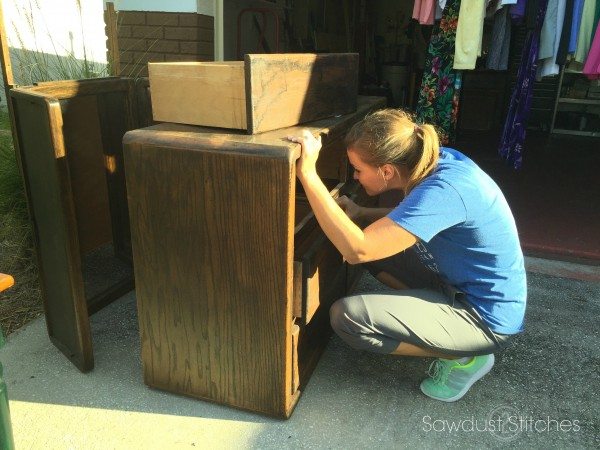 Well this unique piece ended up in my garage and began collecting dust. That was until Elisha from Pneumatic Addict extended a challenge, the “Organize Build Challenge”. Challenge Accepted!
The premise of this challenge was to create a piece that would help with organization, and also included building elements. Lucky for me, I had this dresser just itching for a nice makeover!
…and when it comes to makeovers no one does them quite like HomeRight! I am so excited to partner up with HomeRight on this project, it is through great companies like HomeRight and affiliate links that I can continue to provide all these tutorials at zero additional cost to my readers! So a big thank you to them! (More info. available here.)![]()
So, let’s dive in, shall we?!
How I turned a Dresser into a Mini Mudroom
I started by throwing caution to the wind and went a little crazy! I removed the drawers and flipped it on it’s end. MIND BLOWN, right !?
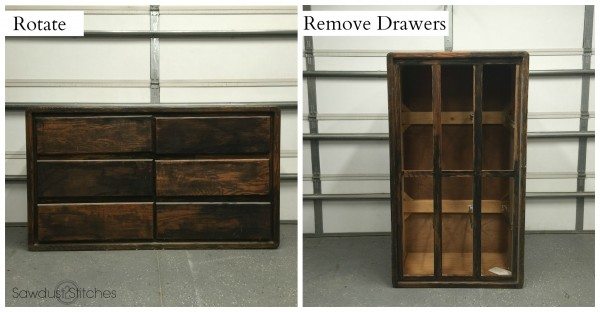 I knew I was going to need better access to the inside of the dresser, so I removed the back. I also removed a secondary face frame from the unit. (It just made it look too bulky.) Next, I beefed up the base using 2×3’s.
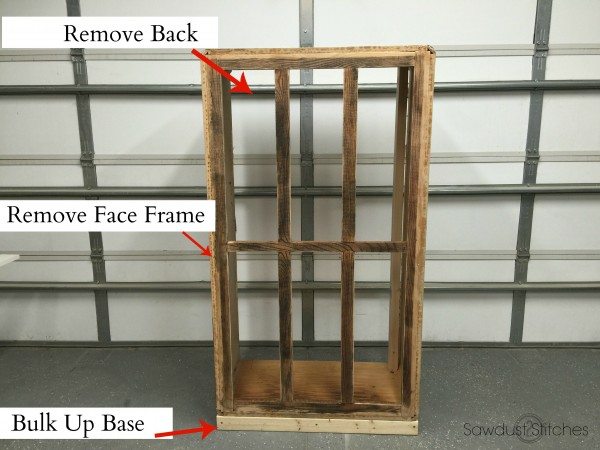
The reason for beefing up the base ? I wanted to be able to add some base trim, and also give it a little bit of visual weight. I then proceeded to do the same to the top, first by adding the 2×3’s as a base to attach the trim to.
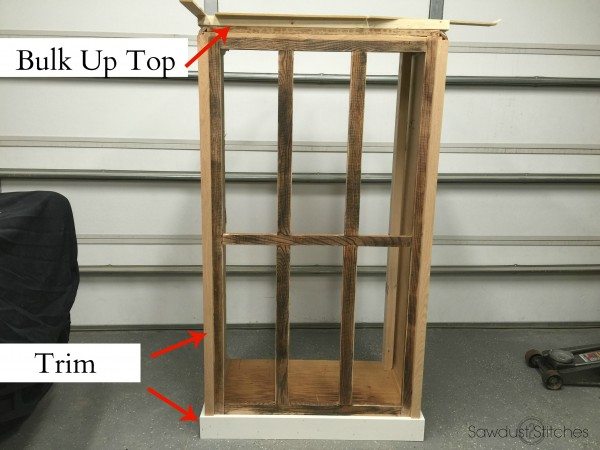
Naturally, next I added the trim to cover up the 2×3’s on the top of the unit. After it was trimmed out, I went a little crazy. I cut out some of the divider/supports! Crazy, I KNOW! ( Don’t worry I had a plan! *fingers crossed*)
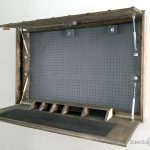
Next, I constructed a series of shelves that would be inserted and attached to the dresser. I decided to do staggered width shelves. First for visual interest, and second I wanted to use them for… wait for it… SHOE STORAGE! Gasp, *shock and awe*. I know, right!? The staggered widths would be perfect for my shoes, boots, and would also be perfect size for my kids shoes . Also with the shorter shelves they wouldn’t need to go fishing to reach them out of the back of the cabinet. 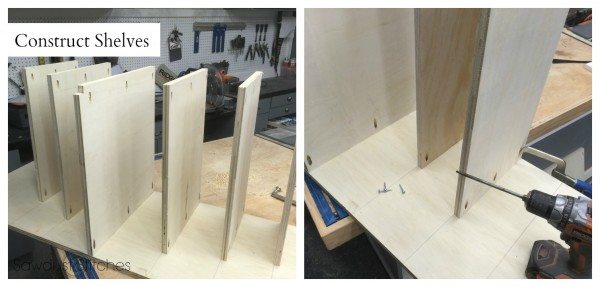 Once the shelves were attached, it really started to come together! *phew*
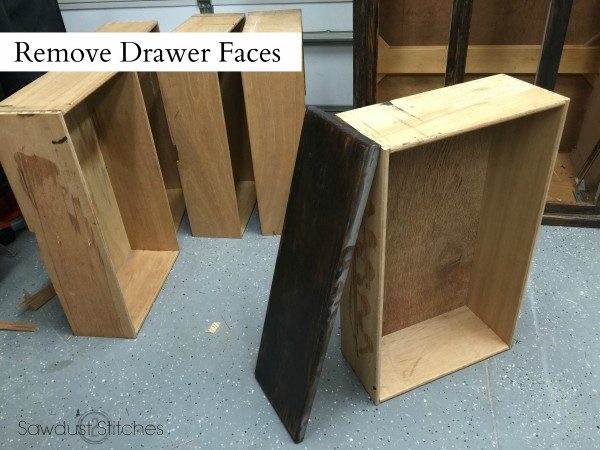
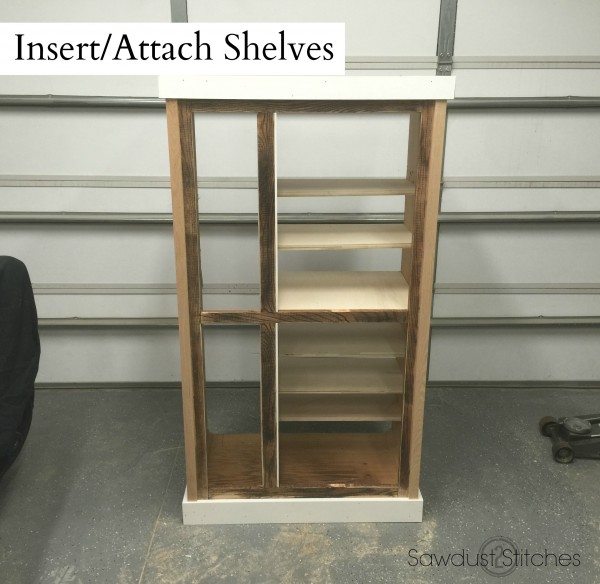 Next, I needed to add doors. So, I used what I had! I removed the faces from the old drawers.
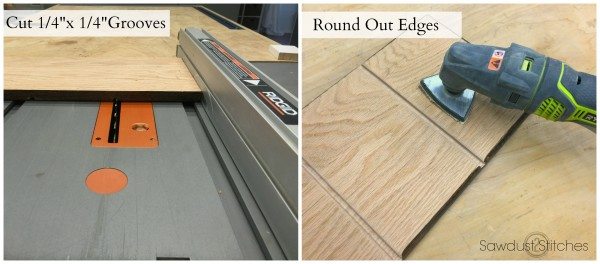
 I definitely did not want this to look like a dresser that I had flipped on it’s side. So, I decided to cut grooves in the panels to give a more rustic apothecary feel. Worked like a charm!
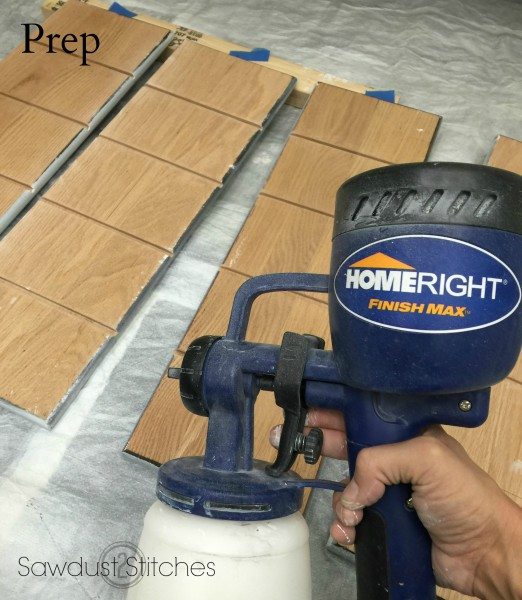
Once the panels were all sanded and prepped, I was ready to prime! So I busted out my handy HomeRight Finish Max Sprayer and got to work!
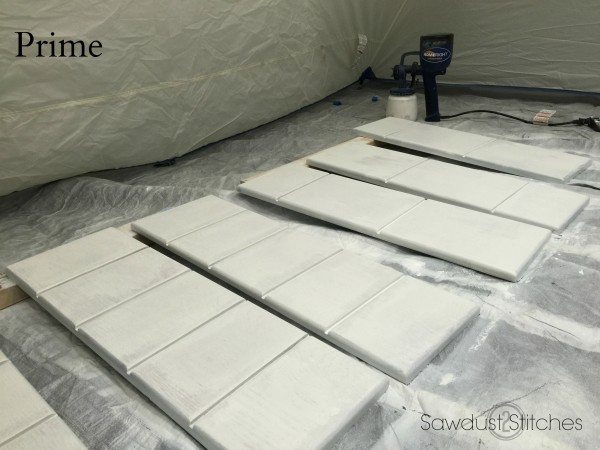
 I was able to prime both my cabinet doors and the dresser/cabinet in just a few minutes! Part of this dresser was oak so it had a really deep set grain, so it required two coats of primer and then it was ready for paint!
There is something about spraying on paint that I find so rewarding! Seriously, look at how quickly I knock out this board, with ZERO brush streaks!
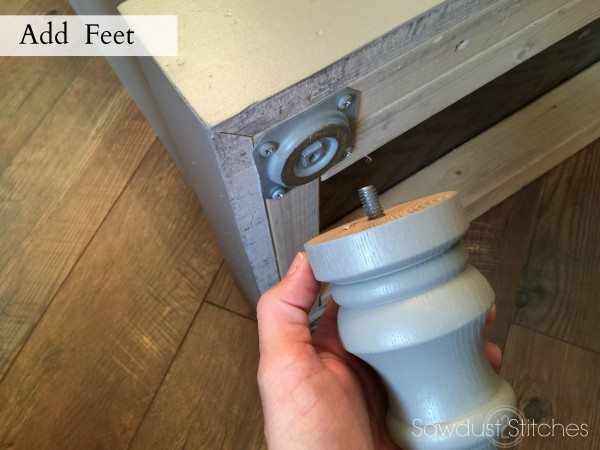
Once all of my painting was done, it was time to bring it all together! I decided that I wanted to add feet, so I simply added some adapter plates, and then you screw the feet in! Easy Peasy.
 Next, it was time to face my aversions to hinges and install the doors. Thank goodness it went smoothly! Also at this point I added a piece of wood to the back of the doors to bridge the gap. (Remember we removed the dividers earlier.) You may ask “But Corey, Why? This seems counterproductive!”
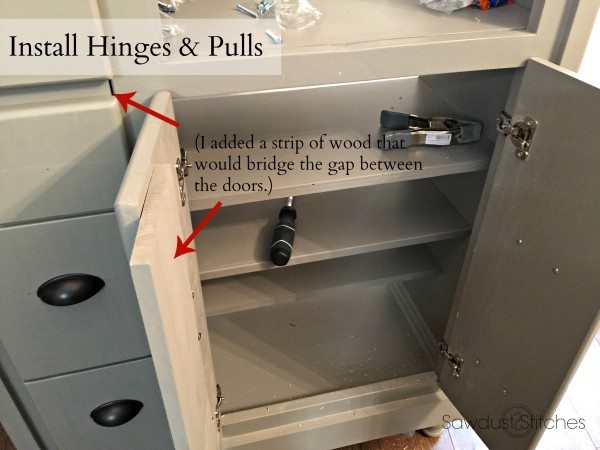 Well my friends this part of the reason. I wanted the two drawers/doors on the left side to be one continuous space… it would serve as a place to hang jackets! I even installed a pull out coat rack and key rack so that you can easily find everything!
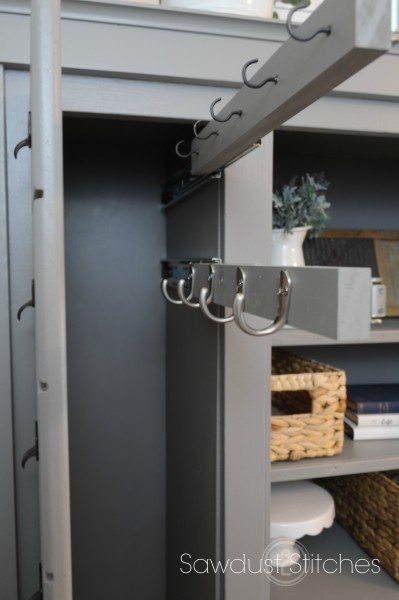
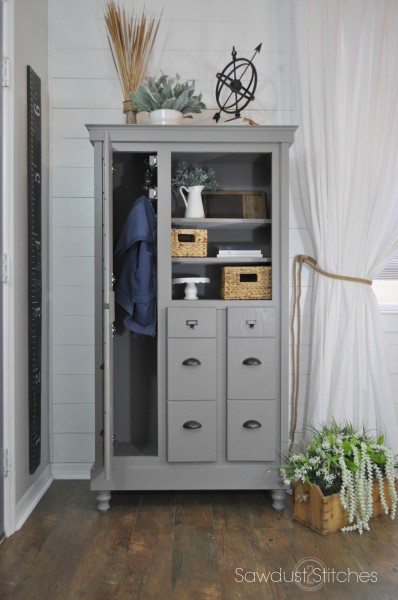 The reason I cut out the divider bar on the other spaces, is because I wanted to have easy access to the shoe storage below. ( I really didn’t want a bar right in the middle!)
Side note: I had not originally planned to have open shelving. I had installed all the doors and was preparing to install those last two, but I kept staring at it, and ultimately decided I liked it, and that it gave it character. So I 86’d the two last doors. 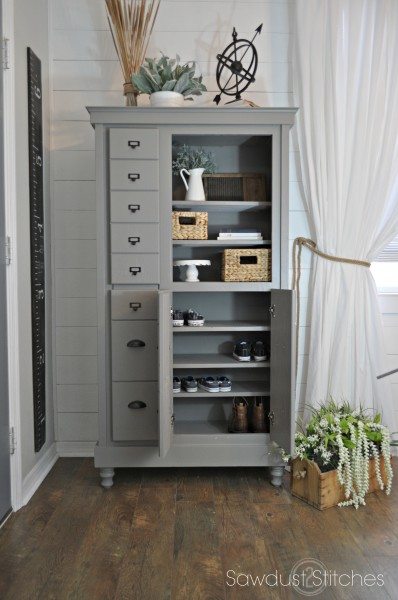 And there you have it folks, my alternative to a mudroom! It has a place for jackets, keys, shoes, and even extra cubbies for glasses etc! All -in – all, I will call this a success! Thanks for stopping by and make sure you see what others did for the “Organize Build Challenge” !

Make sure you check out these other awesome bloggers!
For sneak peeks of my upcoming projects be sure to follow me on Facebook and Instagram. You can also follow me on Pinterest to get tons of projects plans from all around the web!
Take Luck,
Corey
 Copyright secured by Digiprove © 2016


This is gorgeous (as always), I couldn’t believe it was a dresser at first. Nicely done.
Ha, thanks so much Amy! This was seriously a doozy, I almost threw in the towel a few times!
Wow! That is unrecognizable. Amazing!
Thanks so much Kim!
That is amazing. Much better than average hall tree!! Hides all the stuff!! Would you consider posting a way to make this without using a dresser? Very cool. Thanks. Sandy.
Love the ingenuity. Great job on the conversion. I am currently building a shoe organizer/docking station for our front door entryway form a desk. You definitely give me inspiration.
Oh my gosh!!!!! I want!!!!
Knocked it out of the park girl! Seriously awesome! I love it all!
Whoa! Whoa! Whoa! Seriously, whoa! You are my hero!
This is so beautiful and creative! Wow, wonderful job and so inspiring. I would LOVE to have a sprayer, too!
WOW! Gorgeous job! I love this piece!!
Thanks so much for reading and your comment Vivian!
What?! A dresser is under that gorgeousness?!!! Is it ok that I’m just too stunned to have anything witty to say, other than you have KILLER restyling talent?
Oh my gosh… seriously mind blowing.
Thanks so much Donna! You know the blogging game, sometimes you have to go extreme to make waves! 😉 Thanks lady!
Make waves? Girl, you didn’t make waves, you made a frickin’ TSUNAMI! Other than that, I’m speechless! Gobsmacked! And drooling. (Not exactly speechless huh?)
Haha, this may be the best comment I have EVER received! Haha, Thank you so much Maria!
This is an amazing transformation! Very inventive and creative!! You are so talented! I’m not a DIY ‘r but I would love to buy this ready made!!
Wow. You have a real ability to see how one thing can be morphed from another! Crazy creative!
You did an amazing job with this!! Creative, functional and gorgeous! Love the open shelves and the pull-outs for coats and keys – fantabulous!!!
Corey you are a repurposing goddess! Holy smokes it’s so creative and genius plus that grey color is perfect.
Thank Jaime! Haha I felt like I was really getting out of my comfort zone not using a blue! Hah
I think this is one of the most creative and impressive things I have ever seen. Your imagination is amazing!
Wow great job! Such an inspiring project! I wanna go find me an old free dresser now???????? thanks so much for sharing your creative projects!
Alma
Thanks so much Alma, I love the wall gallery you recently posted!
Incredible!! That is probably the most amazing furniture transformation I have ever seen. You are a Genius!
What an amazing transformation! Your creativity is mid boggling!
Thanks so much Leanne, coming from you I will take that as a huge compliment!
Wow, this is such an incredible transformation. Mind blown, still can’t believe it all came from a $15 dresser! Great job girl! Love it.
BOOO yah!! This is a stellar re-creation! Way to go!!!!
Fantastic idea! Now I’m going to have to find a dresser and do this! It would look SO much better than my hall tree!!! Your video is set to private though 🙁 Would have loved to have watched it. Thank you for sharing!
Brilliant!
Wow, this is just AWESOME. I love how creative you got with the drawer fronts. No one would believe the before is the after!
Brilliant!
Thanks so much Denise!
I’m not sure what I’m more impressed with – the finished product, or the fact that your brain conceived something like this.
haha, believe me my brain is a mess, but I have my moments! 😉 Thanks so much Lia!
I have to say that I was awestruck with the transformation of the dresser! I mean, I’ve been DIYer and designer for over 30 years and even though I’ve repurposed a lot and have admired many other’s transformations, this kind of thinking and creativity really is impressive. In browsing your blog, it just keeps on with amazing projects. I look forward to seeing, indulging in more!
Well, thank you so much Kathleen! I am completely flattered. Thanks so much for taking the time to look around!
I liked and am following both pages…..tagged a friend and left this comment. I loved your refinishing projects
Excellent! Thanks for following!
This is amazing! Seriously great work, and so inspiring! Always love seeing your stuff. 🙂
Thanks so much Dawn!
Awesome! I love this, very creative and a lot of skill involved… nice job!
I love the design. It wouldn’t surprise me to see some furniture manufacturers copying it. Great work.
Wouldn’t that be fun to see!? Thanks so much for reading!
Hey there! I love the grey color; do you remember what it was?
Sure do Jana, it is Dovetail to Sherwin Williams!
Have you been investigated for witchcraft? I only ask because this transformation is magic!
You have some seriously awesome skills, vision, and talent.
Haha, best comment I have gotten in awhile! Thanks Jaime!
An organizing dream come true. Pinning now. Found you via Roadkill Rescue.
You are a genius, Girl! It’s beautiful! This is, undoubtedly, one of the best makeovers I have ever seen!