
I did it, I finally did it! I have documented the process for building this case and I am super excited to share it with you today! HOWEVER, let me make this VERY clear, it is not a SAFE. It is a SECRET compartment. The fact that it is hidden and requires knowledge on how to open it is what makes this work. My children have NO clue that there is anything contained in the mirror. If you are considering making this you will need to take into account your own/family/home environment and needs. With that being said, I am EXCITED To bring you this tutorial!
UPDATE: As my kids have gotten older, I have added a key lock to the secret compartment. I don’t think it is completely necessary yet, but in a few years it would be wise to have back up. You can see the updates on the second part of this tutorial HERE.
PLEASE READ BEFORE YOU START BUILDING:
When I originally built this, I NEVER planned on making it into a tutorial. When I make builds for a tutorial, I try to make them easy to follow, budget friendly, and use standard size lumber. This is not really any of those things. I just wanted to put that out there.
This is not a beginner level build. I am not saying this is advanced, with artistic joints. However, I AM saying that if you have not worked with wood often, this may be frustrating! Sometimes the slightest bowing in a board can throw off everything! Another thing to consider when making this, these ARE NOT standard size boards. I custom made most of them to fit my needs. If you have access to a table saw this is do-able…
If you are still with me, then you are my kind of people! Let’s do this!
Supplies Used:
I ended up needing to buy a lot of my supplies online, because they were either A.) Significantly Cheaper or B.) The only place I could find them. That being said, this post does include affiliate links.
- Wood Glue
- Wood Filler
- 2×4″ (2)
- 1×6″ (1)
- 1×2″ (2)
- 1×4″ (2)
- 1/2″ plywood
- 4×8′ pegboard
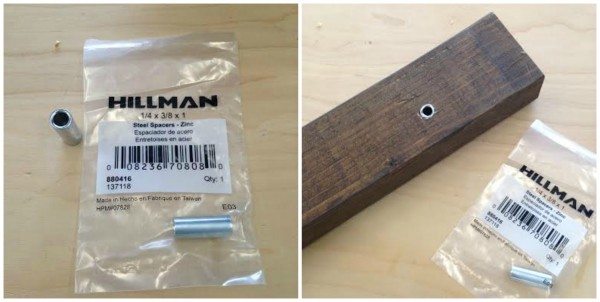
- Hillman Group 1/4 x 3/8 x 1-Inch Spacer (3)

- 1/4″ x 3″ carriage bolts (2)
- 1/4 x 4″ threaded rod
- Eastland 5″ Square Beveled Mirror (40)
- Gas Strut Lift Support (4)
- 1.5″eyelet hooks (x2)
- Piano Hinge (2)
- Soft-Close Dampeners(Optional)
- 10-LED Wireless Motion Sensing LED Light(Optional)
- Hangman French Cleat with Hardware (2)(Optional)
Tools Suggested :
- Miter Saw
- Router (Table Saw can work)
- Table Saw
- Drill
- 3/8″ Drill bit
- Forstner Bit 3/4-Inch
- Kreg Jig
- Drill Press (Would be IDEAL, but I managed without one.)
- Nailer and Compressor (Ideally, but do-able without if you are determined.)
Frame-
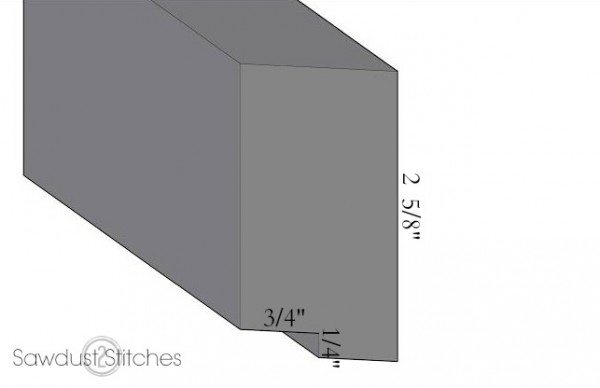
– I ripped 2×4’s down so that their finished dimensions are 2 5/8′ x 1 1/2″.
Using a router or a table saw route out a lip on the inside/ back of the “2×4’s” . This lip will serve as a recess that the peg board will sit in. See image below:
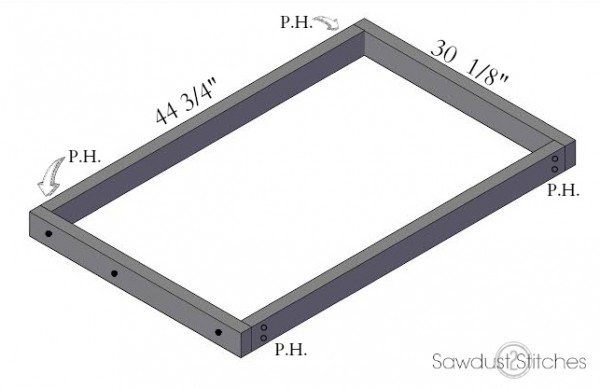
Cut List: (using the custom sized 2×4’s)
(x2) 30 1/8″
(x2) 44 3/4″
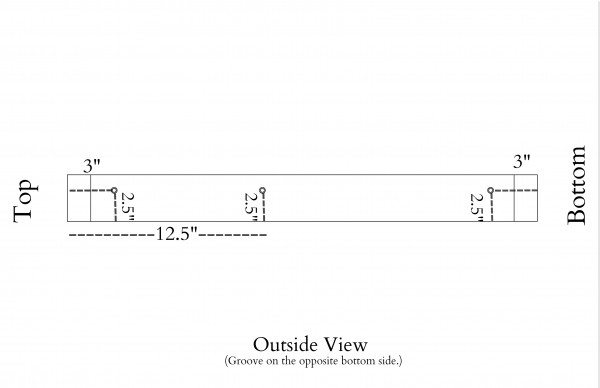
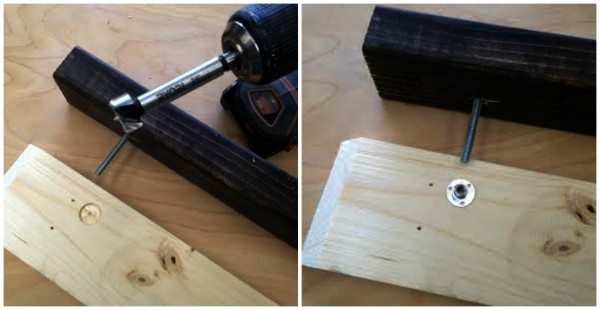
Take ONE of the 30 1/8″ boards and drill holes according to the below diagram. I would HIGHLY suggest using a drill press. If these are not straight holes, it will be difficult to shut/open.
After holes are drilled , assemble the frame. Using a Kreg Jig make pocket holes on the exterior of the 44 3/4″ boards. (See the below diagram.)
Doors-
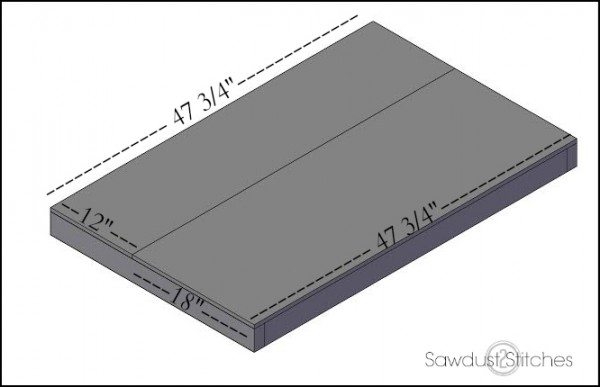
The doors were cut from 1/2″ plywood. There will be an 1/8″ gap where the two pieces meet .
- Cut List :
- 12″ x 47 3/4″
- 18″ x 47 3/4″

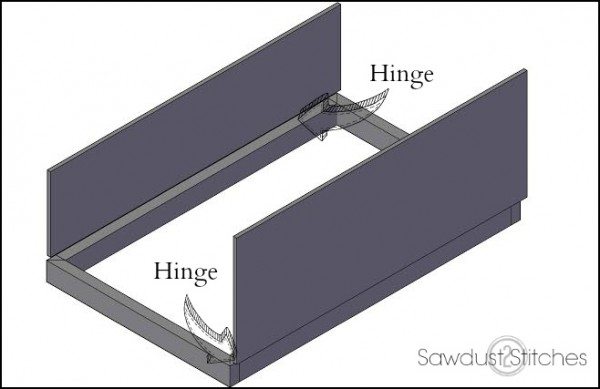
-Install Hinges
Piano Hinges come in a standard 48″ measurement. In order to make it fit, I cut both down to 47″.
This can be down several ways:
- Hack saw
- Grinder
- Using an abrasive disk on circular saw
Trim-
A.)
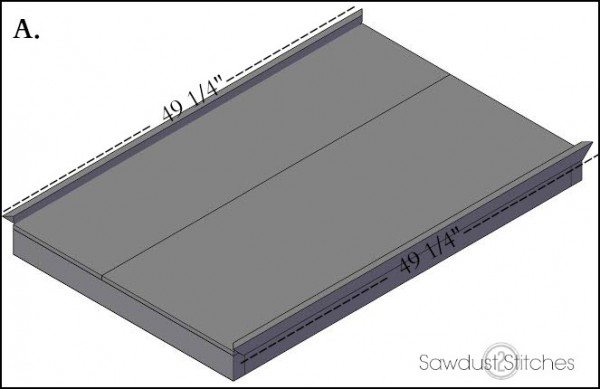
To create the trim (seen in the above Diagram A.) You will need to cut down a 1×2″ board so that it’s finished dimensions are 3/4″ x 1 3/8″. Once the board is resized, groove measuring 1/8″ x 1/8″ will need to be notched out. Either using a router, or a table saw. ( See the image below.)

Once the “1×2” is cut to the specified dimension, it will need (2) 45 degree cuts on each of the ends. (I was getting confused simply writing how to make these cuts. So I am making it a little easier, here is a video on how to make the top and bottom trim pieces.)
Cut board so that it is 49 1/4″ long with 45 ° angles on both ends. (It will be 49 1/4″ long point to long point)
https://www.youtube.com/watch?v=t0464asRpQA
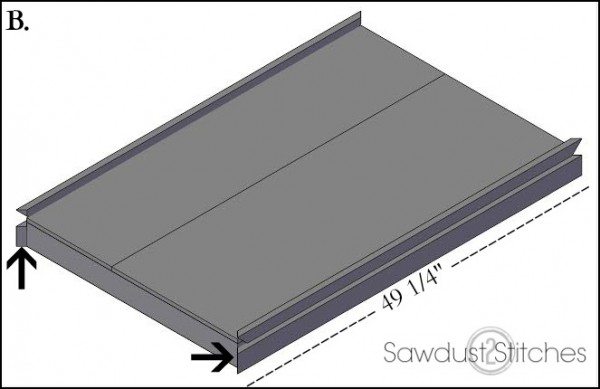
B.)
Rip down a 1×4″ so that its width is 2 7/16″ wide. Using the custom sized “1×4″ boards cut (2) boards so that they are 49 1/4” long point to long point with 45 degree angles on end. ( See Diagram B for clarification)
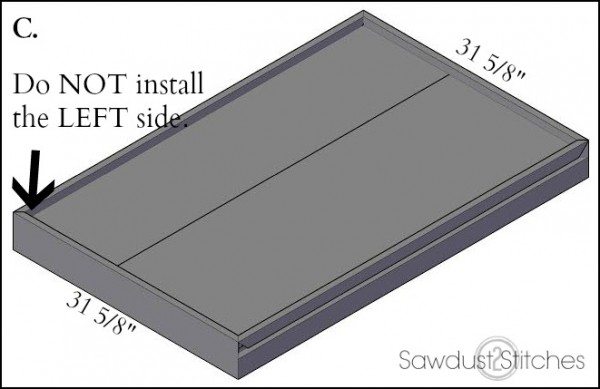
 C.)
C.)
Rip down a 1×6″ so that its width is 4 1/2″ wide. Using the custom sized “1×6″ cut (2) boards so that they are 31 5/8” long point to long point with 45 degree angles on end. (See diagram C. for clarification.) Proceed to attach JUST the right side, leaving the left unattached.
– Left Trim Piece-
Before I show you how to install this, I want to show you what function this will be serving. As you can see in the image below, that the holes need to line up exactly! If they do not, they will bind up making it difficult/impossible to shut or open.
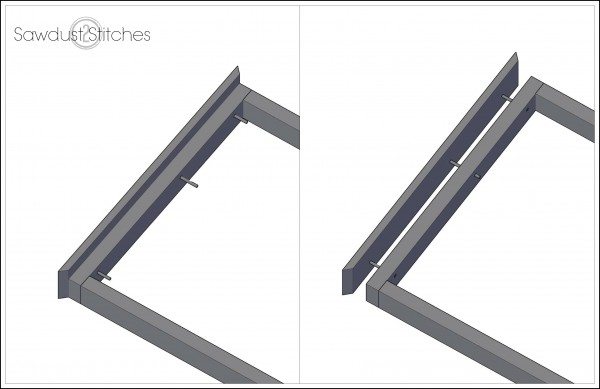 Because this step required precision, I would suggest using this method. (In the Images below the side frame piece (the stained piece) will already be attached to your frame.)
A.) Line up your left side trim piece that you cut earlier. (COMPLETE STEPS A, B, and C for the top hole first!)
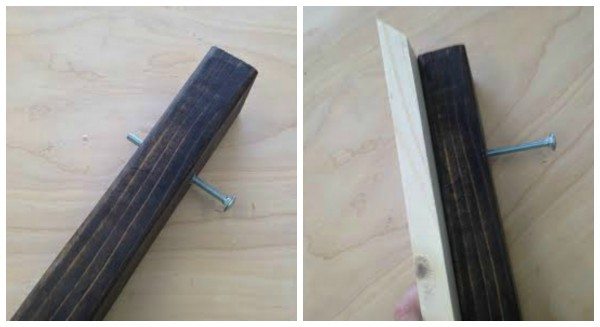 B.) Place a bolt through the top hole, and then hit lightly with a mallet, this will leave an indent showing you the exact location of where the receiving end of the bolt should be placed.
 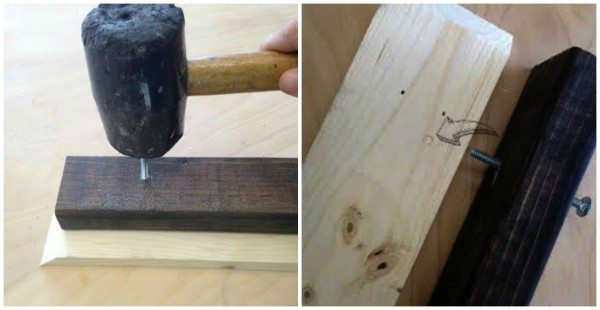 C.) Using a 3/4″ Forstner bit, drill out a mere 1/8″. ( This is not imperative, but there will be a 1/8″ gap between the trim and the frame if this recess is not created in the trim). This hole will hold a “T-Nut” so that it sits flush with with wood. I added a small amount of “Liquid Nails” to the base before screwing into place. Then add the 1/4″ x 3″ carriage bolt, so that it goes through the frame and into the “T-Nut”.
 Once steps A, B, and C, are completed for the top hole, proceed to do the same process for the bottom hole, and then lastly do the middle.
Continue to Part 2
THIS IS AN ENTERTAINMENT BLOG:
When using the tutorials, BUILD AT YOUR OWN RISK , always take necessary safety precautions! We will not be responsible for any injury or damage incurred while following a tutorial from our site. None of our posts should be considered expert advice; please consult a professional when needed, read all safety and instruction manuals, and take all safety precautions.
 Copyright secured by Digiprove © 2015-2016


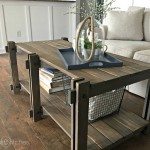


This is so cool! I love how that looks in your house! Oh and by the way your hair is totally gorgeous in that video!
Haha, well I decided I should probably do my hair if I was going to be filming a video. Glad I did, thanks hun!
This is amazing! I wish I had your mad skills, girl! You certainly accomplished your goal of being easy to access, yet not an eyesore. Love following your blog!
You are seriously talented girl. This is amazing!
This is quite possibly the most amazing DIY I’ve ever seen. I’ve been stalking your blog, waiting on this tutorial! I don’t know how I will keep this a secret (so exciting!), but the plan is to make this for Christmas since Father’s Day is quickly approaching, and birthday is in February. Maybe that’ll give me some time to practice my woodworking skills on other projects. 😉
THANK YOU!
Well, thank you so much! Keeping surprises a surprise is the worst! Stay strong! I stayed up until 3 am on Christmas morning trying to get that thing set up and displayed and wrapped! Hahah but he was totally surprised!
I am SO impressed that you came up with this! I just LOVE it. Could use some help though!! I am in the process of making this case but got hung up on the drill press holes and where to place them. I ripped the boards to 2 5/8″ x 1 1/2″ and made the 3/4 x 1/4″ groove, but I’m just not understanding the diagram… it’s probably because it’s late but i just can’t seem to figure out where to place those holes (and I really don’t want to drill out the wrong holes!! I am so excited to be making this! I was anxiously waiting for the tutorial since December!
Thanks for the tutorial! I’ll definitely be making this soon.
That is awesome, when you are finished I would love to see it!