• Blog
  • About
  • Press
  • Privacy

Let’s be social!

  • Skip to primary navigation
  • Skip to main content
  • Skip to primary sidebar
  • Skip to footer
Sawdust 2 Stitches

Sawdust 2 Stitches

  • Tutorials
    • Around the House
    • Organization
    • Wall Decor
    • Sewing
  • Makeovers
    • R.V.
    • Room Makeover
    • Furniture Makeover
    • Decor Makeover
  • Build Plans
    • Small Builds
    • Wall Decor
    • Dresser
    • Tables
    • Seating
    • Shelving
    • Hidden Compartment
  • Seasonal
    • Summer
    • Spring
    • Fall
    • Winter
  • Home Tours
    • First Home
    • Current Home
    • 70’s Ranch Home
  • Workshop

Blog

How to use Pendants to make a Chandelier.

November 3, 2016

dining-room-light-fixture-by-sawdust2stitches-com

how-to-turn-pendant-lights-in-a-dining-chandelier-by-sawdust2stitches-com

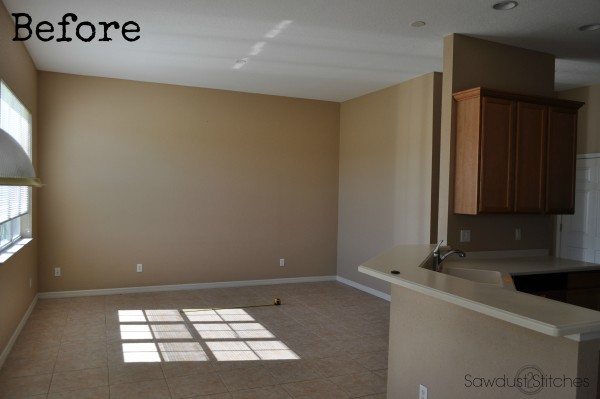
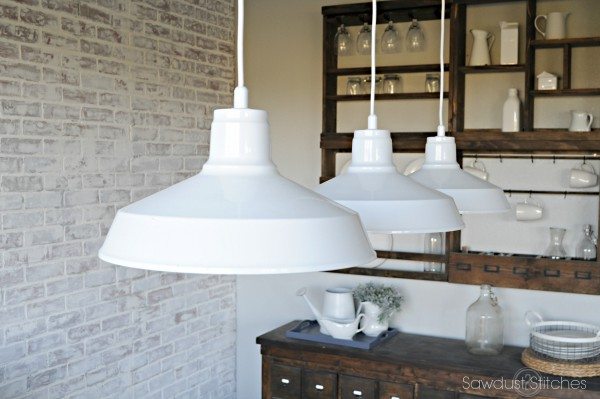
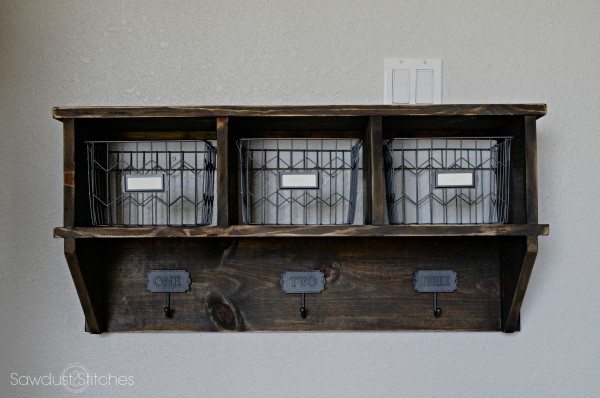
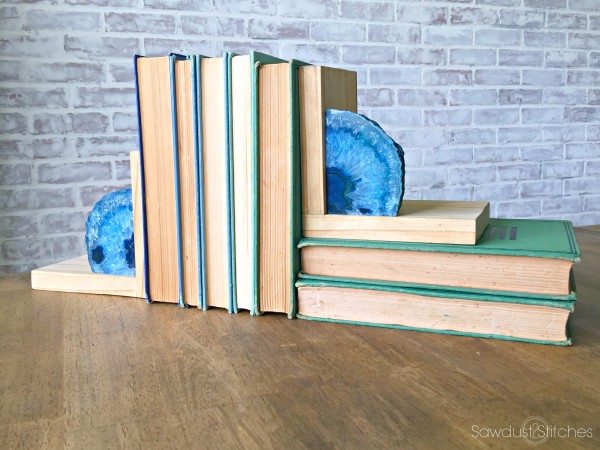
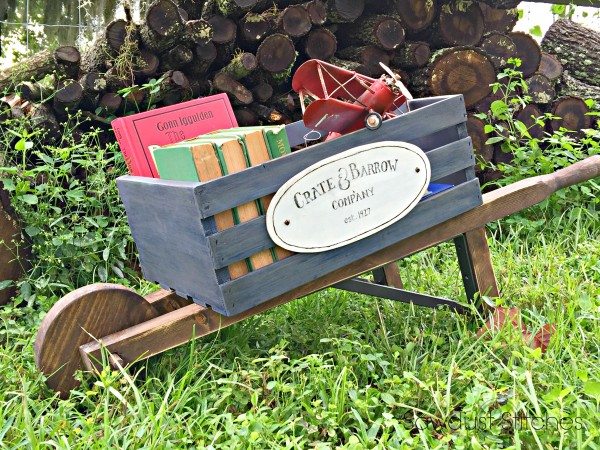
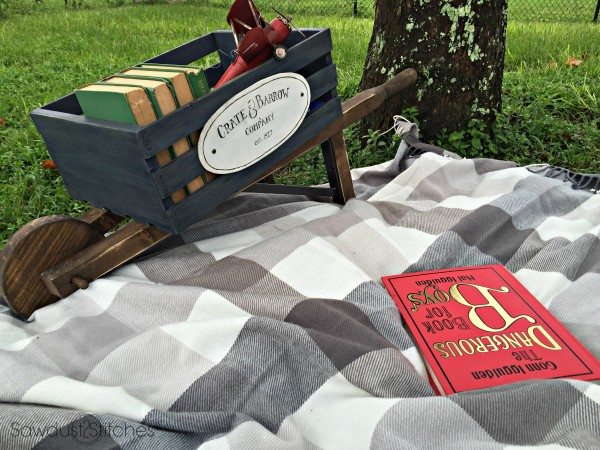
Pendant into Chandelier 

Supplies Used:

  • 3 Pendant Lights (w/basic mounting kits)  * I used some from Home Depot, but they have since been discontinued, HERE is something similar.*
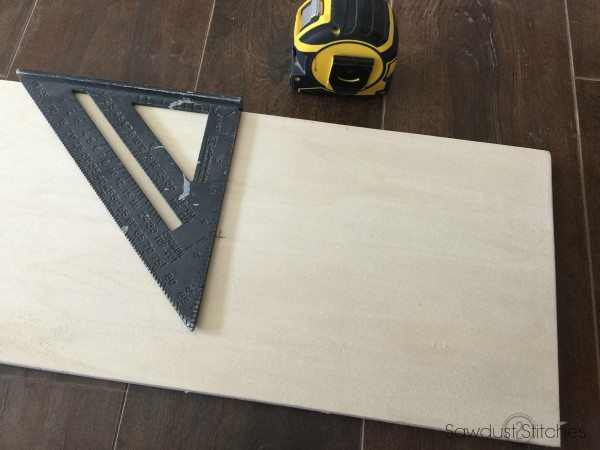
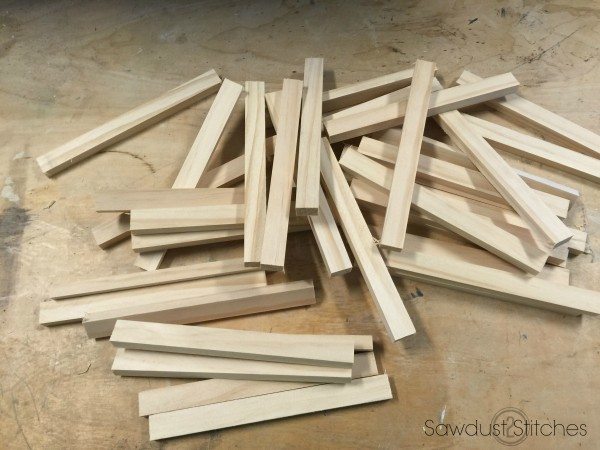
  • 1″x 8″ Board
  • 1″ x 2″ Board
  • 2″x 4″ Boards

Tools Suggested

  • Miter Saw
  • Square
  • Tape Measure
  • 1″ Drill Bit
  • Drill
  • Nail Gun
  • Wood Glue
  • Countersink bit

Disclosure: Some of the links provided  are affiliate links. By purchasing through these links it supports this site and helps keep content free. You can read more about how we do this with no extra cost to you.

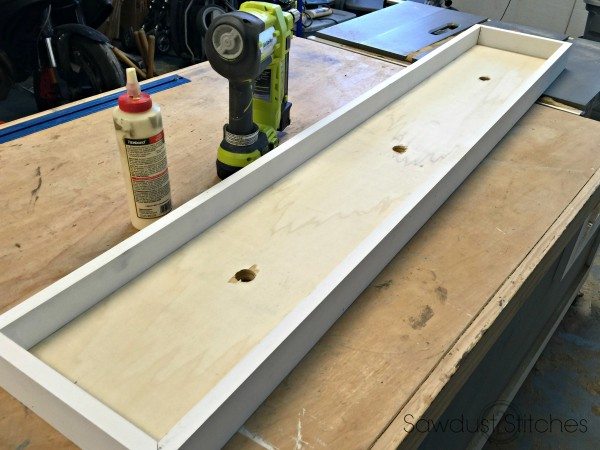
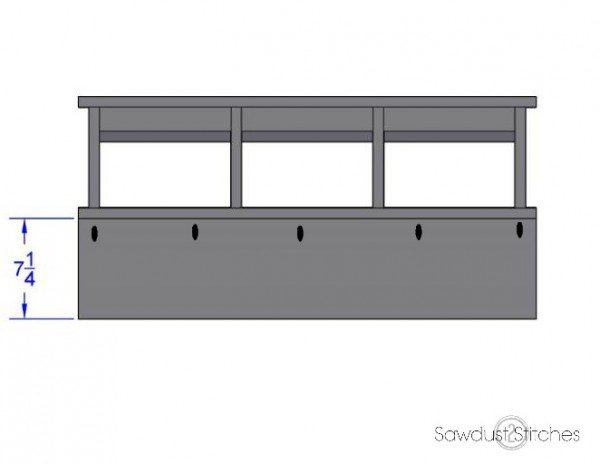
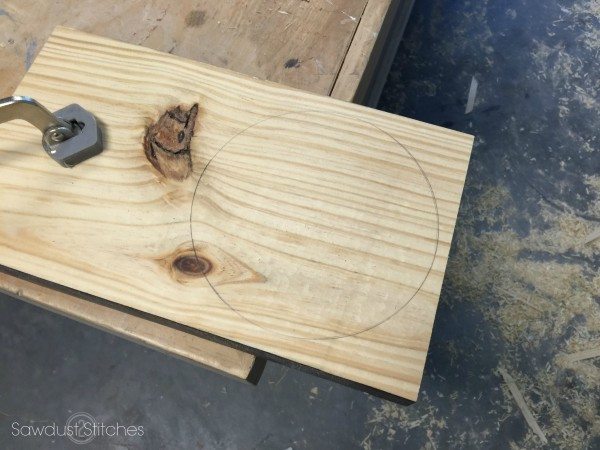
Step 1. Mark Hole Placement
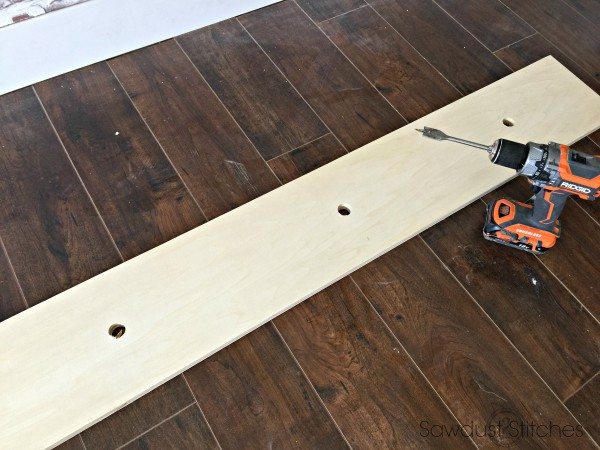
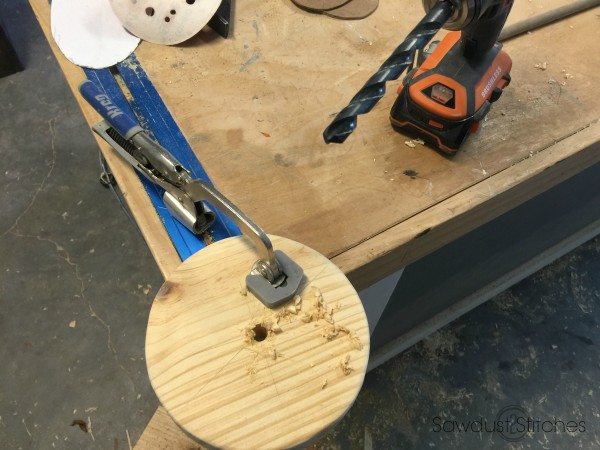
 

diy-dining-room-chandelier


Step 2. Drill Holes

I used a 1″ paddle bit to drill out the holes for my lights.

how-to-build-a-dining-room-chandelier


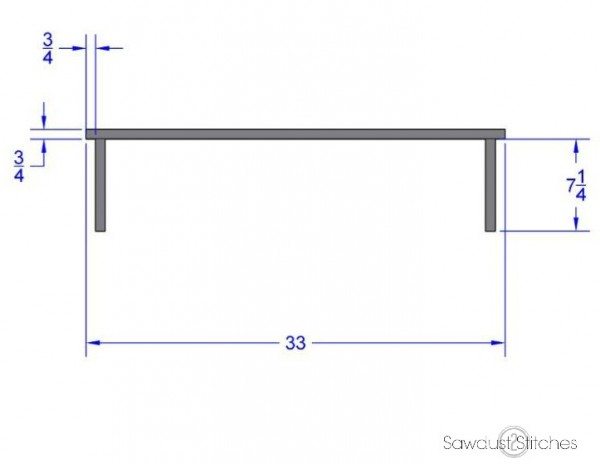
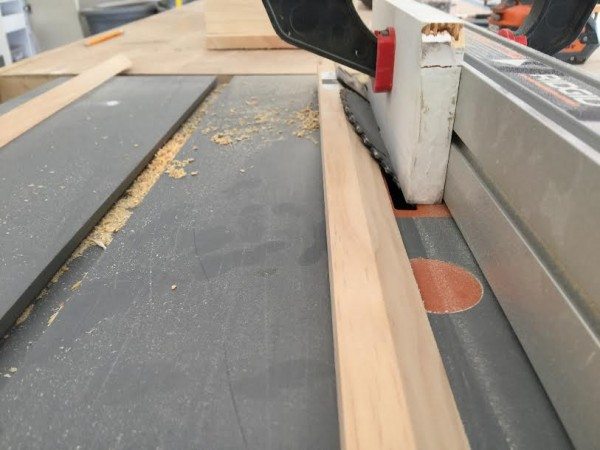
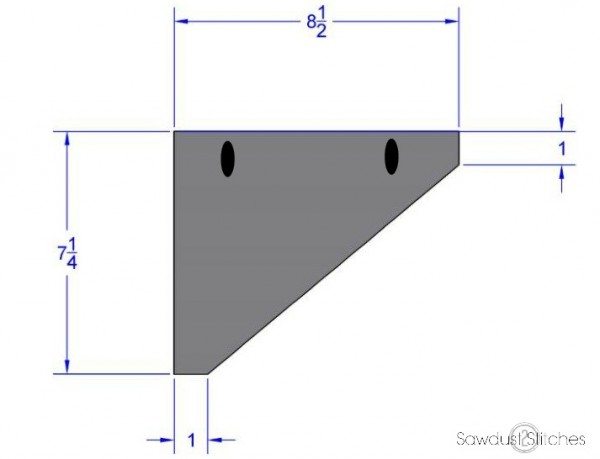
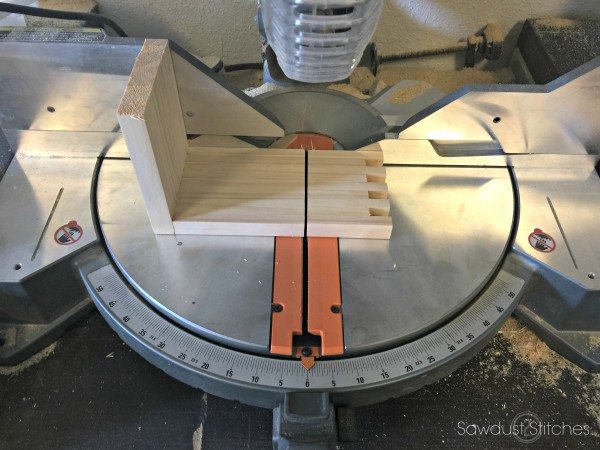
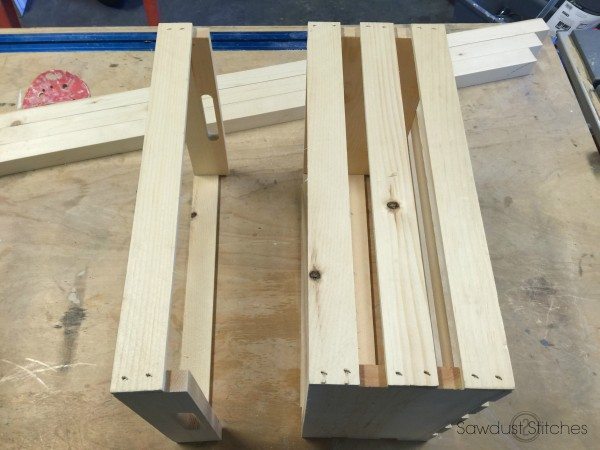
Step 3.  Cut Side Frames

Next I frame out my base using 1″x 2″ primed boards. Okay,  this is simple. So deep breaths. This is just (4) mitered corners.  You will need to cut your boards on a 45 degree angle.
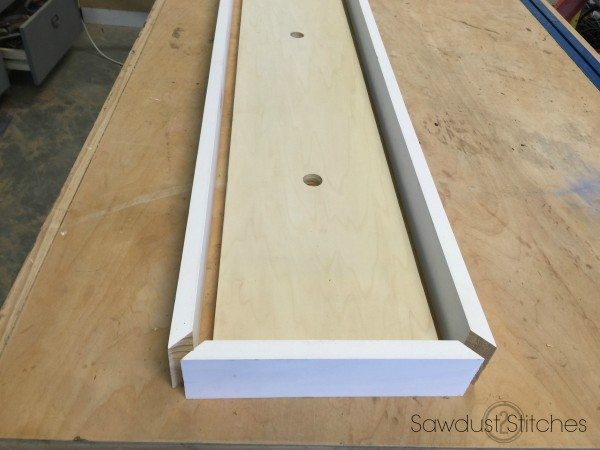
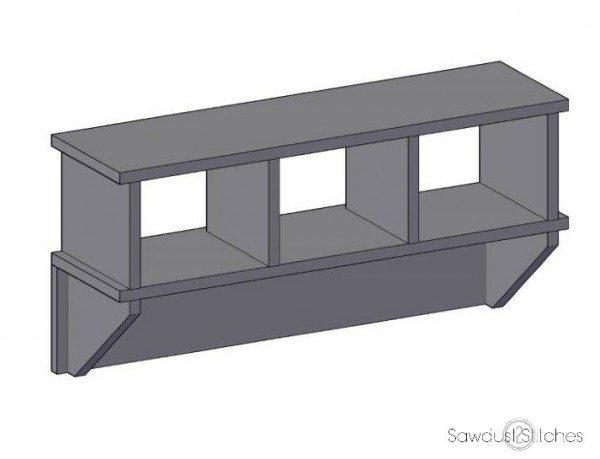
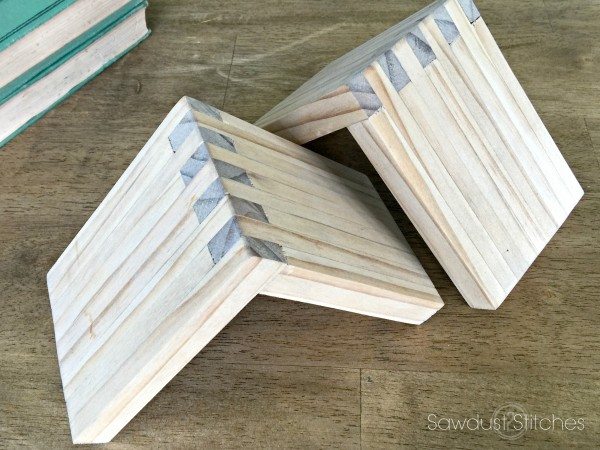
how-to-build-a-dining-room-chandelier-out-of-pendant-lights


Step 4. Assemble

Once your side frames are cut, dry fit to make sure everything fits snuggly,  there is nothing wonky going on. Once you know it fits like a glove, attach the 1 x 2’s  to the base. I use wood glue and then reinforced using  1-1/2″ finish nails.

how-to-build-a-dining-room-chandelier-using-pendant-lights


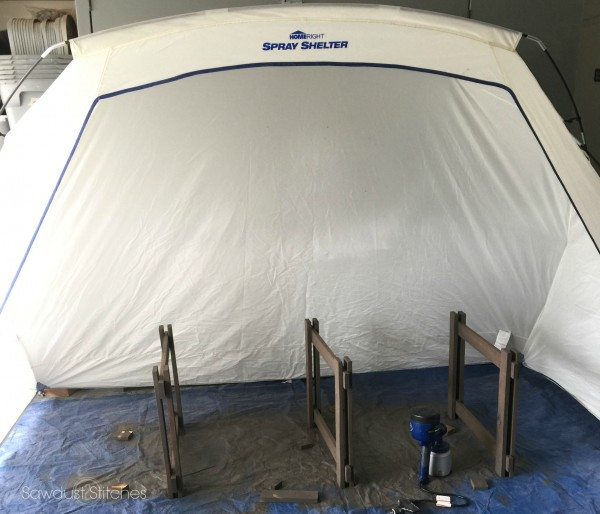
Step 5. Sand/Prep for Paint

Once the glue has set, I gave the whole fixture/box a once over with a sander.  (Using a sander you can easily minimize any discrepancies. 😉
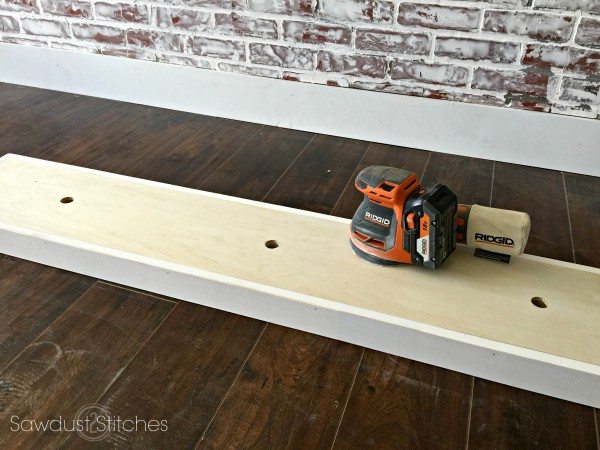
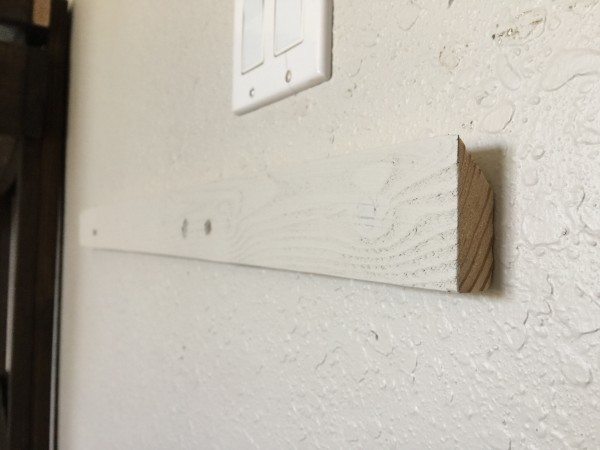
how-to-build-a-dining-room-light-fixture


Step 6. Paint

Once sanded, slap some paint on that sucker! It is so much easier to paint when it is not above your head Sistine Chapel Style.  Your neck and arms will thank you later.

how-to-diy-a-chandelier-using-pendant-lights


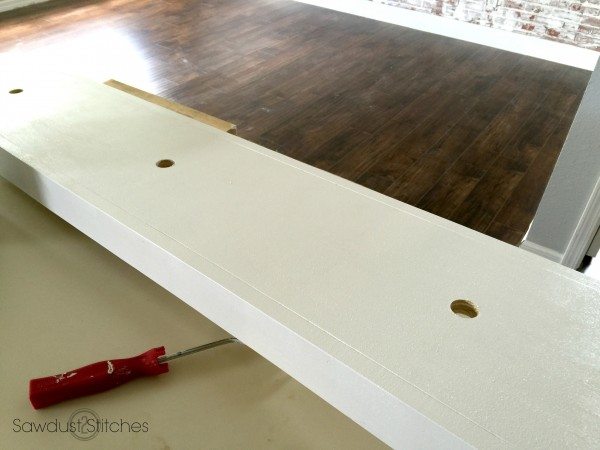
Step 7. Attach Light Fixture Hardware

Now you install the hardware. The  only difference is, you are installing it to the board instead of the ceiling. (hint:The outside of the board.)

create-a-chandelier-using-pendant-lights


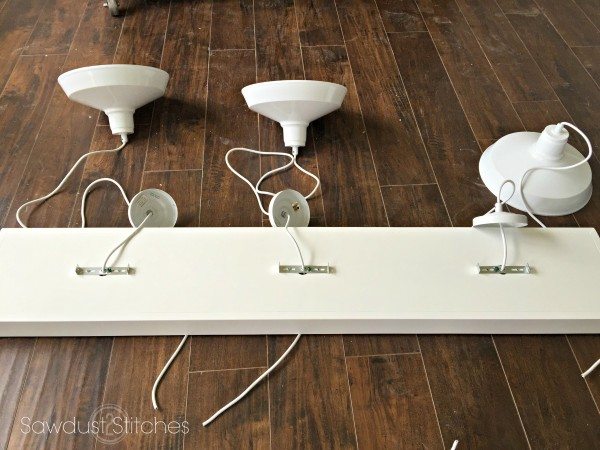
Step 8. String the Pendants through base.

Next you will string the pendants through.  Make sure you measure how long you want each pendant to hang, because now is when you will want to measure and adjust the lengths.

Before you cut off any  wire, make sure you have some excess. (This will be hidden in the box and will make your life easier when wiring/installing.)


how-to-create-dining-room-chandelier-using-pendant-lights


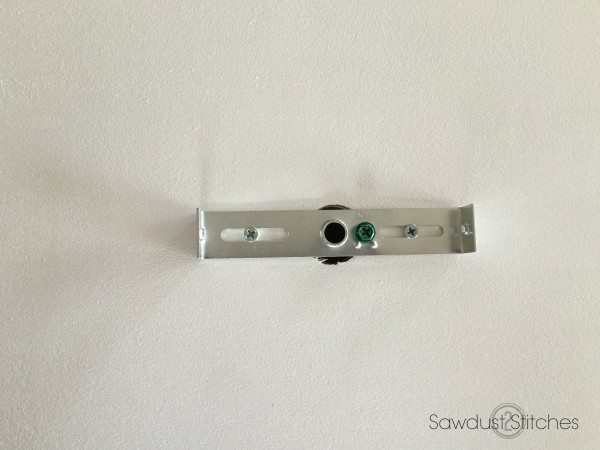
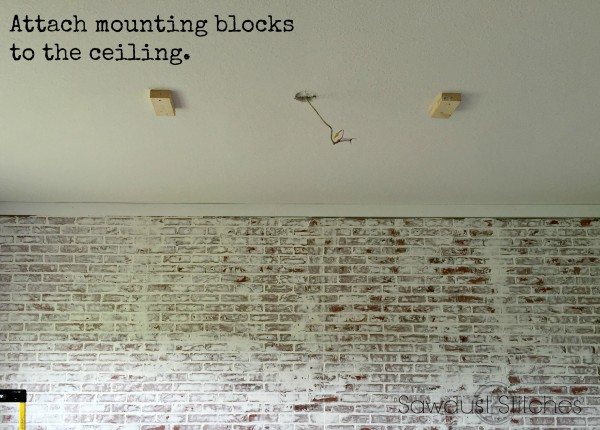
Step 9.Attach Mounting blocks

In order to attach the fixture to the ceiling, I attached mounting blocks to the ceiling. I took extra care to map out where the blocks would be in relationship to the placement on my fixture. I also made sure that my blocks hit the rafters, and would be secure!

build-a-chandelier


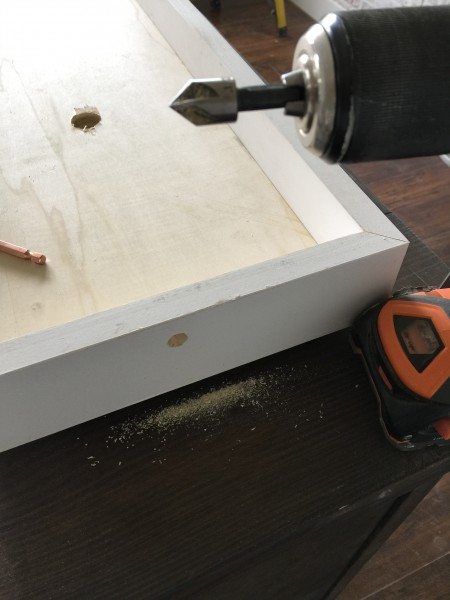
Step 10. Pre-Drill Base

Before  I wired the fixture in place, I did a quick fit check to make sure that my fixture/box fit over my  ceiling mounted blocks snuggly. The idea being, that once it is  wired  I can screw the fixture/box from the outside, attaching it to the mounted block on the inside.

In order to make those screws less obtrusive I pre-drilled with a countersink bit.
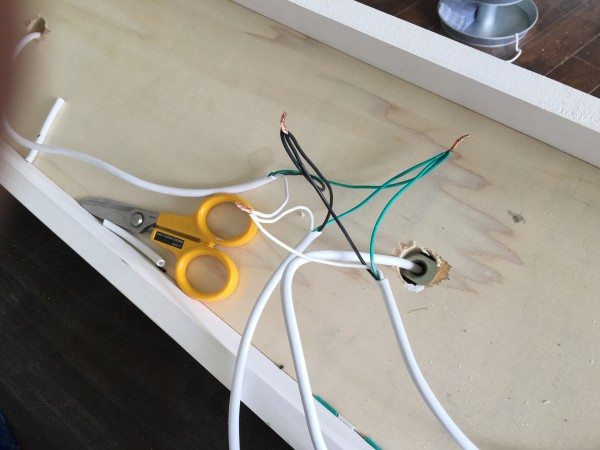
2016-06-05-12-43-15


Step 11. Wire

DISCLAIMER: I AM NOT A LICENSED ELECTRICIAN!  I am simply showing you what I did, and I strongly encourage you to hire/consult with a licensed electrician who is well versed in the NEC (National Electrical Code).

Because I am only  wiring three lights together, I simply  wired them all together. Anything more than three I would usually  do a “Daisy Chain” approach.

Before you even think about wiring this in place make sure you switch off the breaker for the lights!!!

Once you have sufficiently  twisted together your “live” (black), “neutral” (white), and your “ground” (green) you are ready to install.

2016-06-05-13-37-11


Step 12. Install  NEW Light Fixture

This is where it gets a little tricky.  You will need another set of hands when installing. One person will need to hold the fixture/box while the other wires the  fixture in place. You will again match the black wires, the white wires and then attach the ground wires.  When wiring them together use a nut that was intended to accommodate multiple wires.

Once wires are attached  place any remaining excess wire/cord in the box/fixture.

Now it’s ready to be attached to the ceiling! Place the fixture in over the ceiling mounted blocks. Then using a 1-1/2″ to 2″ wood screw(s) attach the fixture/box to  the mounted blocks.
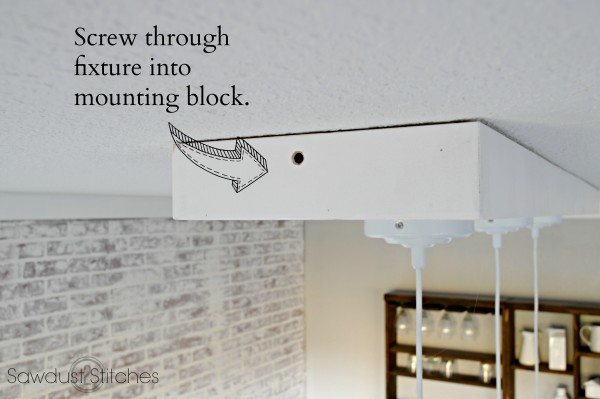
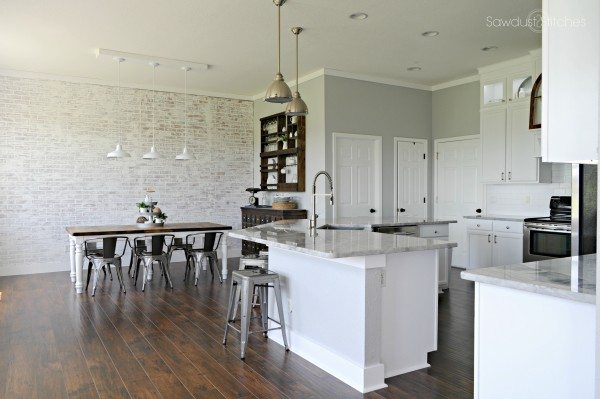
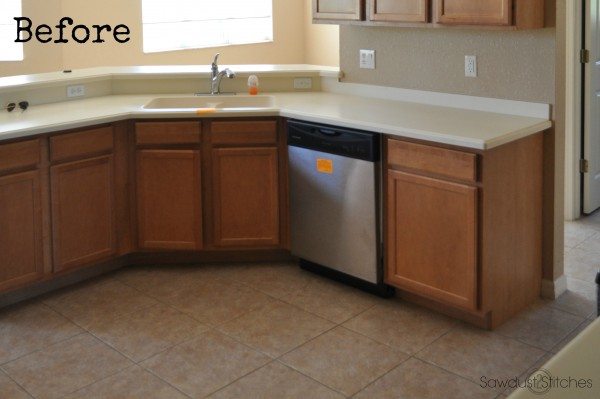
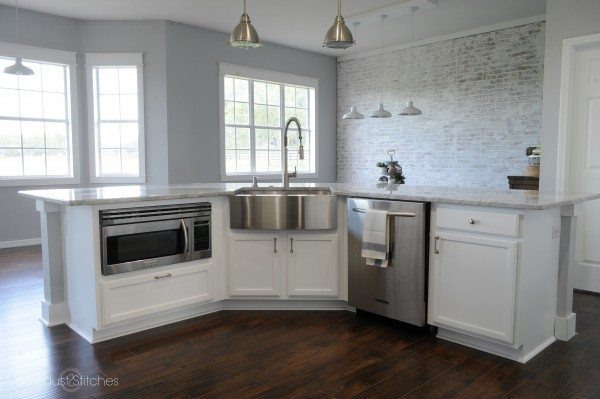
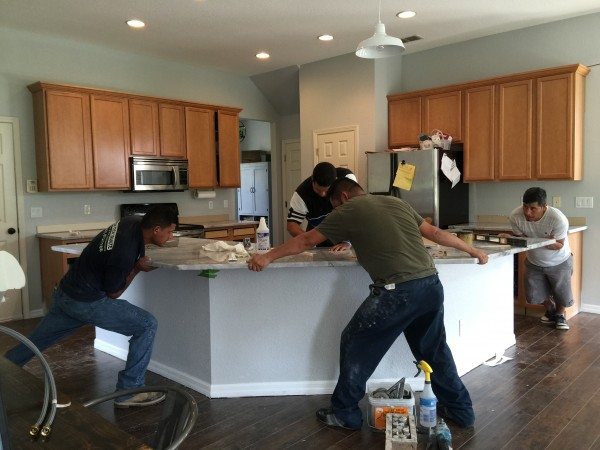
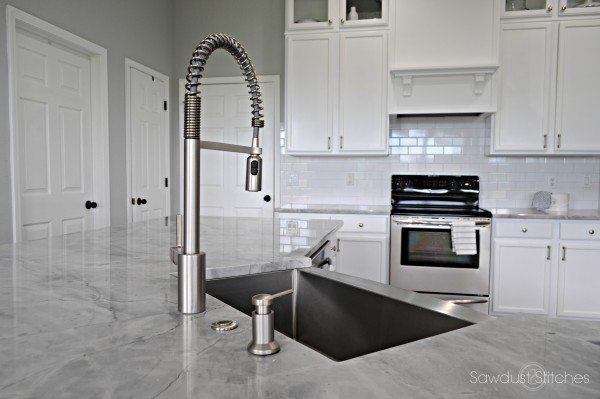
dsc_1580


Pottery Barn Inspired Cubby Organizer

October 28, 2016

diy-pottery-barn-inspired-cubby-by-sawdust-2-stitches

Hey all, I kind of pride myself on working fast, and knocking out projects like nobody’s business. But the last few months… whooa! I feel like I have not sat down since we moved.  Granted the house is looking gorgeous, but some projects had to take a back burner,  this organizer being one of them.  Originally  I wanted to have this  done before the kids went back to school!  (Whoops,  missed that deadline.) Regardless, I wanted to build an organizer  that  (theoretically)  I could  lay out  their clothing the night before school, and have a bin for shoes and socks. With the thought, that if they had their whole outfit (socks and all) out  they could get themselves dressed. (Theoretically)

So…. I took inspiration from a Pottery Barn Organizer and designed this little beauty!

diy-pottery-barn-inspired-cubby-organizer

I’m excited  to be  teaming  up with the great folks over at HomeRight on this  project! It is through  great companies like HomeRight and affiliate links that I can continue to provide all these tutorials at zero additional cost to my readers! So a big thank you to them!  (More info. available here.)  Make sure you enter to win your very own paint tent at the end of the post!

Pottery Barn Inspired Cubby Organizer


Supplies Used:

  • (1) 1″x 10″ x 8′ Common Pine Board  (Actual finished dimensions: 3/4″ x 9 1/4″ x 8′)
  • (1 ) 1″x 8″ x 8′ Common Pine Board ( Actual finished dimensions : 3/4″ x 7 1/3″ x 8′)
  • (1) 1″x 3″ x 8′ Common Board
  • 1 1/4″ Kreg Jig  Screws
  • Stain and/or Paint
  • Wood Glue
  • 1 1/2″ Finish Nails
    Tools Suggested:

    • Drill
    • Drill Bit
    • Kreg  JIg
    • Miter Saw
    • Nail Gun
    • Homeright Small Spray Shelter
    • Homeright Spray Shelter
    • HomeRight Finish Max Fine Finish Sprayer

    Disclosure: Some of the links provided  are affiliate links. By purchasing through these links it supports this site and helps keep content free. You can read more about how we do this with no extra cost to you.

Don’t forget to enter the GIVEAWAY at the bottom of the post! 

Homeright Logo2


  • Step 1.

     Cut List:

    1’x 10″ Board

    • (2) @ 33″ ( Top and Base Boards)

    1″x 8″ Board

    • (2) @ 9 1/4″  (End Supports)
    • (2) @ 8 1/2″  (Center Dividers)
    • (1) @ 33″  (Bottom Apron )
    • (2) @ 8 1/2″ ( These will be modified to make the support corbels on the base.)

1″x 3″ Board

  • (2) @ 30″ ( These will be modified to create a french cleat for installation.)

Step 2.  Attach End Supports to the Top Boardpottery-barn-inspired-cubby-organizer_page_08


Step 3. Cut French Cleat Boardsunnamed


Step 4. Add Interior French Cleat

When attaching the back cleat make sure you position the cleat so that the 45 degree angle faces toward the front of the unit.

pottery-barn-inspired-cubby-organizer-2-by-sawdust2stitches-com


Step 5.  Dividerspottery-barn-inspired-cubby-organizer-4-by-sawdust2stitches-com

img_4040


Step 6.  Attach the Base Board

Measure the appropriate distance ( use Step 5 as a reference).  Using 1-1/2″ wood screws from the underside, going through the 1″x 8″ board into the dividers and end supports.

pottery-barn-inspired-cubby-organizer-3-www-sawdust2stitches-com


Step 7. Add the Bottom Apron

Drill pocket holes along the top ledge of the board. Then using 1-1/2″ kreg screws attach the bottom apron board to the bottom of the cubby unit.

pottery-barn-inspired-cubby-organizer-5-by-www-sawdust2stitches-com


Step 8. Cut Corbels

Cut the 8 1/2″ x 7-1/4″ board into corbels. Once the boards/corbels  are cut drill pocket holes.

pottery-barn-inspired-cubby-organizer_page_12


Step 9.  Attach Corbels/Supports


pottery-barn-inspired-cubby-organizer_page_01


Step 10 . Finish

I was debating over painting  or staining, but ultimately I decided to stain it so that it would match my son’s room. If I had chosen to paint I would have hands down used a HomeRight Finish Max Sprayer and a Homeright Spray Shelter.    Because this was small build I quickly stained it, but  when I do my large builds I normally  opt to SPRAY my stain!  Yup you can do that!

 You can read all about it here. (And get all the details on that devilishly looking good build as well.) 

Rustic Farmhouse table


Step 11. Add Hardware

This is my favorite part, adding hardware!  I feel like the right hardware can definitely take a build to the next level!  I wanted there to be a mix of materials and metal is always a favorite.  I found these awesome little wire baskets at Target in the dollar section! Woot woot!  I love the dollar section!  I got them all for $3 a piece,  they were the perfect size, but the color… hmmm.  It just wasn’t going to jive with the motif.

No worries we can handle that!  I pulled out my handy  pop-up Homeright Small Spray Shelter,  and took care of that color in a jiffy!
home-right-spray-shelter

I wanted to error on the side of caution, so I did a quick coat of spray primer.   Followed by a coat of  “Soft  Iron” by Rustoleum. small-home-right-spray-shelter

Next up, the hooks! Naturally they needed to match my baskets, so into the spray shelter they went!  You will notice I even have the spray shelter set up inside,  yup, I had no worries. This spray shelter works like a charm.
small-home-right-spray-shelter-2


Step 12.  Install Wall Cleat

All that is left to do is install! To attach the wall you will need to install the second cleat.  When installing I suggest a 3″ screw and make sure you are solidly into (2) studs.  I decided to paint my cleat the color of the wall so that it will blend in with the wall!

To install all you need to do is put the wall unit against the wall and drop the unit into place so that the cleats are puzzle pieced together!

img_4183

That’s all there is to it folks! Side note: we used this for the first time yesterday morning and it worked like a charm!  We had laid out my boys’ clothing the night before and put their shoes and socks in their cubbies, in the morning their alarm went off and they got themselves dressed and came downstairs with out me needing to holler up the stair even once!  Ahh…. success!

diy-pottery-barn-inspired-cubby-organizer

diy-pottery-barn-inspired-cubby-by-sawdust2stitches-com

ENTER TO WIN 
a Rafflecopter giveaway

diy-pottery-barn-cubby-organizer-using-only-3-boards-step-by-step-tutorial-by-sawdust2stitches-com


Apron Sink!

September 28, 2016

Hey all! As promised I am back with more details on my recent kitchen remodel. When I first started designing the kitchen  I had a pretty clear idea what  I wanted.  I wanted nice tall cabinets, and crisp clean lines, but the focal point of the kitchen was going to be the island. My dreams were big, and they definitely included an Apron Sink!

apron sink - sawdust2stitches-comApron Sink Install!
apron sink before -Kitchen Makeover 2 www.sawdust2stitches.com

So before we get started   I would like to say a big thank you to the great folks over at MOEN  for teaming up with me on this project! It is through  great companies like Moen and affiliate links that I can continue to provide all these tutorials at zero additional cost to my readers! So a big thank you to them!  (More info. available here.)

moen-brand-banner

In order to create a large island,  I would need to take down (the stupid waste of space wall… seriously it  wasn’t even load bearing!?), and (most importantly) install an apron sink.. So let the demo begin!  I am not going to lie, there WAS something oddly  satisfying about taking a sledge hammer to a counter top.
installing-apron-sink-remove-sink-sawdust2stitches-com

Once the sink was removed I was ready to prep for the apron sink installation.  I began by removing the “rails” (the horizontal 1″x 2″ boards). In a lot of cases face frames are constructed using pocket holes,  so  it was just a matter unscrewing the pocket hole screws and removing the rails. Easy Peasy.    I kept these handy  because I knew I would need them later. installing-and-apron-sink-by-sawdust2stitches-com

Next  I needed to remove the upper support bar. Before I removed the top rail I used a circular saw to cut down the center stile (vertical center board). Once the stile was cut down to the appropriate height,  (this measurement will vary by sink, manufacturer, etc.)

installing-apron-sink

I then used my two smaller rails that I removed earlier.  These were the rails that already had been pocket hole drilled.  I then measured to make sure I was installing the rails level.  Then clamped the rails in place and using 1 1/4″ pocket screws secured the rails in place.
moen-apron-sink

Next I needed to build an internal support system that would hold the sink up.  I chose the Moen 1800 Series Apron Front Sink. This is a heavy under mount sink (meaning it mounts under the counter top, as opposed to resting on top of the counters.)

These can be made any number of ways but the most important thing is the there is a 1/8″ gap between the top of your support and the top of your cabinet.sink-support_page_1

Before I dropped my apron sink in place I did apply some silicone caulk, so that once the sink was  in place, it would not wiggle.

moen-apron-sink-installation

Next came the counter tops!

2016-06-03-10-31-47

As much as it kills me to pay someone else to work on my house, fabricating and installing counter tops simply is not in my repertoire.  Which is why 95% of the budget went to the professionals. (Breathe into a paper bag.)2016-06-08-10-28-37

As much as it pained me to hand over the cash it was totally worth it!  The installers  were great  and they  drilled the holes where the faucet, soap dispenser and garbage disposal button would go.  YES,  you heard right.  Garbage disposal button!  There is no requirement that says the switch to the disposal has to be an ugly light switch.  This little button is air actuated, so there is no risk of electrocuting yourself! Bonus:  They come in lots of finishes to fit any kitchen style!  You can see the whole selection here:  Moen Air Switch Button

moen-sink-with-sawdust2stitches-com

Like I said before, I wanted the island to be the focal point, with a huge emphasis on the sink.  The sink was going to be front and center and I wanted it to make a statement.  When brainstorming the design concept for the kitchen I kept coming back to the idea of a high arch faucet.  When I saw the Moen Align Spot Resist Stainless Pull-Down Faucet I was in love. Wham, Bam, thank you mam, in love.  I coupled it the Moen Modern Soap Dispenser. This combination is perfection.  I don’t know if you could ever qualify a sink as “sexy”, but I say you can, and this is it!

moen-apron-sink-with-sawdust2stitches-com moen-faucet-with-sawdust2stitches-com
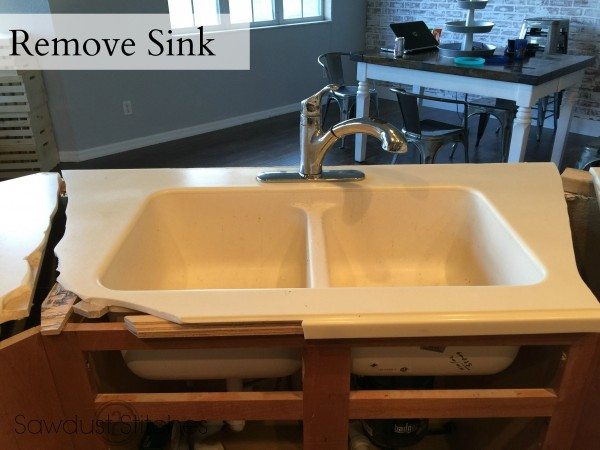
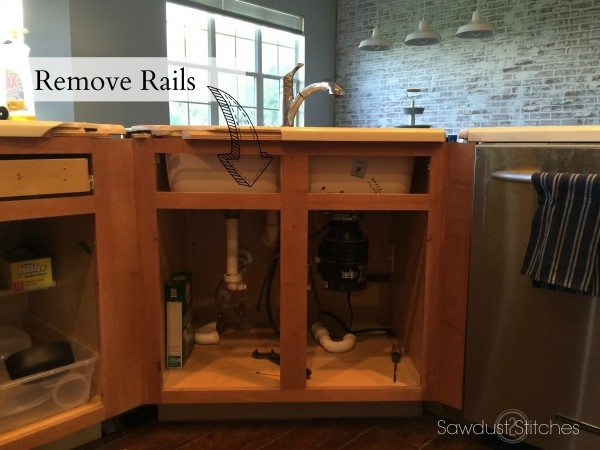
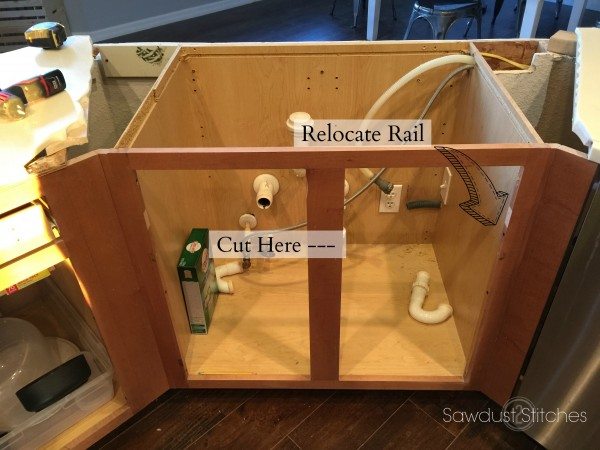
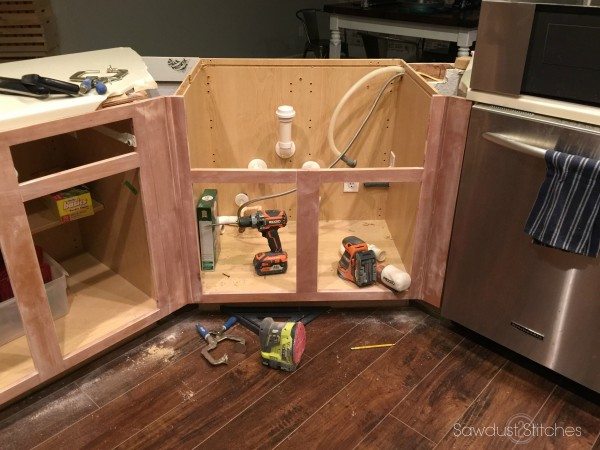
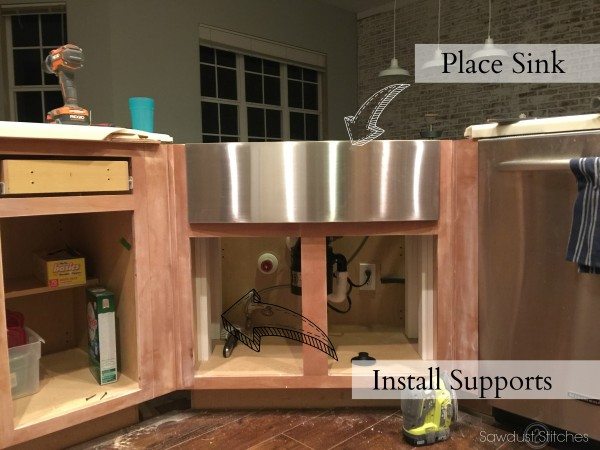
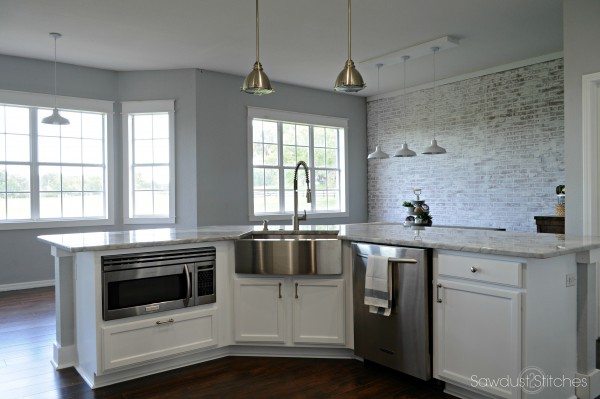
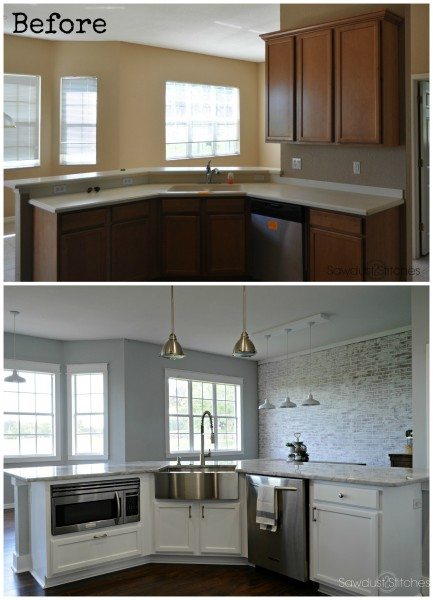
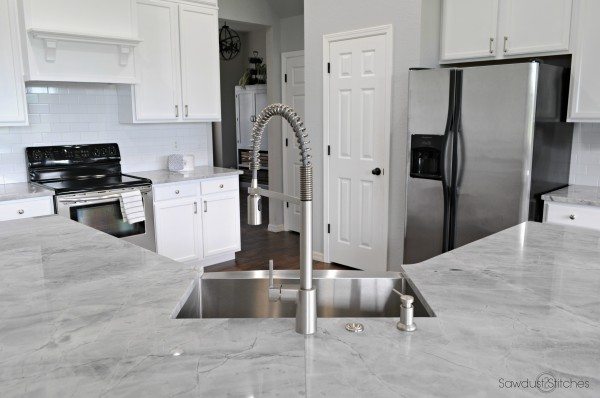
Seriously, look at that sink!? Is it not one of the prettiest sinks you have ever seen?  I love that it is a slight  twist on a time proven classic.  I used this sink and faucet as inspiration for  the rest of the kitchen.
moen-apron-sink-by-sawdust2stitches-com 
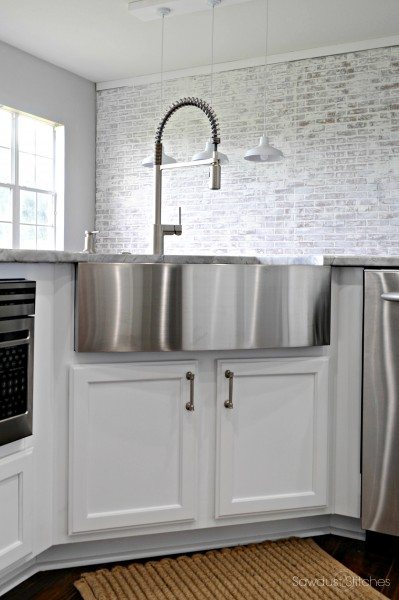
I am not going to lie, I think that the  outcome is  phenomenal!

apron sink reveal Sawdust 2 Stitches kitchen Makeover 3  apron sink install Sawdust 2 Stitches Kitchen 4

If you are interested in the rest of the kitchen makeover you can click on any of the links below to read more about this space!

Faux Brick Wall

Flooring

Kitchen Makeover 

   Again,  big thanks to Moen and their partnership, and thank YOU  for stopping by and reading!

Take Luck,

Corey

apron-sink-with-moen-kitchen-makeover


DIY Book Ends

September 14, 2016

styled-x3

styledx3-banner

Hey there folks today I am please to be teaming up with Stacy from “Not Just a Housewife” and  “The Crafting Chicks”! Here is how it works,  we all took the same items and used/staged them in our own homes, and gave them our own little flavor!

For this #STYLEDX3 we all used Polished Agate Geode Halves Bookends . Of course you all know me, “I simply can’t leave well enough alone”, I decided I wanted to make a “platform”if you will for the Geodes to sit on.  The great part about this simple project is that it can lend itself to nearly  any design style!


Disclosure: Some of the links provided  are affiliate links. By purchasing through these links it supports this site and helps keep content free. You can read more about how we do this with no extra cost to you.81dmgq63eal-_sl1500_

So let’s  get started ?  I used a bunch of scrap boards that I ripped down to approximately 1/2″ x 3/4″ x 7″.  The biggest thing, is that you make all the the pieces of scraps exactly the same. (It will ensure they fit together snugly in the joint.)

diy-book-ends-by-sawdust2stitches-com

Then it was just a matter of puzzle piecing them together.  I used wood glue and clamps to hold the pieces together.

diy-book-ends-2-by-sawdust2stitches-com

I actually  want to keep the staggered ends, but  I did not really plan properly, and made them a little too big.  Easy fix, I just cut them down on the mitersaw.
book-ends-by-sawdust2stitches-com

 This is the result.  Look how cool that spine on this ?!

book-end-joint

 This is how the ends look, I kind of love it! book-ends-by-saawdust2stitches-com

styledx3-book-ends styled-x-3-book-ends


 Now, here is the fun part, you can switch out the accent piece to fit the season/style as well.

diy-book-ends

All in all,  I will say this is a win.  I loved working with all of these talented ladies!  Make sure you drop in to see how they styled their Polished Agate Geode Halves Bookends as well!

Not Just a Housewife 

The Crafting Chicks

Take Luck,
Corey

Rustic Wheelbarrow

September 12, 2016

Hey there Sportsfans,  I am absolutely ecstatic about today’s tutorial.  I am teaming up with Home Depot team to bring you my own personal flair their Wheelbarrow !  I honestly  could not be more pleased with the finished product! #DIHworkshop #Sponsored

Rustic Wheelbarrow by Sawdust2stitches

unnamed

Home Depot Offers Workshops!

  • The Home Depot offers Workshops at all of their locations for do-it-yourselfers of all ages and experience levels. If you are interested in learning more, there is more info HERE.
  • There are three types of Workshops offered – Do-It Yourself (DIY), Do-It-Herself (DIH) and Kids.
  • Customers can learn how to build décor projects, how to make easy home repairs and how to operate tools through demonstrations and step-by-step instructions.
  • Visit and Home Depot to REGISTER learn more.


Rustic Wheelbarrow

Supplies Used:

  • Crates and Pallet Crate
  • 2″x 2″ board (x 2)
  • 2″x 8″ Board
  • 1/2″ Dowel Rod
  • Shelf Supports (x2)  *Optional*
  • Spray Paint *Optional*
  • Paint and/or Stain
  • 1″ wood Screws

Tools Suggested

  • Miter Saw
  • Jigsaw
  • Sander
  • Drill w/ 1/2″ bit
  • Nail Gun or Drill
  • * I used a lathe to make the handles rounded *

Disclosure: Some of the links provided  are affiliate links. By purchasing through these links it supports this site and helps keep content free. You can read more about how we do this with no extra cost to you.

Step 1.

 Cut List:

2″x 2″

  • (2) @ 8″ -Legs
  • (2) @ 36″- Handles

Dowel Rod @


Step 2. Cut Down Crate

While I loved the original full size crate, I wanted mine to be a little more shallow. SO, I cut off the top slat.  Just ran it through the table saw, rotated it, ran it through again, and again.  Boom, decapitated crate.

Rustic Wheelbarrow by Sawdust2stitches


Step 3. Cut Out Wheel

I drew a 7″ circle on a my 2″x 8″, then cut it out with a jigsaw.

Rustic WheelBarrow Cut out the Wheel www.sawdust2stitches.com


Step 4.  Drill Hole for Dowel Rod

Naturally  you will want to drill the whole in the “wheel” in the dead center, or it will wobble a little wonky when you push it.  But honestly, this isn’t really built for functionality, so if you miss the mark breathe deep… it’s gonna be okay.

rustic-wheelbarrow-drill-center-of-wheel-www-sawdust2stitches-com 
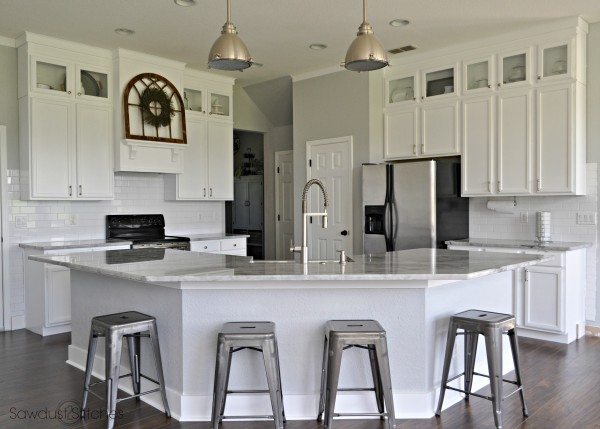
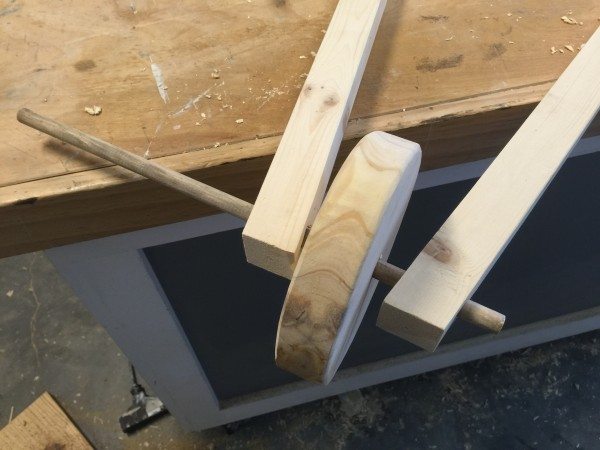
Ok so when you drill the hole  in the “handles” it will take a little finesse and/or some fudging to make it work.  I drilled my 1/2″ holes approximately 1 1/2′ from the end of the handle. It is APPROXIMATELY a 5 degree angle.  I took the very mathematical approach and just winged it (wong it?). rustic-wheelbarrow-drill-handles-www-sawdust2stitches-com


Step 5.  Attach Legs to Handles

I then attached the “legs” to the “handles”.  I placed mine 11.5″ from the end (centered).  I attached using wood glue and tacked it on using 2″ finish nails. ( I knew I would be attaching shelf supports later). If you do not plan to use supports,  I would suggest using something a little beefier.  Example : 2.5″ Wood Screw (Pre-drilled)
Rustic WheelBarrow Handles www,sawdust2stitches.com


Step 6. Add Supports (Optional)

This step is optional,  but I am not going to lie,  I feel like these supports totally “MAKE” this wheelbarrow.   I purchased these from Home Depot. I simply scuffed them up and spray painted those suckers.

Rustic Wheelbarrow Paint Supports www.sawdust2stitches.com 
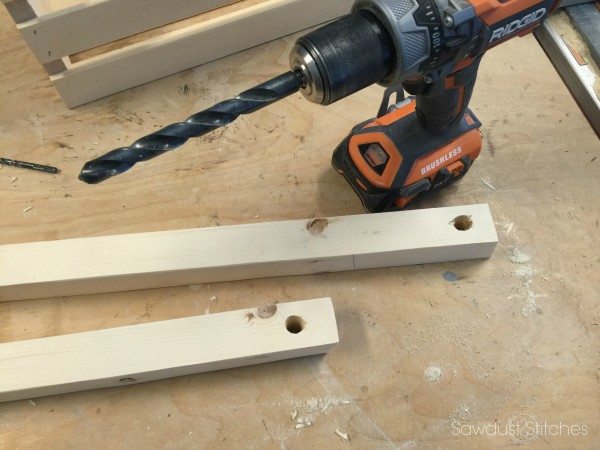
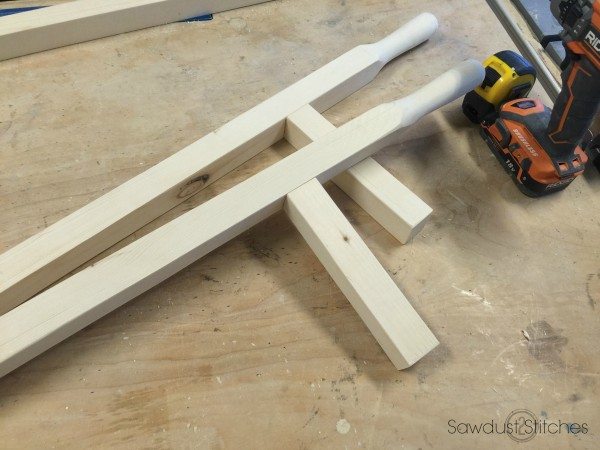
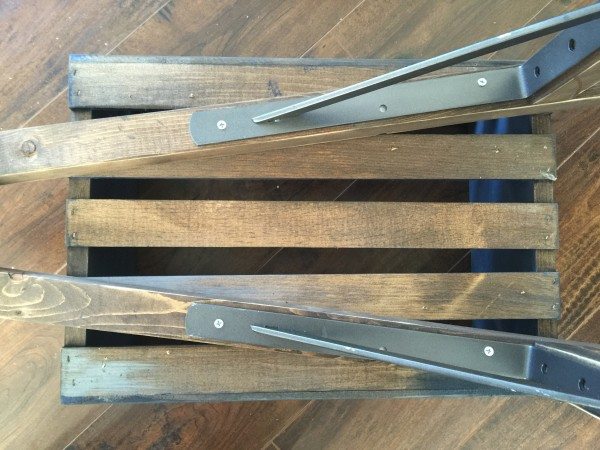
Then attach! You can use a wafer head screw,  OR a finish washers and screws. Rustic WheelBarrow Add Supports www.sawdust2stitches.com


Step 7. Add Wheel to Handles

Remember how I said I was kind of winging it when I drilled the holes for the dowel rod?  I found that it was easiest to assemble the dowel rod/wheel/handles before attaching it to the crate.  It allowed for a little more wiggle room.

2016-08-29-11-43-45


Step 8. Attach Crate to Handlesimg_3480  img_3479


Step 9. Finishing Touches

 Then of course is my favorite part!  The finishing touches!  I used a small piece of MDF paneling and cut out and oval using a jigsaw. Then I  just painted on some charming lettering and called it good! rustic-wheelbarrow-sign-www-sawdust2stitches-com

There you have it folks,  my take on the Home Depot Wheelbarrow!

Make sure you sign up at your local Home Depot HERE. 

rustic Wheelbarrow DIY Sawdust2Stitches.com  Rustic Wheelbarrow by Sawdust2stitches rustic-wheel-barrow-by-sawdust2stitches-com

 Thanks for checking in!  Make sure you drop in and see all the different variations of this project!  You can find them all in the links below.

 Take Luck,

 Corey

#DIHWorkshop Virtual Party Blog Post Links

That’s My Letter

Build Basic

Addicted 2 DIY

Fix This Build That

Build Craft Love

Averie Lane

NewlyWoodwards

Keeping It Cozy

The Chronicles of Home

House of Wood

Remodelando La Casa

Pneumatic Addict

The Home I Have Made

Chatfield Court

Homemade By Carmona

My Love 2 Create

Place of My Taste

DIY Huntress

UnCookie Cutter

Cozy Little House

Love of Home

Duke Manor Farm

Field Treasure Design

Tinsel and Wheat


Why I chose Wood Laminate , AGAIN!

August 31, 2016

If you recall, less  than a year ago I was ripping out tile and replacing the flooring in our last home. (You can read all about that here.)  When we found out  we were moving, that was seriously a source of short-sided sadness. “We JUST finished the floors!?” Seriously, I loved my new laminate floors. (So did ALL of the people that we “showed” the house to in the selling process.)

- Why I chose Laminate Sawdust2Stitches.com

While I was sad to leave behind our home, I immediately started scheming about what I would change, and what I wanted to repeat in the new home.

 When I had  first started looking into laminate flooring ,  I was a little skeptical on how it would wear, and if it would hold up to two rambunctious boys, and my furniture rearranging antics.  I had spent hours pouring over online reviews, and researching durability and of course, comparing prices.  All of the reviews I had read for “Select Surfaces Flooring” were raves, and their price point was well below their competitors. Quality and less $$? Yes, please!

Well, after 6 months with ZERO  scratches, I am a believer!  So when  it came time to select flooring for the new house,  it was a no-brainer. I HANDS DOWN wanted to go with a  Select Surfaces laminate again!  So I reached out to the great folks at Select Surfaces and have teamed up with them to complete this downstairs overhaul!

2016-04-20 16.59.41
Barnwood, Maple, Cocoa Walnut, Silver Oak, Toffee

This time around, I was thinking about changing it up a bit.  They  have some AWESOME new color choices available! I was so torn on what color I wanted to use!  I had LOVED the “Barnwood” color I had used in the last house, but at the same time, if you have a chance to change things up, would you !?  I stared at the color samples for weeks and I had finally narrowed it down to “Cocoa Walnut“ and “Toffee“.

2016-04-20 14.45.47   
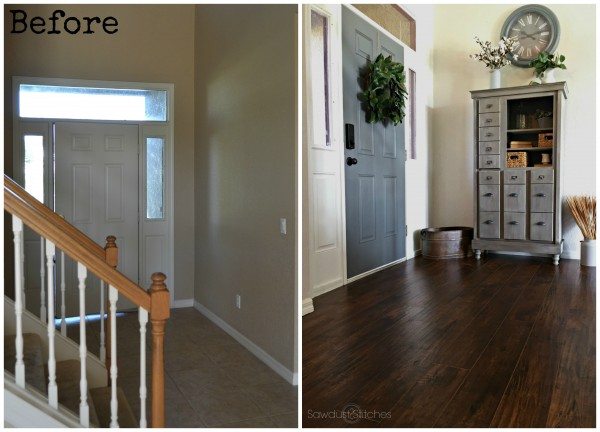
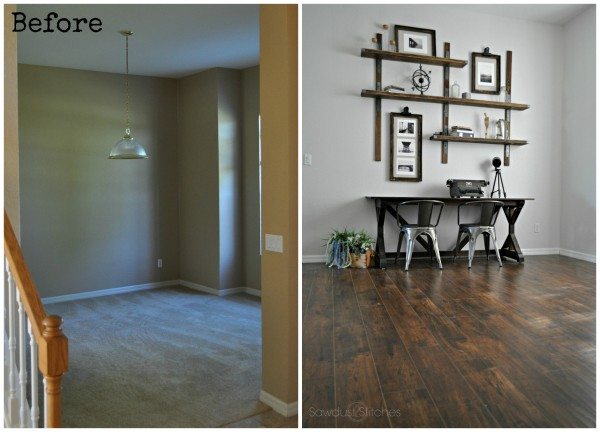
I knew I would like the effect both would create in the house.  I was so torn!  Seriously, I went back and fourth on the decision on an daily  hourly basis.  I finally made my husband weigh in; he loved the darker.  Phew. The decision was made and I was thrilled with our decision.

The “Cocoa Walnut” had nice wide planks, and I LOVED that the planks were well defined, and had so much variation and character in each piece.  They have the “Hand Scraped” effect, which means it has awesome natural looking texture.

I had my color selected, and was ready to go! Now we just needed to get into the house…

 The DAY we closed:

We were up against a TIGHT deadline. We had 6 days to be out of our old house and into the new house. We knew life would be 100 x’s easier if we got the flooring in before we moved all of our crap in.  Crazy? Yes, but we were totally committed!  We got down and dirty within hours of being handed the keys.
-Kitchen and Dining Room Makeover by Sawdust2stitches.com

DAY 1 & 2: DEMO DAYS

I am not going to lie, the first time around, the demo was complete HELL ON EARTH. We were chipping away quarter size pieces of tile for nearly 2 weeks!  We knew we would need help so we hired a few guys to come and help us. I swear,  “luck favors the prepared”,  Andrew and I got started before the help even arrived. We were popping up ENTIRE tiles!  This was a night and day difference this time around, it was, dare I say “easy” . We probably didn’t need the extra help, but we were sure glad we had it to help speed the process along.

Select Surfaces Flooring Why I chose Laminate During Sawdust2Stitches

DAY 3 & 4: Laying the Laminate

Yet another reason we chose laminate… ease of use!  Andrew and I laid all 1600 sq. ft. of flooring in TWO days.  Yes, TWO!  We put down a moisture barrier, and the planks come with an insulated backing. (Once less step!)  They are click and lock planks, once you get the hang of it you can really get cooking.  They do have more detailed instructions available here.

Select Surface Flooring Why I chose Laminate www.sawdust2stitches.com

So without further ado… here is how our Select Surfaces Flooring Turned out!

-Kitchen and Dining Room Makeover by Sawdust2stitches.com

Select Surfaces Flooring Dining www.sawdust2stitches.com
-Why I chose laminate flooring www.sawdust2stitches.com

Select Surfaces Flooring Kitchen www.sawdust2stitches.com

Entry Makeover with Before and After www,sawdust2stitches.com -Office Makeover Before and After Sawdust2Stitches.com

Select Surfaces Laminate Flooring by Sawdust2stitches.com
Family Room Makeover using Select Surfaces Flooring

Every time we completed  the flooring in a room, it amazed me how much flooring did for the space! The flooring alone, made the house look like a million bucks!

Once it was all in, I knew I had made the right choice.  The “Cocoa Walnut” was exactly  what this space needed!  I have found that it lends itself to both warm and cool tones.  So I can put nearly any paint color with it, and it looks fantastic!

So let’s wrap this up. First, the price point is awesome. Second, it comes in plenty of different colors. Third, it is user friendly, and easy to install. Fourth, this stuff HOLDS UP!  Lastly , this stuff looks absolutely amazing!

A big thank you to “Select Surfaces” and the great opportunity to work with them  again.

Laminate Floor Select Surfaceslooring Office www.sawdust2stitches.com F

  • previous
  • Page 1
  • Interim pages omitted …
  • Page 21
  • Page 22
  • Page 23
  • Page 24
  • Page 25
  • Interim pages omitted …
  • Page 47
  • next

Primary Sidebar

  • Facebook
  • Instagram
  • Pinterest
  • Twitter
  • YouTube
IMG_9167 (1).jpg fd
DIY & Design

Meet Corey

Hi everyone, my name is Corey, and I have a problem. I can’t leave well enough alone… The best therapy usually involves a variety of power tools. So, in the few “spare” moments I am not entertaining my two beautiful, rambunctious, boys, I can typically be found hunched over a sewing machine and/or covered in sawdust. All in the efforts to create a perfect balance of aesthetics and practicality in our home.
read more

Join our mailing list!

DIY & design ideas - right in your inbox!

Featured

Stair Tread Makeover

Categories

  • 70's Ranch Home
  • Around the House
  • Build Plans
  • Crafts
  • Current Home
  • Decor Makeovers
  • Dresser
  • Exterior
  • Fall
  • First Home
  • Furniture Makeover
  • Hidden Compartment
  • Kitchen
  • Lighting
  • Makovers
  • Master Closet
  • Organization
  • R.V.
  • Room Makeovers
  • Seasonal
  • Seating
  • Sewing
  • Shelving
  • Small Builds
  • Smart Home
  • Spring
  • Summer
  • Tables
  • Tablescape
  • Tutorials
  • Uncategorized
  • Wall Art
  • Wall Decor
  • Winter
  • Workshop

Footer

Contact Me: Corey@Sawdust2Stitches.com

Latest ‘Grams

Follow on Instagram
2020 © Your Blog Name
theme by soleilflare
Enter your name and email and get the weekly newsletter... it's FREE!
Your information will *never* be shared or sold to a 3rd party.