Hello all! It’s April back again from UncookieCutter and I wanted to share a fun DIY that looks hard and expensive but is not at all either of those things. I recently redid my bathroom for the One Room Challenge – a six-week event where a bunch of bloggers make over one room. I gutted the whole thing and redid the entire space, including building the vanity. I knew a concrete vanity top would fit perfectly with the vibe I was going for, so I built one and love it. Now I’m here to share with you guys how I did it. [Read more…] about Concrete Vanity Top
Blog
Holiday Home Tour 2016
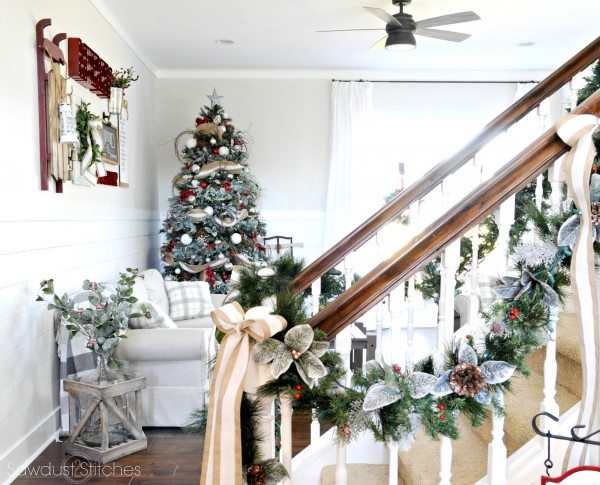
Hey all. I am have been bursting at the seams for the past month! (Truth be told, my Christmas tree was set up and fluffed on Halloween Day.) Seeing as I am not a patient person (obviously), not sharing all the fun decor has been killing me! So without further ado, I present to you for your viewing pleasure my 2016 Holiday Home Tour.
Corey-ism: (In case you didn’t know my name is Corey) : Whenever I take a tour I most generally get annoyed with the tour guide. With that being said, I am going to let you just peruse through, and I will only interject for really pertinent facts. 🙂
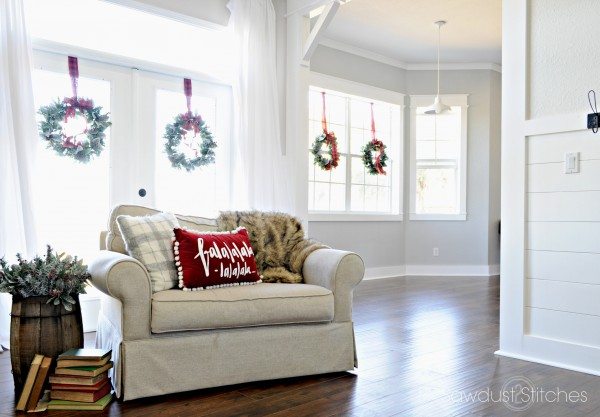
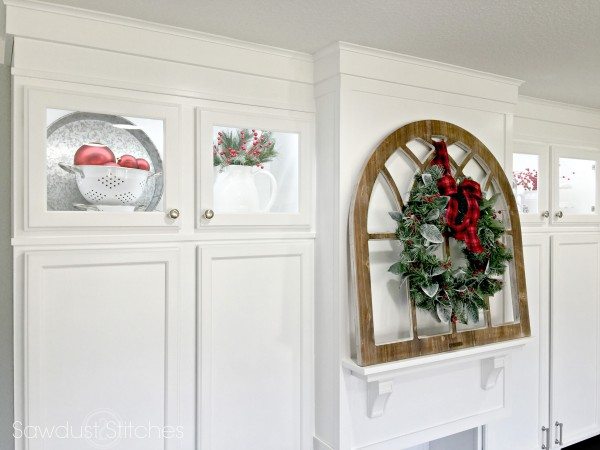
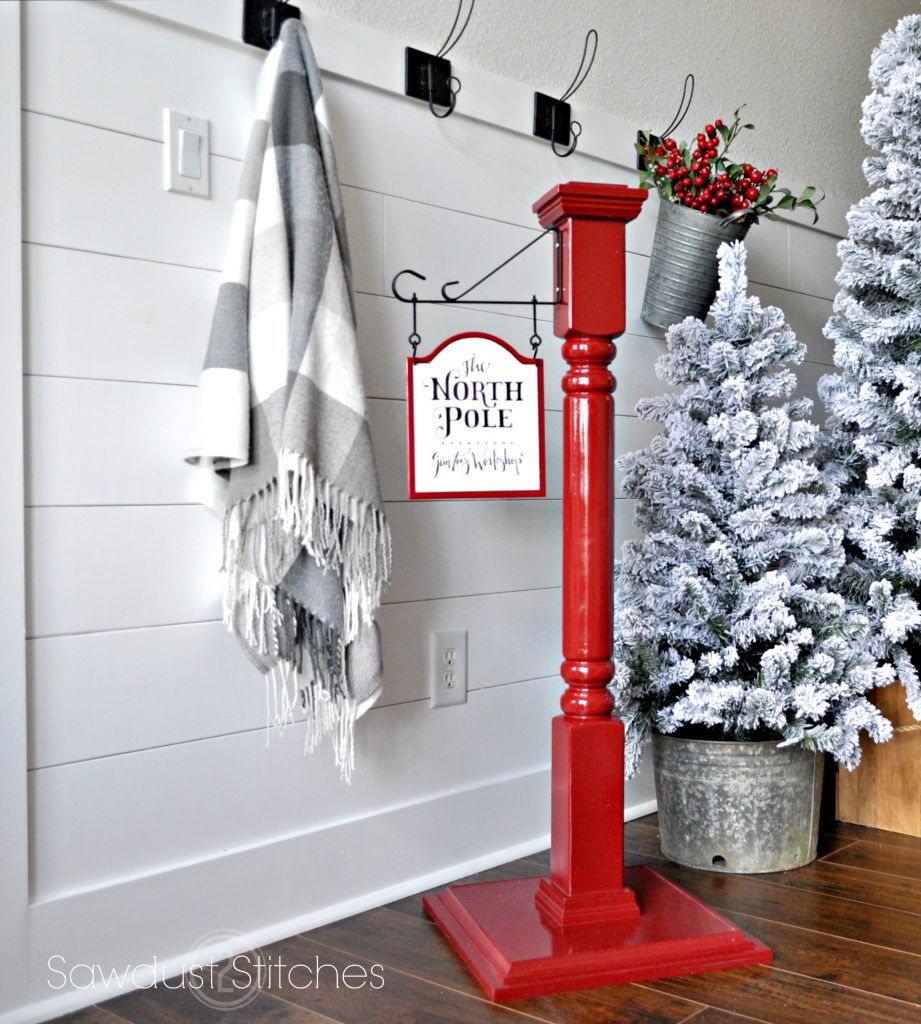
Front Entry
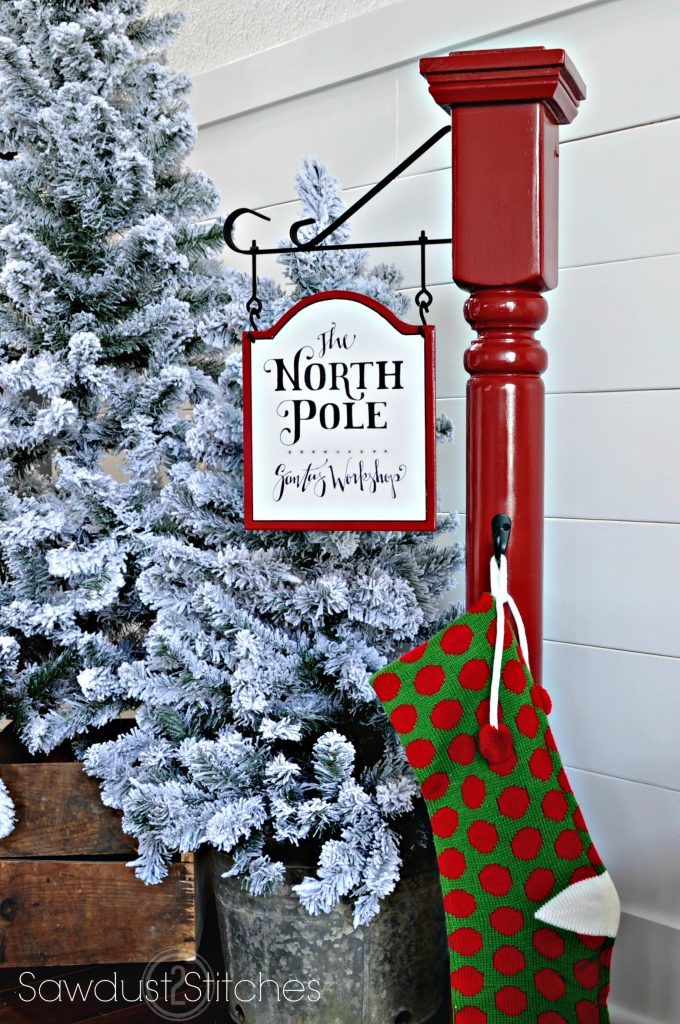
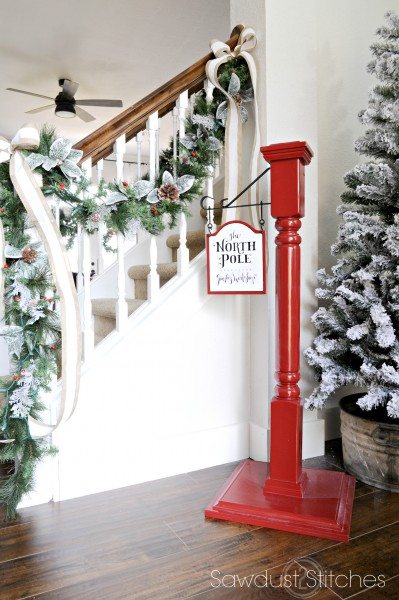 Psst… If you want to build a “North Pole”, (also can be used as a stocking post) you can find the tutorial here.
 And on the left… ok, ok, so I might had a few fun factoids for you. This entry closet used to be a HORIZONTAL beat up dresser. You can see the transformation here.
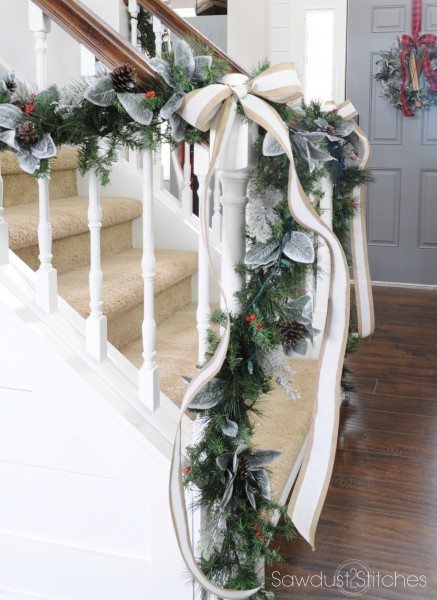
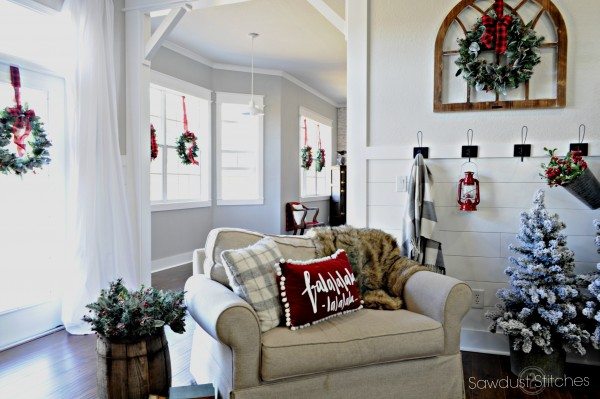
Family Room 

Stay tuned, I will have some more details (and possibly tutorials) on the gallery wall coming soon! 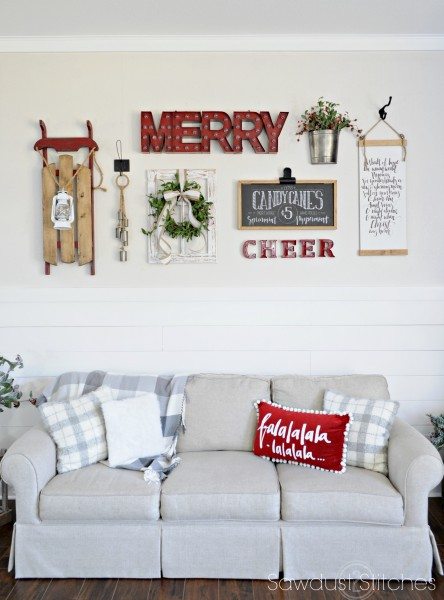
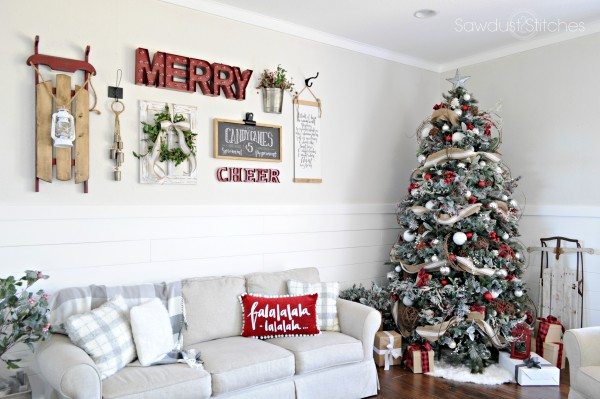 If you love the tree, and want some tips on how to create the look you can check out my “Rustic Tree” post Here.
 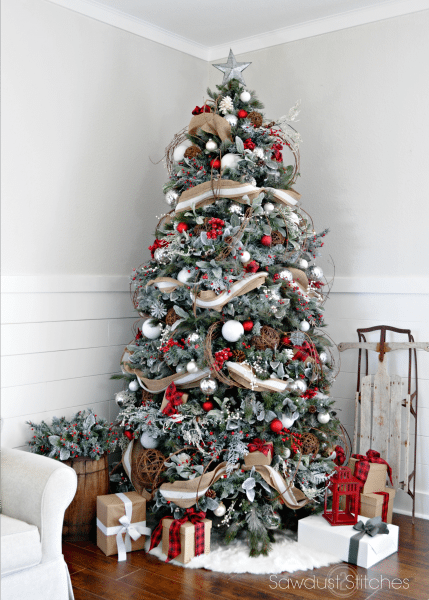 This little guy has been a fun new addition to the family room decor. It is a nice easy way to incorporate pops of color and seasonal decor. If you are interested in making your own, I have got you covered. You can find a tutorial for the “Crate Wheelbarrow” here.
  This “Crated Carboy Jug” is also a favorite of mine when it comes to adding festive decor! If you want to build your own you can find the tutorial here.
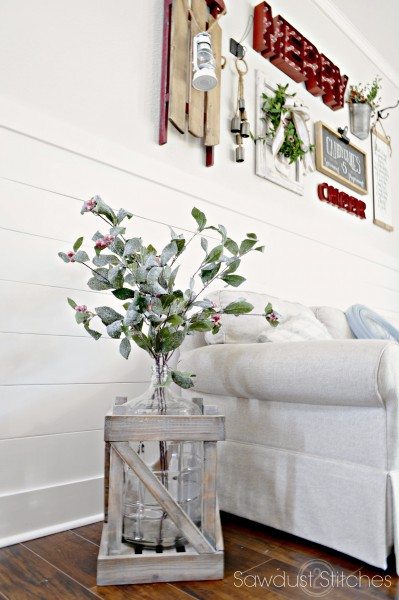
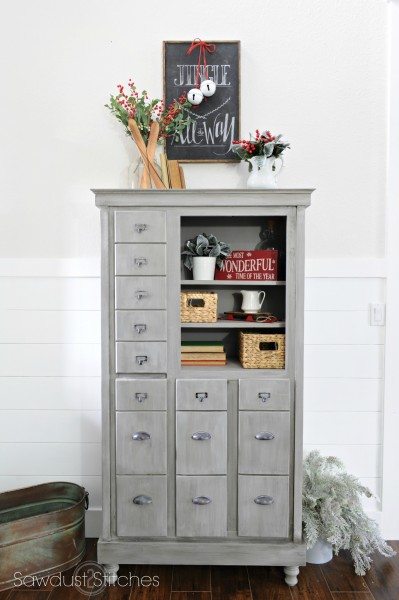
Kitchen
Honestly, if you think this is a pretty kitchen you should seriously consider checking out what it looked like BEFORE!
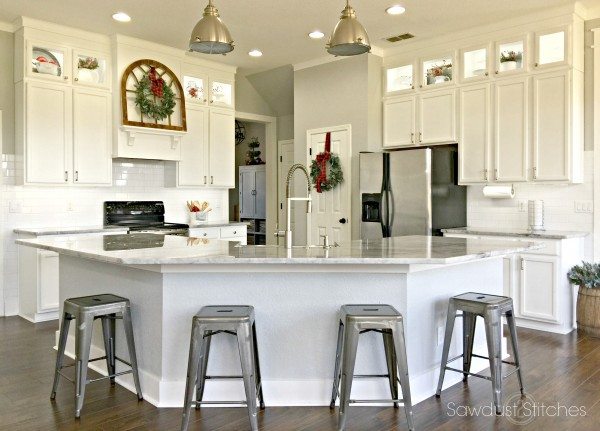
I am still working on pulling together a table-scape for the dining room, but in all honesty I kind of love it just the way it is.
If you are eyeing any of the pieces of furniture in this picture, then you might be shocked at what they looked like before I got my hands on them!
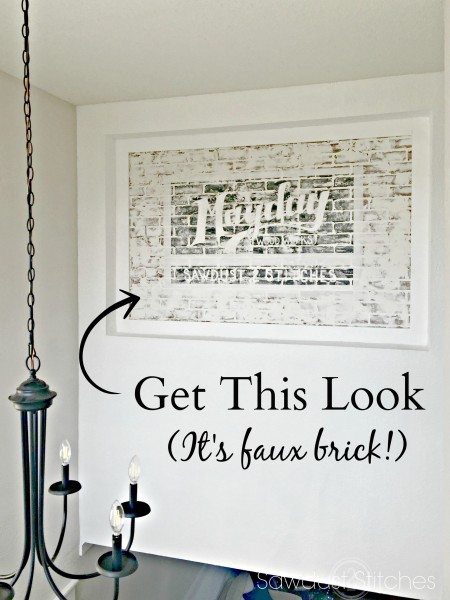
Ok, ok, sorry one last thing, if you love that exposed brick wall, I should tell you something… It is Faux Brick Paneling and I have a full tutorial for you, should you decide your home absolutely NEEDS one too.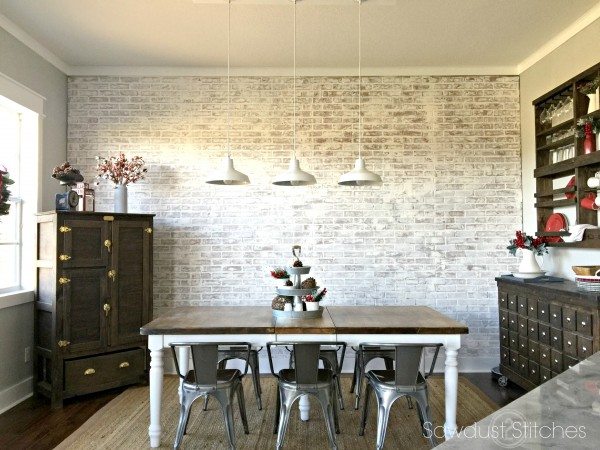 OR if you are interested in the Modular Wall Units , I have full build plans for this Pottery Barn inspired beauties right here.
 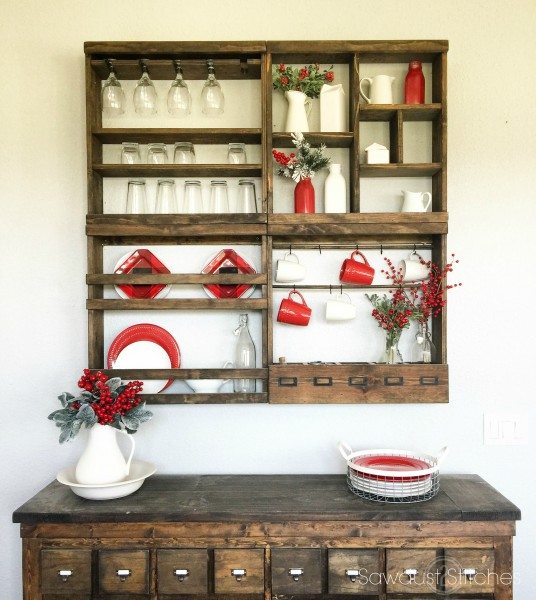 Well there you have it, a brief tour of my downstairs living area!
Take Luck,
Corey
P.S. I have plenty of seasonal inspiration and tutorials in the works, so make sure you check back often!
Rustic Christmas Tree
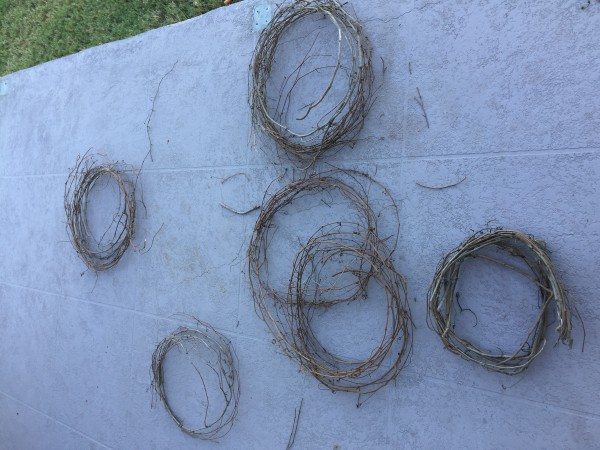
Alright you guys, here it is… the moment I have been prepping for since Halloween day! (Yeah, you read right.) The day I get to show you my 2016 Christmas Tree! Don’t you worry, I have plenty more pictures of the whole house coming tomorrow, but today I am showing off my tree!  This year I really gravitated towards more natural elements. One of the most prominent, being grapevine! I used grapevine balls as large ornaments, and grapevine as a garland! ( I used one strand, and it will run you about $10ish or less if you use a coupon at most craft stores.
  If you are unfamiliar with Grapevine, it often comes in a spool resembling a grapevine wreath.
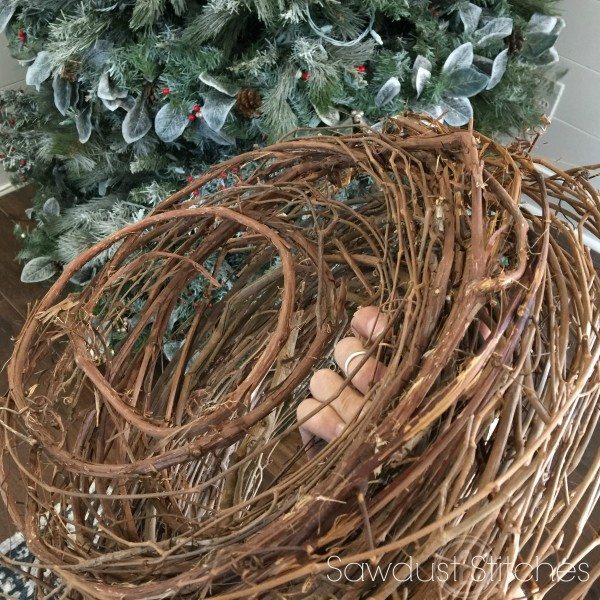 You can add garland one of two ways; you can either leave it in long sections and press into the tree and work around it while add the remainder of your ornaments. Or you can try this! I cut my grapevine into small manageable sections.
 Then I do this!
Look at how much character and dimension it adds to the tree! 
One other trick I have decided I love, is layering my ribbon! It adds just a little more pizzaz to a traditional ribbon. After which, I add red berries. Lots and lots of red berries! 
Shhh… I am giving you just a small sneak peak for tomorrows post, my Holiday Home Tour 2016! Tune in tomorrow!
Take Luck,
Corey
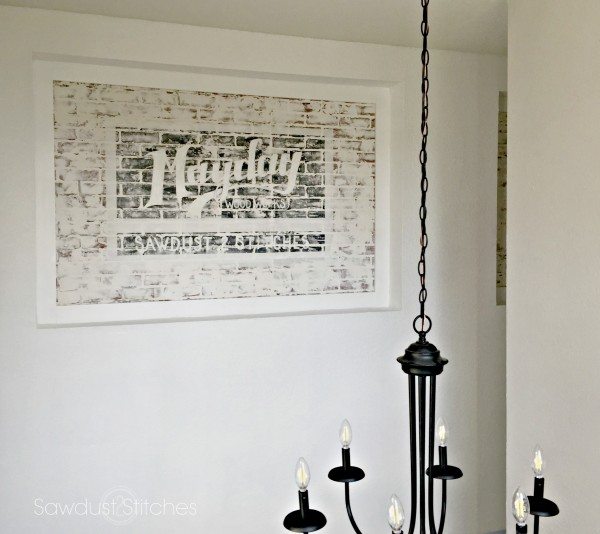
Faux Brick Wall with Ad
This post is sponsored by DAP.
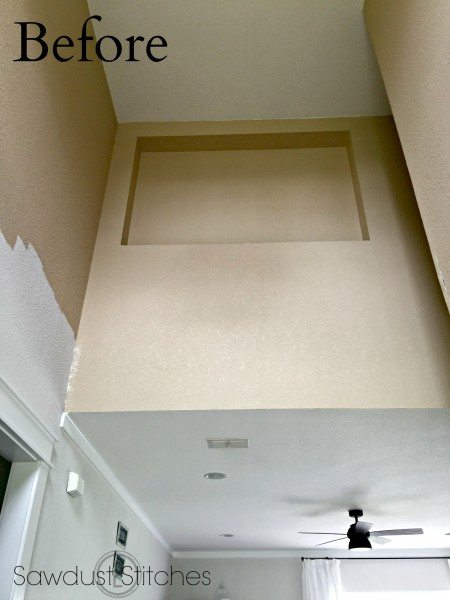
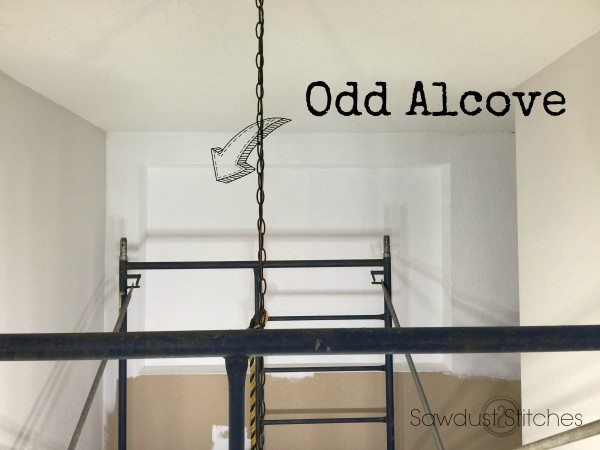
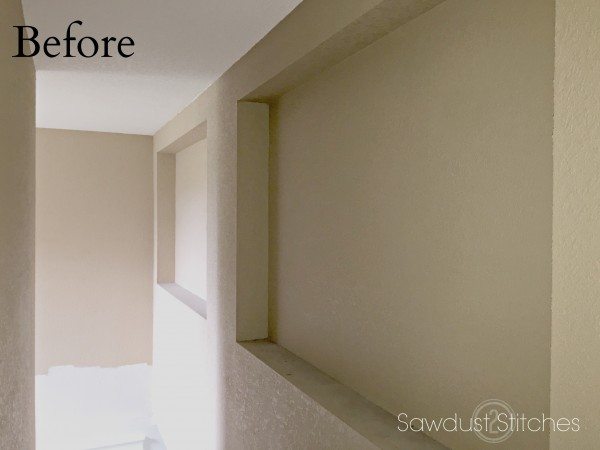
Hey there sports fans, I am back and I am pumped! Want to know why?! I have finally crossed off one of my most daunting home improvement projects. You know the type I am talking about ? They are those projects that you regularly convince yourself that they don’t really need to be done? I can relate, I had talked myself out of my personal Goliath Project on a daily basis, but was always brought back to reality every time I answered the door. You see, my daunting task was my two story entry. It was tall, had odd alcoves, it was tall, it was an atrocious shade of a used band-aid, and it was tall, did I mention it was tall?
Well, I DID it, I tackled my hurdle and I would definitely consider it a WIN! So without further ado, I am excited to share all the pretty and not so pretty details of the project.
For this project I teamed up with the great folks over at DAP. I have used DAP products for years, and I would never recommend a product that I would not personally use. All opinions shared are expressly my own.
Supplies Used:
- Faux Brick Panels (Home Depot)
- 1″ x 4″ Boards (or trim if desired)
- DAP Plastic Wood Filler
- DAP 20 min. Paintable Caulk
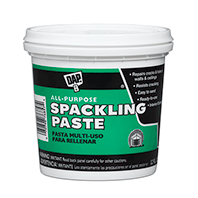
- DAP “Spackling Paste” (Make sure you read the whole tutorial before purchasing.)
- Paint
Tools Suggested:
- Table Saw
- Nailer
- 2″ Finish Nails
- Spackle Paddle/Knife
Disclosure: Some of the links provided are affiliate links. By purchasing through these links it supports this site and helps keep content free. You can read more about how we do this with no extra cost to you.
If you remember a while back I did a faux brick wall in my kitchen, it turned out beautiful and I love everything about it. It added so much personality and I knew that it could add some character to my odd alcoves.
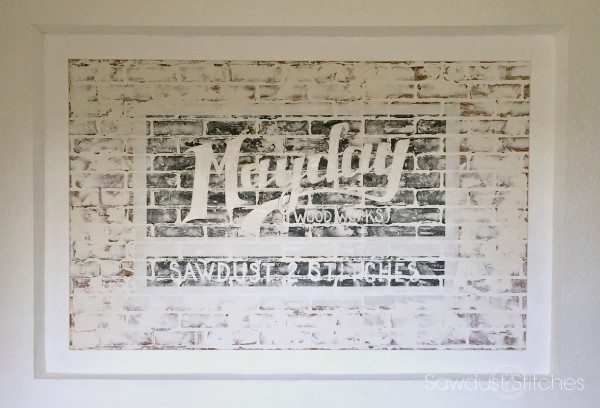
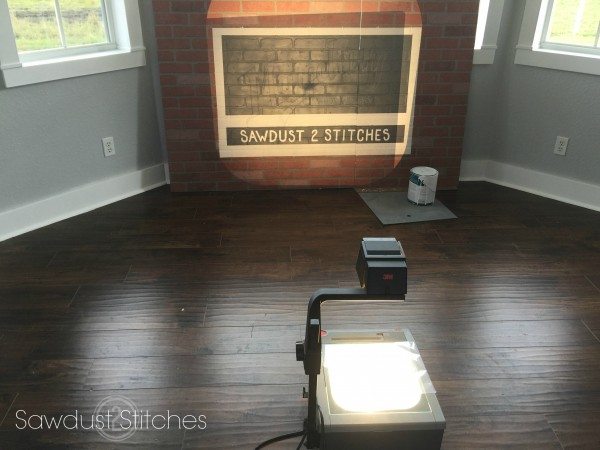
Let’s get started, I began by sketching up the text I wanted to have featured on my wall. I am lucky enough to have a sweet neighbor that owns a screen projector! Once, I had worked out all the kinks, I traced the image onto a transparency sheet. (OR in my case I was fresh out of transparency sheets, so I had to work with what I had. In this case a gallon size ziploc bag. Ha) Moving on.
 Before I could begin transferring the image, I needed to first add my background color blocks. I ran a few trial runs to test different color combos. I ultimately decided on the gray background with white lettering.
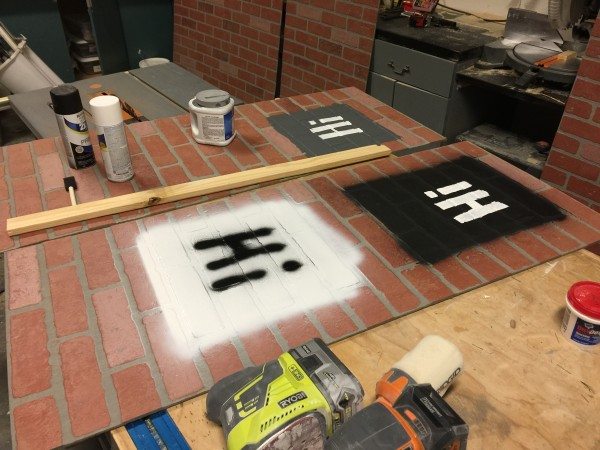 Once I had my colors selected, I taped off the entire bottom layer so that I could easily paint it. In this case the base/outline would be white. During this process I was consulting my original design and making sure my blocks were to scale. (If that idea freaks you out, you can always use the projector to create your outline.)
Side Note: I used white and gray primer when painting on my designs. It is not entirely necessary, but if you you use a paint I suggest giving it plenty of time to cure. After all, you will be SCRAPING the panel with with a spackling knife.
 Once the bottom layer of white was painted and completely dried, I then taped off the gray section and proceeded to paint the taped off area. Again, I played it safe and used a gray primer. (Available in a spray can)
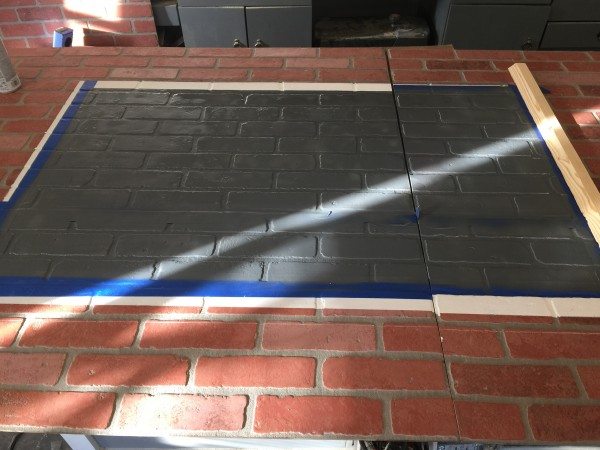
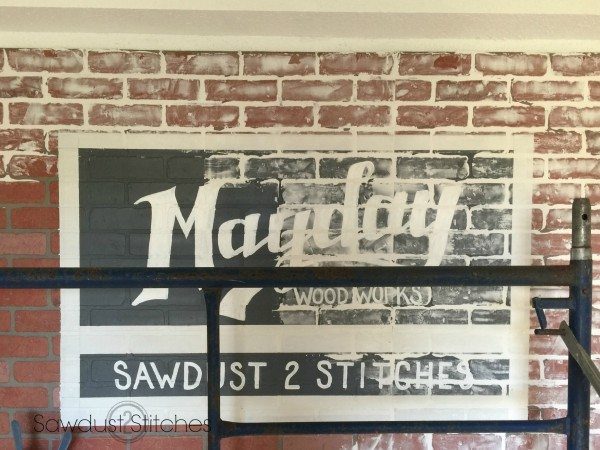
Once the gray primer/paint was completely dried I was able to remove the tape to reveal this beauty! It’s now time to add the pretty details! 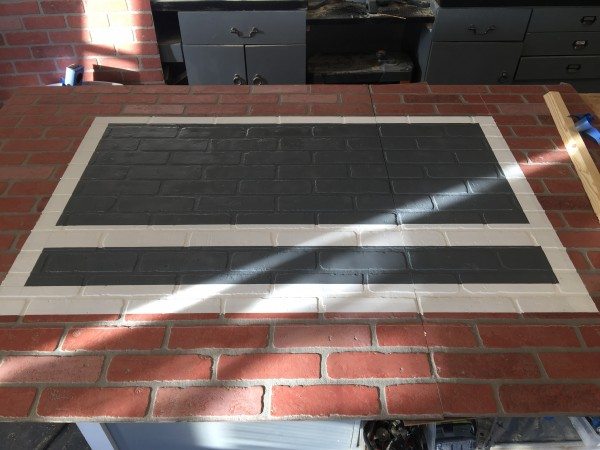 I set it up in front of the projector and got to work! I used a pencil to lightly trace/transfer the projected design on to the brick wall.
After the design was traced, I proceeded to fill in the design with paint. I did this portion with a basic art paint brushes.
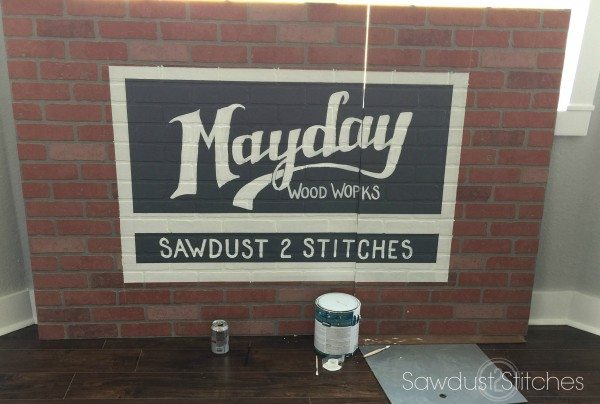
Now we are firing on all cylinders! Once the design is finished, we are ready to install this bad boy! It is really a straight forward task. I just tacked mine in place using a finish nailer. If you want more details on the install process, you can read more details about my Kitchen Brick Wall, or you can check out what “Sawdust Girl” did. Honestly, she pretty much rocks the faux brick wall’s world! You should definitely check out both of her wall tutorials, you can find them here, and here.
Learn From My Trial Runs:
Once the panels are secured we are ready to roll! Or so I thought. During this process I was able to try a few different products and figure out which one worked best for this purpose.
First I tried DAP’s ” Crack Shot”. I am not going to lie, this stuff was AH-MAZING! It went on smooth, like butta’. It also dried quick without any shrinking. HOWEVER, to my horror, as it was drying I started to see faint tinge of pink to the spackle that had once been white. Once it was completely dried, all of my grout lines had turned pink!? That wasn’t right. After a little bit of research I think I found the source of the “pinkness”. Like I said I love working with “Crack Shot” but it seems that it has an active ingredient in the “Crack Shot” that caused a small chemical reaction with my brick panel. After comparing active ingredients, I think I figured out that it was having a funny reaction with the Ethylene Glycol. So I looked at other wall spackles, and found just the ticket! I needed DAP Spackling Paste, (The one in the green tub is what I used, and it has my stamp of approval!)
Once I had the right product, I was crackin’ on!
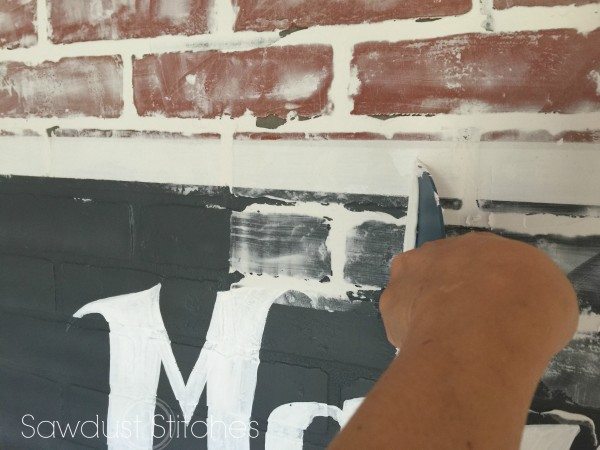
I know this part might seem scary, but I promise it is not. A little messy? Yes. But Scary? No.
Honestly, there isn’t much to it, just smear it on, and scrap it of until you get the look you are going for.
Here are some short clips to show just how easy it it!
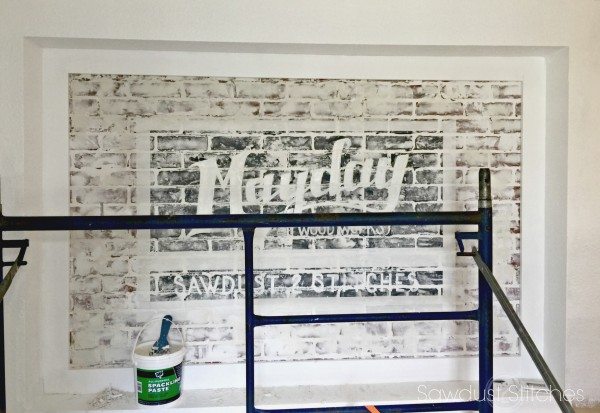
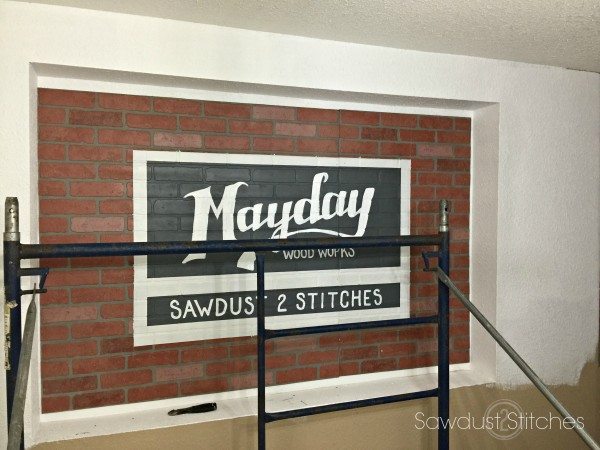
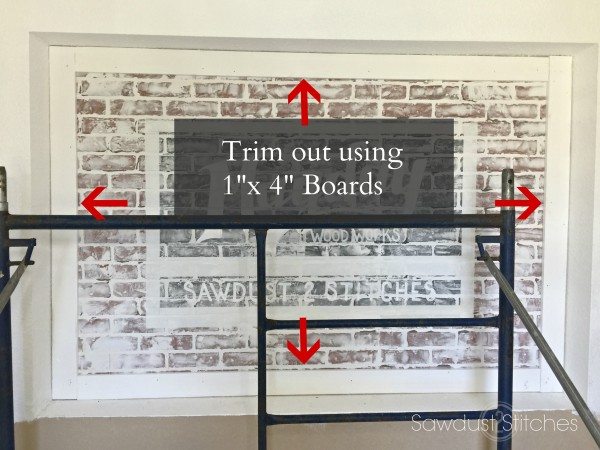
Once the spackle was dry I was ready trim this sucker out! This isn’t entirely necessary, BUT when considering the dimensions of my alcoves in particular, it made sense to leave a gap around the perimeter , because I would only require one panel per alcove. PLUS, I wanted to trim it out anyways, so it was a win-win.
To trim out the alcove I used 1″x4″ primed finger board. It comes primed white, which eliminates a step, and they are actually cheaper than select pine boards. BONUS!
To install, I again relied on a finish nailer with 2″ nails to attach the boards to the wall.
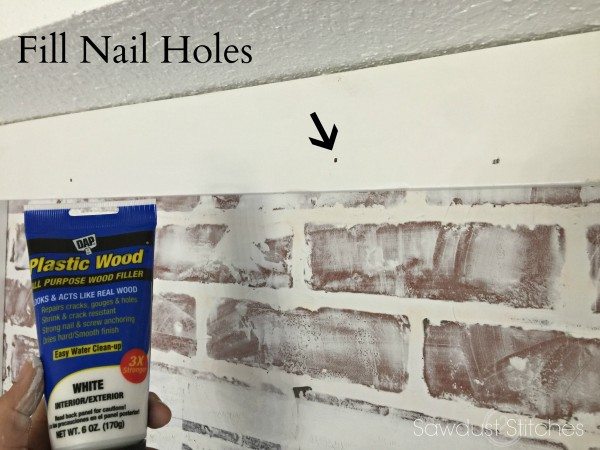
 Once the trim boards are installed I was ready to fill all the nail holes in preparation to paint.
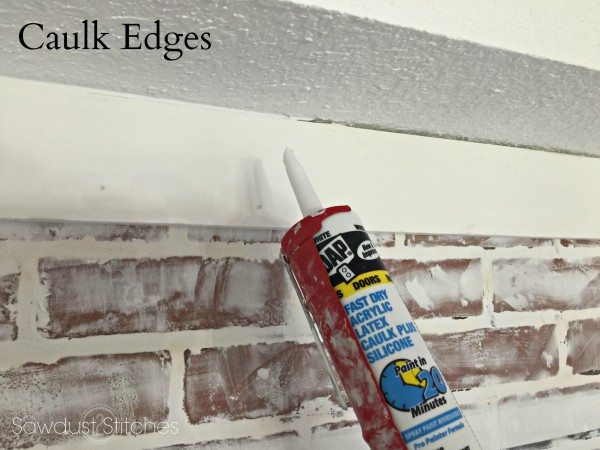
 If you have never used caulk you are in for a real treat. Caulk can basically work miracles. It can hide almost any unsightly gap, and make your trim look flawless. Moral of the story? When in doubt; caulk.
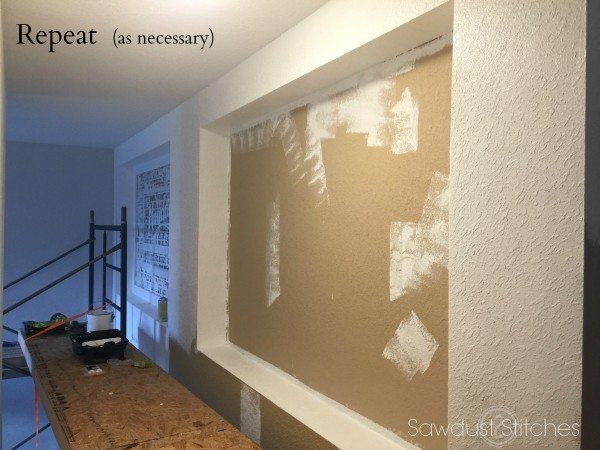
 I had not one, but two of these alcoves. So repeated the above steps again.
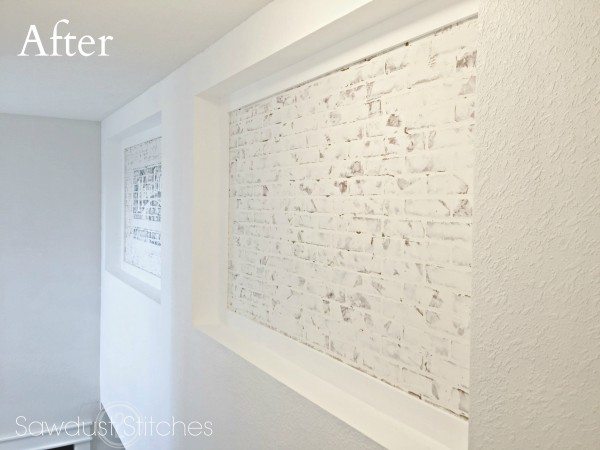

There you have it folks, a great way to add character and interest to any place in your home! Thanks for tuning in.
Take Luck,
Corey
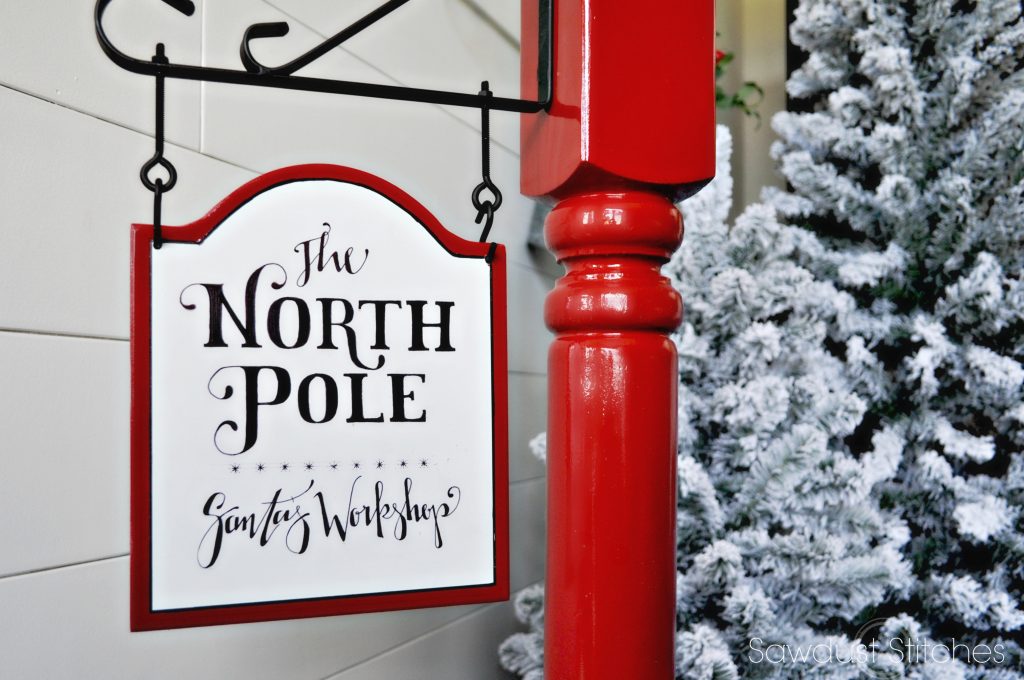
North Pole Stocking Post
Hey there Sportsfans, I am absolutely ecstatic about today’s tutorial. I am teaming up with Home Depot team to bring you my own personal flair to their Stocking Post! I honestly could not be more pleased with the finished product! #DIYworkshop #Sponsored

Home Depot Offers Workshops!
- The Home Depot offers Workshops at all of their locations for do-it-yourselfers of all ages and experience levels. If you are interested in learning more, there is more info HERE.
- There are three types of Workshops offered – Do-It Yourself (DIY), Do-It-Herself (DIH) and Kids.
- Customers can learn how to build décor projects, how to make easy home repairs and how to operate tools through demonstrations and step-by-step instructions.
- Visit and Home Depot to REGISTER learn more.
Stocking Post
Supplies Used:
- Deck Post ( I used a turned post)
- Post Cap
- Post Base Cover
- 3/4″ Plywood
- Trim
- Caulk
- Plant Hanger
- “S” Hooks
- Eyelet hooks with bolt
- Paneling
Tools Suggested
- Miter Saw
- Drill
- Drill Bit
- Finish Nailer (For trim)
Disclosure: Some of the links provided are affiliate links. By purchasing through these links it supports this site and helps keep content free. You can read more about how we do this with no extra cost to you.
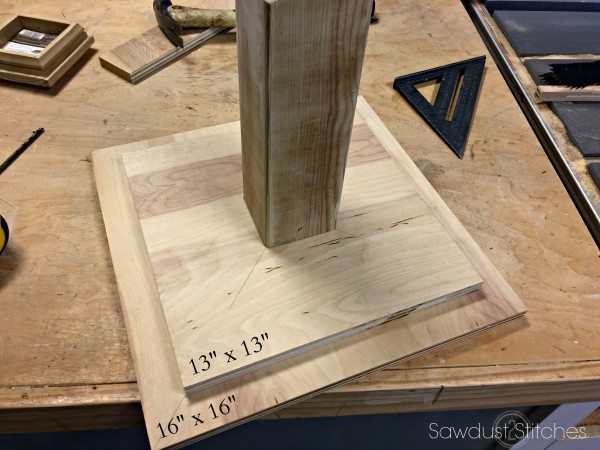
Step 1. Cut List
4″ x 4″ Post Cut @ 41″
3/4″ Plywood @ 16″x 16″
3/4″ Ply wood @ 13″x 13″
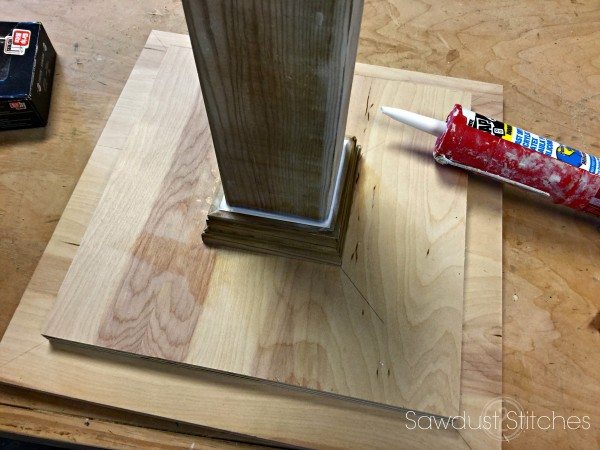
Step 2. Secure Post to Base
To be stable, this post requires a 16″x 16″ base, BUT I wanted my base to have two tiers. So I added a second layer (the 13″ x 13″ board). I began by centering my 13″x 13″ board and securing to the post using wood glue and reinforced with 3″ screws. 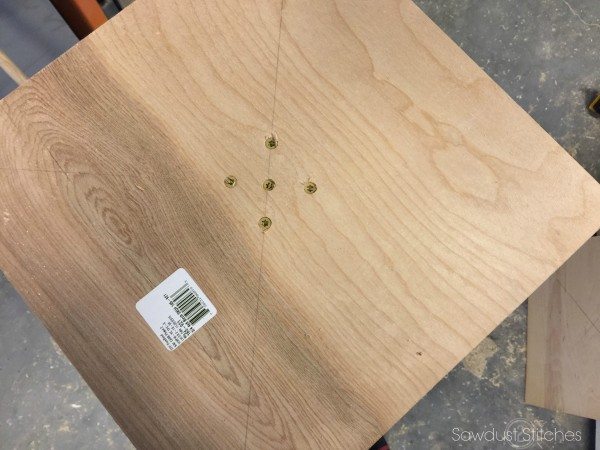 Once the 13″ x 13″ board was secure, I covered the bottom side with wood glue and repeated the above process with the 16″ x 16″ board. Base Completed!
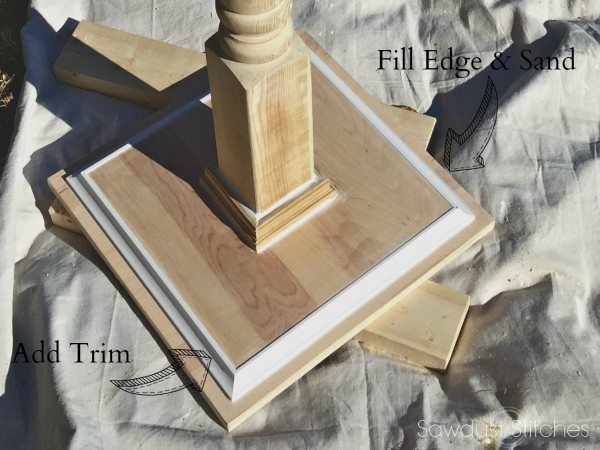
Step 3. Trim
Time to make it pretty! Home Depot sells these nifty little base moldings specifically for fence posts. They come pre cut and ready to install! I just fit it in place and then filled the gap with a paintable caulk.
I also wanted to dress up the edges of the plywood. For the first tier I added a small amount of trim around the base. These will all be cut 13″ from short point to short point with 45 degree cuts on the end. I used wood glue and reinforced with a small finish nail. For the bottom tier I filled the plywood layers with a wood filler, allowed to dry , and then sanded smooth.
The last piece of decorative trim it needed was a post cap. Again this was an easy fix, they sell post caps in several different styles at the Home Depot. I selected this one. Just add an ample amount of would glue and allow to dry! 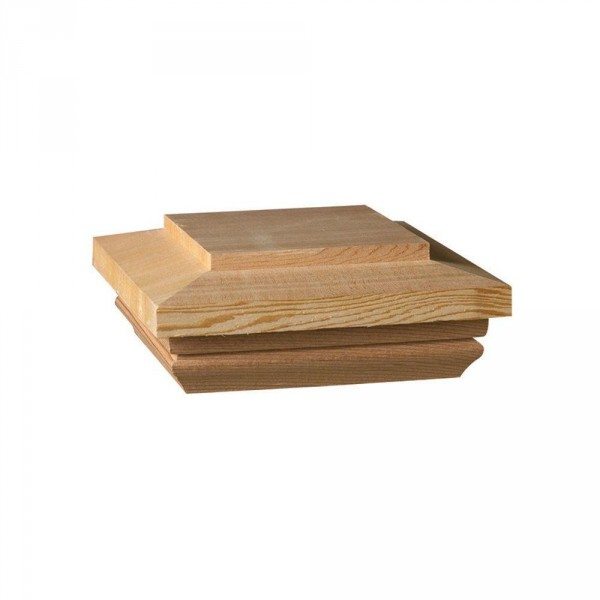
Step 4. Prime and Paint
Before you pick up a paint brush, or a spray can, I highly encourage you do a little prep work. Fill any and all nail holes with filler, and caulk all joints. This will make a world of a difference to your finished product!
I used a spray primer on my post. Once the initial coat had dried, I did a quick once over with a foam sanding block. I swear it helps create a prefect smooth finish!
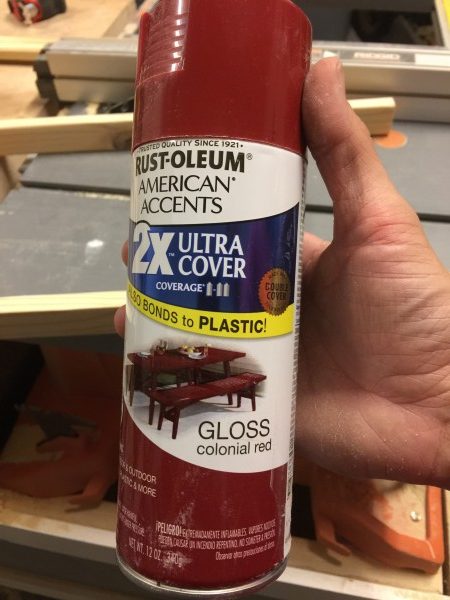
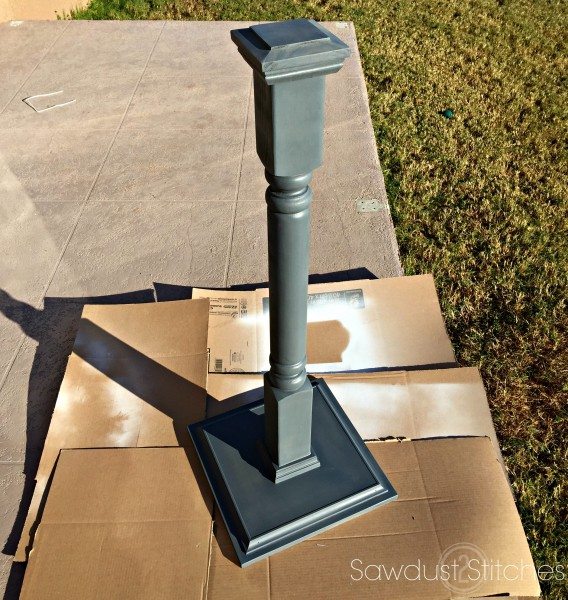 Next we are ready for paint. I wanted mine to be a glossy read. Colonial Red is my go to for Christmas, so I went with that.
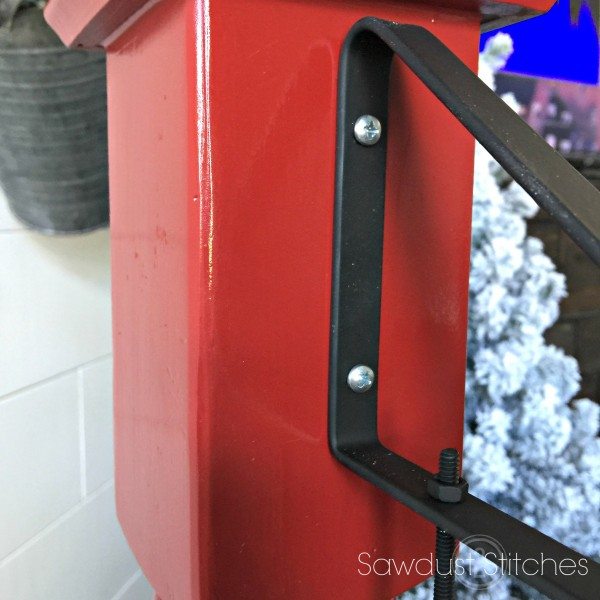
Step 5. Add Hardware
To hang the sign I used a pot hanging bracket. They can be found in the “Garden Section” of the Home Depot. They come in two different size, and I opted for the smaller 9″ bracket.
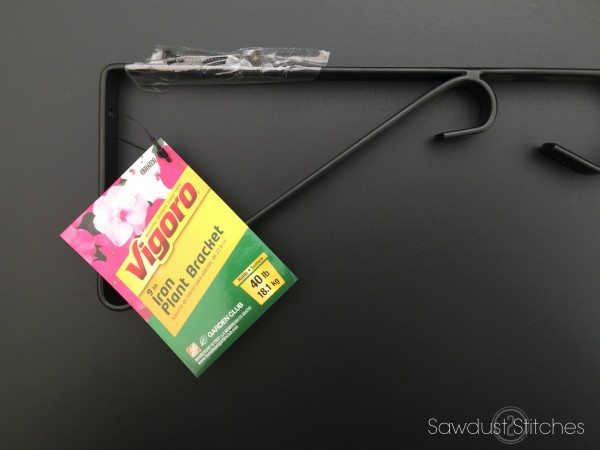
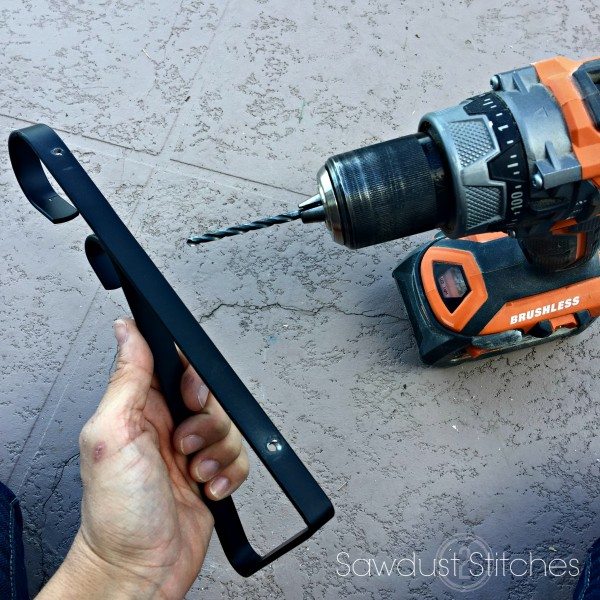
This particular size did not have holes in the bracket so I took matter into my own hands.
Step 6. More Hardware
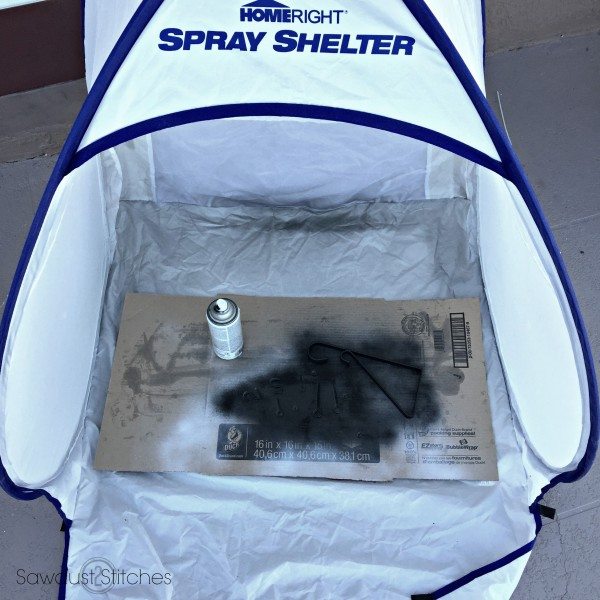
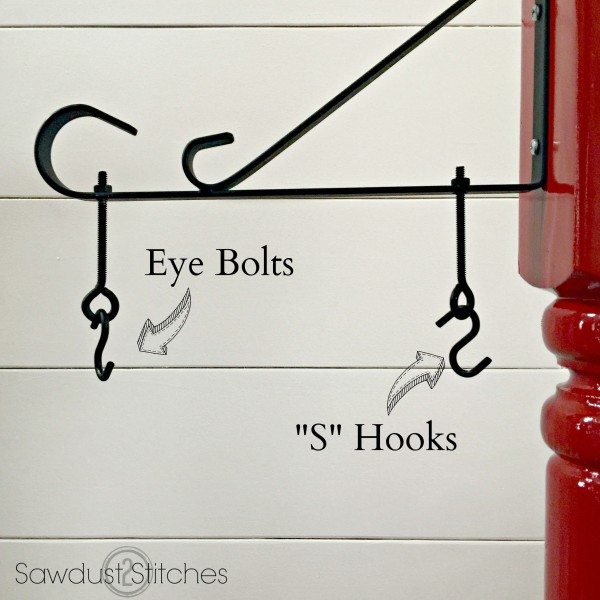
In order to hang the sign from the bracket I needed to use two “S” hooks, and two eyelet bolts. They normally come in a solver finish, so I had to correct that. I gave all my hardware a quick coat of matte black paint.
When I was installing the bracket, I had a “scratch my head moment”. I cannot for the life of me figure out the screw placement for the bracket. You will need to measure, mark and pre-drill your screws, because you will not have the luxury of a drill. You will need screw them in the old school way, by hand. (I would not be able to say that with a straight face.) Moving on.
Ta-Da! You see where I am going with this right ?!
Step 7. Create a Sign
I wish I could say I used a stencil of a template, but I didn’t. This is good ol’ fashion straight edge and pencil style. I did however tape off the interior of the sign and used a bit of the red spray paint, in order to create the boarder. The rest of it was just a permanent marker (Both regular and fine point).
Here is a basic north-pole-template of what I did. Please feel free print it off and use it! (Ignore all the excess pencil markings, haha, you can tell it is the original.) It would be easy enough to transfer using carbon paper. 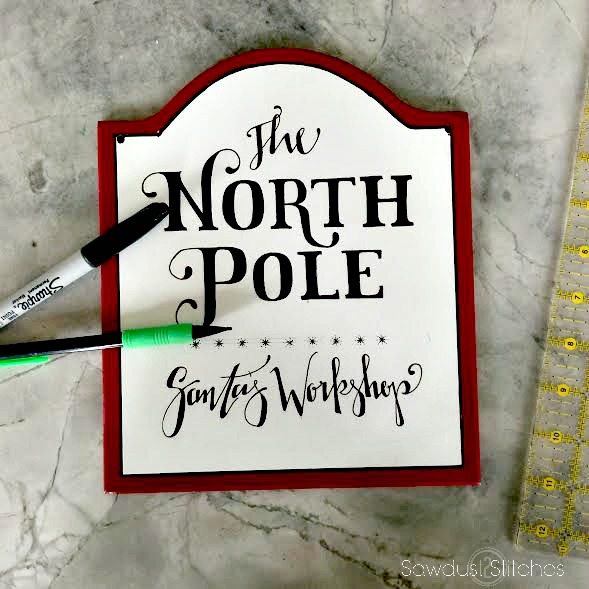
Once your sign is complete, you will need to drill two holes in the top corners of your sign. This is where you will insert your “S” hooks, that will allow you to hang your sign.
Step 8. Add Stockings
I absolutely LOVE the way my post turned out, and I will probably use mine purely as a decorative piece. However, if you are looking for a place to hang your stockings, I have got you covered! All you need to to is add some hooks. 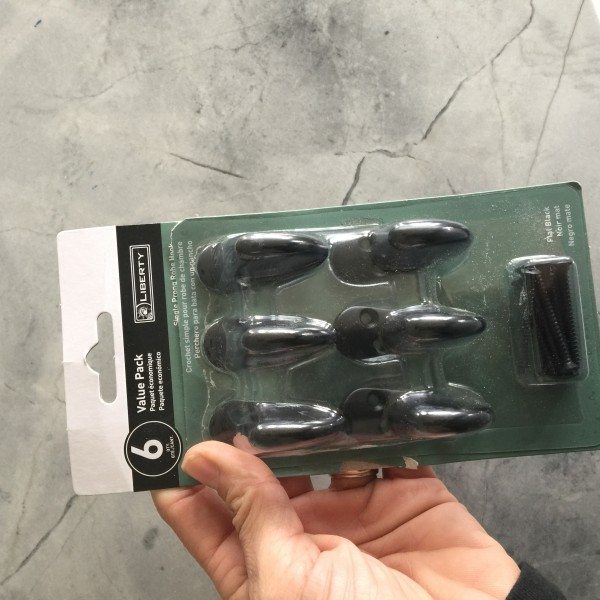
There you have it ! Add as few or ass many hooks as you would like/need.
But seriously how CUTE is this ? Like I said, I am using this just to look pretty, just because I like it!
Make sure you check out all of my talented friends to see how they added their own twist to a Stocking Post. You can find all of their project links here:![]()
Domestic Charm \\ Homemade By Carmona \\ My Altered State
Smart Girls DIY \\ Chaotically Creative \\ Ciburbanity
Lazy Guy DIY \\ Build Basic \\ That’s My Letter
Her Toolbelt \\ The Handmade Home \\ The Heathered Nest
Designer Trapped \\ The Chronicles of Home \\ Cherished Bliss
Just a Girl and Her Blog \\ House of Wood \\ Shades of Blue Interiors
Uncookie Cutter \\ Ella Claire Inspired \\ Shine Your Light Blog
Remodelando La Casa \\ Paper Daisy Design \\ Fix This Build That
Take Luck,
Corey

Home Depot Virtual Party
Hey All, I am very excited to be participating in The Home Depot’s Virtual Workshop! Here is how it works, there is a group of creative bloggers (*ahem* myself included) that will take on one project and give it there own style and flare! For this workshop, we will be all creating a Holiday Stocking Post! So, make sure you stay tuned for next Monday (14th), because it is going to be AWESOME! #sponsored #DIYWORKSHOP
- The Home Depot offers Workshops at all of their locations for do-it-yourselfers of all ages and experience levels. If you are interested in learning more, there is more info HERE.
- There are three types of Workshops offered – Do-It Yourself (DIY), Do-It-Herself (DIH) and Kids.
- Customers can learn how to build décor projects, how to make easy home repairs and how to operate tools through demonstrations and step-by-step instructions.
- Visit Home Depot to register and learn more.