• Blog
  • About
  • Press
  • Privacy

Let’s be social!

  • Skip to primary navigation
  • Skip to main content
  • Skip to primary sidebar
  • Skip to footer
Sawdust 2 Stitches

Sawdust 2 Stitches

  • Tutorials
    • Around the House
    • Organization
    • Wall Decor
    • Sewing
  • Makeovers
    • R.V.
    • Room Makeover
    • Furniture Makeover
    • Decor Makeover
  • Build Plans
    • Small Builds
    • Wall Decor
    • Dresser
    • Tables
    • Seating
    • Shelving
    • Hidden Compartment
  • Seasonal
    • Summer
    • Spring
    • Fall
    • Winter
  • Home Tours
    • First Home
    • Current Home
    • 70’s Ranch Home
  • Workshop

Blog

ConverTABLE

March 16, 2013

 
Conver-TABLE  From Breakfast to Buffet. www.sawdust2stitches.com

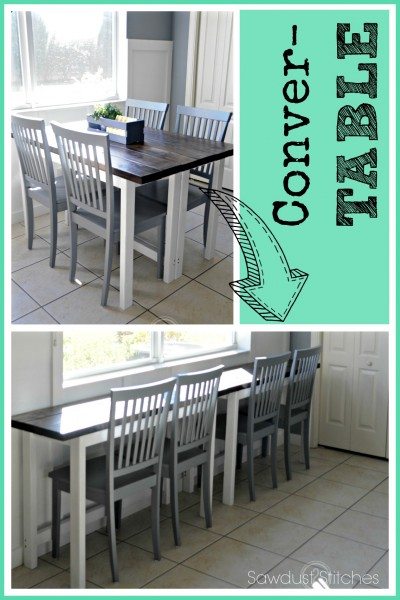
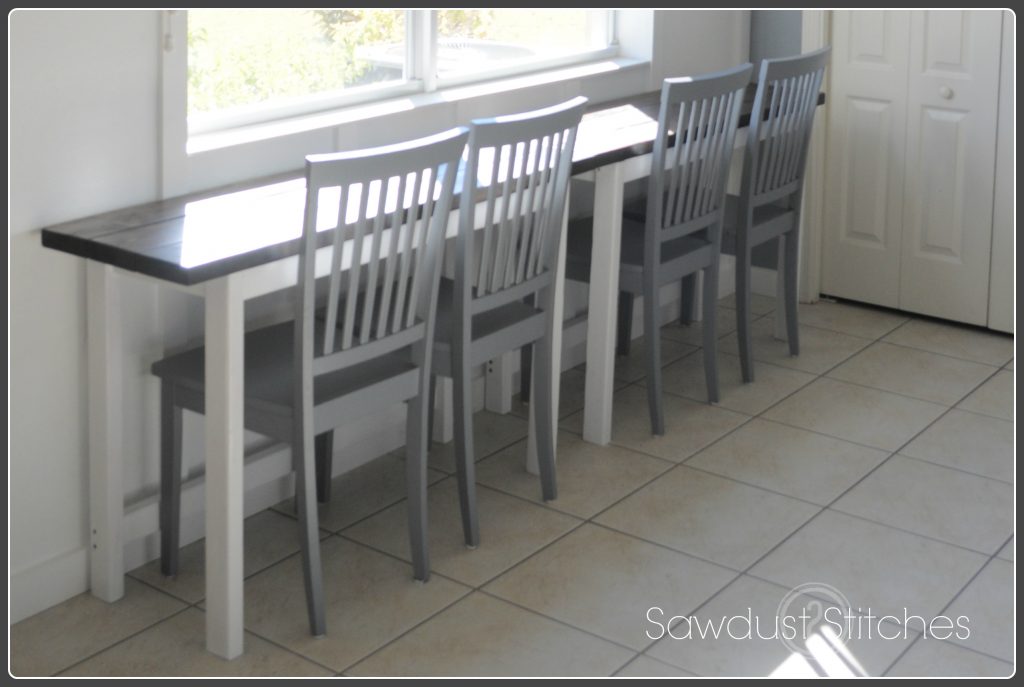
Okay, so  I had a kitchen table and whenever I needed more space or was mopping,  I would push it up against the window.   It  made the kitchen so much bigger! I loved it and so did my Husband,  but the designer in me hated it.  So,  here was my newly created problem… push it against the wall and have space, or in the middle and have it be functional….
Well I love a good problem…

our home kitchen 4
 Let me preface this with a disclaimer.  I have never used Auto Cad before and this was my first attempt, so no judging.
 Now that, that is all cleared up, let’s make a table! (Well, 2 to be exact.)
Here is your shopping list:
 3-  2″x6″ (8′)                                                                                                          $6.00 x 3 =    $18.00
6-  2″x3″ (8′)                                                                                                          $2.00 x 6 =    $12.00
2-  “1×3” (8′)                                                                                                          $2.00 x 2 =    $  4.00
                                                                                                                         Est lumber =    $ 34.00ish
 You will also need:
-sandpaper
-paint and/or stain  (I used Jacobean by Minwax for the top and Behr Ultra White for base)
-paint brushes
– 2 1/2″ Screws
-3 1/2″ Screws
– Brad nails (either hand drive or for nail gun)
-Wood filler
Tools Suggested:
– Miter Saw
– Electric Hand Sander
– Drill
– Brad nailer or hammer
– Kreg Jig
Okay, so you have visited your local hardware. (I am personally a Home Depot Girl), we are ready to start cutting!
Cut list:
 2×3’s
    4 @ 39″ (top support, footrest)
    8 @ 29″ (legs)
    4 @ 13″ (top side supports)
    4 @ 11″ (bottom side supports)
 2×6’s
    6 @ 48″ (top planks)
 1×3’s
    4 @ 11″ (side fronts)
    2 @ 39″ (front)
At this stage I personally double check and make sure all measurements that are supposed to be the same are EXACTLY the same. If there are any discrepancies I even them out.
 Then go crazy with the sander.
Now,  I know some people prefer to apply paint or stain after everything is put together, not me.  I hate trying to paint all the surfaces on a 3D object, flat boards are easier.  Like I said personal preference.  I undoubtedly will end up doing some touch-ups, but  I still say it is easier.
 Assembly
 Okay,  lets do  this…
-Center your 11″ 1×3 on the 13″ 2×3, there should be 1.5″ space on either side.
-Secure the 1×3 to the 2×3. If you have a nail gun, use it, if not use a hammer and brad nails,  or wood glue.—
-Pre-drill and fasten the the 13″ 2×3 to the back of the legs using 2 1/2″ screws.
-Take your 11″ 2×3″ and secure it so that the base of the new support is 3″ from the bottom of the leg. If you have a kreg jig use it. If not you will need to pre-drill through the leg  and use a 3 1/2″ screw.
– Now do it all over again, 3 more times…
 
Still with me ?  Good.
– Take one of your  39″ 2×3’s and secure it at the ends of your 13″ 2×3’s.  (It should fit perfectly in the corner)
-Take your 39″ 1×3 and secure it to the front. ( It will be inset about 3/4″)
-Take your other 39″ 2×3″ and secure it so that the base of the new support is 3″ from the bottom of the leg. Again if you have a kreg jig use it.
-Repeat on the other table.
 
Ok next comes the tops…
– I would strongly suggest  having these stained/painted in advance,  getting down in the cracks after this  point could be near impossible.
–  Lay 3 of your 2×6’s side by side on the ground, with the “top” facing down, flip your table base upside down and lay directly on top of the 2×6’s.
– Then predrill  through your 2×3 supports so that your will have screws fastening all 3 of your 2×6 boards  to the base.
– Flip over and marvel at your work, and then do it again.
Side notes, I know some people will wonder about the cracks,  you can put a wood filler in between them,  sand it down and then  seal it.   I did not do that on this table. I made the spacing between the boards large enough that I could clean between with a knife if needed and water would just go through.  I have used the filler method before and it has to be very close and sealed very well to work.  I had a problem with a seam that repeatedly popped on a kitchen table (actually it is what pushed  me to make this table.)  Whatever you do make sure your filler is able to be stained or painted depending on your finish.
 I did end up adding latches in  two spots on the under side of the table in order to help it stay  put, and it worked perfectly!
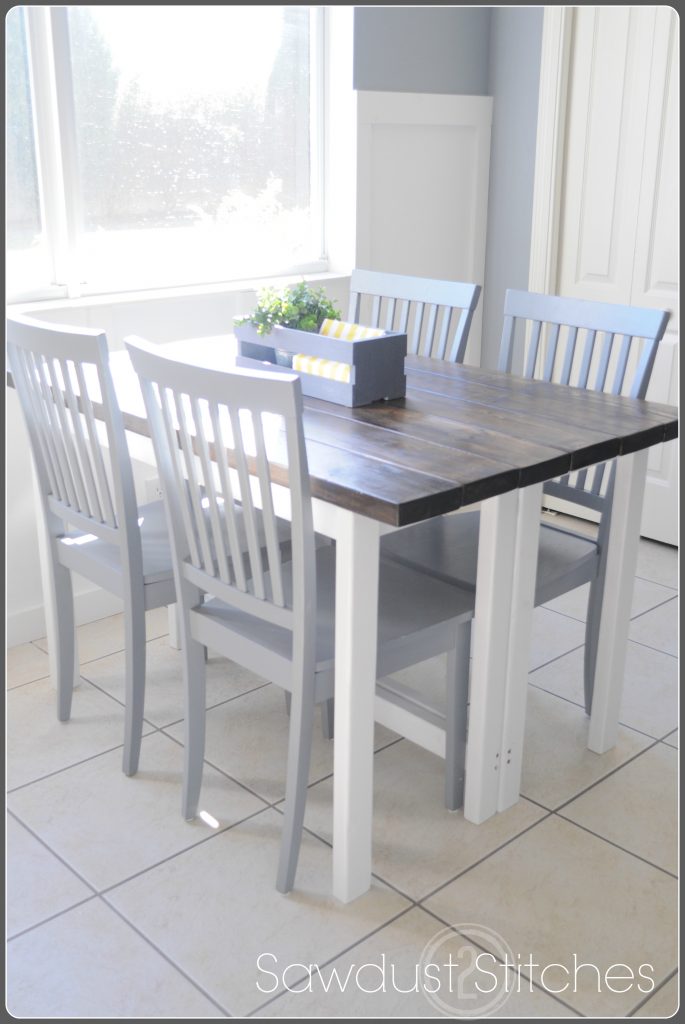
Ta-da, problem solved,  a table that  could be functional even while pushed against the wall, and still be beautiful as a full kitchen table!
our home 5

our home kitchen 4


Craft Cabinet

March 15, 2013

Made up problem:
I  use our office as my sewing room, it is an open room and I didn’t want all my craft supplies  to be part of the decor.

Solution: Craigslist is one of my favorite things, I found this computer hutch made of solid wood for $35.00! ( Why on earth would you not tidy it up before you took a picture attempting to sell it ?)

 
My darling husband went and picked it up for me around 4 ?  By about 9 this is what it looked like.
 

Sanded it down really well, and put 2 coats of primer on this puppy,  it smelled like cats and smoke,  I was not running any risks of it smelling up my house.   I have used this primer for multiple projects in my house and can’t complain.

Next  I added drawers to the bottom cubbies  so that I could utilize all of the space.  I also raised up the entire unit.  I built a basic platform out of 2×4’s and then put a piece of 1×4 on the front  of it. It made it sit  nearly 4″ taller and it needed the visual weight to make it a little more bottom heavy.

I ended up distressing  the cabinet after the final coat of paint.  I know there are a lot of  fancy products for distressing, but I go basic.
I always  just use a sander with a fine grade paper,  I scuff up the edges and areas where there would be natural wear. Then I take an old rag and a little stain and run it over the edges. ( I work with  one small area at a time) Immediately after applying the stain use  a different rag with a little bit of baby oil on it, and rub the area you are working on.  It will even out the stain  and make it easier to work with.   Then  just let it dry.


TA DA!  A craft closet in a room that doesn’t have a closet.  Problem solved.

Break down :
Media Cabinet    $35.00
Paint                   $0.00   (leftover from previous projects)
Stain                   $0.00   (leftover from previous projects)
Total       =    $35.00

  To see phase 2 of this cabinet overhaul  click here !

How to Refinish a LIght Fixture

March 11, 2013

When we bought our home I was trying to come up with temporary fixes to minor eye sores.   I needed something that would last  until  I could figure out exactly what  I wanted.   This light fixture is  a perfect example.  Granted it was not terrible,  but it was not adding to my space.

Progress Lighting Renovations Collection 3-Light Antique Nickel Semi-flushmount 
Like I said not awful,  not great.  So I made a drum shade, and covered the sucker up.
 I had been keeping my eye out for a more permanent solution, and  my patience paid off.  I found this little beauty at a thrift store for less than $6.00. 


It just needed a little lovin’. I started by taking it apart, and then used a fine grade steel wool  to scuff up the surface just a  little.  After you sand it, make sure you wipe it down well.
 I then used this awesome product… I have used this all over my house and love it!

After waiting the appropriate allotted time I reassembled the light and installed this little guy.  I love it. Bonus : I have been trying to come up with an excuse to use one of these awesome vintage light bulbs, and I found it. Perfection.

Breakdown

Light Fixture       $5.50
Spray Paint         $0.00   (Leftover from previous projects)
Light Bulb          $10.00 (Home Depot)
=    $15.00


  • previous
  • Page 1
  • Interim pages omitted …
  • Page 45
  • Page 46
  • Page 47

Primary Sidebar

  • Facebook
  • Instagram
  • Pinterest
  • Twitter
  • YouTube
IMG_9167 (1).jpg fd
DIY & Design

Meet Corey

Hi everyone, my name is Corey, and I have a problem. I can’t leave well enough alone… The best therapy usually involves a variety of power tools. So, in the few “spare” moments I am not entertaining my two beautiful, rambunctious, boys, I can typically be found hunched over a sewing machine and/or covered in sawdust. All in the efforts to create a perfect balance of aesthetics and practicality in our home.
read more

Join our mailing list!

DIY & design ideas - right in your inbox!

Featured

Stair Tread Makeover

Categories

  • 70's Ranch Home
  • Around the House
  • Build Plans
  • Crafts
  • Current Home
  • Decor Makeovers
  • Dresser
  • Exterior
  • Fall
  • First Home
  • Furniture Makeover
  • Hidden Compartment
  • Kitchen
  • Lighting
  • Makovers
  • Master Closet
  • Organization
  • R.V.
  • Room Makeovers
  • Seasonal
  • Seating
  • Sewing
  • Shelving
  • Small Builds
  • Smart Home
  • Spring
  • Summer
  • Tables
  • Tablescape
  • Tutorials
  • Uncategorized
  • Wall Art
  • Wall Decor
  • Winter
  • Workshop

Footer

Contact Me: Corey@Sawdust2Stitches.com

Latest ‘Grams

Follow on Instagram
2020 © Your Blog Name
theme by soleilflare
Enter your name and email and get the weekly newsletter... it's FREE!
Your information will *never* be shared or sold to a 3rd party.