• Blog
  • About
  • Press
  • Privacy

Let’s be social!

  • Skip to primary navigation
  • Skip to main content
  • Skip to primary sidebar
  • Skip to footer
Sawdust 2 Stitches

Sawdust 2 Stitches

  • Tutorials
    • Around the House
    • Organization
    • Wall Decor
    • Sewing
  • Makeovers
    • R.V.
    • Room Makeover
    • Furniture Makeover
    • Decor Makeover
  • Build Plans
    • Small Builds
    • Wall Decor
    • Dresser
    • Tables
    • Seating
    • Shelving
    • Hidden Compartment
  • Seasonal
    • Summer
    • Spring
    • Fall
    • Winter
  • Home Tours
    • First Home
    • Current Home
    • 70’s Ranch Home
  • Workshop

Craft Cabinet

March 15, 2013

Made up problem:
I  use our office as my sewing room, it is an open room and I didn’t want all my craft supplies  to be part of the decor.

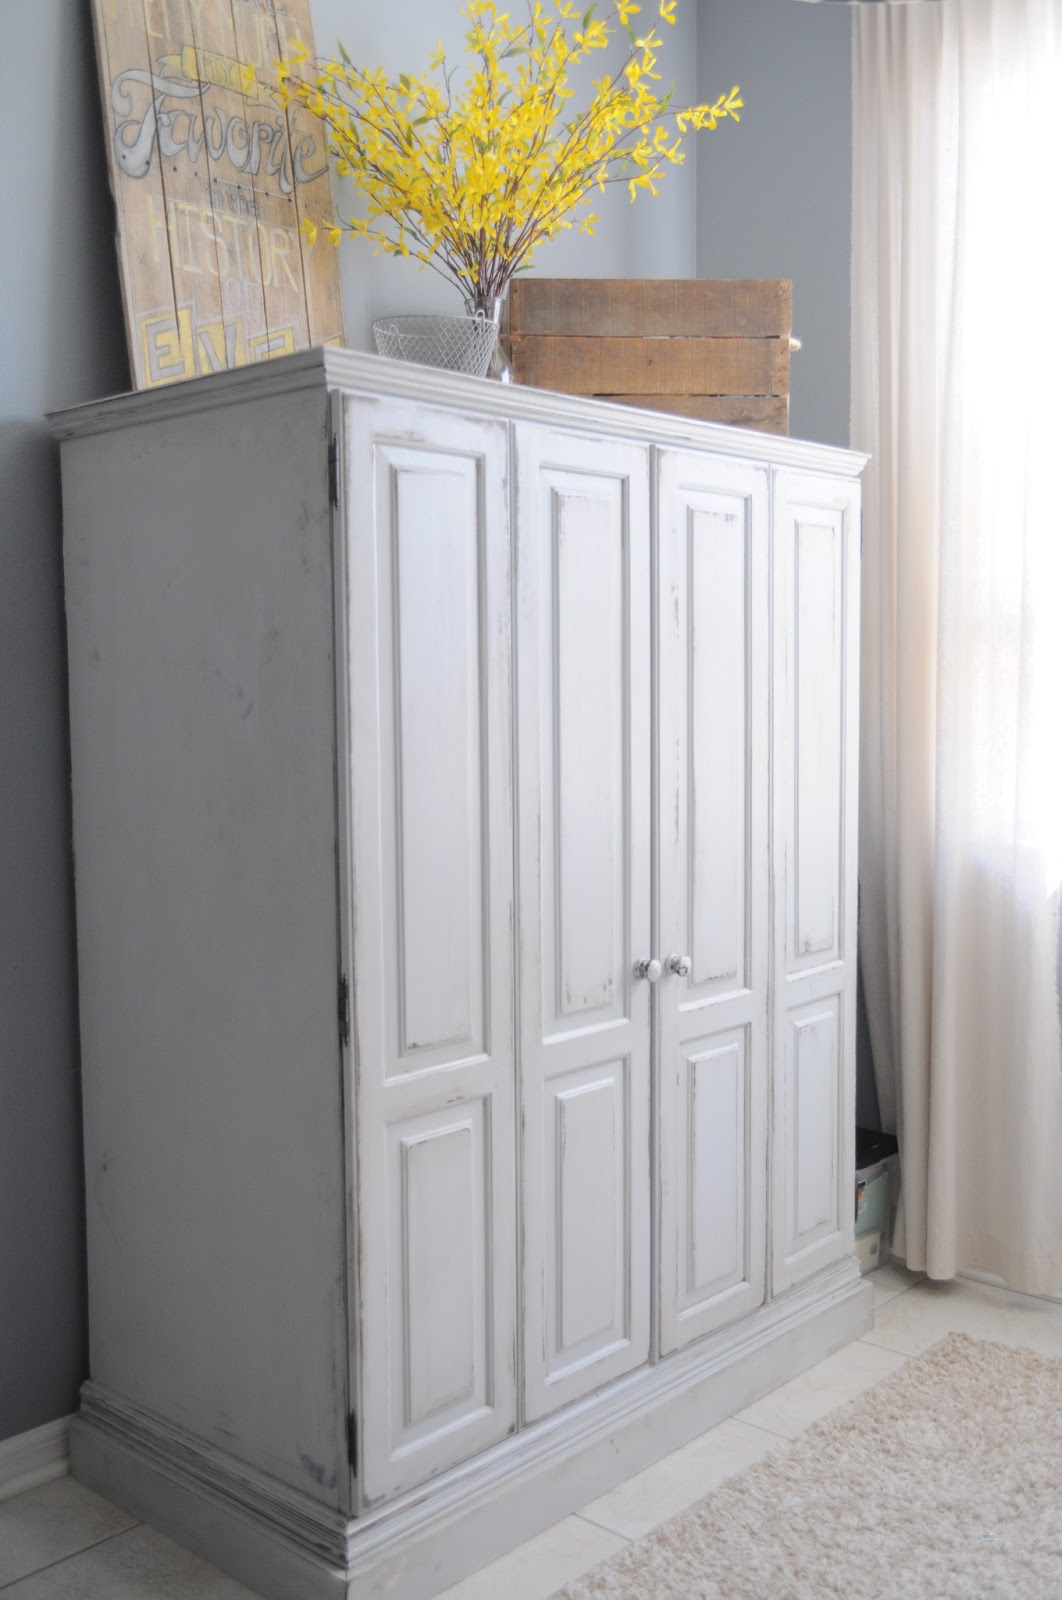
Solution: Craigslist is one of my favorite things, I found this computer hutch made of solid wood for $35.00! ( Why on earth would you not tidy it up before you took a picture attempting to sell it ?)

 
My darling husband went and picked it up for me around 4 ?  By about 9 this is what it looked like.
 

Sanded it down really well, and put 2 coats of primer on this puppy,  it smelled like cats and smoke,  I was not running any risks of it smelling up my house.   I have used this primer for multiple projects in my house and can’t complain.

Next  I added drawers to the bottom cubbies  so that I could utilize all of the space.  I also raised up the entire unit.  I built a basic platform out of 2×4’s and then put a piece of 1×4 on the front  of it. It made it sit  nearly 4″ taller and it needed the visual weight to make it a little more bottom heavy.

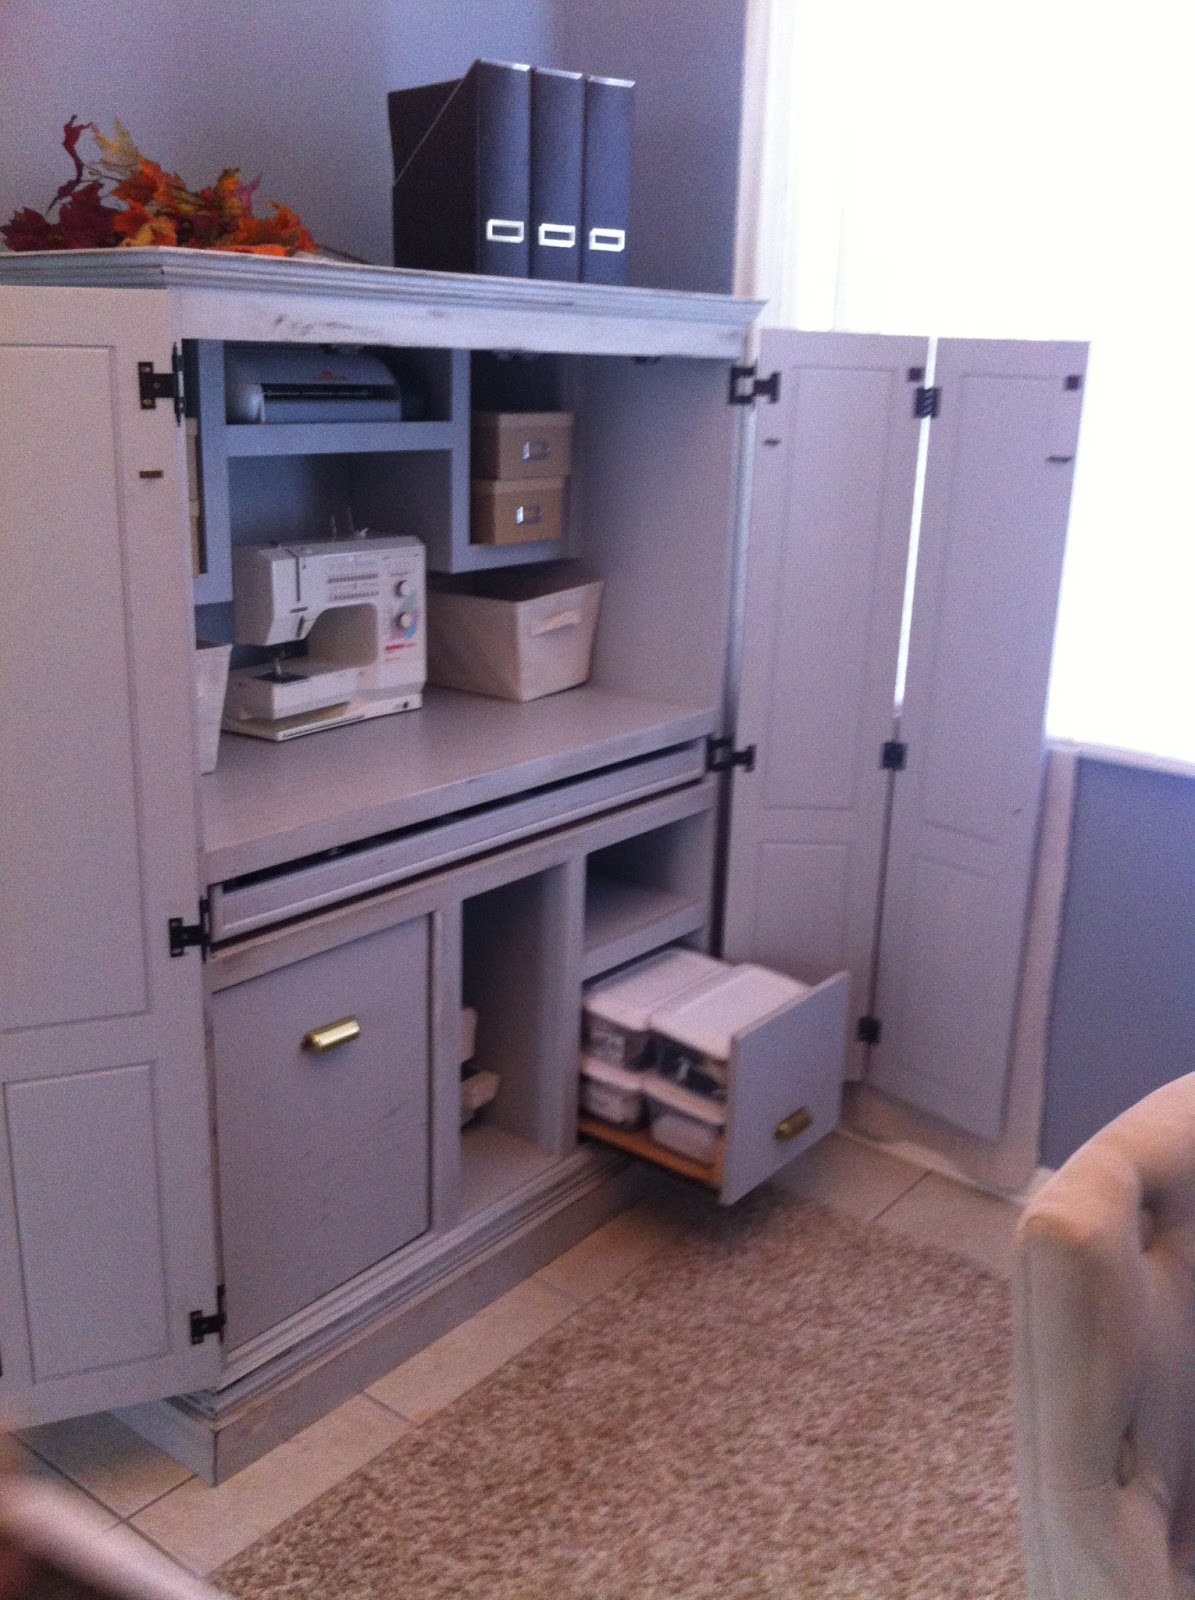
I ended up distressing  the cabinet after the final coat of paint.  I know there are a lot of  fancy products for distressing, but I go basic.
I always  just use a sander with a fine grade paper,  I scuff up the edges and areas where there would be natural wear. Then I take an old rag and a little stain and run it over the edges. ( I work with  one small area at a time) Immediately after applying the stain use  a different rag with a little bit of baby oil on it, and rub the area you are working on.  It will even out the stain  and make it easier to work with.   Then  just let it dry.


TA DA!  A craft closet in a room that doesn’t have a closet.  Problem solved.

Break down :
Media Cabinet    $35.00
Paint                   $0.00   (leftover from previous projects)
Stain                   $0.00   (leftover from previous projects)
Total       =    $35.00

  To see phase 2 of this cabinet overhaul  click here !

More from my site

  • Dresser Makeover into a Mini MudroomDresser Makeover into a Mini Mudroom
  • Media Cabinet Makeover into a LockerMedia Cabinet Makeover into a Locker
  • Garage Sale FlipGarage Sale Flip
  • Ikea Cubbies into a Rustic ApothecaryIkea Cubbies into a Rustic Apothecary
  • Workshop Table for X-Carve  (Using OLD cabinets!)Workshop Table for X-Carve (Using OLD cabinets!)
  • DIY Farmhouse TrayDIY Farmhouse Tray

in Furniture Makeover, Makovers, Organization, Uncategorized # Furniture, Re-purpose

Reader Interactions

you may also like
Back of Door Spice Rack
Pool Patio Design
How To: Exterior Door Makeover
Out-feed Assembly Workshop Table

Comments

  1. Amanda says

    May 14, 2015 at 12:25 am

    Hi Corey! I recently purchased an armoire for the exact same purpose that you did-better storage in my craft space. I’ve been browsing lots of furniture makeover posts to gather ideas and I stumbled upon yours… only to find we have almost the exact same cabinet! I love the color you chose, and the distressing you did makes it fit in perfectly with the rest of your decor. Well done!

Primary Sidebar

  • Facebook
  • Instagram
  • Pinterest
  • Twitter
  • YouTube
IMG_9167 (1).jpg fd

Popular Projects

  • How to: Faux Brick Wall
  • Cheap White Curtains
  • Ikea Cubbies into a Rustic Apothecary
  • Cabinet Transformed Into A Kitchen Island
  • R.V. Makeover
  • How to: R.V. Curtains
DIY & Design

Meet Corey

Hi everyone, my name is Corey, and I have a problem. I can’t leave well enough alone… The best therapy usually involves a variety of power tools. So, in the few “spare” moments I am not entertaining my two beautiful, rambunctious, boys, I can typically be found hunched over a sewing machine and/or covered in sawdust. All in the efforts to create a perfect balance of aesthetics and practicality in our home.
read more

Join our mailing list!

DIY & design ideas - right in your inbox!

Top Hits!

  • How to: Faux Brick Wall
  • Cheap White Curtains
  • Ikea Cubbies into a Rustic Apothecary

Featured

Back of Door Spice Rack

Categories

  • 70's Ranch Home
  • Around the House
  • Build Plans
  • Crafts
  • Current Home
  • Decor Makeovers
  • Dresser
  • Exterior
  • Fall
  • First Home
  • Furniture Makeover
  • Hidden Compartment
  • Kitchen
  • Lighting
  • Makovers
  • Master Closet
  • Organization
  • R.V.
  • Room Makeovers
  • Seasonal
  • Seating
  • Sewing
  • Shelving
  • Small Builds
  • Smart Home
  • Spring
  • Summer
  • Tables
  • Tablescape
  • Tutorials
  • Uncategorized
  • Wall Art
  • Wall Decor
  • Winter
  • Workshop

Footer

Contact Me: Corey@Sawdust2Stitches.com

Latest ‘Grams

Follow on Instagram
2020 © Your Blog Name
theme by soleilflare
Enter your name and email and get the weekly newsletter... it's FREE!
Your information will *never* be shared or sold to a 3rd party.