If you recall, less than a year ago I was ripping out tile and replacing the flooring in our last home. (You can read all about that here.) When we found out we were moving, that was seriously a source of short-sided sadness. “We JUST finished the floors!?” Seriously, I loved my new laminate floors. (So did ALL of the people that we “showed” the house to in the selling process.)
While I was sad to leave behind our home, I immediately started scheming about what I would change, and what I wanted to repeat in the new home.
When I had first started looking into laminate flooring , I was a little skeptical on how it would wear, and if it would hold up to two rambunctious boys, and my furniture rearranging antics. I had spent hours pouring over online reviews, and researching durability and of course, comparing prices. All of the reviews I had read for “Select Surfaces Flooring” were raves, and their price point was well below their competitors. Quality and less $$? Yes, please!
Well, after 6 months with ZERO scratches, I am a believer! So when it came time to select flooring for the new house, it was a no-brainer. I HANDS DOWN wanted to go with a Select Surfaces laminate again! So I reached out to the great folks at Select Surfaces and have teamed up with them to complete this downstairs overhaul!
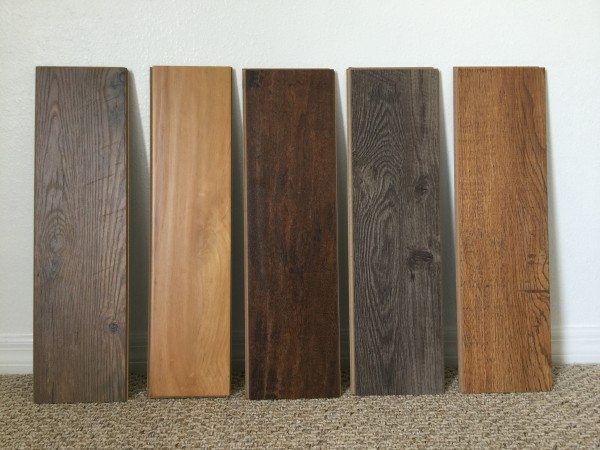
This time around, I was thinking about changing it up a bit. They have some AWESOME new color choices available! I was so torn on what color I wanted to use! I had LOVED the “Barnwood” color I had used in the last house, but at the same time, if you have a chance to change things up, would you !? I stared at the color samples for weeks and I had finally narrowed it down to “Cocoa Walnut“ and “Toffee“.
 I knew I would like the effect both would create in the house. I was so torn! Seriously, I went back and fourth on the decision on an
 daily hourly basis. I finally made my husband weigh in; he loved the darker. Phew. The decision was made and I was thrilled with our decision.
The “Cocoa Walnut” had nice wide planks, and I LOVED that the planks were well defined, and had so much variation and character in each piece. They have the “Hand Scraped” effect, which means it has awesome natural looking texture.
I had my color selected, and was ready to go! Now we just needed to get into the house…
The DAY we closed:
We were up against a TIGHT deadline. We had 6 days to be out of our old house and into the new house. We knew life would be 100 x’s easier if we got the flooring in before we moved all of our crap in. Crazy? Yes, but we were totally committed! We got down and dirty within hours of being handed the keys.
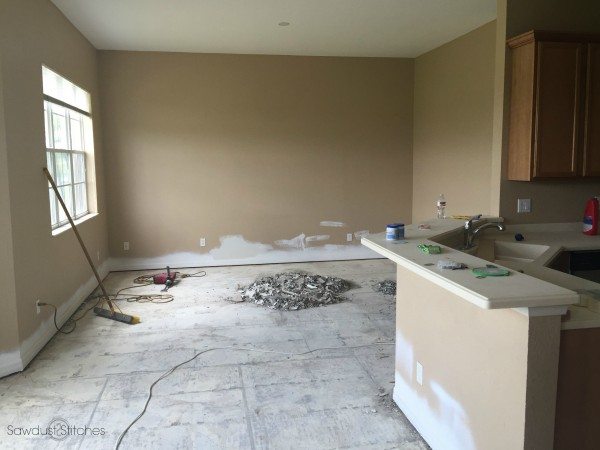
DAY 1 & 2: DEMO DAYS
I am not going to lie, the first time around, the demo was complete HELL ON EARTH. We were chipping away quarter size pieces of tile for nearly 2 weeks! We knew we would need help so we hired a few guys to come and help us. I swear, “luck favors the prepared”, Andrew and I got started before the help even arrived. We were popping up ENTIRE tiles! This was a night and day difference this time around, it was, dare I say “easy” . We probably didn’t need the extra help, but we were sure glad we had it to help speed the process along.
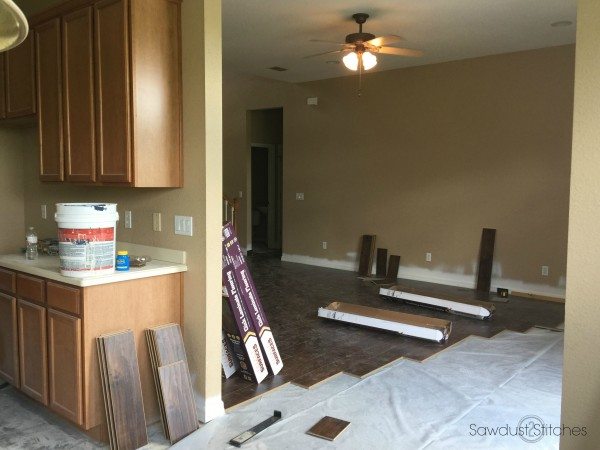
DAY 3 & 4: Laying the Laminate
Yet another reason we chose laminate… ease of use! Andrew and I laid all 1600 sq. ft. of flooring in TWO days. Yes, TWO! We put down a moisture barrier, and the planks come with an insulated backing. (Once less step!) They are click and lock planks, once you get the hang of it you can really get cooking. They do have more detailed instructions available here.
So without further ado… here is how our Select Surfaces Flooring Turned out!
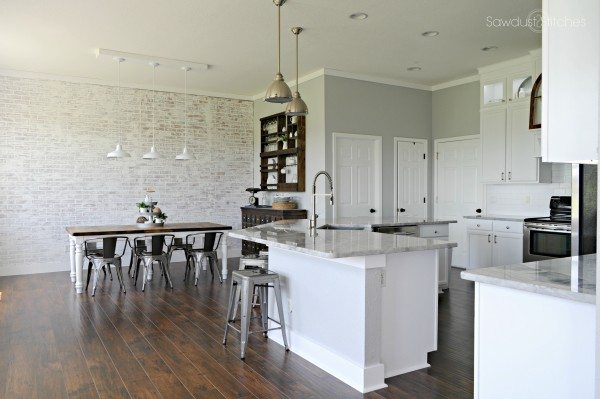
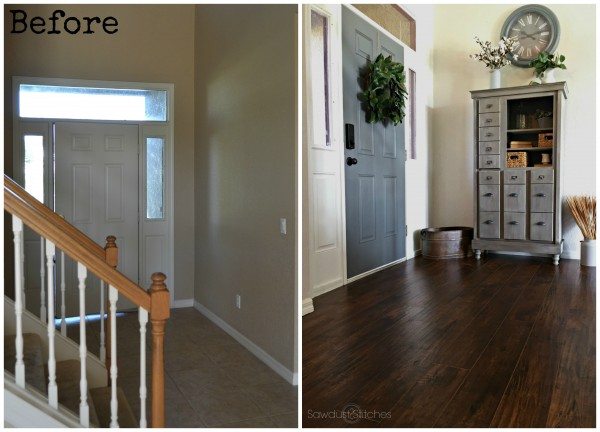
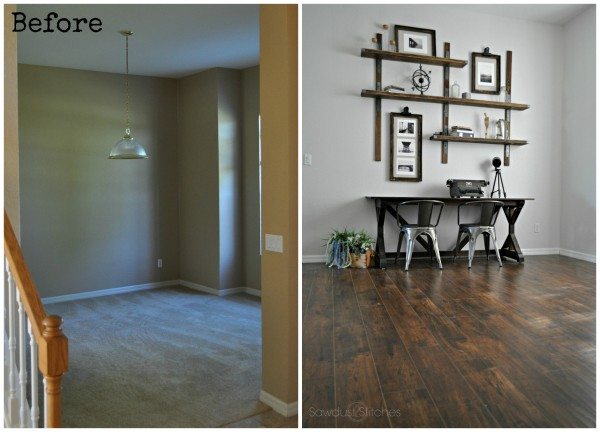


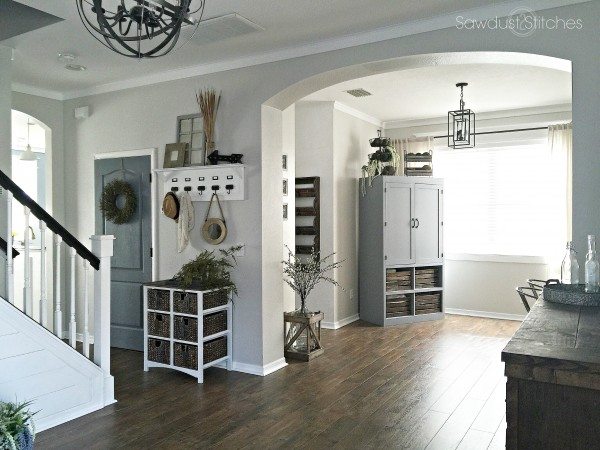
Every time we completed the flooring in a room, it amazed me how much flooring did for the space! The flooring alone, made the house look like a million bucks!
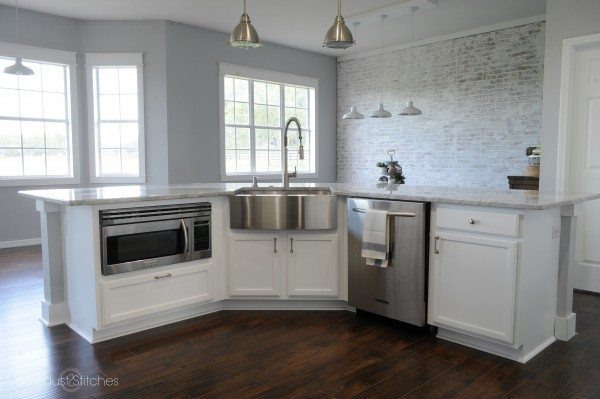
Once it was all in, I knew I had made the right choice. The “Cocoa Walnut” was exactly what this space needed! I have found that it lends itself to both warm and cool tones. So I can put nearly any paint color with it, and it looks fantastic!
So let’s wrap this up. First, the price point is awesome. Second, it comes in plenty of different colors. Third, it is user friendly, and easy to install. Fourth, this stuff HOLDS UP! Lastly , this stuff looks absolutely amazing!
A big thank you to “Select Surfaces” and the great opportunity to work with them again.
 Copyright secured by Digiprove © 2016


My jaw literally dropped when I saw the kitchen after. I am so jealous…errr…I mean happy for you! 😉 That was a great color choice and given we made a bad floor choice two years ago, I’m headed to their website to see what kind of trouble I can get into! Thanks so much for the review!
Just curious what is the price point? I can’t find any pricing on their site.
Price point is the best I have seen for the quality of the product! At my local Sam’s Club they are currently running a sale, and it is about $1.30 a sq ft. It may vary on location. Here is a link to the product :http://www.samsclub.com/sams/cocoa-walnut-laminate-flooring/prod9040473.ip
Holy moly! It doesn’t even look like laminate! Looks like wood flooring! Definitely great choice going with the dark! Goes great with your color scheme. I had no idea they sold flooring at SAMs club! I have one right down the street and will be checking it out! Thanks for info!
Did you remove the baseboards first? Leave the baseboards and add quarter-round? Or just butt up against the baseboards? It looks so fabulous!
You can do either way! If you want to remove baseboards lay the floor, and then put the baseboards back on. We left ours on and then added a shoe molding to the base boards to hide any gaps.
That looks AMAZING! Why cut down a tree when your floor can look this good? Beautiful job, guys!
Just gorgeous!
Any idea isf this is available in Canada?
I loved the barnwood in the last house but I’m loving the darker choice this time too!! So warm and inviting! Amazing transformation!
Absolutely stunning! Your kitchen is to die for, but every room is beautiful.
Thank you so much Jeannie!
Just YUMMY!! BTW – what is the wall covering (?) on the dining room wall? I really, really LIKE that!!
Thanks so much Linda! The wall is a faux brick paneling. Here is a link to the tutorial. http://sawdust2stitches.com/3937-2/
I’m in love with the cocoa’ I’ve been longing to redo our floors on our main floor. I knew I wanted dark floors but a friend told me that hers scratched and it was difficult to keep up with it. I have the same color walls that your new house has (Revere Pewter I’m guessing) so now that I see it, I want it! And the price is really good!
One question I do have, is when you were installing it, did you have to stagger the seams? I remember when we installed Pergo in our townhouse they recommended staggering the seams so that they didn’t line up for a weak spot.
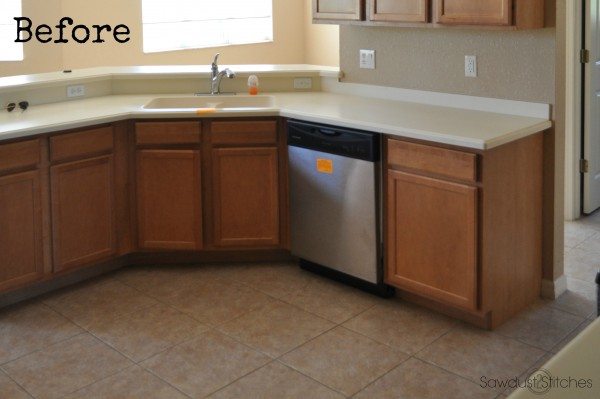
And the kitchen cabinets, did you paint them or buy new?
I have not had ANY issues with scratching. As with dark floors you do have to stay on top of cleaning them, because they do show dust. But that is any dark floor. The color variation in these planks do seem to hide some dirt though! We did stagger our seams, 1st, because it does help eliminate weak spots. (We have never had any issues with them separating.) 2nd, we prefer the look of staggered seams. The color on our walls is VERY close to Revere Pewter! It is Agreeable Gray by Sherwin Williams. 🙂 As for the cabinets, yes I did paint them.
I am Curious. I have laminate floors in my home and had the sound of them. It is like walking on plastic floors. they sound fake and very hollow. Does your flooring have the same issue?
I have been on a few floors before that did have that hollow sound. These ones do not. The foam backing definitely seems to eliminate that issue!
I have been wanting to replace the tile in our kitchen area. The tile goes wall to wall so the cabinets sit on top. Curious as to how you handled this in your kitchen. Did you remove the tile up to the cabinets and then use the shoe moulding to cover any variance? Love your floors by the way.
That is exactly what we did! We didn’t have any problem hiding it!
I have had laminate floors in both my kitchens in 2 different locations—I love it—and want to pull up the carpet in my dining room and lay it there—what stupid person would put carpeting in a dining room? glad you have loved it and it looks fantastic.
Carpet? Who does that!? Do it! Thanks so much for reading Cathy!
Beautiful! Are those laminate floors from a specific brand? Or can i find the same anywherelse?
I know there are a lot of different brands, and I shopped around. My biggest concern was scratch resistant and price! I went and gathered samples from lots of place and actively tried to scratch them with screws… Select Surfaces held up best and had the best price. Can’t beat that!
Wish this color was sold in my area, it’s beautiful.
WHAT color white did you use on your cabinets?
It is Ultra Pure White by Behr. Thanks for stopping by!
Curious to know how the floors have don in your kitchen or entry areas especially with water being more commonly n in those areas. Any tips?
Have had zero problems, and have experienced plenty of spills!