 |
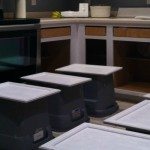
| Previous Owners Interior |
So I researched, and researched, and researched. I researched until I was so sick of it that I gave up and just got started.
This is what I learned.
This process is about 80% prep work.
Supply List:
Fine Sanding Disks
Foam Sanding Block
Wood Grain Filler (Optional)
Paintable caulk
Primer ( I used Zinsser 123)
Paint ( I used Behr Semi-Gloss)
Good paintbrush
High density 3-4″ roller
Paint Roller
Paint Tray
Rags
Drop Cloth
Prep: I began by taking off all the doors, ( I made sure to label where they all go), and also removed all hardware.
Sanding:
I started with the cabinet bases. I did the majority of the sanding with an electric sander using a “fine” grade sand paper. This is my strong suggestion… hook up a vacuum to the sander. I was able to get away with leaving the cabinet bases in place (instead of removing them), and my house was not covered in dust!

I sanded every inch of the cabinet base, EXCEPT the interior, I DID do the inside lip but not the actual interior.
When sanding you DO NOT need to take it down to natural wood, if you are painting you only need to rough up the surface enough to make it smooth and make sure it is NOT glossy.
Next… the doors. Ugh.
I took a sanding block and sanded all the crevices really well, basically any space that I would not be able to reach with the electric sander.
I used these awesome little foam sanding blocks! They are awesome.

After you have the crevices done, move on to the larger surface areas. I did both front and back! I know that there are some tutorials that don’t . That would drive me crazy.
After you are finished sanding…your arm may feel like it is permanently vibrating. Your hand may be deformed to a claw like state, but, you are done the with most tedious part!
Wipe down all your cabinet pieces well! Let dry….
(EXTRA STEP) I did this because I was afraid the wood grain would show through. I used this product I simply smeared this on the cabinet panels and used a putty knife to scrape it off. It then required another once over with the sander, and another wipe down.

It DID diminish the wood grain, but it was not eliminated. If I were to do this over I don’t know that it was worth the effort. I might do this on your top cabinets where they will have more lighting on them, and the grain may be more visible.
(ANOTHER EXTRA STEP) This was another personal preference. I remember cleaning the crevices on the lower cabinets and having all sorts of gross gunk in them. I knew I was painting these white and knew that there would inevitably be dirty. I took a small bead of caulk and filled the crevice so that when food did drip down the front of the cabinets it would not get stuck in the crack.
This extra step has been worth it to me, especially on the cabinets below the sink and the cabinets below where I typically stand when I cook.

Simply apply a very SMALL bead (line) of caulk, then wet your finger, and slide along the surface. It will smooth it out and you can remove the excess. Then allow to dry.
( I forgot to take pictures, of this step but the wonderful folks over at “Addicted 2 Decorating” had the same stroke of genius.
Now take a breather and get ready for the REAL fun!
Part 2 of Painting Cabinets HERE
 Copyright secured by Digiprove © 2015


This is so perfect! We are going to paint our cabinets soon, so now I can do it feeling confident that I am doing it right!! Thanks!!
I love your blog so far. My sister Laura has always raved about your skills. I'm glad I now get to take a peek at your work from far away. I will definitely be stealing a few ideas but I'll be starting with the belts!
Thanks Christy! I have heard a lot about you, your sister is a rock star. You will have to let me know how the belts turn out!