• Blog
  • About
  • Press
  • Privacy

Let’s be social!

  • Skip to primary navigation
  • Skip to main content
  • Skip to primary sidebar
  • Skip to footer
Sawdust 2 Stitches

Sawdust 2 Stitches

  • Tutorials
    • Around the House
    • Organization
    • Wall Decor
    • Sewing
  • Makeovers
    • R.V.
    • Room Makeover
    • Furniture Makeover
    • Decor Makeover
  • Build Plans
    • Small Builds
    • Wall Decor
    • Dresser
    • Tables
    • Seating
    • Shelving
    • Hidden Compartment
  • Seasonal
    • Summer
    • Spring
    • Fall
    • Winter
  • Home Tours
    • First Home
    • Current Home
    • 70’s Ranch Home
  • Workshop

Cabinet Makeover Part 2

April 15, 2013

 This is the “funner” part of the cabinet refinishing process. After all the tedious  prep work, here  comes the payoff!  You actually begin to  feel like you are making progress instead of making giant steps backwards. I started  with the cabinet bases (as opposed to the doors).

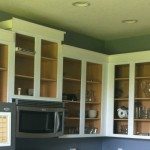
I went through and taped the interior lip, as well as where the cabinets meet the wall.

I used Zinsser Primer 1-2-3,  I first painted the cracks and edges with a good paint brush. Immediately after use the foam rollers on the large surface areas.  (I love these rollers, they are cheap and I have had great results, with no streaks! )

When  painting/priming you will want  to work in small sections.  For example,  don’t go through and do all your cracks, and joints, and then all your roller painting. Instead,  follow up with the roller  shortly  after you use the brush,  this will create a consistent finish.  Be warned primer does dry very quickly.

While your cabinet bases are drying,  you can start on your doors.  I had my doors set up in the garage, and the kitchen.  I set them on top of  bins so that they would be elevated and I would easily  be able to paint the edges.


  Now that all your surfaces are all primed,  wait until they are completely dried.  Then take  your foam sanding block and  do a quick sanding to all surfaces.  Then wipe down all surfaces completely.
 I did 2 coats of primer, ( I would prefer to do an extra coating of primer than an extra coat of paint.)
 

PAINTING TIME!

 I used …


Repeat the same steps from priming.  I did do 2 coats of paint as well,  make sure you sand inbetween coats.  You do not need to sand after final coat.

So this is your itinerary:

1. Primer
(Allow dry time,  if doing doors flip over and repeat)
2. Sand/Wipe Down
3. Primer
(Allow dry time,  if doing doors flip over and repeat)
4. Sand/Wipe Down
5. Paint
(Allow dry time,  if doing doors flip over and repeat)
6. Sand/Wipe Down
7. Paint
(Allow dry time,  if doing doors flip over and repeat )

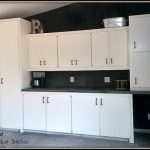
8. Stand Back and admire!


More from my site

  • Painting Cabinets Part 1Painting Cabinets Part 1
  • Modern Chair UpCycleModern Chair UpCycle
  • Spice CabinetSpice Cabinet
  • Workshop Table for X-Carve  (Using OLD cabinets!)Workshop Table for X-Carve (Using OLD cabinets!)
  • Concrete Wall and BacksplashConcrete Wall and Backsplash
  • Dresser Makeover into a Mini MudroomDresser Makeover into a Mini Mudroom

in Kitchen, Makovers, Tutorials, Uncategorized # Cabinets, Painting, Refinish

Reader Interactions

you may also like
DIY Pull Out Drawer Storage
DIY Drawer Dividers
Built-in Pantry Makeover
Lazy Susan Charcuterie Board

Comments

  1. Rachael says

    May 6, 2013 at 2:14 am

    I love your kitchen! This tutorial is amazing! We are going to do our kitchen cabinets/cupboards this month, so your timing is perfect for us! I have a few questions:

    If we are going to paint the kitchen walls and cabinets different colors, which would you recommend doing first? Or does it even matter?

    The paint has primer, but you still primed everything first. Is it really worth the extra time and money?

    What is the name of the shade of white that you used? There are so many to choose from, and yours looks so nice!

    Thanks! You are the best!!!

  2. The Deckers says

    May 8, 2013 at 2:29 pm

    Rachael,
    I am so excited for your new little adventure. I decided it was worth the extra time and money to prime and paint. I figured we were saving a lot of money refinishing, instead of replacing. So I took all extra precautions, I didn't want to have to re-do this EVER!
    I used Ultra Pure White by Behr in a semi-gloss finish.
    As for painting order… I would definitely start with walls. It will be easier to touch up walls than cabinets if you have any oops spots.

    I hope this helps! Make sure you take before and after pictures!

  3. The Llewellyn's says

    May 29, 2013 at 10:06 pm

    Love love love this, now to get my hubby on board! Also, what color did you do your kitchen walls, it looks so nice and i really need to repaint!

  4. The Deckers says

    May 30, 2013 at 3:11 am

    I have tried so many different shades of grey/blue, and this is my “hands down” favorite! It is “diving dolphin grey” and it is actually a Walmart brand paint! It's by Color Place.
    Do it, you'll be glad you did!
    Corey

Primary Sidebar

  • Facebook
  • Instagram
  • Pinterest
  • Twitter
  • YouTube
IMG_9167 (1).jpg fd

Popular Projects

  • How to: Faux Brick Wall
  • Cheap White Curtains
  • Ikea Cubbies into a Rustic Apothecary
  • Cabinet Transformed Into A Kitchen Island
  • Workshop Assembly Table
  • The BEST Beach Blanket ever!
DIY & Design

Meet Corey

Hi everyone, my name is Corey, and I have a problem. I can’t leave well enough alone… The best therapy usually involves a variety of power tools. So, in the few “spare” moments I am not entertaining my two beautiful, rambunctious, boys, I can typically be found hunched over a sewing machine and/or covered in sawdust. All in the efforts to create a perfect balance of aesthetics and practicality in our home.
read more

Join our mailing list!

DIY & design ideas - right in your inbox!

Top Hits!

  • How to: Faux Brick Wall
  • Cheap White Curtains
  • Ikea Cubbies into a Rustic Apothecary

Featured

DIY Pull Out Drawer Storage

Categories

  • 70's Ranch Home
  • Around the House
  • Build Plans
  • Crafts
  • Current Home
  • Decor Makeovers
  • Dresser
  • Exterior
  • Fall
  • First Home
  • Furniture Makeover
  • Hidden Compartment
  • Kitchen
  • Lighting
  • Makovers
  • Master Closet
  • Organization
  • R.V.
  • Room Makeovers
  • Seasonal
  • Seating
  • Sewing
  • Shelving
  • Small Builds
  • Smart Home
  • Spring
  • Summer
  • Tables
  • Tablescape
  • Tutorials
  • Uncategorized
  • Wall Art
  • Wall Decor
  • Winter
  • Workshop

Footer

Contact Me: Corey@Sawdust2Stitches.com

Latest ‘Grams

I’m on a kitchen organizing kick, and these pull I’m on a kitchen organizing kick, and these pull-out drawer are easier than ever to make using the new (extremely intuitive/user-friendly @kregjig 720 PRO.
I have a full tutorial on the site today.#linkinbio #sponsored
Photo Credit: @ashleynavarrophotography
My organizing heart could just burst!! I’m still My organizing heart could just burst!! I’m still organizing the kitchen, but so far I have fit all the contents from the existing pantry AND freed up an entire lower and upper cabinet that contained pantry items.  #winning
Would you believe me if I told you that where this Would you believe me if I told you that where this beautiful custom-built pantry sits, used to be a small builder grade closet? Talk about untapped potential!? While the closet/pantry served its purpose, the space was not well utilized and was altogether unremarkable. With the help of The Home Depot this pantry is not only extremely functional it is a gorgeous feature in my kitchen. 
Sometimes we might look past or forget the untapped potential and resources. 
For example, did you know The Home Depot has a TON of resources to help you with your projects?  Did you know that you can do image search in their mobile app? Yup! Just take a picture of the needed item scan it on your app and find the product in a flash! In fact you  can add it right to your cart and have it ready to be picked up at available stores or lockers!
#THDDoerProject #HomeDepotPartner @homedepot
Have big plans? (Swipe to see the before.) I deci Have big plans? 
(Swipe to see the before.)
I decided that our little closet/pantry needed a little bit of help. I have big plans for a huge custom build, but first some walls needed to come down! 
A project of this size means a hefty supply run. Normally, I need my husband to make a trip to 
The Home Depot to help me load ¾” plywood. Not anymore! Did you know that many Home 
Depot stores offer curbside pickup? That means I can order my BIG (and small) orders online 
or in their app and have my order pulled, and ready for a curbside pickup. 
#THDDoerProject #HomeDepotPartner @homedepot
Happy Holidays to all my DIY loving friends! I’ Happy Holidays to all my DIY loving friends! 
I’m going to put down the tools so I can hang with my crew. 
Merry Christmas from our family to yours! I look forward to sharing so many great projects in 2021, stay tuned! @ashleynavarrophotography
LAST MINUTE DIY GIFT IDEA!!! This Holiday Season m LAST MINUTE DIY GIFT IDEA!!!
This Holiday Season might be a little different from those we’ve seen in the in past. With many folks looking to keep costs and stress low, they are turning to a more sentimental approach to holiday gifting. 
 Handmade gifts are a great way to personalize gift giving this year. I made this serving tray/lazy susan for a friend and I know she will love it! If you want more easy-to-make, handmade gift ideas The Home Depot has many other great tutorials.

@homedepot #HomeDepotPartner #THDxHoliday #THDxDIYWorkshops
Follow on Instagram
2020 © Your Blog Name
theme by soleilflare
Enter your name and email and get the weekly newsletter... it's FREE!
Your information will *never* be shared or sold to a 3rd party.