Hey sports fans. I am VERY excited to introduce you to a new member of the Sawdust 2 Stitches team! April is an amazing blogger and talented diy’er, and lucky for us, you will be seeing more of here around here!

WELCOME April, and take it away….
Hi, I’m April from Uncookie Cutter. I am so excited to be contributing here at Sawdust 2 Stitches. Corey has been an idol of mine for awhile, so getting to work with her is a treat. I’m here to share my modern dining chair upcycle.
A little about me…In January of this year, my husband and I packed up our two kids and three dogs and moved from Virginia to small town Oklahoma. I told my Realtor I wanted a new house in a new neighborhood. As it turned out, we couldn’t find one that we really feel in love with–there always seemed to be something missing. Then, on a whim, our Realtor showed us what she described as a very “UncookieCutter” house and after a million inspections and with a bit of fear, we decided to go for it. We loved the layout, the huge yard and the fact that we could all bike right down the road to the elementary school. However, it needed a lot of work, so I started UncookieCutter to document our journey here trying to make this house a home.
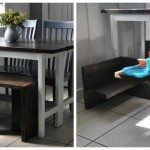
For the past couple of months I’ve been working in the dining room. I upcycled an old piece of wood into a hanging shelf and then built my concrete top table, inspired by Restoration Hardware. Everything was going so well until I realized how expensive dining chairs were. I have never bought a traditional dining set, we’ve been eating off of a cheap 4 person set for years. We could never have people over for dinner, because we had nowhere to sit. The size of our dining room won’t allow for much more than a 8 person table, so that’s what I built. I needed six side chairs. I wanted them to not have fabric (remember the kids and dogs I mentioned?) and I wanted them to look a little modern, funky and fit with a table with a concrete top. So I searched and found THESE chairs, which I thought were beautiful.

However, these chairs cost $168 a piece. That would’ve cost me over $1,000 plus the cost of the end chairs. I floated this by my husband, who just laughed. Rude. Anyway, I had to come up with another idea.
So I honestly thought about making chairs, but a good chair has a slight backwards lean to it and unfortunately I don’t have the saw to make cuts like that. So, I needed to find some old chairs with solid bases and, low and behold, after a LOT of searching, I found some! I couldn’t believe it, but a library was closing in a nearby, even smaller, town and I grabbed one to bring home and see what I could do with it. I turned it into a chair that was similar to the one I wanted, but actually fit in the space better and cost about $20 per chair, making it $120 for six. Score!

The fabric was in pretty bad shape, but the frame seemed strong, so I got to work ripping the fabric off.

Once I had all the fabric off and removed all the zillion or so staples, I sanded the whole frame down and filled the staple holes with stain-able and sand-able wood filler. Then more sanding until they were all smooth.
Next, I had to make the seat for the chair. I took some craft paper and made a rough template a little bigger than I wanted it.

I cut one board template with my circular saw and used that template to cut out the rest, but left a little extra to allow for slight changes from chair to chair.


Like I said, I cut the boards too big on purpose, but worked with my jigsaw until they fit right into the back of the chair, then I traced each board so that I could cut the seat to match up to the frame exactly.

I bought some very pretty “craft board” in the lumber section, but I think any plywood would work. This was made from real wood and I love the grain it shows. Now I had to figure out how to make the top piece for the chair back. Most chairs have a curved back to make them a little more comfortable. Like I mentioned before, I don’t have too many fancy power tools, but I still wanted to bend the back a little bit. My father in law was visiting as I was trying to figure it out, and he told me about a presentation he once saw where they soaked the boards in water and then bent them, so I decided to give that a shot.
I cut the pieces down to size and then put them in a pan of water. 
Yes, I realized I should not leave my jig in water, I moved it and replaced it with a flower pot, but forgot to take a picture of that :). I left it soaking in the water for a day or more. Then I took it out and “molded” it to the top of the chairs with clamps. 
Once I got it just so, I let it sit out in the sun until it was completely dry.

I learned a couple of things trying to “bend” wood. First, it has to be soaked all the way through or it will crack. This will take at least a day for this size board. Next, you have to let it dry in the mold completely or it will loose it’s shape when you take it off to stain. And lastly, if you look at the pic above, I should have tried to make the grain of the board run horizontal instead of vertical. I did it this way because I wanted to use every piece of the board, and it worked, but I did crack a couple and I think they would not have cracked had I gone the other way with it.
Once it was nice and dry I went ahead and popped it off to be painted.
Now that the chairs were stripped, filled and sanded and both of the seats and backboards were cut out and “molded” I was ready to paint. I wanted the chair part to look like metal, and I’ve always been impressed with Rustoleum Metallic spray paints, but since I had six chairs and a small budget, I decided to stain them with some leftover stain and then spray paint them. So I started by staining them with Minwax Ebony.

Then I spray painted them all with Rustoleum Flat Iron. I then put a couple of coats of spray poly on.
Next, I painted the seats and backs with one light coat of Minwax Special walnut to start

When the stain was all dry, I mixed a small mixture of leftover white trim paint with water (about 50/50 mix) and used a paper towel to lightly rub it over and blend it in. Then 3 coats of polyurethane.
It worked better to finish the back of the backboard piece and leave the front unfinished for now. Then I re-clamped it onto the chair, and then countersunk some screws into the board and attached it to the chair.

I waited to finish it so that I could sand down the holes without messing up the stain. Once it was attached, I went ahead and finished the front side.

The last thing I did before bringing them in was I glued the seats to the chairs.

Once they were inside, I added these feet. I tried a couple of different furniture feet and these were the only ones that slid nicely, didn’t fall off and didn’t scratch my floors.

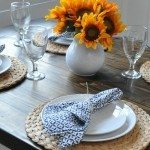
Now they really were done! I got them all set up with my table, which you can see all the details on that HERE.

So, instead of spending over a grand, I spent about $120 on boards, stain and spray paint to upcycle these old chairs.

That was it! And they are actually pretty comfortable. I’d love for you to visit me over on UncookieCutter or follow me on social media. A big, huge thank you to Corey for asking me to guest host and I’ll be back soon for some more!
April – Uncookie Cutter
 Copyright secured by Digiprove © 2015


Fabulous!
Thank you Kathy!
They look great! I like your version better than the inspiration chair. Good job!
Thanks so much Denise!
Great job on these chairs! Unique vision for a really pitiful chair. The outcome is great! (Loved the bending wood tip too!)
Thanks so much Trudi!
I think you did a great job reproducing your inspiration chair. My only objection is that having the boards so high might not make the most comfortable sitting in them. How are they to sit in?
Hi Leah! I actually had the exact same worry. I made one and made a ton of people sit in it for their opinion and it was actually very comfortable. Even my six year old likes it (surprisingly)! I did like that is sat above the table line, so I went with it. Thanks for asking!
Those turned out awesome!
Thanks Rose!
I love those chairs! Gorgeous.
Thank you Heather!
You are so talented! I love seeing everything you make April. Those chairs are gorgeous. The whole dining room looks awesome!!!
Thank you so much Kim!
Yours are waaay more attractive than the inspiration chair! I can’t imagine paying $168 for that!
Thank you so much Kim!
April, I’m so happy for you! Congrats on joining the Sawdust 2 Stitches team! You go girl. Your chairs turned out amazing! I LOVE LOVE the look of them. You did an awesome job. I love your transformations! You can tackle some big jobs. Great work girl!
Thank you Sara! I’m pretty stoked about this :).
These chairs are amazing! I love the new look and how you made the seat and back have a weathered look to them. I totally want to do something like this for my dining chairs.
Thank you Katie! They’ve been done a couple of weeks now and we love them so far!
Fantastic job, April! These are amazing. Beautiful wood grain, great colors, nice fitting, all around good work. I love it when a DIY comes out looking better than its inspiration! Well done.
How nice to read! Thank you so much!
Oh my word…I LOVE your chair. It is better than the inspiration chair. You did a fabulous job!
Thanks, that is so nice!!
These turned out amazing! Your dining room is beautiful!
Thank you Emily!!
The before and after of this is amazing! I love your dining room!
Thanks so much Emily!
Your hard work paid off, thEse are fabulous! Bending wood is tricky and I have never tried it. Kudos to you!
Thank you!
Goodness what an amazing transformation! Beautiful end product.
Thanks Megan!
This is a great post, thank you for sharing how to do this! I have so many chairs that need love!
Thanks Ashleigh!
Oh April, they are just gorgeous! Fantastic job and I love all the things you are learning and passing on to the rest of us. Truly, a GREAT post and project.
Thank you so much!!
Thanks Allison!
These chairs are gorgeous! I’ve seen these exact chairs and swooned over them but, like you, couldn’t justify the price tag when I need 6. I may need to find some old chairs and make my own. Thanks for the GREAT tutorial!
Thank you Sydney! It wasn’t so bad, once I got the million staples out ;).
I love this idea. I never thought of stripping down a Parsons chair. I’ve been on the lookout for the perfect chairs to redo for our farmhouse table. This opens up so many more options. Thanks!
So glad it helped! Thanks for reading!
These chairs look great. Bravo to you for not going out and spending a fortune. They look great and they also look very sturdy. They match your dining room table (which I looooove) and so you have a win-win here.
Thank you Mary! I should’ve thought about chair options before I built the table, that was a hard thing to match!
Wow, what an awesome transformation! Pinned, tweeted, and shared. Thanks for sharing at Merry Monday, hope to see you again next week!
Thank you Chelc!
Oh Wow what a big difference! They turned out great, and they go perfectly with your table. You did a wonderful job!
Thank you so much!
What an awesome upcycle! I see those chairs all the time while junkin! Love the transformation! Thank you so much for sharing this pin on the P3 party Board! I love it and it will be featured on the blog and my social media Friday! So look for a little traffic from me!
Best,
Kim
Thank you so much Kim!!
Just saying…. I like your chair better than the inspiration chair! Holy Talented! Well done! I hope you have a great day!
Smiles!
Terry
P.S.
I’d love it if you would share this at my Making Broken Beautiful Party if you have time to stop in and inspire! :0)
That is so sweet, thank you Terry!
So happy you joined in the fun tonight! You do such nice work! Thank you for sharing at Making Broken Beautiful this week!
Smiles!
Terry
Thanks Terry!
These chairs are awesome! The trick for bending the wood is simply genius! And the best part is that you ended up paying 120 instead of 1,000!!
Hugs,
Pili
Thank you so much Pili!
What a great upcycle!! Thanks so much for sharing with us at the Bewitchin’ Block Party; I’ll be featuring you this week! I hope you can stop by and visit again!!
Thank you so much for featuring Sydney!!
Thanks for linking up to Pin Worthy Wednesday, I have pinned your post to the Pin Worthy Wednesday Pinterest Board.
Thanks!
Thank you for sharing these AMAZING chairs with us at Friday’s Furniture Fix! We loved them so much we’d like to highlight them tonight at 9PM EST. We hope you’ll join us again really soon!… Carrie http://www.thirtyeighthstreet.com/2015/11/fridays-furniture-fix-link-party-no-15.html
Thank you again so much Carrie, It’s always an honored to be featured with you guys!