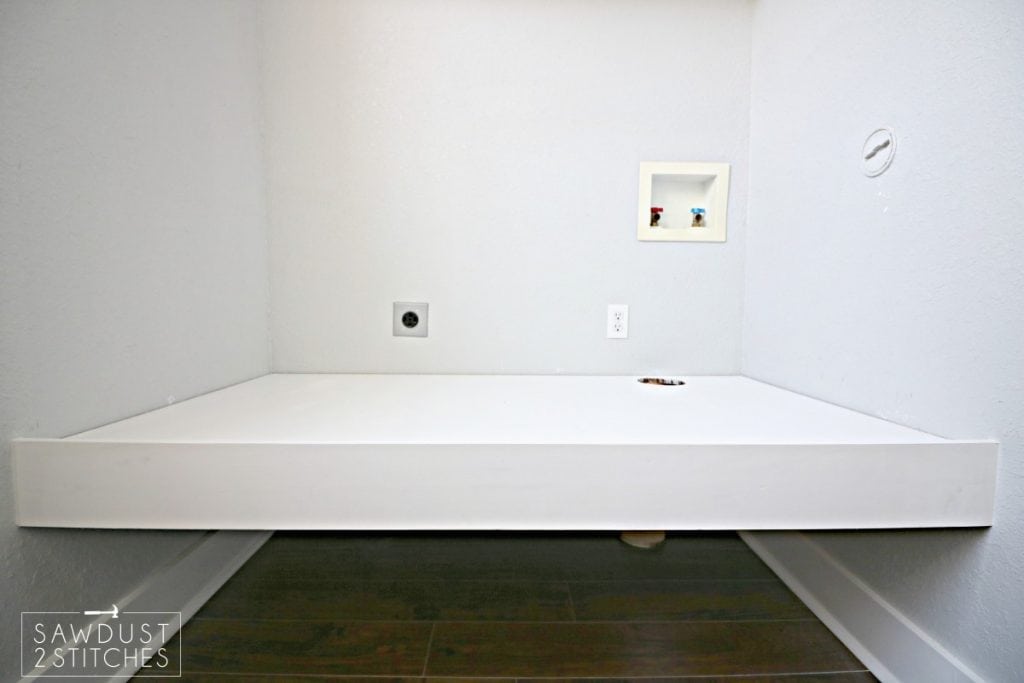
Every once in awhile I will get on Pinterest and browse for ideas. It’s not very often, on this given day I hopped on and looked up “laundry room”. I am not going to lie all the images of Laundry Rooms that had a bigger footprint than my living room made me drool a little bit, and I DON’T EVEN LIKE LAUNDRY!?! I had gotten it into my head that “maybe if my laundry room was a little easier on the eyes I wouldn’t mind it so much. In addition lack of storage space, or even the space to turn around without tripping on oneself would be a big step towards that goal. So, I dreamed up a way that I could maximize my tiny space without compromising aesthetics. I basically only had a big enough footprint to walk in and have the washer and dryer. So I really needed to maximize that small space where the washer and dryer would sit. I would use all the space above it, and even BELOW them! That’s right. I found a great way to store my laundry baskets and have over head storage by building a built in laundry platform and overhead shelving. Bonus: It even looks amazing!
 A big thanks and shout out to this posts sponsor DAP. It is because of excellent partnerships like these that I am able to continue to provide more content at no cost to my readers.
Tools Suggested:
- Miter Saw
- Table Saw
- 18 gauge Nailer
- Drill
- Level
- DAP Plastic Wood
- DAP ALEX Plus Molding Caulk
- Paint of Your Choice
Supplies Used:
- 2×4’s
- 1×6″ Primed Finger Board (Or Premium Pine)
- 3/4″ Plywood
- 2″ 18 Gauge Nails
- 4″ screws
- Foam Sanding Block
- Damp Cloth
- Caulk Gun

Build Platform Frame:
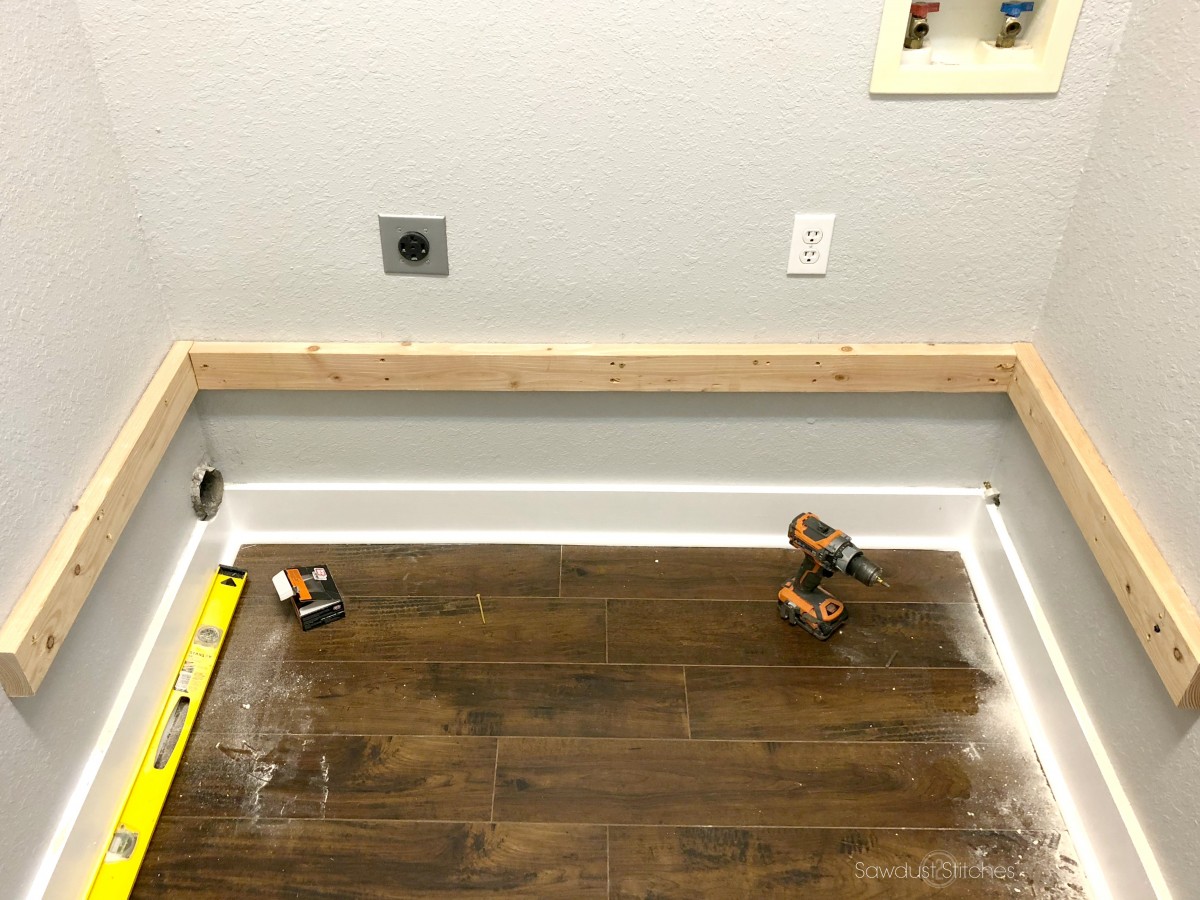
A WORD OF CAUTION: Now, I don’t want to intimidate you, this is actually a fairly simple project, but you do need to be careful. I cannot stress enough, that you need to know exactly where your studs are! Laundry rooms by nature have plumbing and electrical. All of that plumbing and electrical has to live somewhere. Spoiler alert; they are all located in the walls running next to those studs we are trying to locate. Now imagine if we accidentally put a screw though a water line? It could potentially be a fairly big pain in the *ss. So in order to avoid that situation, I STRESS, know where your studs are. You can do this by using a stud finder, lots of homes codes require they be positioned 16″ apart, but sometimes if the wall isn’t divisible by 16″ it can be a little less reliable. I just urge you to take the time to locate the studs and then clearly mark them with a pencil.
Begin by determining the height of your pedestal. I made mine 16″ tall. I based that measurement off of our laundry baskets. The goal was to be able to easily slide all my laundry baskets under my pedestals. I began by using a a level and drawing a line at the predetermined height. I then continued that line on the two adjoining walls. Believe me, having a washer and dryer agitating on the top of a sloped platform does not sound ideal.
The first board I added was the back support. I used standard 2×4’s for the framing process. I measure the width of the back wall and cut my first board. ( You can build the entire platform and install the entire platform. I did not do this BECAUSE my walls are not all square. I wanted a perfect fit so I cut all my boards to fit in place.) Next I secured the board to the wall. I used (x2) 4″ screws and drilled through the 2×4 into each pre-marked stud location. If this makes you a little ansy, feel free to extend the length of your screw or if you want to go bunker mode use lag screws. ( I have zero complaints using my method, but if you aren’t use to building and framing homes this might seem a little light duty.)
Next we attach the side supports using the same method.
Next I measured from the front of my side support to the other to get the front measurement. (Cut x2 of these.) Once cut go ahead and attach it to the front ends of the side supports.
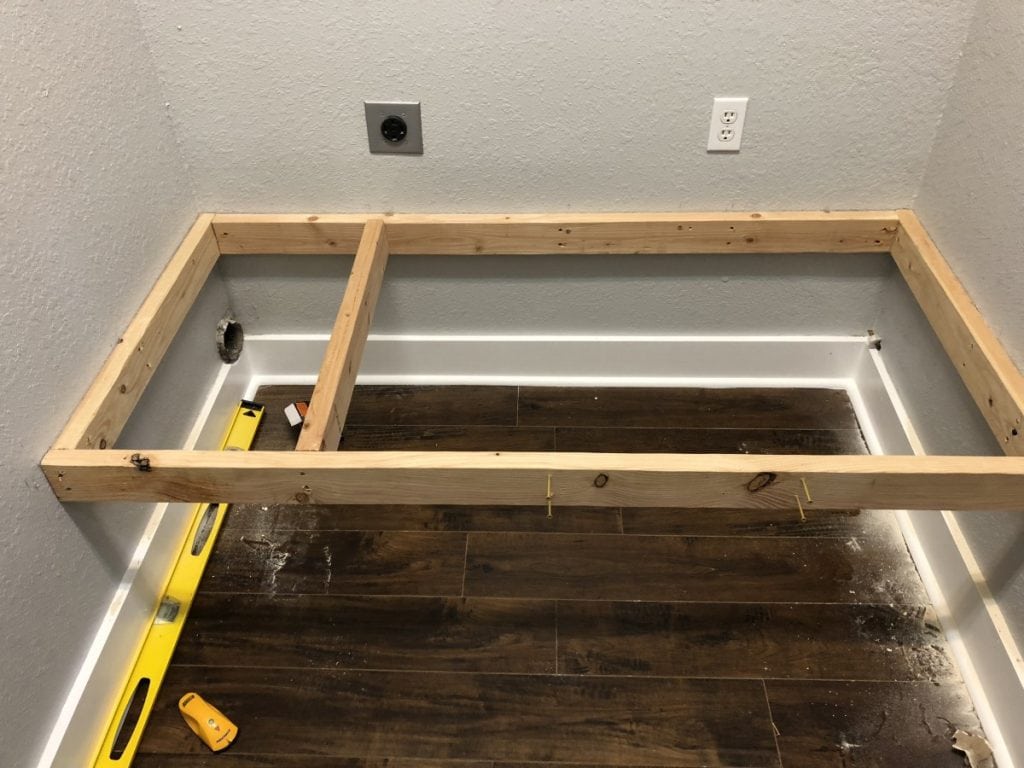 Once the front support is in place, I added my platform supports. To get this dimension, I just measure my interior platform dimension. The spacing of these supports will vary dependent on the overall width of your space. I would suggest not going more that 14″ apart though. Once you know your spacing measurement. Mark the measurements on both your front and back support. To attach the front board simply drive through the front support into the platform/middle support. I again used (x2) 4″ screws in each location. Now to attach the back. You have two options, you can use a Pocket Hole Jig or you can use the rough construction method and “toenail it”. Seeing as this would not be visible, I took the quick and dirty approach. You simply drive a screw through the top of your middle/platform support, at an angle towards your back support. The trick is to drive through a decent amount of each board. Repeat this again on the bottom of the board driving up towards the back support. Repeat this for every support.
 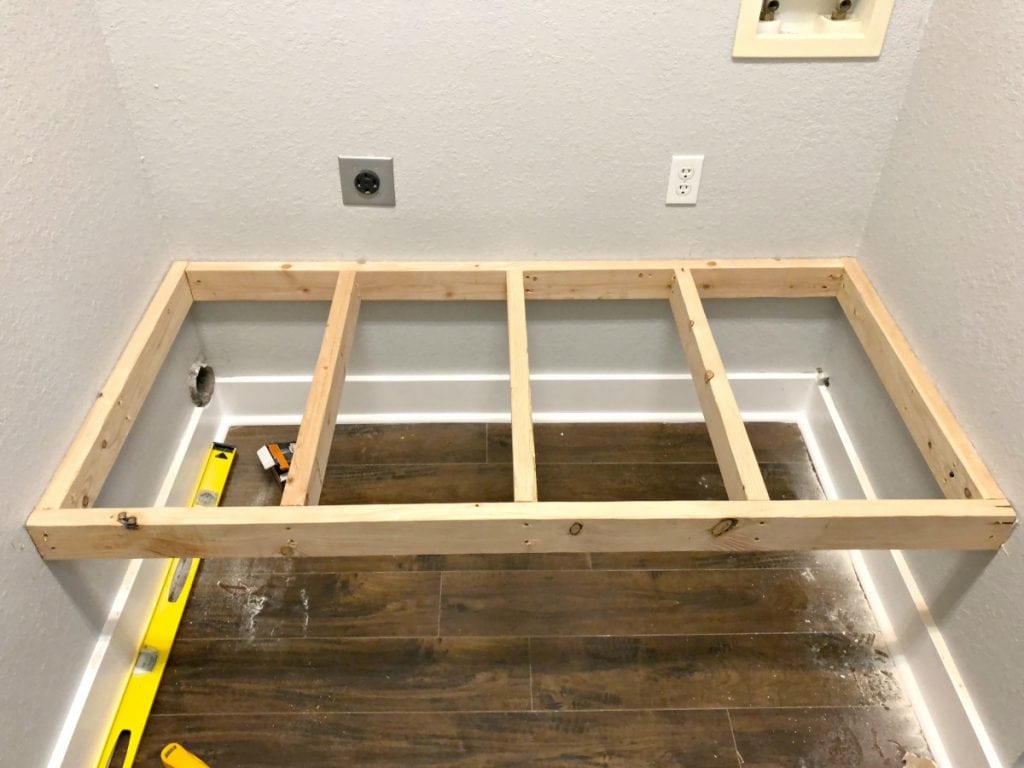 Not pictured but HIGHLY suggested. After the platform is built I went through and added a second 2×4 to the front support. Nothing special, just literally used another 2×4 with the exact dimensions and attached it directly to the front of the front support. This will just be a safeguard in the event one of them ever gave out.
Add Platform:
Next it was time for the platform. I used a nice 3/4″ plywood for my platform. I measured the dimensions of my already built platform and transferred those dimensions to my plywood, and then cut using a table saw. Now, this next part will vary based on the placement of your washer and dryer hookups. Based on the logistics of our washer and dryer I needed to cut out a hole that would accommodate our dryer ventilation.
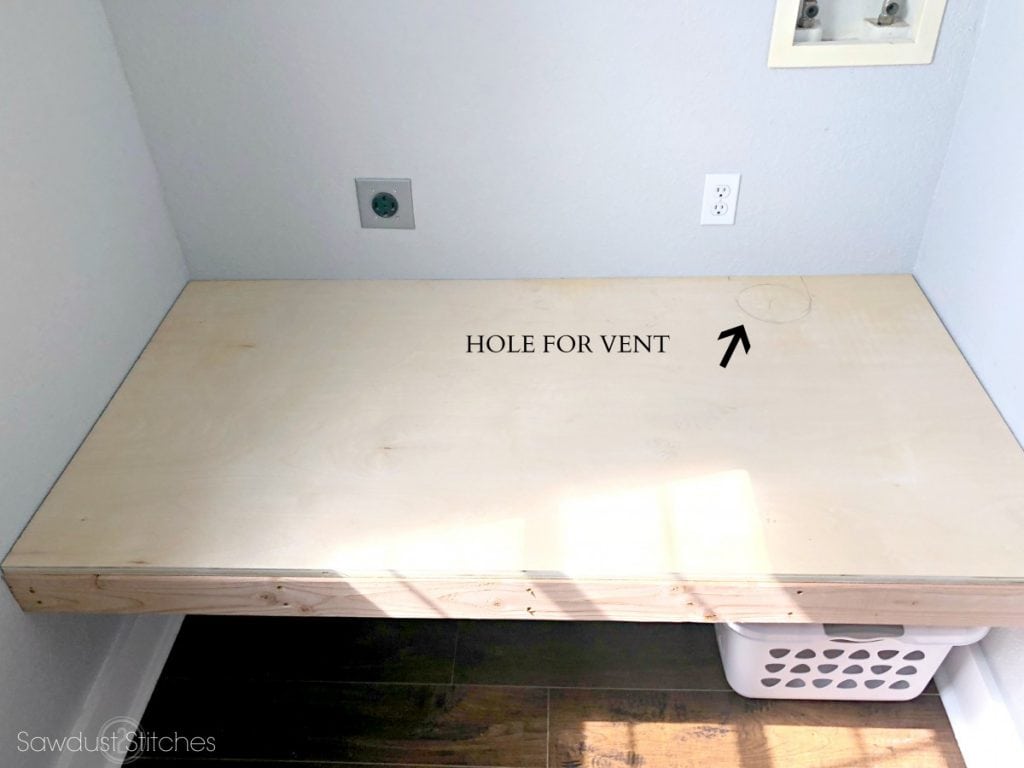 It was a quick process, when I cut holes I use a 1/2″ drill bit and give myself a starter hole. Then I use that hole as a starting point for using a jigsaw to cut out the circle. (Make sure you are aware of the placement of your 2×4 supports that are running under the platform. It won’t do you any good have the hole with a 2×4 in the way.
 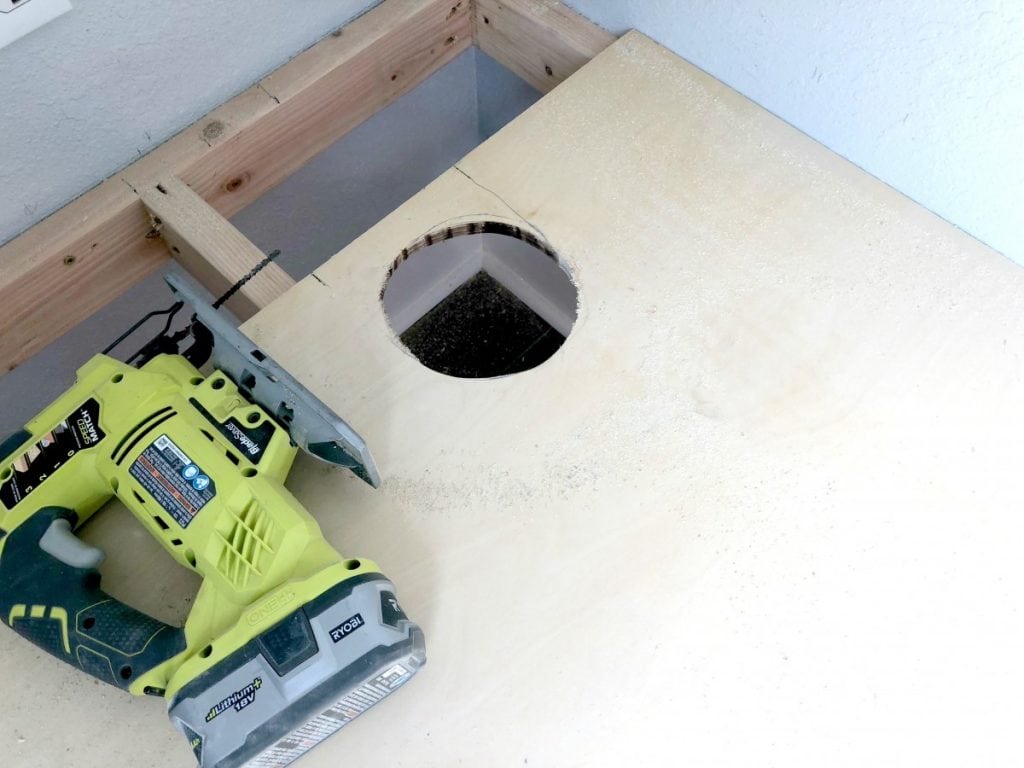 Last step, slide your plywood back into place and using screws secure it to the platform. This will just prevent the plywood from vibrating when the appliances are in use.
Make It Pretty!:
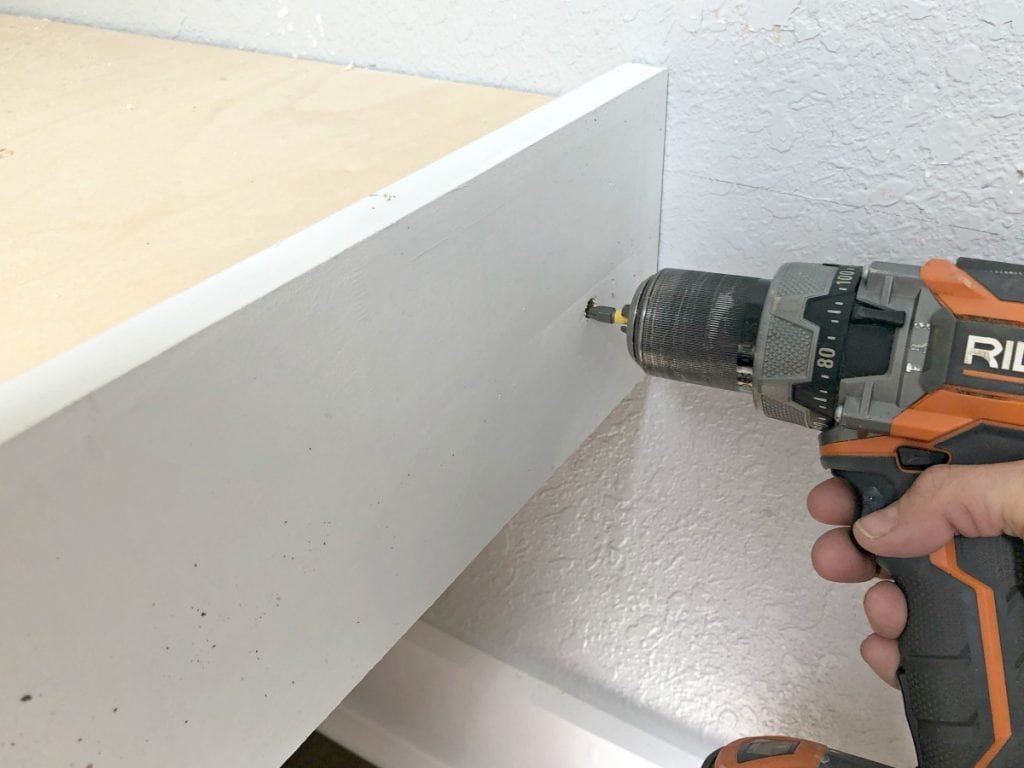
Next up ? Make it pretty! I wanted to make my platform look very polished and a little more beefy. So I added a 1×6 board to the face of my platform. I left mine with a small lip on the top. My husband assures me that it’s not necessary, but in my mind I feel like this tiny lip could potentially prevent a washer from vibrating right off. Still debatable who is correct, but I did it, and I don’t regret it. To add the board measure the width of the from of your platform, cut your board and screw it to it!
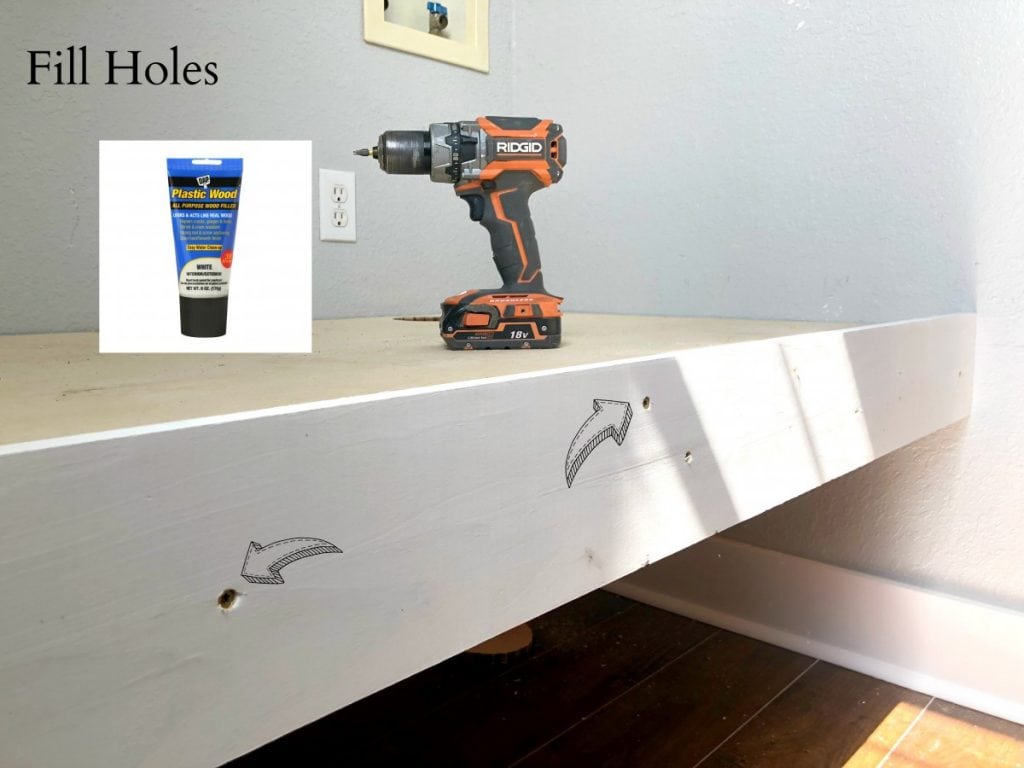
 Now we are to the fun part, making it look pretty! Next I went through and filled all the visible screw holes using DAP Plastic Wood. It is easy to apply. Once dried I used a small sanding sponge to remove any excess filler. It creates a smooth flawless surface!
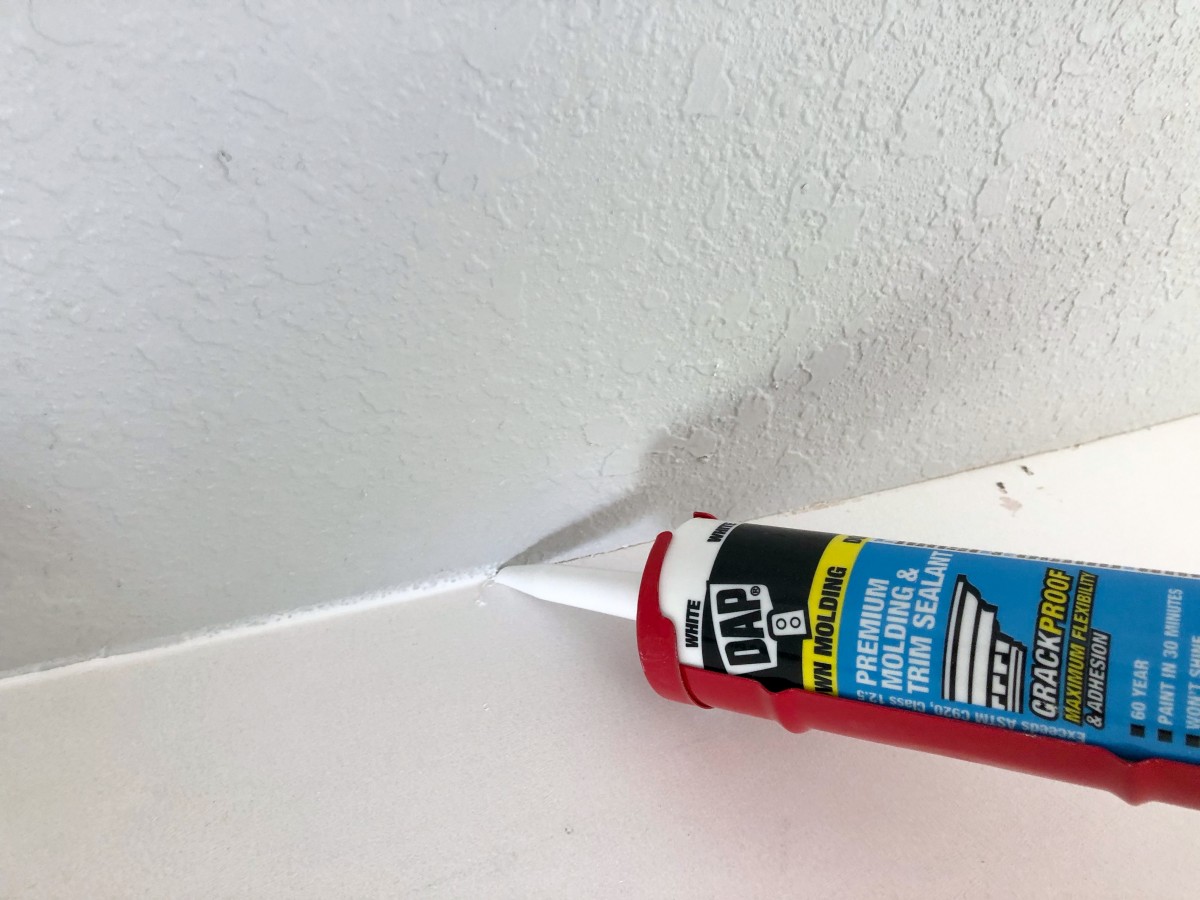
 Once all the holes are filled we can move on to filling any unseemly , seams… see what I did there? I used DAP ALex caulk to fill all the seams where my platform and met the walls. This will blend any discrepancies and make it look like a flawless built. If you have never used caulk before you are in for a real treat. This is like a magic eraser for trim work. I always start with a very small cut on the tip. Again, you can always make the cut bigger if you need to.
If you have never used caulk before I would suggest doing a couple of practice rounds. I like to set the tip of the tube on the board and glide it along leaving a small consistent bead of caulk along the trim. After a lot of practice I can normally leave it as is. HOWEVER, I have found that dipping my finger in water and gently sliding it along the bead smooths it out nicely!
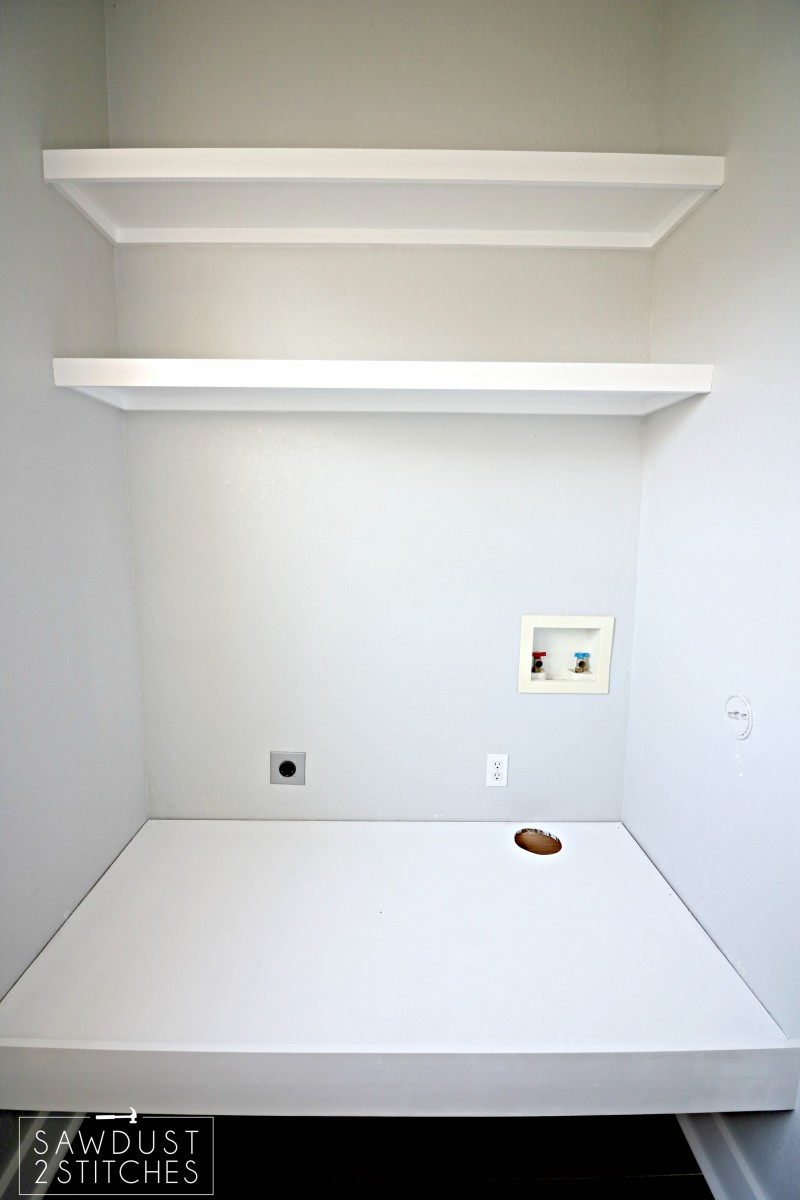
 Once it is all caulked you are ready to go! DAP Alex Caulk is paint-able within 30 mins. So, by the time you have you paint out and prepped you will be good to go! I wanted my platform to match my Open Shelves and my newly installed Upgraded Baseboards, so I painted my platform Ultra Pure White by Behr.
Isn’t she a beauty!? I have all the base work done, now comes the fun part! I get to put all the finishing touches on the laundry room. Make sure you check back for the reveal of this tiny Laundry Room Makeover later this week!
Take Luck,
Corey

 Copyright secured by Digiprove © 2018


Super nice. I love it. Such an incredible idea!
Looks amazing! Dying to try this in our tiny laundry room. What kind of laundry baskets did you find to go underneath??
Just standard ones from Walmart!
I am a little concerned about the lack of extra support under the platform. Once filled with a full load of clothes and water, the washer will be very heavy. I would be tempted to make at least, some sort of leg under the middle of platform that incompases a 2×4 that runs across the floor, front to back, and of course up the back and front to help defray the weight. I realize that it might interfere with laundry basket size.
BY all means, do what you are comfortable with! I definitely doubled up my 2×4 framing in the front. (not pictured but explained in text) I have used this method in two homes now without a problem. But I would not suggest this approach if you aren’t confident in your building abilities. I had my husband triple check all my anchor points to make sure it was attached properly.
Looks great! I like the warning bit about the studs haha!