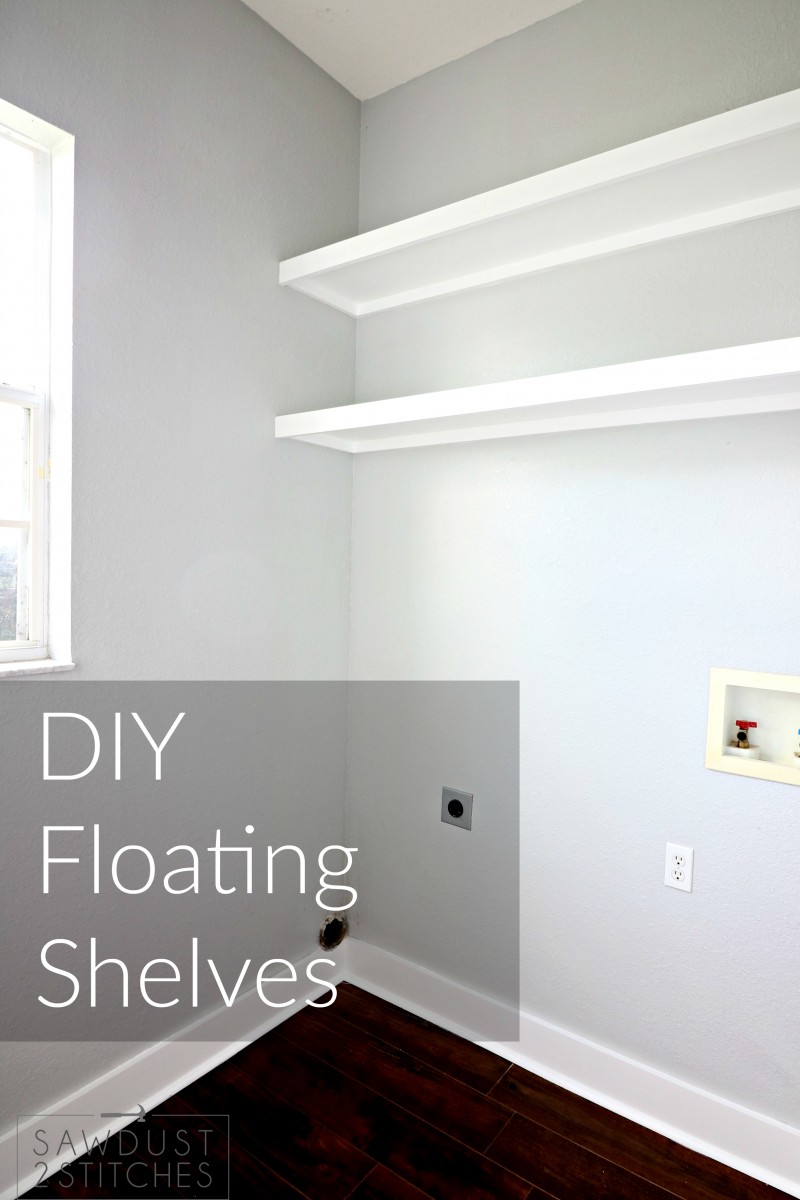
The first project I tackled when we moved into our current home was the kitchen. ( You can see that here.) During the kitchen remodel I started painting all the kitchen cabinets white. As the project evolved I realized that I didn’t necessarily want to use all of said cabinets. Instead, I didn’t even bother finish painting them and stuck them in the garage… fast forward 6 months, and I was getting super annoyed with the lack of storage in the laundry room. So I thought ” maybe those old cabinets would work?” Yeah… It worked alright. I thought that maybe I would try and make them purposefully look different heights, and then I would add shelving in-between? Maybe? Well, I think with an exhaustive amount of hours I could have made it look a little less embarrassing. But, then the whole epidemic of DIY Open Shelving, hit. I love the look but always thought it was really impractical in the kitchen. (*Gasp!* Yeah, I said it!) Well impractical in the kitchen, yes… but in the laundry room? I think I can make it work! 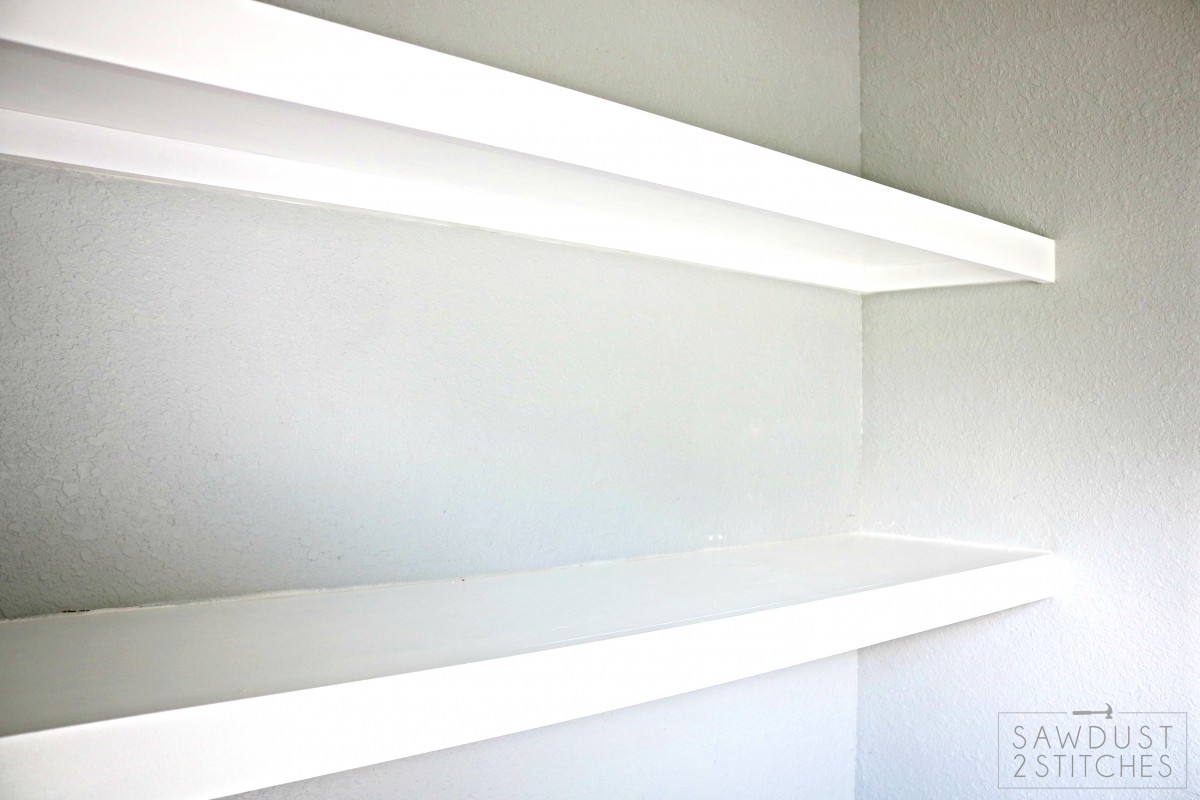
So today I have teamed up with my friends over at DAP to bring you a basic walk through of the process. Beginner to built-ins? NO WORRIES! That is where DAP products come into play. It is like an eraser for the little mistakes due either to A.) user error. Or B.) Contractor Error. (In every home I have ever lived in there are always weird discrepancies, and walls that aren’t square. This makes it really tricky to trim out a room. But with miracle workers like caulk, and wood filler you can easily fake it until you make it!

Tools Suggested:
- Miter Saw
- Table Saw
- 18 gauge Nailer
- Drill
- 1/8″ Drill Bit
- Countersink Bit
- Level
- DAP Plastic Wood
- DAP ALEX Plus Molding Caulk
- Paint of Your Choice
Supplies Used:
- 1×3″ Primed Finger Board (Or Premium Pine)
- 1×2″ Primed Finger Board (Or Premium Pine)
- 3/4″ Plywood
- 2″ 18 Gauge Nails
- Foam Sanding Block
- Damp Cloth
- Caulk Gun
Remove Old Cabinets:
See, I never even finished painting the doors! I was not at all sad to remove these. It was a very liberating 15 mins. Yes, it should only take a few minutes to uninstall. I would suggest having some help you because it is a little tricky to unscrew them from the wall and also catch them.
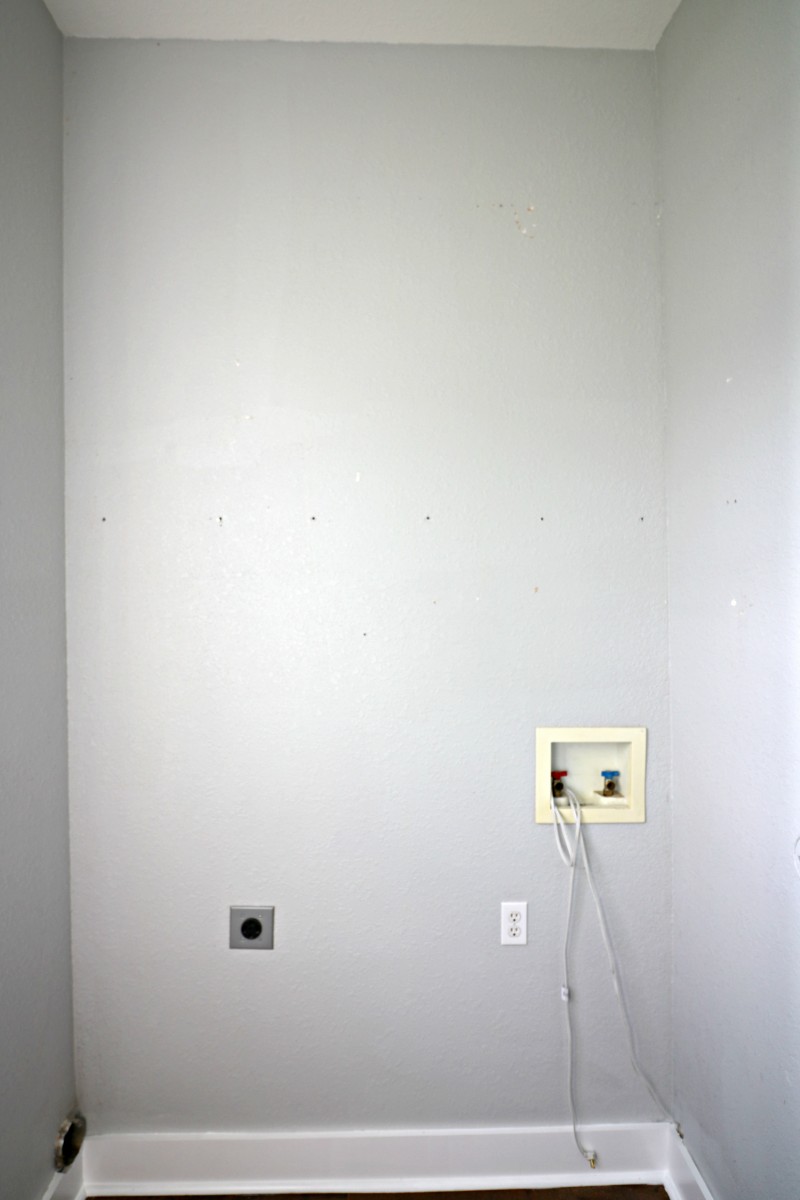
Fill Old Holes:
After you remove your cabinets you will have large holes that might be a little unseemly. These are an easy fix. I like to use Alex Plus Spackling. It comes in a convenient tube, dries quickly, sand-able, does not shrink. #winning Before you go to crazy I would strongly suggest using a pencil of a piece of tape to indicate where the whole were/are. Why? Odds are those are where your studs are located. You will want to know where they are for the installation process.

Install Supports:
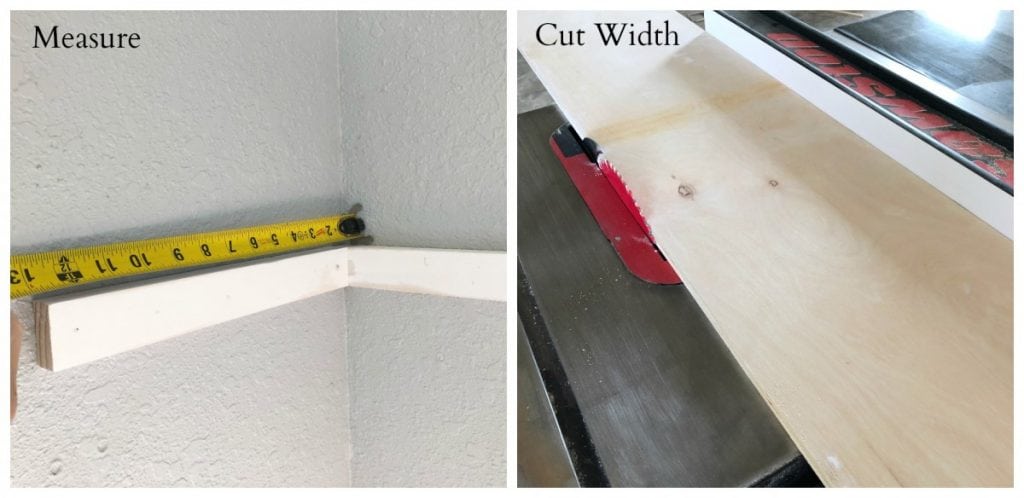
For the supports I used a 1×2″ primed pin board. (You can purchase them pre-primed from The Home Depot and I LOVE it! To get this dimension simply measure from one wall to the other. This will be your back support.
When I am starting the install process I like to begin by tacking my boards in place with a brad nailer. This will not be a strong, permanent hold, but it will hold it in place long enough to ensure that it is level, and allows me to properly install it. In order to ensure it’s stability make sure you are securing the 1×2″ board into studs. (Remember how I said to take note where your studs are located ? This is why.) To secure it to the wall, I begin by marking the screw placement (directly over a stud), then I used a counter sink bit, next I pre-drilled using an 1/8″ drill bit. THEN I used a 3″ screw to attach the board to the wall/stud.
 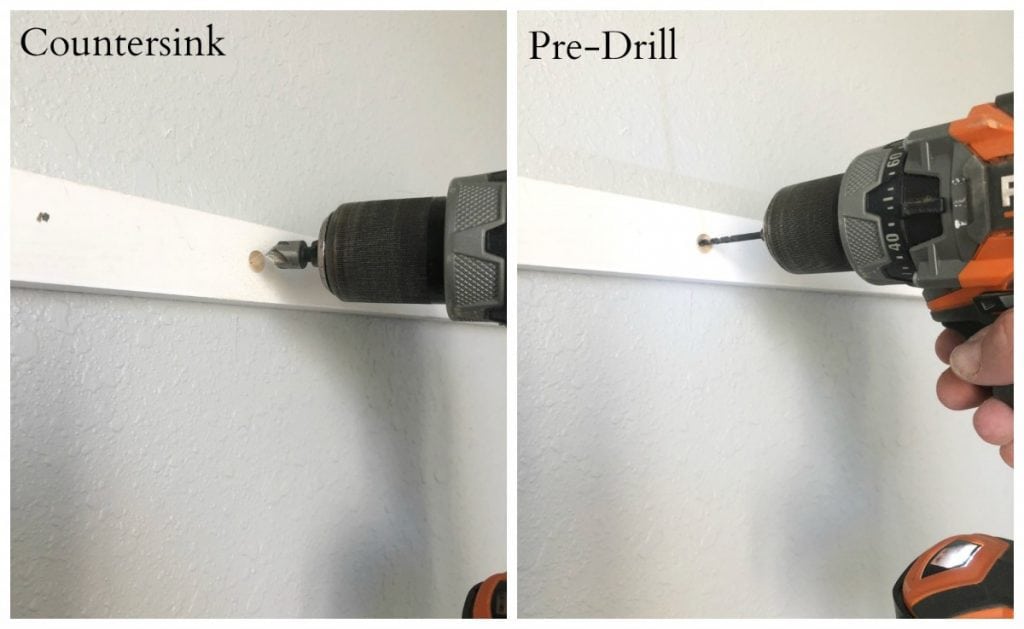 The reason I like to use a countersink bit when attaching built-ins, is because it is easier to conceal. It creates a nice smooth hole to fill. To fill the hole I used DAP Plastic Wood. It goes on smooth and is sand-able.
  Once the filler is completely dry, I knock it down with a sander until is perfectly smooth.
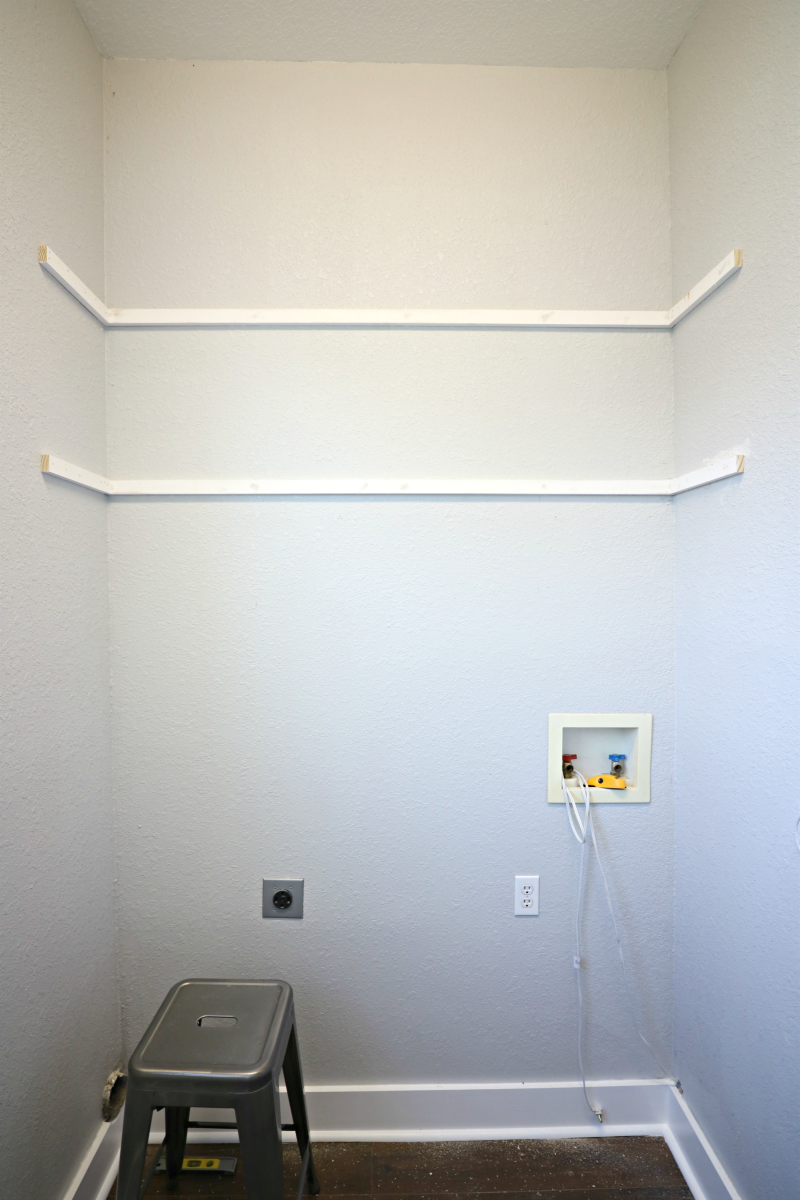
  Then repeat! You will complete these steps for both the back support and both side supports. (Cut the sides supports based on the desired width of your shelf. (Keep in mind the dimension of the back support. You need to factor in an additional 3/4″ for your overall depth.) Once you have your desired measurement, cut the side supports and install the same way we did the back support. Always double check that you are sitting level.
I was creating two different floating shelves, so once my side and back supports were installed, it was looking like this:
Install Shelves:
Next up, shelving! I used a 3/4″ birch plywood as my shelving. I measured from the back wall to the front corner of the side supports. Use this measurement to cut your boards for the shelving. (Then of course measure the length and cut that as well.
 I tend to hate painting built-ins so I painted my shelving boards before I installed them. Typically I will need to follow up with some touch up paint, but that is a fairly painless process. Once they are dry I laid them so they are resting on the previously installed supports. I then measure the outer edge. (It is not uncommon to have not perfectlly square room, so I tend to make every cut to fit, when it comes to built-ins.)
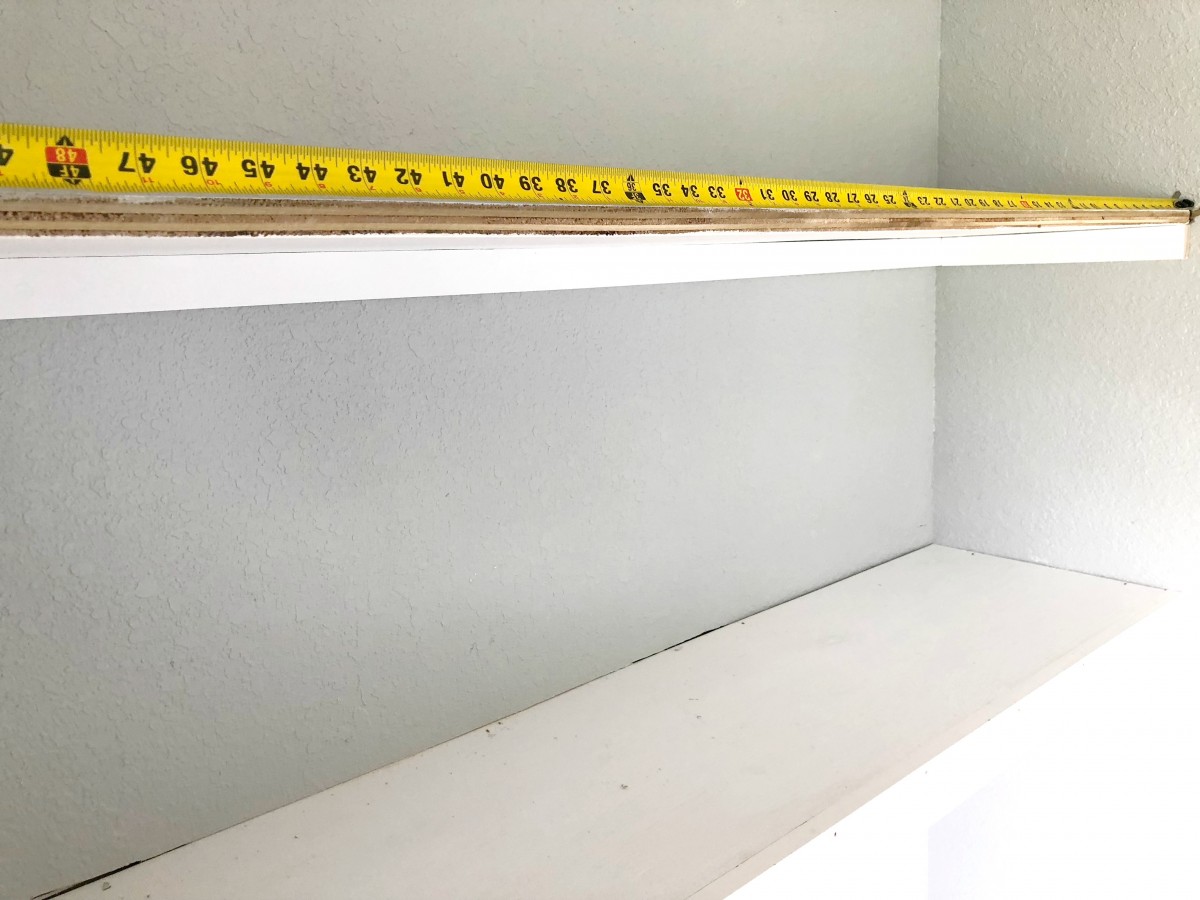
I used a 1x 3″ primed pine board as the face/front support of my shelves. The reason for this board is to first, give stability to the shelf, and also create the appearance of a thicker, more substantial shelf. I attach the face of mine using DAP wood glue, and then reinforce with 2″ brad nails. 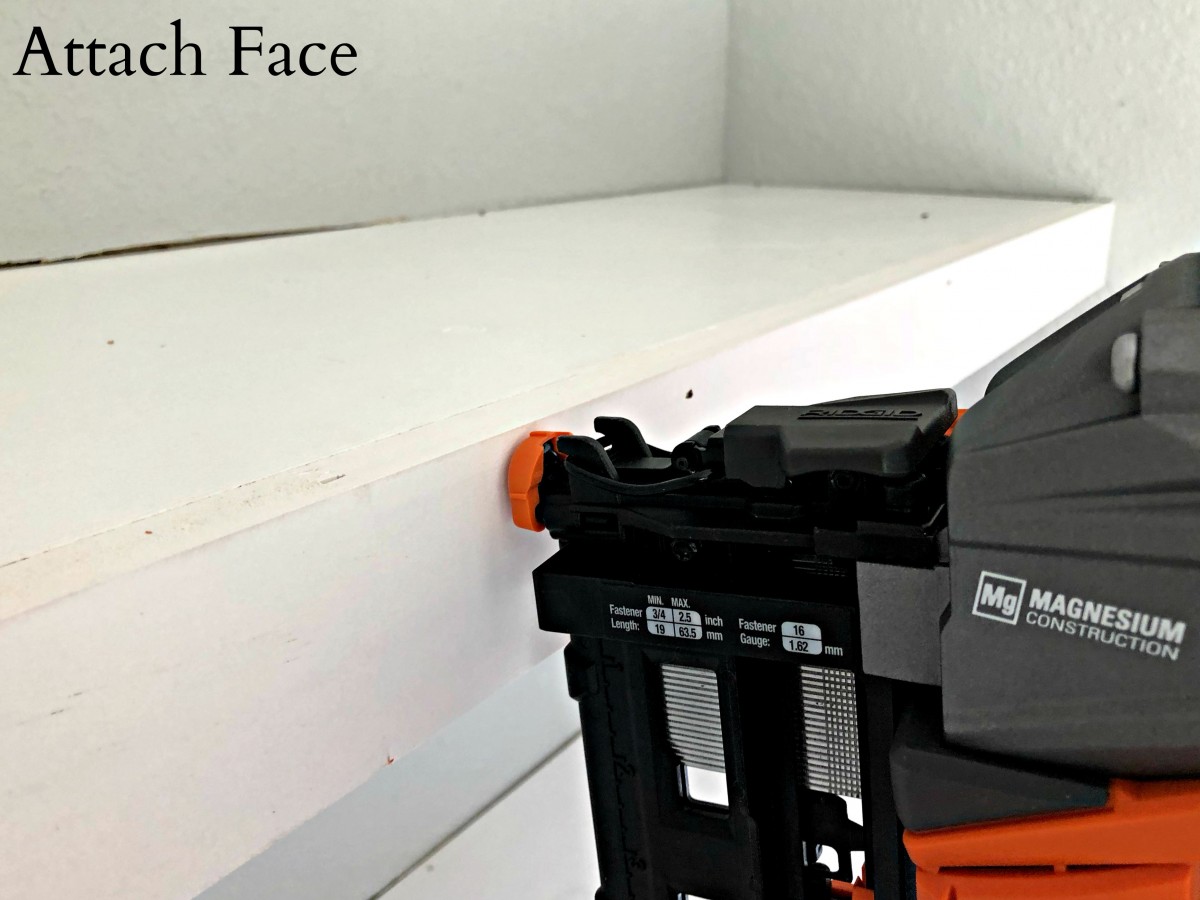
Once the face/front support is attached I went through and filled the holes left from the brad nails. (Make sure you sand off any excess, and then wipe down.) At this point, the shelf is fairly sturdy, but as an added precaution, I used the brad nailer to secure the shelf to the supports below it. (Simply drive a nail through the top of the shelf into the supports along the the perimeter below it.)
PLEASE KEEP IN MIND: These shelves can hold a decent amount of weight, but they are not meant to be used as a ladder, or a jungle gym, or a diving board… you get the idea. 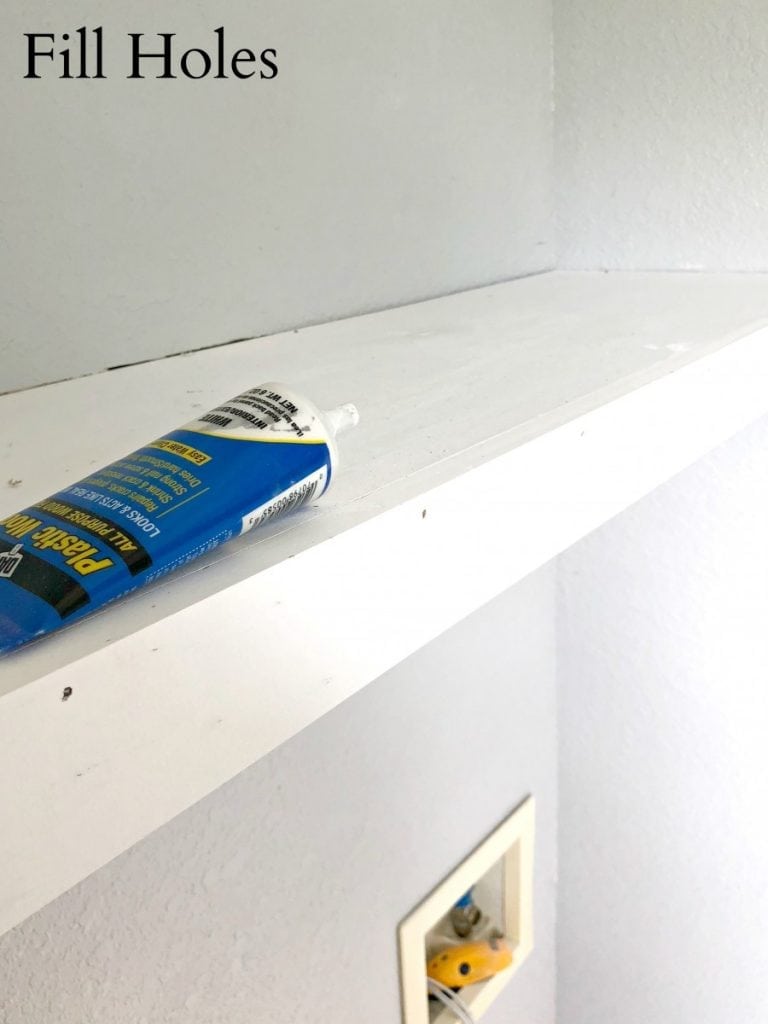
Install Shelves:
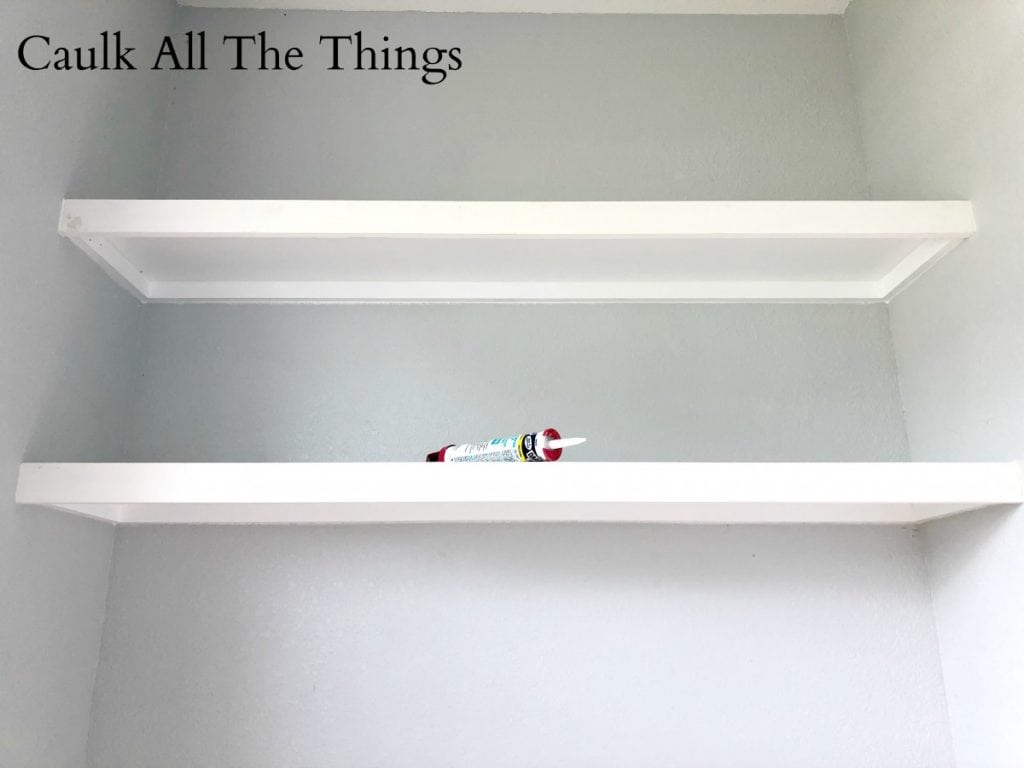
We are in the home stretch! Now it’s time to hide any and all discrepancies, we are ready for the magic-maker. If you have never used caulk before you are in for a real treat. This is like a magic eraser for trim work. I always start with a very small cut on the tip. Again, you can always make the cut bigger if you need to .
If you have never used caulk before I would suggest doing a couple of practice rounds. I like to set the tip of the tube on the board and glide it along leaving a small consistent bead of caulk along the trim. After a lot of practice I can normally leave it as is. HOWEVER, I have found that dipping my finger in water and gently sliding it along the bead smooths it out nicely!
In order to get that flawless built-in appearance, I caulk under the shelves where the shelf meets the supports. 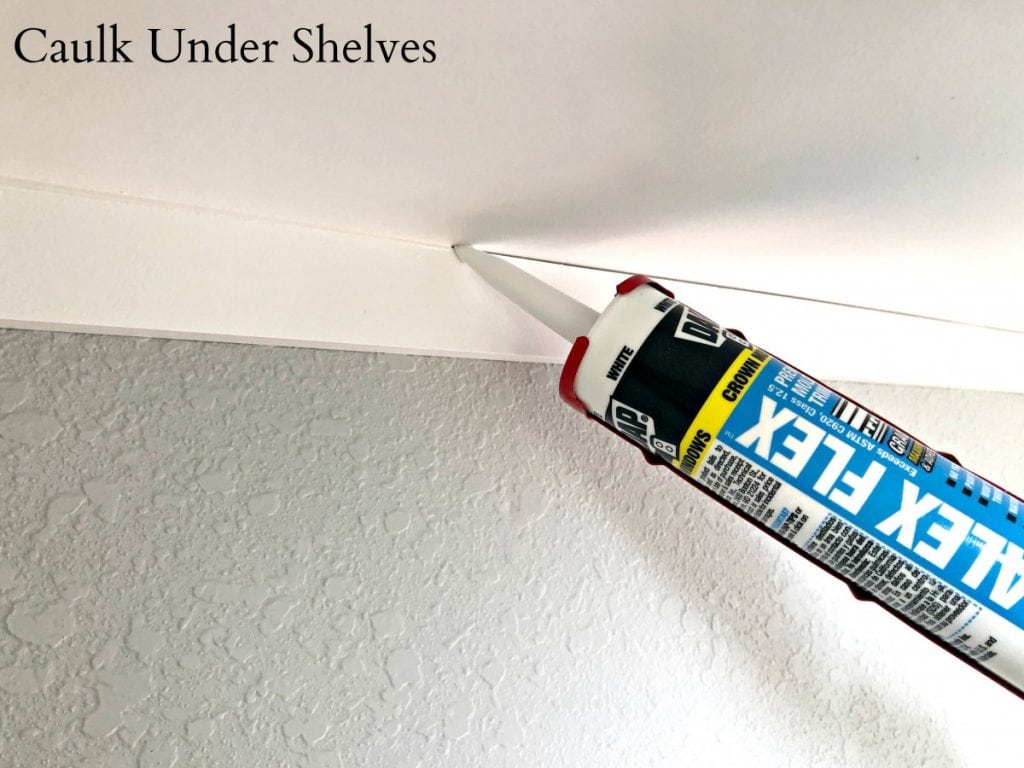 I also like to caulk the seam where the top of the shelf meets the wall. In this case it isn’t absolutely necessary because of how high my shelves are placed, but as a rule of thumb it is always a good idea.
 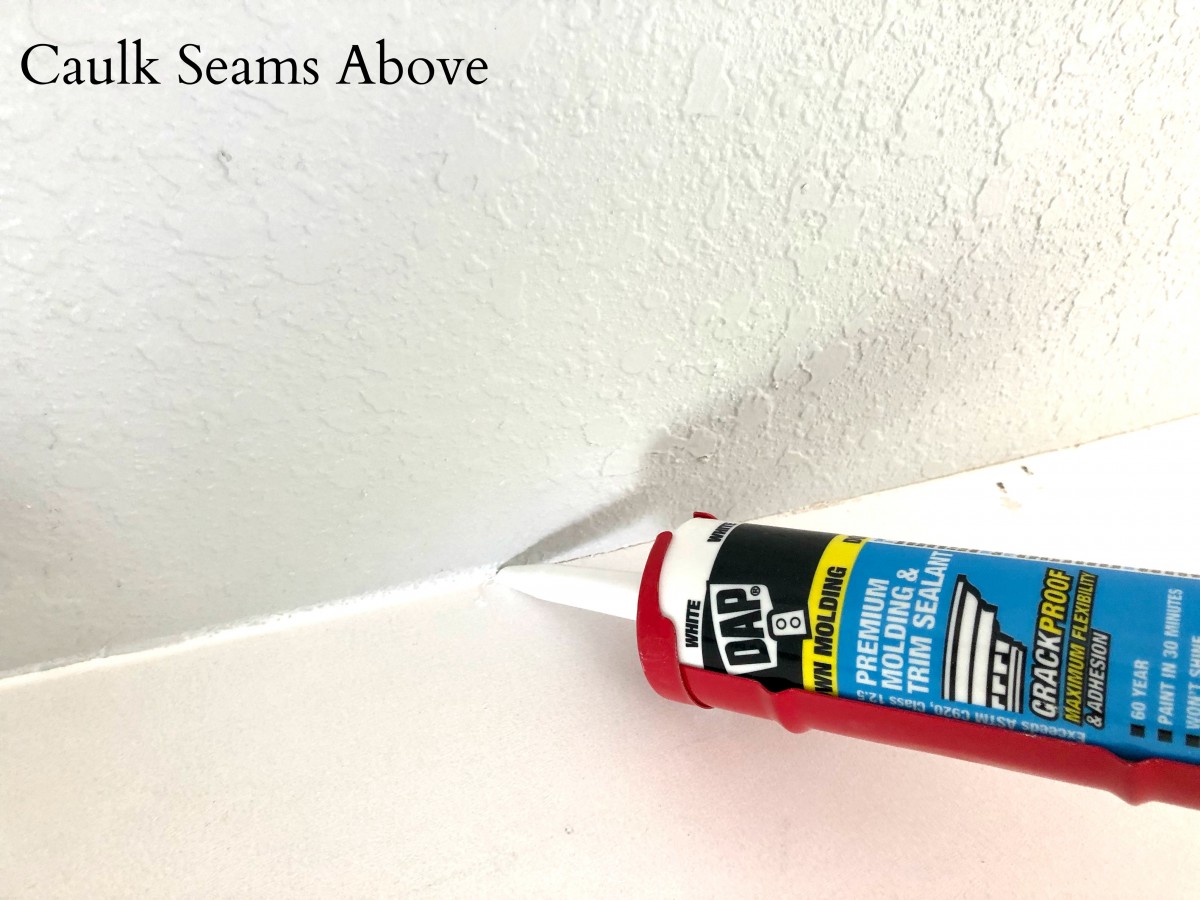 Once it is all caulked you are ready to go! DAP Alex Caulk is paint-able within 30 mins. So, by the time you have you paint out and prepped you will be good to go! (As I said earlier, I make sure as many components are painted as possible before install. I much prefer just touch up paint once the install is complete.)
 Well there you have it, in an afternoon you can take a truly boring space and turn it into a beautiful feature! Just make sure you stay tuned as I wrap up this Laundry Room Makeover, I am working on some adorable decor to be displayed on this DIY Open Shelving!
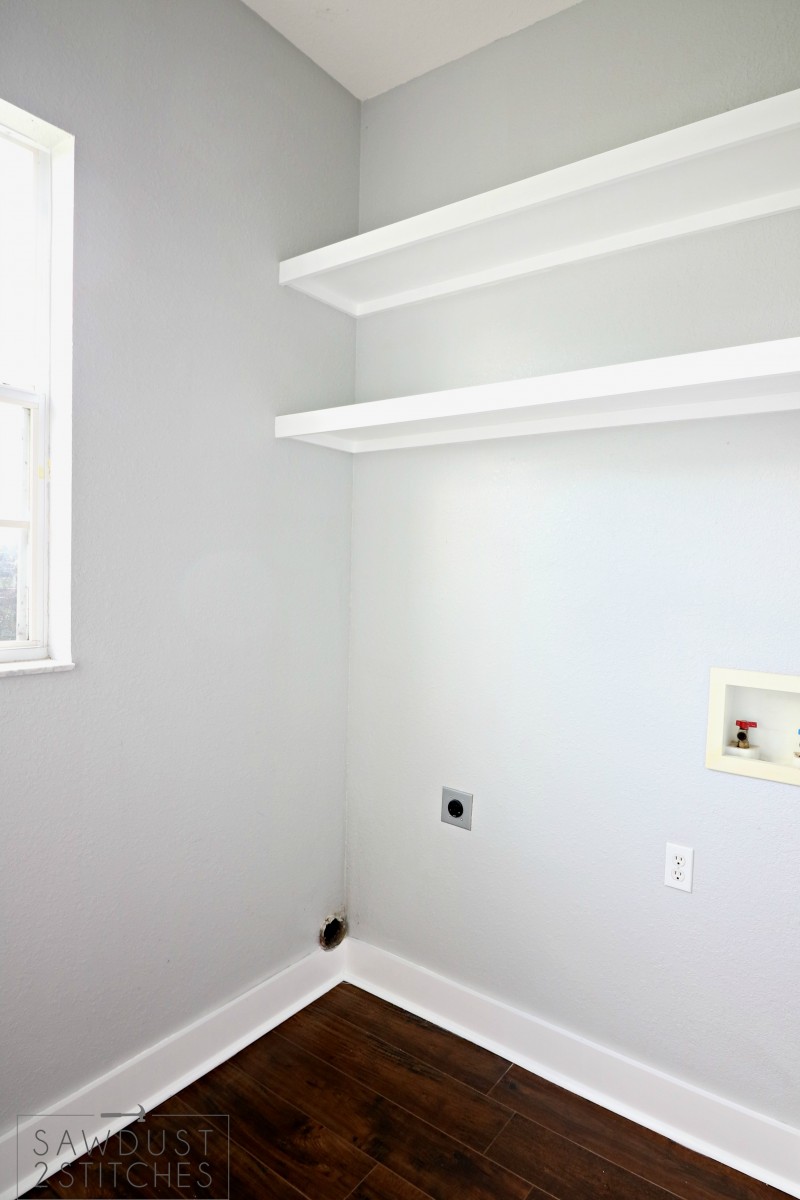
 Thanks so much for following along!
Take Luck.
Corey
 Copyright secured by Digiprove © 2018


[…] walkway to access them. Well, I had a few ideas to really maximize the space. So I added “Open Shelving” and a “Pedestal/Platform” for the washer and dryer. […]