• Blog
  • About
  • Press
  • Privacy

Let’s be social!

  • Skip to primary navigation
  • Skip to main content
  • Skip to primary sidebar
  • Skip to footer
Sawdust 2 Stitches

Sawdust 2 Stitches

  • Tutorials
    • Around the House
    • Organization
    • Wall Decor
    • Sewing
  • Makeovers
    • R.V.
    • Room Makeover
    • Furniture Makeover
    • Decor Makeover
  • Build Plans
    • Small Builds
    • Wall Decor
    • Dresser
    • Tables
    • Seating
    • Shelving
    • Hidden Compartment
  • Seasonal
    • Summer
    • Spring
    • Fall
    • Winter
  • Home Tours
    • First Home
    • Current Home
    • 70’s Ranch Home
  • Workshop

Blog

Dresser Makeover/Flip

June 24, 2015

Furniture flip and makeover sawdust2stitches.com

A while back I was really  intrigued with the idea of flipping furniture.  I actually loved doing it, and there was decent money to be made.  However,  life got a little busy, and this little side business needed to take a back burner to life and the site.

However, if you have the time and resources this makes a profitable hobby. When looking for flip furniture pieces, I would  peruse the “free”section of the Craigslist,  thrift stores, and even  the occasionally curb side pick up. 
Dresser before Sawdust2stitches.com

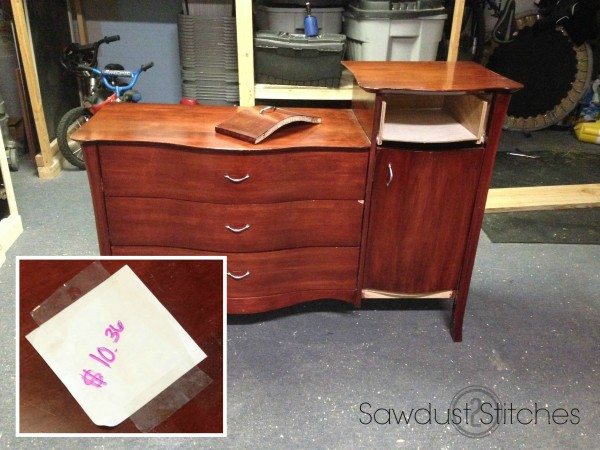
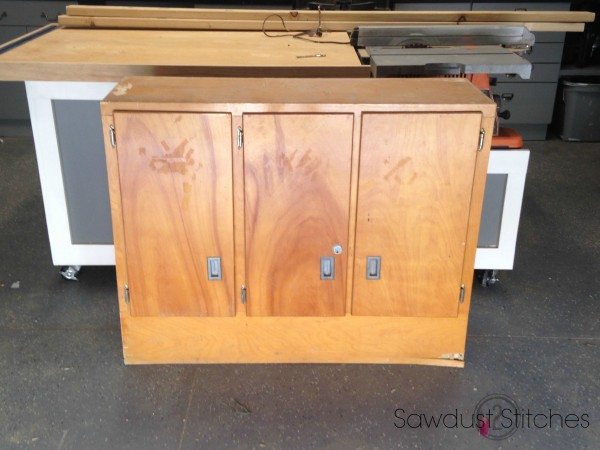
I was not entirely certain  what direction I wanted to take this  dresser.  Which is typical. I normally don’t know what type of  finish (stain or paint) I will  use  until I  sand it  down uncover the type and condition of the  wood I am working with. sand down dresser Sawdust2stitches.com

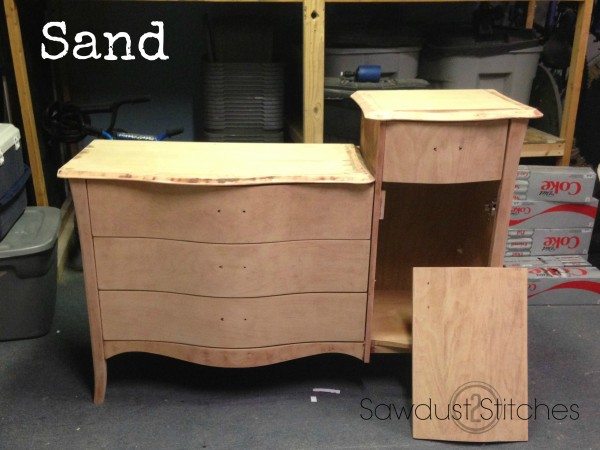
 The drawers sanded down really  nicely, and I didn’t want to cover up that beautiful wood with paint so I opted for Jacobean Stain by Minwax. Stain dresser sawdust2stitches.com   
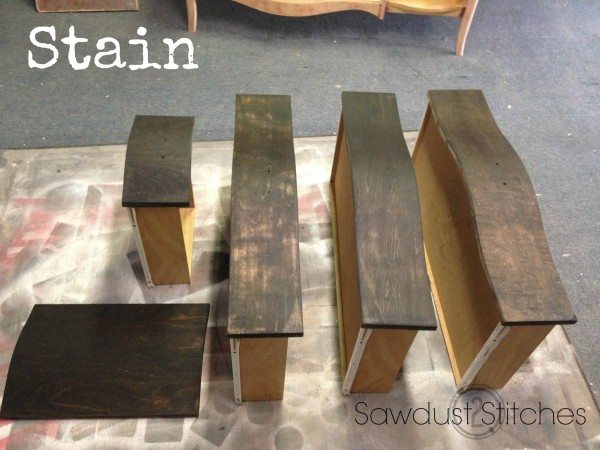
After it was dry I went over the stained drawers with steel wool. This removes and debris and excess stain, and gives it a ultra smooth finish.  steel wool  sawdust 2 stitches    
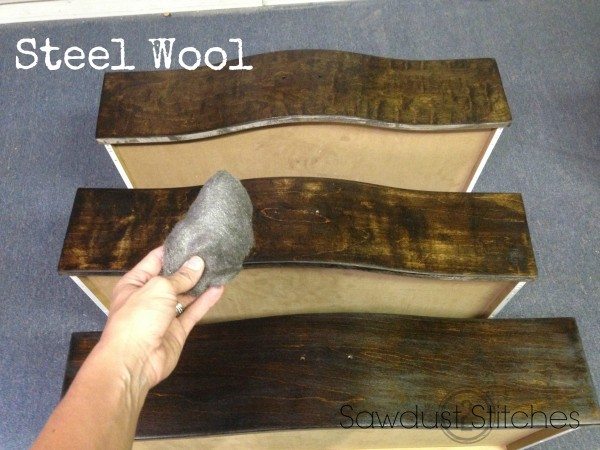
After  using steel wool on them, wipe them down to remove any dust. I then applied a  Satin finish polyurethane.  They looked gorgeous. Poly  dresser swdust2stitches.com

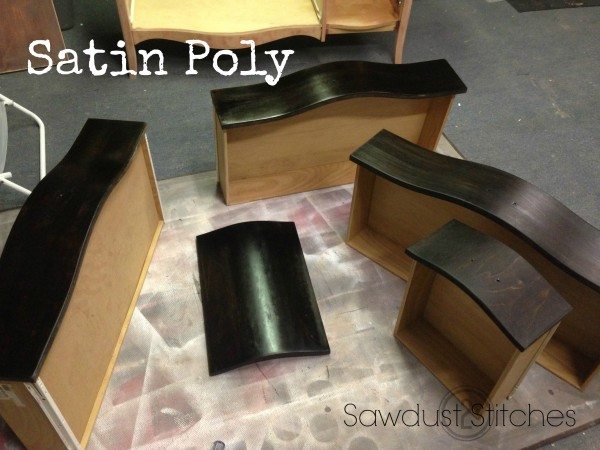
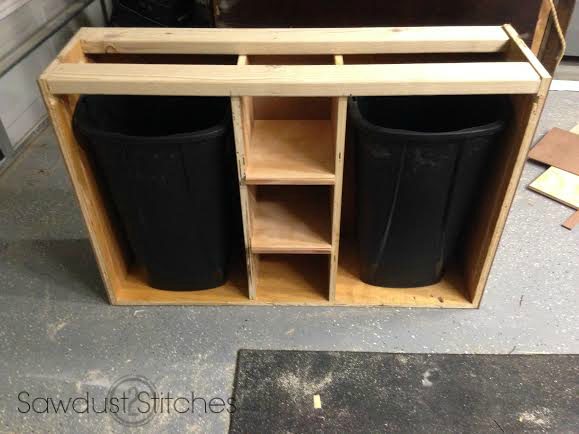
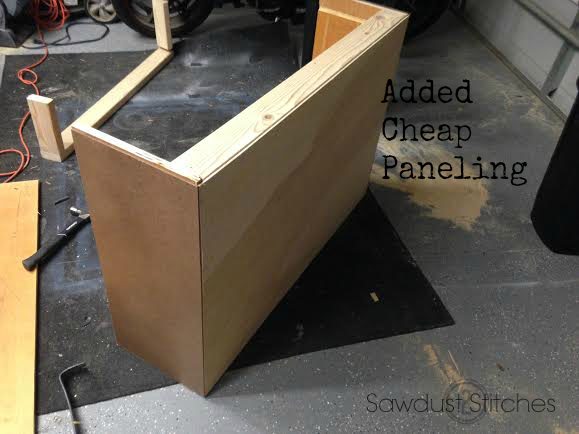
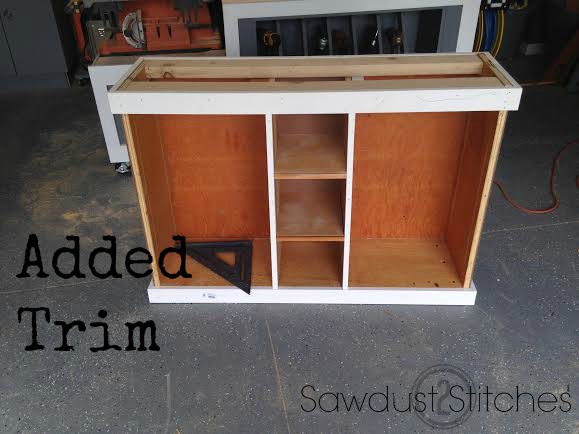
The  dresser frame did not sand down quite as well. It was stain-able but I was worried the finish would be “splotchy” at best. Instead I opted for a 2-tone look. I taped off the inside ledges.   (When I am re-finishing something to sell, I try to make it look like a new piece, not  just a  makeover piece.) prep for paint sawdust2stitches.com

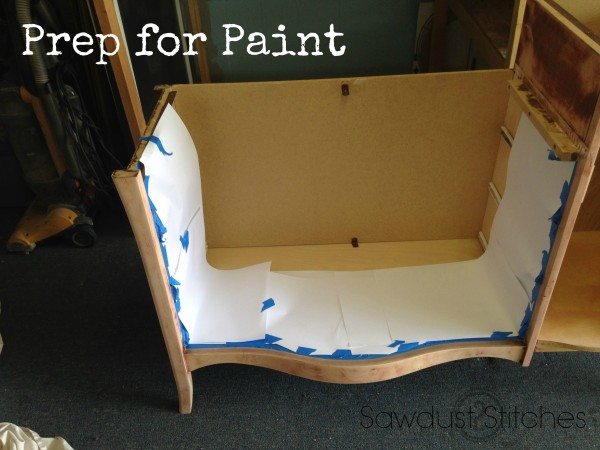
I then primed all of the exterior surfaces. Once  the primer had dried I again went over the entire piece with steel wool and then proceeded to paint. I used Ultra Pure White by Behr.  Prime and paint sawdust2stitches.com

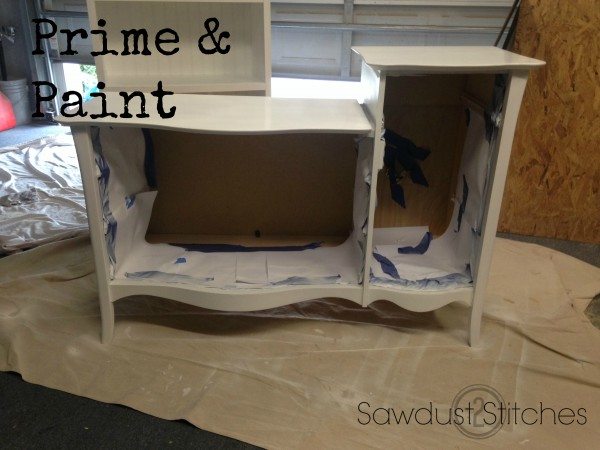
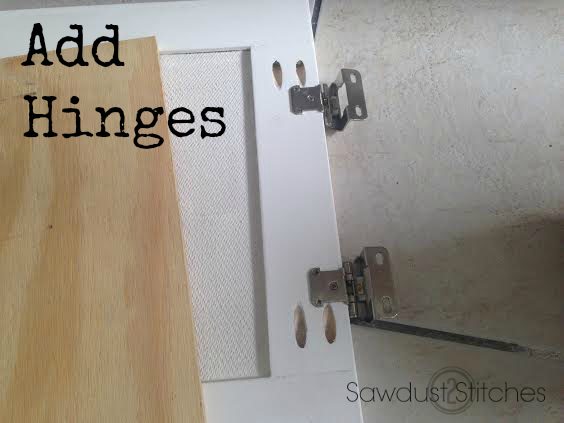
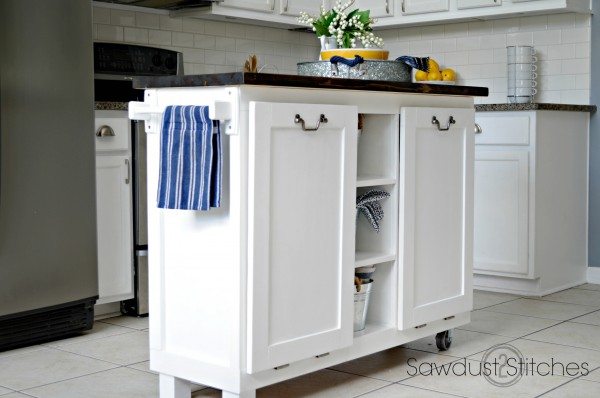
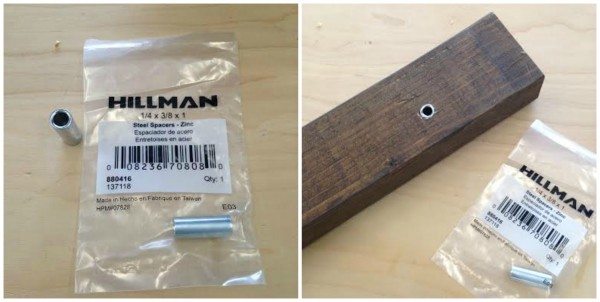
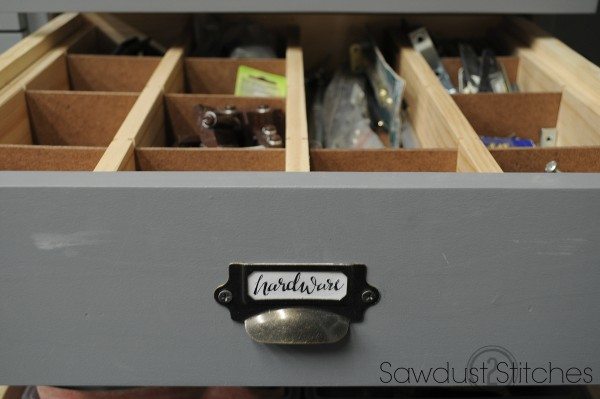
  Now, for my favorite part, adding the finishing touches.   I added hardware that  made it unique and stand out.  add hardware sawdust2stitches.com

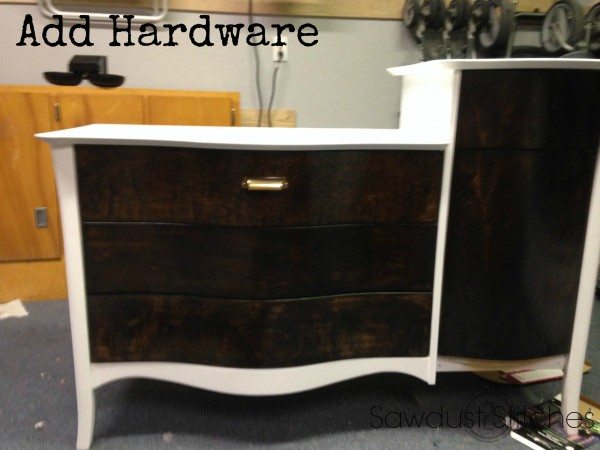
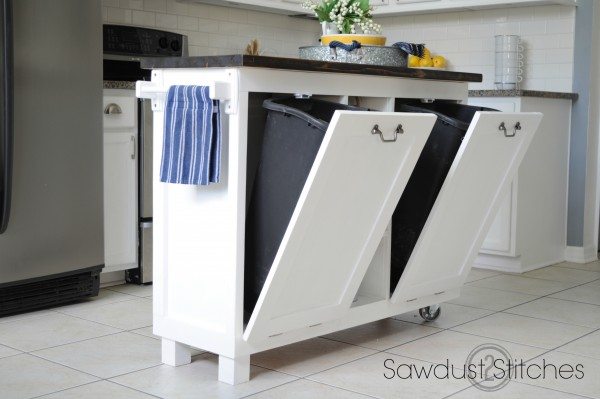
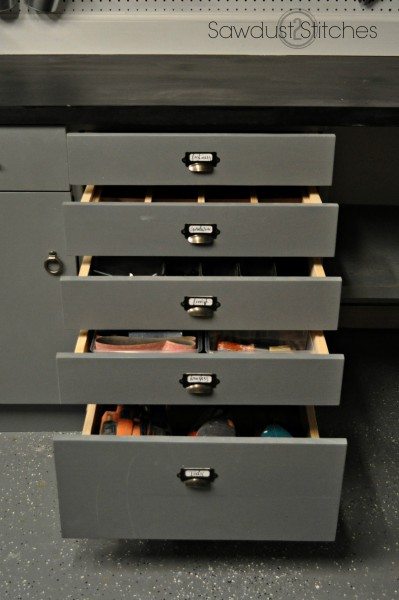
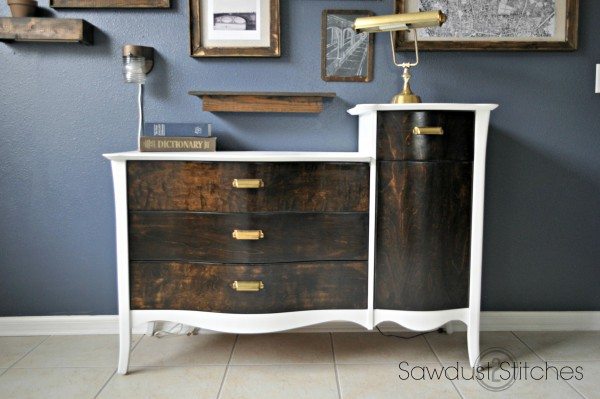
Ta-Da, a freshly  finished piece ready to be moved in, OR moved out.

When furniture flipping one of the biggest things I would stress is staging your photos! I only brought this piece into my house long enough to stage it and photograph it, and then I took it back to the garage.

Dresser makeoverflip sawdust2stitches.com

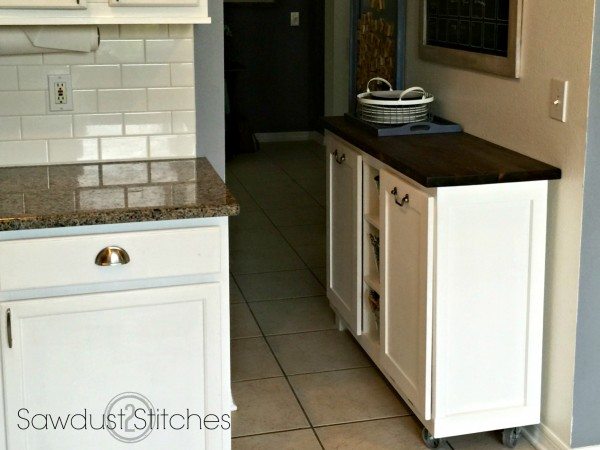
From my experience the photos  really make a difference! I  have never had a problem  selling a piece and getting my asking price, WHEN I take the time to take a decent photo.  Actually, a  lot of buyers ask if they can see a picture of the actual piece. (Assuming that the picture is a stock marketing photo).   I am not saying I am in ANY WAY, SHAPE, or FORM a great photographer,  but most  people  scanning Craigslist are accustomed to pictures of the  “merchandise” in horrible lighting, in a dusty  garage. Seriously,  a decent photo can work wonders.

dresser makeover sawdust2stitches.com  
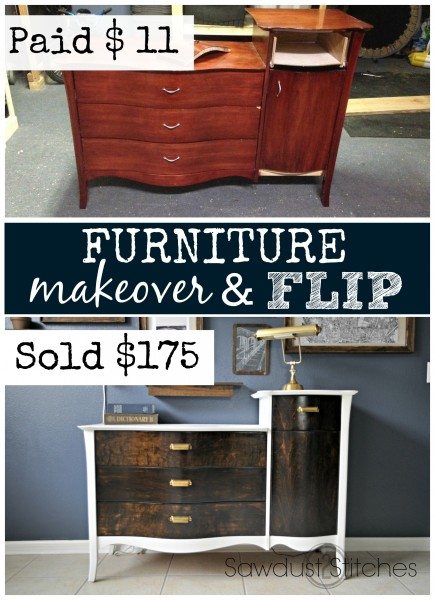
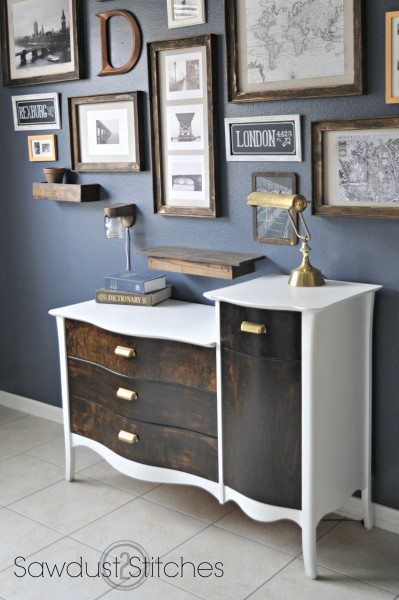
I listed this piece  for $175, and it sold in a few hours.

Let’s Break it Down:

Dresser          $11.00

Stain              $0.00 leftover

Paint             $0.00 leftover

Hardware    $ 1.00 (x4)  a clearance at HD!

Sold              $175.00

 Profit           $163

I spent approximately 5 hours  working off and on, on this.   Which doesn’t equate to an extremely  high hourly wage,  but  I enjoy doing it and I don’t mind it. (So long as I have the free time.)

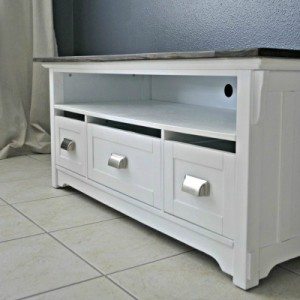
Sp, if you are interested in  doing some furniture flips, here are a few others you can reference.


Media Center Flip
Pub Table Makeover
Garage Sale Upcycle

Take Luck,

Corey

Cabinet Transformed Into A Kitchen Island

June 14, 2015

cabinet into island sawdust2stitches.com 

   Does this cabinet look familiar !?   You may  recall me making a nearly  identical cabinet into a  MEDIA CABINET. 

Apothecary with shelves sawdust2stitches

Well, I  picked up both of these cabinets at a garage sale for $5.00!  They weren’t in perfect shape, but they were made of decent wood, and I  knew  I would have definitely spent more to make them  from scratch.  It really was a no brainer for me.

Cabinet Makeover Sawdust2stitches.com 1

This was definitely a  play it by ear sort of project.  I dove in with reckless abandon.  I just started  ripping  that sucker apart.

Cabinet makeover Sawdust2stitches.com ss  

Using the shelving I removed  from the unit, I  built this little cubby system. Why?

  • A.) To give it a little character.
  • B.) To take up and dead space in between the two garbage cans.  Cabinet makeover Sawdust2stitches.com 2 ss  Fit like a glove. (Phew)Cabinet makeover Sawdust2stitches.com 12 ss   Once, I  had all the internal components mapped out, I started on the exterior.  The frame of the  cabinet  was very  sturdy, but it had more dings and blemishes than I cared to try and buff/sand out.  Instead,  I used  leftover paneling to cover the exterior. (Notice I used all  my scraps, made evident by the fact that they are all different. I knew I was painting it, so it didn’t matter) ! $0 spent Cabinet makeover Sawdust2stitches.com 10 ss

Once the paneling was all in place, I began adding some bulky trim pieces.  I used primed 1×3″ and 1×2″ finger board.   I then made some custom  trim to trim out my cubbies.  Cabinet makeover Sawdust2stitches.com 14ss

Next I needed to build my cabinet doors.   This is in NO WAY, SHAPE, or FORM, a complete tutorial, but rather  brief synopsis of my door making.

cabinet doors for island This is when it really  started coming together!

cabinet doors Sawdust2stitches

I primed and painted the back of the doors  before I proceeded to install them. (Using hinges)    hinges sawdust2stitches.com

  Next,  I added castors and legs to the island. I wanted to be able to easily  move it, but did not want it to serve as an amusement park ride for my sons. ( Keep reading to see why I wanted it mobile.)Cabinet makeover

  I was then ready for the finish work. I filled holes, sanded, primed, sanded, and then painted it.  I used Behr “Ultra Pure White” Glossy,  it is the same color as my cabinets and cleans up nicely.  I then installed my pulls.  I actually  purchased a TON of these from Lowes when they were discontinuing them for cheap!

Cabinet transformation sawdust2stitches.com

 I was of course making this whole contraption to fit the garbage cans I had,  and this cleat system is what worked best for me.  I only used one side of the cleat, and attached it to the inside of the cabinet door.

kitchen island cleat ss

  The lip of the garbage can rests on the cleat, making it easy to remove and the weight of the can holds the door shut when not in use.  I then connected a chain that ran from the interior of the cabinet and connected to the door.  Ensuring that  I did not have  landfill on my  kitchen  floor.  kitchen island opening 

It took me a while to decide on a finish for the top. Ultimately I opted for Jacobean by Minwax, with a Satin finish. ( I was not planning on using it as a cutting board.)  As an afterthought I added this towel bar.  It was the perfect finishing touch. towelbar ss

 That pretty  much sums it up! It hides the garbage can, and I no longer need to take 312 daily  trips to the garage to access the recycling. SO NICE!

 cabinet into island makeover sawdust2stitches.com  cabinet into island sawdust2stitches.com

One last feature,  as you recall I put casters on it because I wanted it to be moveable… and this is why. I don’t have a huge kitchen and was always afraid a island would be too bulky and get in the way.  Well,  I made this island to the dimensions that it would fit in the small hallway between the kitchen and the front room!  So if I want  it out for mopping, or entertaining guests, its no big deal!  Just wheel her away!   It’s love people.

sawdyst2stitches island

So, that is the basic premise of how I turned a $5.00  garage sale cabinet,  into a kitchen island!

Thanks for reading and take luck,

Corey

cabinet to island makeover sawdust2stitches.com

Secret Compartment Mirror

June 4, 2015

I did it,  I finally did it!   I have documented the process for building this case and I am super excited to share  it with you today! HOWEVER,  let me make this  VERY  clear,  it is not a  SAFE.  It is a SECRET compartment. The  fact that it is hidden and requires knowledge on how to open it is what makes this work.   My children have NO clue that there is anything contained in the mirror. If you are considering making this you will need to take into account your own/family/home environment and needs.  With that being  said, I am EXCITED To bring you this tutorial!

UPDATE:  As my kids have gotten older,  I have added a key lock to the secret compartment.  I don’t think it is completely necessary yet, but in a few years it would be wise to have back up.  You can see the updates on the second part of this tutorial HERE. 

PLEASE READ BEFORE YOU START BUILDING:

When I originally built this, I NEVER planned on making it into a tutorial. When I make builds for a tutorial, I try to make them easy to follow, budget friendly, and use standard size lumber.  This is not really any of those things.  I just wanted to put that out there.

This is not a beginner level build.  I am not saying this is advanced,  with artistic joints. However,  I AM saying that if you have not worked with wood often, this may be frustrating! Sometimes the slightest bowing in a board can throw off everything!  Another thing to consider when making this, these ARE NOT standard size boards.  I custom made most of them to fit my needs. If  you have access to a table saw this is do-able…

 If you are still with me, then you are my kind of people!  Let’s do this!

Supplies Used:

I ended up needing to buy a lot of  my supplies online,  because they were either A.) Significantly Cheaper or B.) The only  place I could find them.  That  being said,  this post does include affiliate links.

  • Wood Glue
  • Wood Filler
  • 2×4″  (2)
  • 1×6″ (1)
  • 1×2″ (2)
  • 1×4″ (2)
  • 1/2″ plywood
  • 4×8′ pegboard
  • Hillman Group 1/4 x 3/8 x 1-Inch Spacer (3)
  •  1/4″ x 3″ carriage bolts  (2)
  • 1/4 x 4″ threaded rod
  • Eastland 5″ Square Beveled Mirror (40)
  • Gas Strut Lift Support (4)
  •  1.5″eyelet hooks (x2)
  • Piano Hinge (2)
  • Soft-Close Dampeners(Optional)
  • 10-LED Wireless Motion Sensing LED Light(Optional)
  • Hangman French Cleat with Hardware (2)(Optional)

Tools Suggested :

  • Miter Saw
  • Router (Table Saw can work)
  • Table Saw
  • Drill
  • 3/8″ Drill bit
  • Forstner Bit 3/4-Inch
  • Kreg Jig
  • Drill  Press  (Would be IDEAL, but I managed without one.)
  • Nailer and Compressor (Ideally,  but do-able without if you are determined.)

 Frame-

– I ripped 2×4’s  down so that their  finished dimensions  are 2  5/8′ x 1  1/2″.

 Using a  router or a table saw route out a lip  on the  inside/ back of the “2×4’s” . This lip will serve as a recess that the peg board will sit in.  See image below:

Secret gun compartment sawdust2stitches.com ss
  Cut List: (using the custom sized 2×4’s)

(x2) 30 1/8″

(x2) 44 3/4″

 Take ONE of the 30 1/8″ boards and  drill holes according to the below diagram.   I would HIGHLY suggest using a drill press.  If these are not straight holes, it will be difficult to shut/open.

Gun Case 10000mn

PicMonkey Collage ss

After holes are drilled , assemble the frame.  Using a Kreg Jig make  pocket holes on the exterior of the 44 3/4″ boards.  (See the below diagram.)

secret gun compartment sawdust2stitches.com ss


Doors-

 The doors were cut from 1/2″ plywood.  There will be an 1/8″ gap  where the two pieces meet .

  • Cut List :
  • 12″ x  47 3/4″
  • 18″ x  47  3/4″
Secret Gun Compartment sawdust2stitches.com ss

-Install Hinges

Piano Hinges  come in a standard 48″ measurement.  In order to make it fit, I cut both down to 47″.

This can be down several ways:

  •  Hack saw
  •  Grinder
  •  Using an abrasive disk on circular saw

Secret gun compartment sawdust2stitches.com ss


Trim-

A.)

Secret gun compartment sawdust2stitches.com 5

  To create the trim (seen in the above Diagram A.) You will need to cut down a 1×2″ board  so that it’s finished dimensions are 3/4″ x 1 3/8″.  Once the board is resized,   groove  measuring 1/8″ x 1/8″ will  need to be notched out.  Either using a router, or  a table saw. ( See the image below.)

trim piece ss

Once the “1×2” is cut to the specified dimension,  it will need  (2) 45 degree cuts on each of the ends. (I was getting confused simply  writing how to make these cuts.  So I am making it a little easier, here is a video on how to make the top and bottom trim pieces.)

Cut  board so that it is 49 1/4″ long with 45 ° angles  on both ends. (It will be 49 1/4″  long point to long point)

https://www.youtube.com/watch?v=t0464asRpQA

 B.)

 Rip down a 1×4″ so that its width is 2  7/16″ wide.  Using the custom sized  “1×4″ boards cut (2) boards so that they are 49  1/4” long point to long point with 45 degree angles on end. ( See Diagram B for clarification)

Secret gun compartment sawdust2stitches.com 6 C.)

Rip down a 1×6″ so that its width is  4 1/2″ wide.   Using the custom sized “1×6″  cut (2) boards so that they are 31  5/8”  long point to long point with 45 degree angles on end. (See diagram C. for clarification.) Proceed to attach JUST the right side,  leaving the left unattached.

Secret gun compartment sawdust2stitches.com 7 ss

– Left Trim Piece-

Before I show you how to install this, I want to show you what function this will be serving. As you can see in the image below,  that the holes need to line up exactly!  If they do not, they will bind up making it difficult/impossible to shut or open.

Gun Compartment sawdust2stitches.comBecause this step  required precision,  I would suggest using this method.  (In the Images below the side frame piece (the stained piece) will already be attached to your frame.)

A.) Line up your left side trim piece that  you cut earlier.   (COMPLETE STEPS A, B, and C  for the top hole first!)

Sawdust2stitches gun case B.) Place a bolt  through the top hole, and then hit lightly with a mallet, this will leave an indent showing you the exact location  of where the receiving end of the bolt should be placed.  sawdust2stitches.com gun case imprintC.)  Using a 3/4″ Forstner bit, drill out a mere 1/8″. ( This is not imperative, but there will be a 1/8″ gap between the trim and the frame if this recess is not created in the trim).  This hole will hold  a “T-Nut” so  that it sits flush with with wood.   I added a small amount of  “Liquid Nails” to the base before screwing into place.  Then add the 1/4″ x 3″ carriage bolt,  so that it goes through the frame and into the “T-Nut”.

placing t nutOnce  steps A, B, and C, are completed for the top hole,  proceed to do the same process for the bottom hole, and then lastly  do the middle.

Continue to Part 2

THIS IS AN ENTERTAINMENT BLOG:

When  using the tutorials, BUILD AT YOUR OWN RISK , always take necessary safety precautions! We will not be responsible for any injury or damage incurred while following a tutorial from our site. None of our posts should be considered expert advice; please consult a professional when needed, read all safety and instruction manuals, and take all safety precautions.

Secret Compartment Mirror (Part 2)

June 4, 2015

Be Responsible:  I have documented the process for building this case and I am super excited to share  it with you today!  HOWEVER,  let me make this  VERY  clear,  it is not a  SAFE.  It is a SECRET compartment. The  fact that it is hidden and requires knowledge on how to open it is what makes this work.   My children have NO clue that there is anything contained in the mirror. If you are considering making this you will need to take into account your own/family/home environment and needs.  With that being  said, I am EXCITED To bring you this tutorial!

Return to Part 1

Locking–

After the the moveable trim is in place, flip the entire case over so that you can easily see the inside of the case while it is closed.

At this point we will be placing 1 1/2 ” eyelet hooks on both the upper and lower lids. These eyelet hooks are intended to be placed so that the 4″ bolt (1/4″ threaded rod) will pass through both “eyes”. I have included some measurements on the images below. However, I would make sure that the bolt will easily go in and out of the hooks, when the trim is pulled out and pushed in, before securing the hooks in place.

The first eyelet hook will be attached to the lower lid, approximately 1 1/4″ from the side.

Gun Case Sawdust2stitches.com lock The second eyelet hook is a little bit trickier. I had to screw it into a piece of 1×3″ and then place the block on the upper lid in order to get the correct placement. Again, make sure that it is placed so that the bolt (1/4″ threaded rod) will easily clear it when in motion.
Gun Case Sawdust2stitches.com

Note: The eyelet on the upper lid (the second one featured above) is not entirely necessary. If the trim piece you attached to hid the gap is secured well, it will prevent the upper lid from opening until the lower lid is unlocked. When making this I did not realized that the trim would hold it in place as well as it does. However, if you are concerned about it being more secure, add the extra eyelet hook for peace of mind.


Grid-

For the grid I used a piece of trim that is 3/4″ wide and 1/4″ deep.

Cut List:

(2 x) – 47 3/8″ long point to long point with 45 degree angles on ends

(4 x) – 47 3/8″

(41 x)- 5 1/8″

(4 x) – 5 7/8″ from the long point of a 45 to a straight cutSecret gun compartment sawdust2stitches.com 8

  • Start with trim piece that will hide the gap between the 2 doors. It is the red piece in both the above and below images. It is important that this hide the gap and is attached to the LOWER lid NOT the upper lid. Make sure this is strongly secured using wood glue, and finishing nails if possible.

Gun Case 12 upclose mirrorOnce the (red) trim piece is placed proceed to layout the rest of the pieces. I would STRONGLY suggest laying out all the pieces AND mirrors before you start attaching. Just to be safe.

  • Place all horizontal trim pieces
  • Place all vertical trim pieces
  • Place all Mirrors

Once all pieced are placed, and fitting correctly, proceed to glue all the components in place. If possible reinforce with 3/8″ finishing nails on the trim. I used liquid nails to place the mirrors without any incidents.

Mirrors– I made this around Christmas time, and during the Holidays I was able to find these mirrors at the Dollar Tree. ( They are technically for candle placement.) Tracking down 40 was not an easy feat, I enlisted a few friends to help me track these down. ( Thank you friends!) This is a large part a reason why I have put off this tutorial, I wanted to track down a new source. I still do see these at the Dollar Tree from time to time, but not steadily. After looking through MANY stores I found that the cheapest way to purchase the mirrors (other than dollar tree) was online. Here is a link to the best option I could find: Mirrors


Install Hardware-

I used Gas Struts on mine, this will allow it to have the slow open action. These are not entirely necessary. You can use a cheaper/easier method and use a basic support hinge. They are only a few dollars at your local hardware. I only used the Gas Struts because this was a gift for my husband, and he kind of geeks out about that kind of thing. (Follow the instructions included in your hardware when installing.)

I also installed a slow close dampeners, again not completely necessary, but again, my husband finds that stuff cool. These are also available at most home improvement stores. (Follow the instructions included in your hardware when installing.)

2c8b5d67-00b7-42d0-8575-c167d23df6c4_400

Another “extra” was a motion sensing light. I found one that is battery operated and flips on when the door opens. Again, not necessary, and in some cases not entirely ideal. But my husband thought it was awesome!

Installing:

The last thing to consider is how and where you are planning on mounting your case. There are two options: The easier being a cleat system, using a system like this: 18″ low profile French Cleat with Hardware. (2) cleats would be required for this project.

Or a more secure approach would be securing it to the wall with lag screws. When I originally made this, I was playing the whole thing by ear, and making it up as I went. As a result the approach to mounting it was a little interesting. As you can see in the image below.

DIY gun case what I did sawdust2stitches.com I first decided where I wanted my case to be placed. I then determined where the studs where on the wall that I was mounting my case. As you can see my lag screws are not centered. This is because I placed the lag screws according to the stud placement.

I then cut 3″ blocks from a 2×3″ board. I then securely mounted these to the frame. I carefully pre-drilled with 1/4″ bit through the block. (This will prevent the board from splitting when securing the case to the wall.)

The only thing to keep in mind is that you cannot have anything in the top corners, because the supports/hydraulics will hit it.


Peg Board-

Cut List:

  • 46 1/4″ x 28 5/8″


The last thing it will need is the peg board. It will require a piece of peg board that is approximately 46 1/4″ x 28 5/8″ This should fit in the notch that was cut out when first assembling the frame. Secure in place using wood glue and reinforce with finishing nails.

It is important that the peg board hooks are arranged prior to mounting to the wall. In an effort to make the case as low profile as possible there was no clearance allowed on the back side of the case. Again, the peg board hooks will gauge your wall if they are installed or moved after the case is mounted.

UPDATED-  As my kids have gotten older, I have since added a key lock.  Here is what I did to include a key lock.

Sawdust 2 Stitches lock
2016-04-27 11.52.55

2016-04-27 11.50.14

That is it!


Alright everybody, I know this is not an easy build, but with some math and planning you can take this theory and apply it to any number of dimensions!

Thanks for reading, and … Take Luck!

Corey


THIS IS AN ENTERTAINMENT BLOG:

When  using the tutorials, BUILD AT YOUR OWN RISK , always take necessary safety precautions! We will not be responsible for any injury or damage incurred while following a tutorial from our site. None of our posts should be considered expert advice; please consult a professional when needed, read all safety and instruction manuals, and take all safety precautions.


The BEST Beach Blanket ever!

May 24, 2015

sawdust2stitches.com  beach blanket   My family and I  live about 5 minutes from the beach, so we are frequent visitors.   When we first moved to Florida we  definitely looked like tourists. Over time we  learned to stream line, and figured out a few tips and tricks to make the excursion  a little  lower maintenance. This beach blanket is HANDS DOWN  my favorite new replacement/addition to the beach bag!

 It is CHEAP, easy to make,  dries quickly, sand falls right off, stores compactly,  it doesn’t  blow away, and doesn’t slowly  end up in a small shriveled pile when in use!  It is perfect!

 Just pull it out, stake it down, enjoy,  shake it out, fold it up and go! So easy.

Supplies used:

  • Twin size flat sheet
  • Shoelaces
  • 4 tent stakes
  • Sewing machine (or it can be done by hand, it will just take a little more time.)
    beach blanket

Begin by cutting (4) 12″ sections of  shoe lace. shoe lace cut  Then tie knots in the 12″ sections of shoelaces. knots   Then fold the corners of the sheet over the loop of shoelace. sew corner  Pin the sheet in place and then sew!  Make sure you really reinforce the stitches!  top view That is pretty much it!   Told you it was easy!

 It is ready for it’s debut.  Just bring along 4 tent stakes!

( Of course, make sure you drive the stakes in completely, don’t want to stub you toe on those!)DSC_0820

 There you have it, now you can sit back and relax.

best  beach blanket ever sawdust2stitches.com 

Ultimate Drawer Organizer

May 21, 2015

drawer organizer  sawdust2stitches

As many of you have  seen in previous posts, I have been in the process of transforming my  garage into my  “workshop”.   If you recall, I had used a plethora  of old cabinets, scrap wood, and free Craisglist finds to  create my cabinets.  ( See all the details here.)    One of the free cabinets I used as my base, was actually intended to be used as a corner piece, so it did not have a door. ( See image below.) 2015-02-24 16.47.33 SS

Instead of making a simple door and drawer to match the rest of the lower cabinets I had a better idea…

Have you ever been to a hardware, and seen the isle that consists primarily of rows of small  drawers,  all filled with all sorts and sizes of treasures ?  I have, and I  kind of love them. I  have always  joked to my  husband, that when we  are  independently wealthy I will NEED those drawers in my workshop.

2015-03-26 08.29.10

Well, for those who know me, I have never been a patient person…

Fate would have it that the great folks at D. Lawless hardware were willing to help out on my little renovation.

So let’s dive in.

  I proceeded to make 5 drawers. (If you need help making the drawers, I would refer you to the awesome Sandra at Sawdust Girl).

I got a little excited and forgot to take pictures of the process… again.

2015-03-26 09.27.57 SS  Once my drawers were completed, I proceeded to install all of my drawer glides.

If you need help with the installation, they even have an online tutorial to help.

 My only  caution is measure,  measure, and measure. 2015-03-26 10.44.34ss

Just look at how pretty it is!  To all my OCD readers, can I get an AMEN !? 2015-03-26 10.48.03 ss

  Next I added the drawer fronts.  I usually  glue mine  and then reinforce with finishing nails from the inside.  2015-03-28 20.07.42 ss  Once the drawer fronts were dry, I proceeded to paint…

NOW we are ready for the fun part!

2015-03-29 19.21.01 ss

Now that I have my drawers, it is time to organize them, and not just any system will do! I wanted it to be changeable and be completely customizable…

I kept looking through Home Depot’s  tool boxes/organization caddy’s.  I kept seeing this basic design. ( I have seen this system used for all sorts of organization, for example craft organization, or fishing tackle boxes.)  The basic premise , is that you can  add and remove dividers from the rows.

Which is EXACTLY what I wanted,  but they were all far too small…0ff7c33e-0773-4ded-be1d-b1087e1c805f_400

So here is my solution…

I  began by  making  drawer dividers, using  1×3″ boards*.  I  simply measured the depth of the drawer and cut the 1×3’s to fit.

*I did plane my down a little, but this is not necessary.dividers ss

Once I had all my dividers cut to fit ,  I removed them and  marked them at the size cubbies I wanted to create.  For example mine are about 4 ” apart.  The marks will  show  where  the notches will be cut in order to accommodate  the horizontal/removable  dividers.

notch dividers

Using a table saw,  I set  my guide so the  I would hit pre-marked lines.  I  set the depth approximately 3/16″ high.

Once all of the  notches  are cut,  place  the dividers in the drawers, and space them evenly!  Make sure you take the time to measure so that all the spaces are the same, which will allow the dividers to be interchangeable.

Once  all dividers are evenly placed,  they will need to be secured.   I used a small amount of wood glue on the bottom and ends of each of the dividers ( 1×3’s).  For additional support, I nailed them in place  using 2″ finishing nails;  starting on the outside of the frame and entering into the ends of the 1/3″ dividers.


dividers ss2Re-moveable Dividers-  Measure the distance from the inside notch to the inside notch of the subsequent divider, then subtract an 1/8″.  The 1/8″ will give it  just a little wiggle room so that you can easily  remove them when needed.

I ripped  down 1/8″ paneling board into 2.5″ strips.  Once they are in the strips, they can then be cut to the dimensions determined. (Above)

For example,  the space between my 1/3″ board dividers is 4 1/4″. I then  subtract my 1/8″  for wiggle room.  Which would make my panels/rectangles cut to 2.5″x 4 1/8″.

dividers install s2s


Then  you can add  dividers  depending on the supplies you have to store! As your inventory changes, so can your storage!

*sigh*

 Everything has a place, and everything in it’s place.  That is what keeps me sane.

hd drawers 

  But wait, there is more!  What would these drawers be without labeled pulls ? They are the perfect finishing touch!

 D. Lawless has them for a steal-of-a-deal here. DSC_0457 ss

DSC_0473 ss


  • previous
  • Page 1
  • Interim pages omitted …
  • Page 29
  • Page 30
  • Page 31
  • Page 32
  • Page 33
  • Interim pages omitted …
  • Page 47
  • next

Primary Sidebar

  • Facebook
  • Instagram
  • Pinterest
  • Twitter
  • YouTube
IMG_9167 (1).jpg fd
DIY & Design

Meet Corey

Hi everyone, my name is Corey, and I have a problem. I can’t leave well enough alone… The best therapy usually involves a variety of power tools. So, in the few “spare” moments I am not entertaining my two beautiful, rambunctious, boys, I can typically be found hunched over a sewing machine and/or covered in sawdust. All in the efforts to create a perfect balance of aesthetics and practicality in our home.
read more

Join our mailing list!

DIY & design ideas - right in your inbox!

Featured

Stair Tread Makeover

Categories

  • 70's Ranch Home
  • Around the House
  • Build Plans
  • Crafts
  • Current Home
  • Decor Makeovers
  • Dresser
  • Exterior
  • Fall
  • First Home
  • Furniture Makeover
  • Hidden Compartment
  • Kitchen
  • Lighting
  • Makovers
  • Master Closet
  • Organization
  • R.V.
  • Room Makeovers
  • Seasonal
  • Seating
  • Sewing
  • Shelving
  • Small Builds
  • Smart Home
  • Spring
  • Summer
  • Tables
  • Tablescape
  • Tutorials
  • Uncategorized
  • Wall Art
  • Wall Decor
  • Winter
  • Workshop

Footer

Contact Me: Corey@Sawdust2Stitches.com

Latest ‘Grams

Follow on Instagram
2020 © Your Blog Name
theme by soleilflare
Enter your name and email and get the weekly newsletter... it's FREE!
Your information will *never* be shared or sold to a 3rd party.