• Blog
  • About
  • Press
  • Privacy

Let’s be social!

  • Skip to primary navigation
  • Skip to main content
  • Skip to primary sidebar
  • Skip to footer
Sawdust 2 Stitches

Sawdust 2 Stitches

  • Tutorials
    • Around the House
    • Organization
    • Wall Decor
    • Sewing
  • Makeovers
    • R.V.
    • Room Makeover
    • Furniture Makeover
    • Decor Makeover
  • Build Plans
    • Small Builds
    • Wall Decor
    • Dresser
    • Tables
    • Seating
    • Shelving
    • Hidden Compartment
  • Seasonal
    • Summer
    • Spring
    • Fall
    • Winter
  • Home Tours
    • First Home
    • Current Home
    • 70’s Ranch Home
  • Workshop

Blog

All Purpose, Every Occasion Caddy

May 15, 2015

 Wooden Caddy SAwdust2stitches for remodelaholic.com

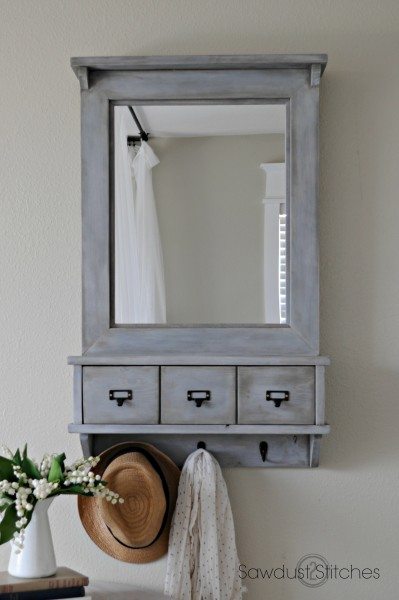
Father’s  Day  will be here before you know  it!  Are you ready ?

Come to think of it so is the end of the school year… that means teacher gifts… dang.

What about that graduation party you  just received and announcement for ? Oh man, what about that baby shower?

  Wedding Reception ?

House warming party?

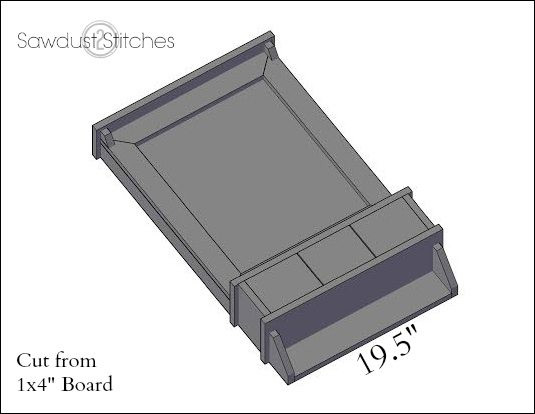
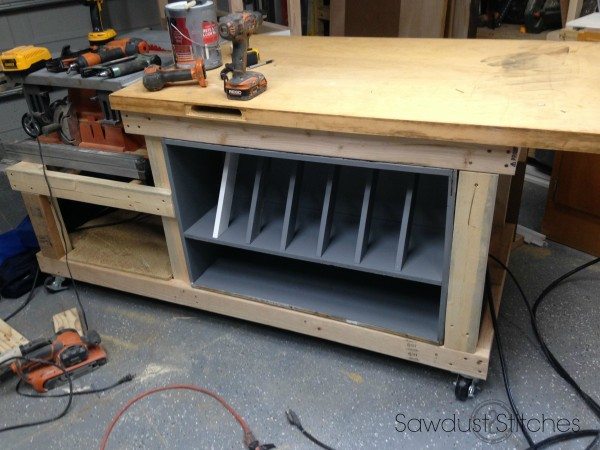
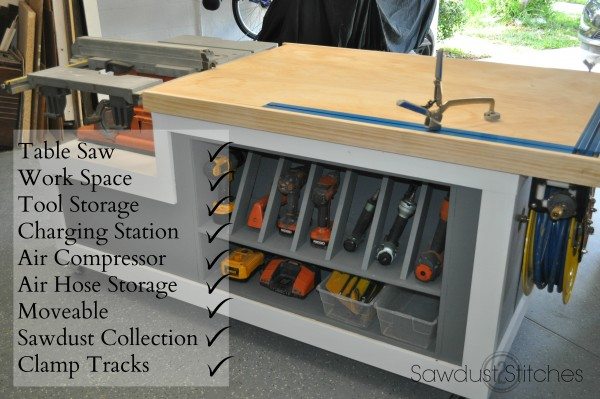
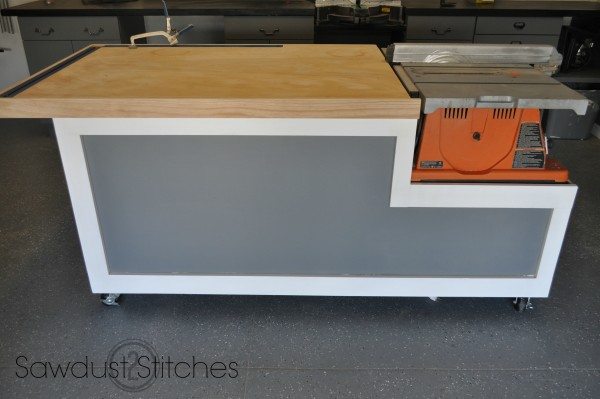
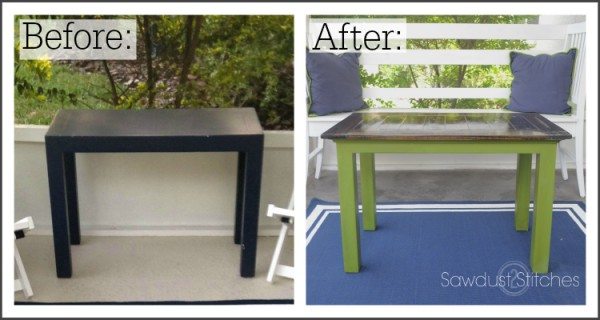
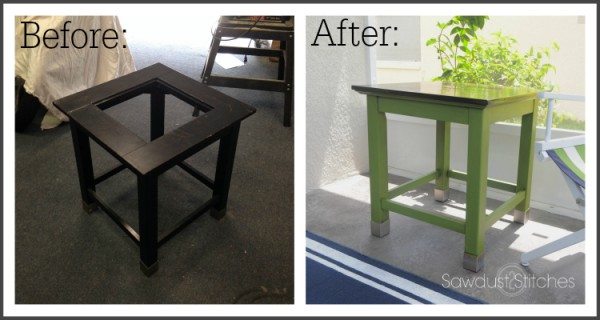
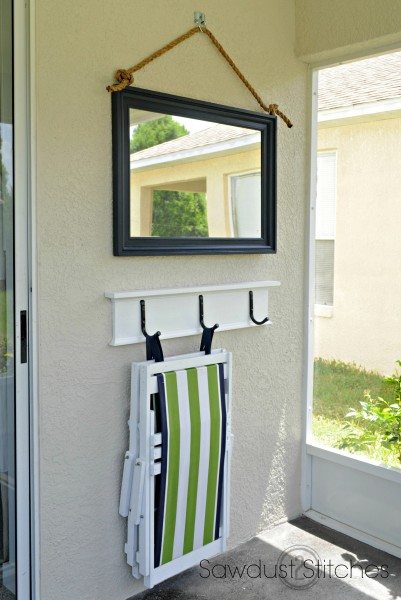
No matter what the occasion,  I’ve got your covered.   Check out how versatile this baby is!

Drink Caddy  sawdust2stitches for remodelaholic.com  kitchen  caddy  Sawdust2stitches for Remodelaholic.com  office caddy sawdust2stitches for remodelaholic.com  planter caddy  sawdust 2 stitches for remodelaholic.com

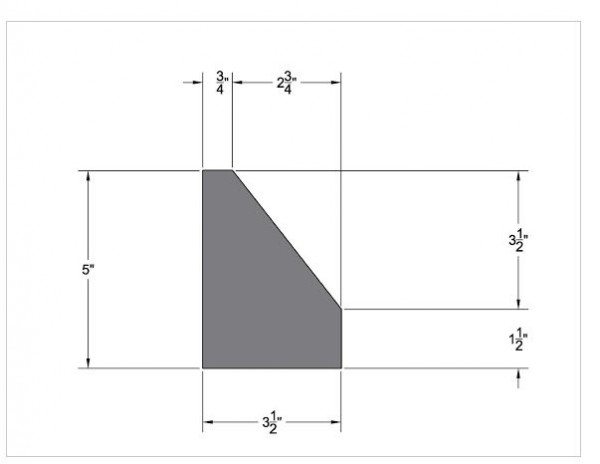
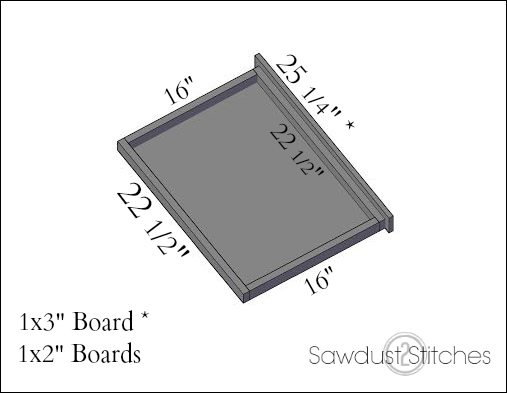
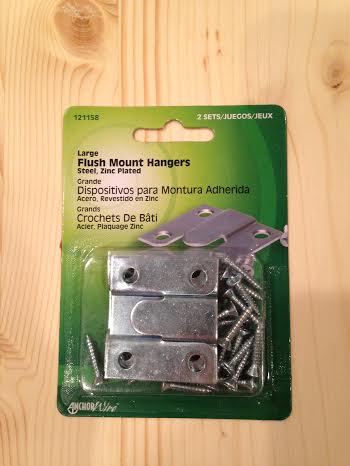
Want to make one of your own !?  How about 3 or 12 ?   Get all your holiday  gifts done in one fell  swoop!

  I am over at Remodelaholic today, and  you can see  the entire tutorial here!

My Recycled Shop Cabinets

May 5, 2015

upcycled recycled workshop

 Supplies Used:

  •  A whole bunch of FREE crap
  • Elbow Grease
  • Lots of of Work
  • Clearance Hardware from Lowes

Ok, I am speaking to all of my skilled craftsmen out there,  please just ignore the following post. Seriously, stop reading. The following post will make you cringe.

BUT to all of my  DIYer,  makeover addicts, and frugal finders, you are gonna love this!  I am going to show you,  how I took a whole bunch of free Craigslist crap  and turned it into an awesome workspace.

It all started with these cabinets. These were originally from a High School  renovation.  There were three left and I was able to snag them for free!  I sanded them down, primed them, and then installed them.cabinets before

The next question was what to use for counter tops… the cabinets from the high school,  did have a counter top,  BUT   I wanted to space out the cabinets to allow for more storage,   so the original counter top would be far too small.

Well my Husband was scrolling through the “free” section of Craigslist, and came upon  two FREE “all wood doors”.  So  he was my hero and went and snagged those from the curb.  Which was no easy feat, those beasts are HEAVY,  which is  probably why the owner assumed they were all wood…  They weren’t.  They were solid core, meaning they aren’t hollow,  but they were not solid wood. Which presented some problems,  but stay  tuned I will be showing you how I turned them into awesome  counter tops.


cabinet makeover sawdust2stitches 

Next, I needed to create some overhead storage.  Over the past few months my husband acquired quite a collection of solid wood furniture for me.  He found them by  simply  perusing the “Free” section of Craigslist.  After moving all of these pieces from place to place while trying to organize the garage, I decided to sacrifice all my spare wood and potential projects towards the greater good of the garage. I tore them all apart and ripped them down to make my  cabinets.

Sawdust 2 stitches cabinets 2
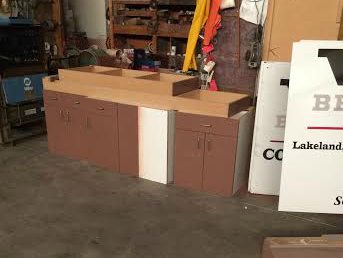
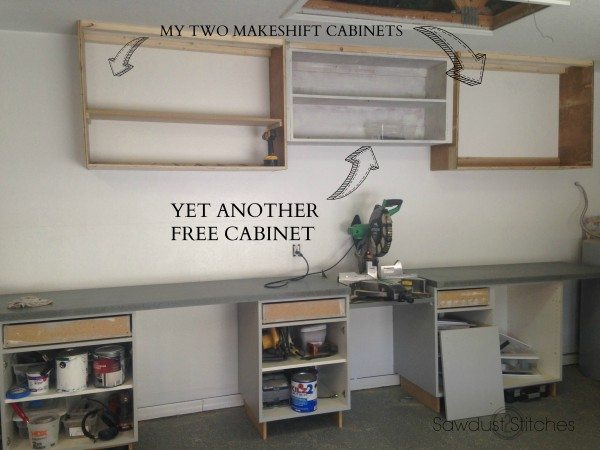
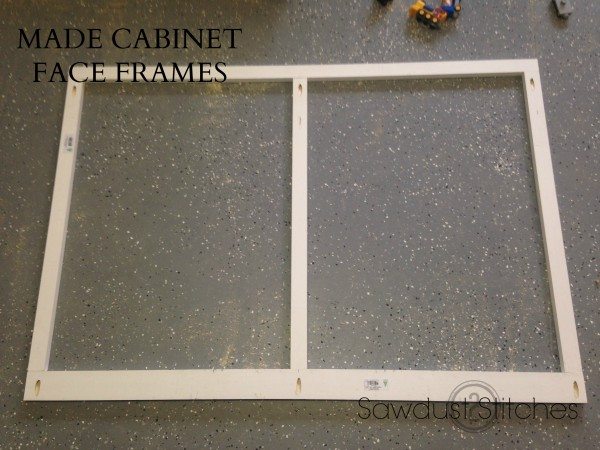
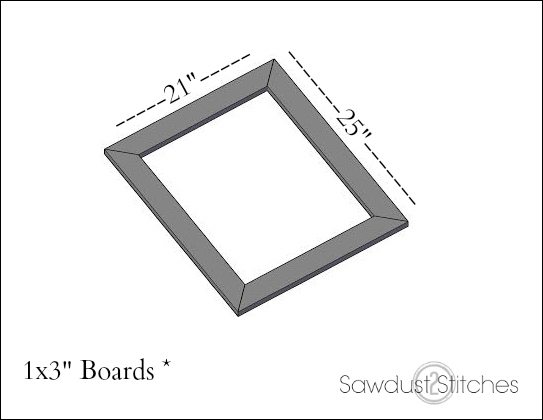
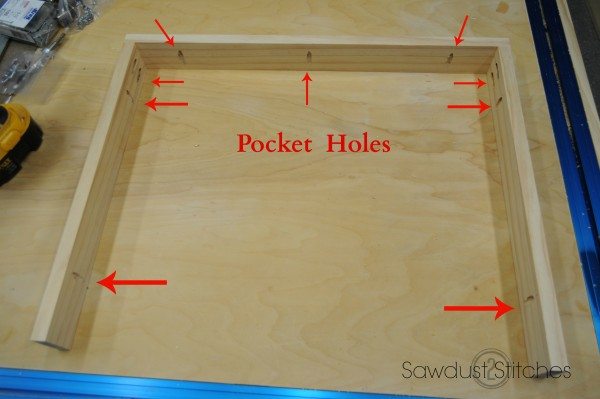
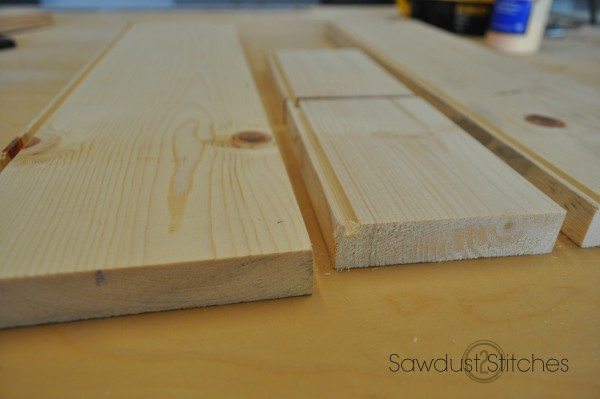
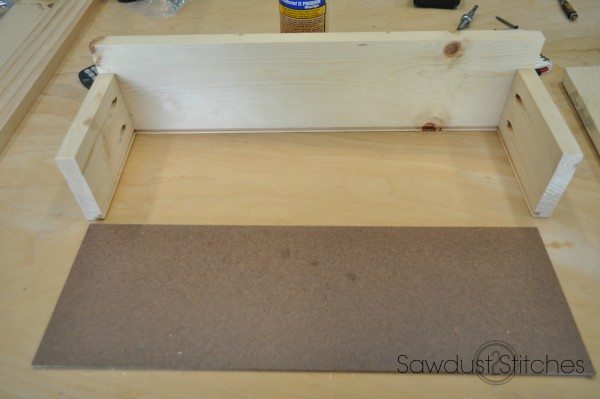
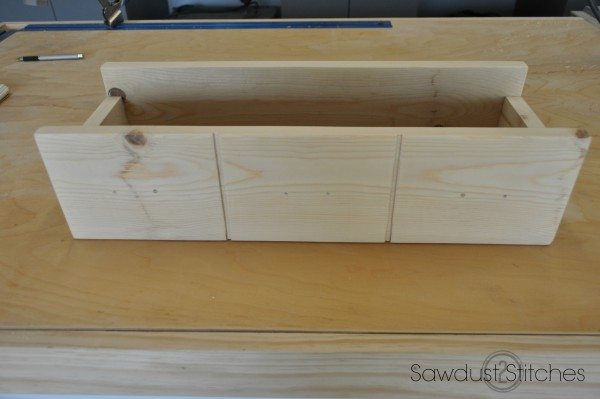
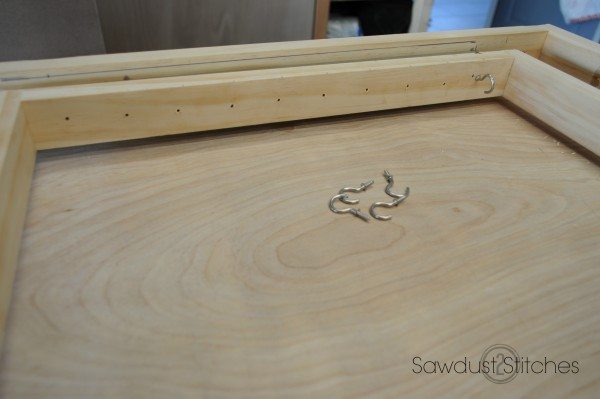
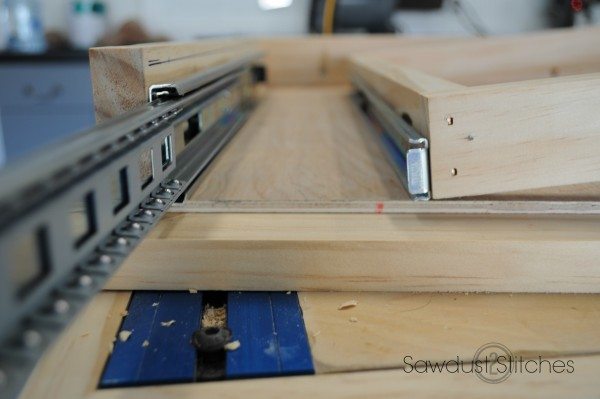
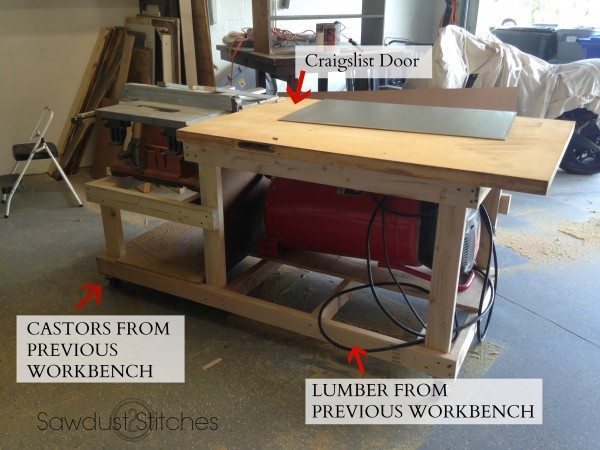
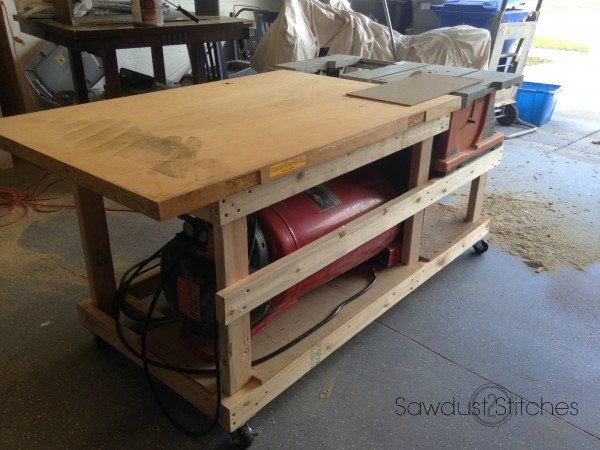
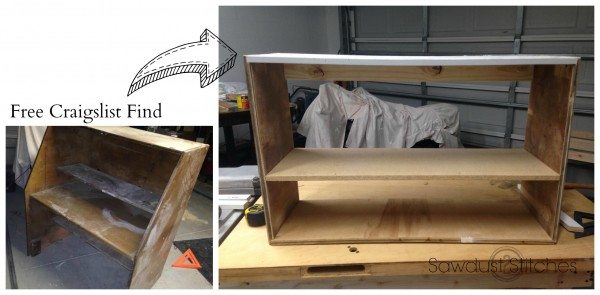
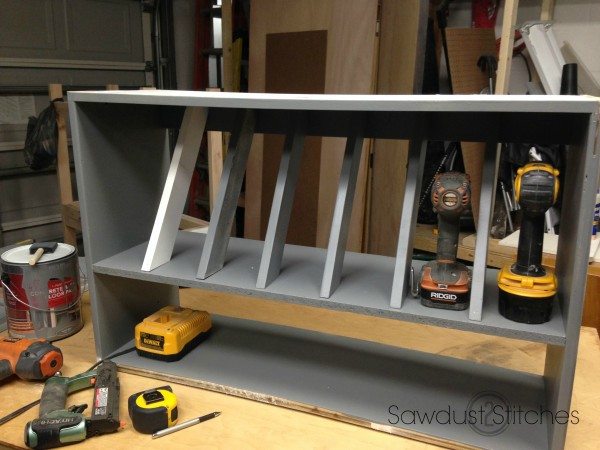
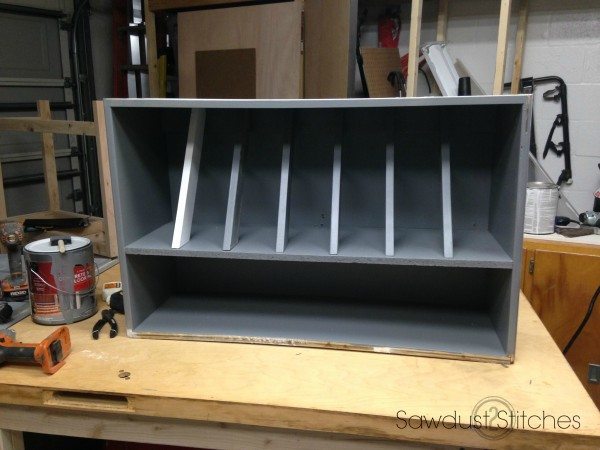
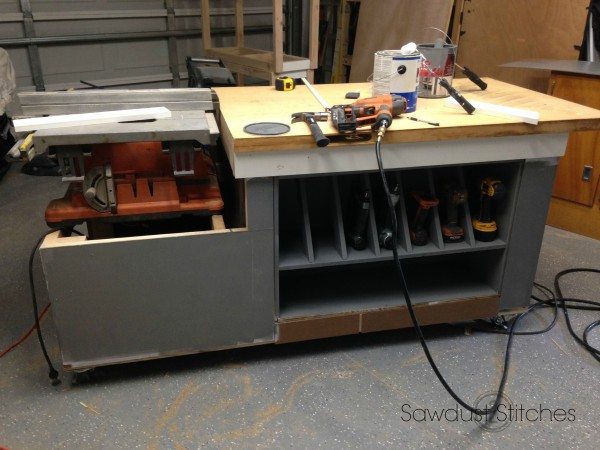
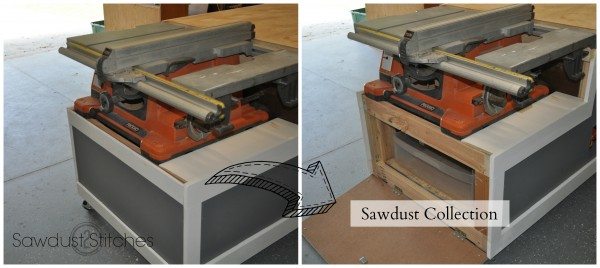
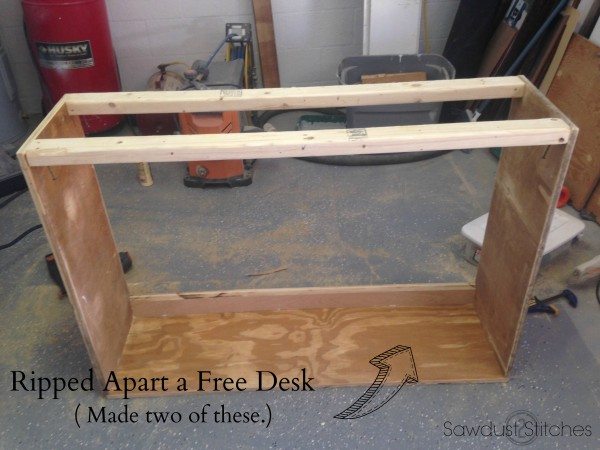
Like I said,  all pro wood workers,  look away.  I am butchering these cabinets.

BUT  guess what they are in my garage, they  are going to take some abuse and are FREE.

Mic Drop.

CABINET sawdust2stitches 3  After a little bit of playing around with sizes, I came up with this configuration. I kept one of the cabinets in the original dimensions ( the center one) and then  installed the two side cabinets.sawdust2stitches cabinets 4    I then used 1×2’s and 1×3’s to make face frames for the cabinets.


sawdust2stitches cabinets 5  Sawdust2stitches cabinets 6

The only  part of the project I really  spent money on was making the cabinet doors.   I  made a simple shaker style cabinet door.  I apparently  got a little ahead of myself and did not document the process.

BUT,  Jill  from “The Rozy Home” did   great post at Remodelaholic showing “How to Make a Shaker Cabinet Door”.

CABINETS sawdust2stitches 7After deliberating over the cabinet color I settled on a dark gray.   I am not going to lie, I changed  some of the cabinets 3 times! After my frustrating trial runs, I realized I  really wanted them to match the floor.  So that is exactly what I did.  I had leftover paint from  refinishing the floor, and so that is what I used!  Ha.

hardware sawdust2sttitches

 Last thing they needed was hardware.  A few months ago,  I was at Lowes and stumbled upon this hardware… all on CLEARANCE!  they were selling the small pulls for like $.49!   The large ones for $.97! I bought every single one, and I am so glad I did. I have used them everywhere and had just enough to put them on my garage cabinets!

  So there you have it,  my  nearly free modge podge garage cabinets.  There is a lot more to the garage renovation, but that will need to wait for another day.shop cabinets sawdust2stitches

 The moral of the story: If  you are hesitant to start an overhaul  because of the price, then  start hitting up the “free” section of Craigslist.  It WILL be a lot more work,  but it is A  LOT cheaper!

 Take Luck,

Corey

Secret Compartment Jewelry Case

April 24, 2015


Materials Used:

  • 1×6″  (x1 @ 6′)
  • 1×3″  (x2 @8′)
  • 1×8″  (x1 @6′)
  • 1×2″  (x1 @ 8′)
  • 1/2″ x  3  1/2 ” Board  ( I found this in the trim section, they were  only 1/2″ thick, or you can use a planer)
  • Paneling 1/4″  (2’x4′ sheet)
  • Cup Hooks  (x 10)
  • Mirror ( 20″ x 15 3/4″)  I found that Lowes will cut  this size mirror for about $12.00
  • Full Extension Ball Bearing drawer Glides 16″
  • (3)  2″ drawer pulls
  • (3)  Coat Hooks
  • Wood Glue

Tools Suggested:

  • Kreg Pocket Hole Jig
  • Table saw
  • Finish Nailer

Making the Frame-

1×3″-
  •  21 ” long point to long point  with 45 degree angles    (x2)
  •  25″ long point to long point with 45 degree  angles     (x2)

  • Using a Kreg Jig , drill pocket holes  in order to create  a 90 angle.
  • Repeat on all four corners, in order to create the rectangle frame.

HIdden jewelry box SAwdust2stitches 1

 The Back of the Framed Mirror-

1×3″-
  • 19.5″   (x2)
  •  25″     (x1)
 Paneling (1/4″)-
  •     20 1/4″ x  23  1/2″

Using a Kreg Jig  make pocket holes to:

  • Join the 2 joints.
  • Attach the frame to the back.
Hidden Jewelry Box Sawdust 2 Stitches.com 2 

Using wood glue,  secure the 20 1/4″  x  23 1/2″ paneling behind the frame opening.

Jewelry Box by Sawdust 2 Stitches 3

Top Piece-

1×6″ Board  ( You will need to rip this down)
  • 22″x 5″

Using wood glue place the board centered on top of the unit.  Then reinforce with 1″ wood screws. I wold suggest using a counter sink drill bit and pre-drill.

Corbel-

Use a 1×2″ board to make  the corbel.  Then attach  at the top corners of the mirror.  smaller corbel

Base-

1×8″ ( You will need to rip this down)
  • 22″  x  7 1/4″  (x2)
  • 5″ x 7 1/4″      (x2)

Drawer-

1×6″ ( You will need to rip this down)
  • 19 1/4  x 4 3×4″ (x2)
1×4″ Board
  • 5 1/2″  ( x2)
Paneling
  • 6x 18 1/2″

In order to create the appearance of 3 individual drawers, I  made cuts in one of the 19 1/4″ boards.  To enhance that card catalog look I used small 2″ label pulls.

sawdust2stitches jewelry case 3When making the drawer using  either a table saw or a router and cut a 1/4″ deep groove, approximately 1/2″ from the bottom edge. (See image below.)

drawer step 1 Using a Kreg  Jig I attached the sides to the front of the drawer. drawer step 3Add  a small bead of glue to the cut out groove of the boards.  Then slide the paneling into the grooves. DSC_0134  Then attach back  with  glue and reinforce with a nailer.

Hook Base-

1×4″ Board-
  • 19 1/2″
  • 5″         (x2)   (These will be made into the corbels,see dimensions below.)

Small Corbel I   attached the  the corbels to the base board using pocket holes, and then fastened  it to the base of the jewelry  case.

( You can fill the holes with Kreg Jig Wood Plugs.)

Drawer Insert-

1×2″ Boards
  • 22 1/2″ (x2)
  • 16″        (x2)
Paneling 1/4″
  • 22′ x 17 1/4″

Construct the fame using the 1 x 2″ boards. (Hold off on attaching the 1×3″ board until after you have installed the drawer glide.

Drawer insert

At this point I would pre-drill the locations for your cup hooks.

DSC_0112 cup hooksNearly  there! One of the last steps is adding the drawer glides.

DSC_0106 glidesOnce you have your  drawer glide  installed, then add the 1×3″ trim board. (Remember this is only 1/2″ as opposed to standard boards that are typically 3/4″ thick. We need that ext 1/4″ allowance so that we can use a magnetic touch latch.  This will allow the opening to stay inconspicuous, while still allowing easy access. push pop

The Finish-

I  used “Weathered Gray”  from Minwax, I then used a small amount of Minwax Jacobean to darken the edges and crevices.  I then white washed the entire unit two times.  Both times wiping away  any excess with a rag.  Once dried completely I  used a finishing wax.

jewelry box drawer sawdust2stitches

 The Hardware –

After the finish has completely  dried,  it’s time to add the last of the hardware and the mirror. To place the mirror, I  smoothed an ample amount of Liquid Nails on  to the panel sitting with in the frame.  Gently set the mirror in place and allow to dry.

I decided to add trim  to the interior rim of  mirror, so it would hide the edges and create a nice finished look. (If you own a router, then you can easily route out the interior lip of the 1×3″ boards to  hide these edges as well.  I was simply  trying to make this tutorial more accessible to more readers. )

 Now, slap on the hooks and pulls!  I always love adding the finishing touches!  Only thing left to consider is how to install  it on a wall. I opted for this:wall mount

 Now,  hang er’ up and enjoy! Jewelry box by sawdust2stitches  Jewelry Box by Sawdust2stitches for Kreg closeup   Jewelry box by Sawdust2stitches for Kreg.com

 Jewelry Case tutorial from SAwdust2stitches.com

Pantry Bi-fold into French Doors

April 22, 2015

I have recently  finished up my  kitchen makeover and this  was one of my last projects on the list!  I wanted to give my basic bi-fold  doors a facelift.  After a while considering my options, I came up with this solution, and I kind of LOVE it.  You can read all about it on my  post over at Remodelaholic! Bifold into french doors sawdust2stitches for remodelaholic.com

Workshop Assembly Table

April 15, 2015

Ultimate assembly table Sawdust2stitchesassembly table sawdust2stitches

Ok, so  after 3 years of being frustrated with my  shop set up, I finally  decided to do something about it !  One thing that I really wanted to have an assembly table. I was always sitting on the garage floor trying to assemble furniture.  My joints were always wonky, and the fact that it had carpeting did not help. Well the carpet is long gone.

The reason I had never built an assembly table before was due to space issues, but then I had an epiphany, if I could  make it multipurpose, so that it  actually created  more space in then it would be totally worth it! I decided that my table saw,  air compressor, and the  air hose/reel  were bulky and hard to work with (space wise).   The other requirement,  I had to do it CHEAP! So those were my requirements… and I met and surpassed them!

I am so excited about how it turned out!

WARNING:  This is a BRAG POST,  not a tutorial.  I am  featuring the assembly table that I made, in hopes that it will  spur some ideas !

assembly tabe sawdust 2 stitches   So far I  had spent $6.00 on  (2) 2×4’s,  to supplement the lumber I had from disassembling  my old work bench. (You can see my old shop here) The castors were from my  old table as well, and the door was a FREE  find on Craigslist!  (Yes,  it is solid.)
2015-03-10 15.07.50At this point I had incorporated my  air compressor and my table saw,  2 of my bulkiest items in the shop! (  I did research about laying this compressor down, and it was “ok” as long as it was elevated on one end allowing it to drain).  Then  obviously  the table saw is on the end. Next where to put my hose reel… and what to do with all the space on the far side of the compressor! I  just  can’t let that space go to waste!  Well,  I have my compressor, and air hose reel,  it only makes sense to add my  pneumatics! Here is what I did!  I basically  made a box  (out of wood from yet another Free Craigslist find!)craigslist assembly table Then  added  a  shelf and dividers,  as you can see from the picture this was a lot of scrap wood pieces,  all unified by paint!  I just  used  leftover paint from  the garage floor! 2015-03-11 09.14.24css

 The last thing it needed was a backing,  I just recycled the back of my Free Craigslist “thing?”.  So  ZERO  money spent  on my  nailers and drills.

2015-03-11 09.18.33 ss

 I made it to fit perfectly in the empty space  in my  assembly  table.   Just  slid it into place.

2015-03-11 09.29.18 ss

 Then I used cheap paneling to box it all in.   I ended up using a full 4×8′ sheet  as well as as some scrap pieces.  So that was another $14.00.
2015-03-11 11.12.43 ss

 I then trimmed out all the edges to give it a nice finished look.  I spent about $25.00 on primed 1×4″ finger board. 2015-03-11 14.38.22 ss

The last thing I needed to finish up was my table top, I routed out a strip for my  Kreg Clamp Tracks  (ie  My extra set of hands)

and then trimmed out with premium cut 1×3’s.

Assembly table top Sawdust2stitches.com

Look at how pretty that is!  Everything has a place, and everything in it’s place. Ah… My happy place.

Drill storage Sawdust2stitches.com It wouldn’t be complete without a charging station.  I was able to  incorporate a power strip that allowed me to plug in the chargers, the compressor and the table saw.  Eliminating all the annoying cords!

assembly table sawdust2stitches 

 I was able to mount  my  air hose reel  on the underside of my  table top . I made sure that it was located close to the air compressor and easily accessible. air compressor storage sawdust2stitches 

 I love that the saw is mounted at the end, and creates  support when cutting long pieces.  Another thing I LOVE is that it collects all the sawdust!  Just flip down the front,  pull out the drawer, empty, replace, repeat. Assembly table sawdust2stitches.com

 I was able to include all of my requirements, and I LOVE it. I don’t know how I ever functioned without an assembly table. It definitely  makes like easier. Ultimate asssembly table Sawdust2stitches

It is not only practical, but look at HOW PRETTY !?   Assembly table saswdust 2 stitches.com

What I Spent :

2×4’s                            – $6.00

Paneling 4×8′            – $14.00

Trim                            – $25.00

1×3″ s (3)                    – $15.00

 What I  spent *          – $ 60.00

 Like I said, this is what  I made it for,  the total amount reflects the  money  I had to spend to complete this project*.  It used a lot of  recycled materials from previous projects.

So, how much space are you WASTING, NOT having an assembly table !?

 Thanks for reading,
Corey

 At times I will  discover a product  I LOVE and want to share these new products, brands, and services with you.   All reviews are true opinions and not altered by endorsements.  In some cases  I may be compensated for my efforts.  Posts may contain affiliate links or sponsored content.

Complete Patio Makeover

March 31, 2015

 Patio Makeover sawdust2stitches

 One of lasts summers projects was to make the back  patio a little more appealing.  It was a lot of little projects that seemed to drag on forever.  I did finally finish it all up, but it was a little late in the season for it to be relevant for most readers. So here it is,  my back patio makeover in all of it’s 9×13′ glory.  Enjoy.

 Patio makeover

I started with the floor, the floor the ceiling and the walls were all the same color. It felt like a cave.  It was too dark of a color for the ceiling, but too light for the floor.  The floor always looked dirty.  So it got a little makeover.  You can read more about the process here! Patio Floor makeover after
I loved the difference the floor made, so I decided the ceiling needed some help as well.

You can read more about  how I significantly  brightened the room here. It is amazing what a little paint can do.

ceiling makeover ss

While I loved the new floor, my kids liked to play out on the patio, and I wanted them to have a little bit of a softer surface to play on. So I used a cheap rug  and some paint and  turned it into this!  You can read more about how I did it here. eded

For the tables,  I used two different tables, one that I found at a thrift store, the other, on the side of the road.  With a little bit of elbow grease I was able to make them look as if they went together.

  You can read all about the process here.

before  after rectangle  square before after

For seating I used 2 chairs from my  old dining set and turned them into a bench!  You can read all about the process here.

 Chairbench before after

 For wall decor  I  used a mirror that I picked up from “ReStore for $2.00.  With a little bit of work I was able to make it fit the theme.  You  learn how to make your own here. nautical mirror ss before after

As a small finishing touch I added a couple of simple coasters, that are super  simple and cheap  to make,  you can read more about them here.

 The directors chair was a thrift store find. It was all a matter of repainting, and removing the fabric,  using it as a pattern to create a  new one.coasters final sawdust2stitches  

Patio makeover sawdust2stitches  mirror makeover sawdust2stitches

 I absolutely  love the way it turned out.  You may have noticed I am not great at using color in my house.  BUT  the back porch was different. I was able to get over the anxiety of bright colors and went for it!   I love it.

  • previous
  • Page 1
  • Interim pages omitted …
  • Page 30
  • Page 31
  • Page 32
  • Page 33
  • Page 34
  • Interim pages omitted …
  • Page 47
  • next

Primary Sidebar

  • Facebook
  • Instagram
  • Pinterest
  • Twitter
  • YouTube
IMG_9167 (1).jpg fd
DIY & Design

Meet Corey

Hi everyone, my name is Corey, and I have a problem. I can’t leave well enough alone… The best therapy usually involves a variety of power tools. So, in the few “spare” moments I am not entertaining my two beautiful, rambunctious, boys, I can typically be found hunched over a sewing machine and/or covered in sawdust. All in the efforts to create a perfect balance of aesthetics and practicality in our home.
read more

Join our mailing list!

DIY & design ideas - right in your inbox!

Featured

Stair Tread Makeover

Categories

  • 70's Ranch Home
  • Around the House
  • Build Plans
  • Crafts
  • Current Home
  • Decor Makeovers
  • Dresser
  • Exterior
  • Fall
  • First Home
  • Furniture Makeover
  • Hidden Compartment
  • Kitchen
  • Lighting
  • Makovers
  • Master Closet
  • Organization
  • R.V.
  • Room Makeovers
  • Seasonal
  • Seating
  • Sewing
  • Shelving
  • Small Builds
  • Smart Home
  • Spring
  • Summer
  • Tables
  • Tablescape
  • Tutorials
  • Uncategorized
  • Wall Art
  • Wall Decor
  • Winter
  • Workshop

Footer

Contact Me: Corey@Sawdust2Stitches.com

Latest ‘Grams

Follow on Instagram
2020 © Your Blog Name
theme by soleilflare
Enter your name and email and get the weekly newsletter... it's FREE!
Your information will *never* be shared or sold to a 3rd party.