Supplies Suggested:
- Old beat up table
- 1×4’s
- Stain
- Paint
- Polyurethane
- Wood Filler
- Wood Glue
Tools Needed:
- Sander ( I used a planer too)
- Miter Saw
- Nail Gun
I found a random table sitting on the curb in our neighborhood. I actually drove right past it the first 2 days. I couldn’t think of any great place to put it. So I figured I would skip the step of storing it in my garage.

It was while I was working on my patio floor, that it dawned on me, I need a matching table to accompany this plain jane rectangle table. *Light Bulb*.

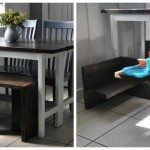
* FYI- I am working on two different tables through this project, so don’t be confused when it shows a square table then a rectangle table, and vis- versa. The goal was to make these two Non-matching tables, match.*
Prep:
I prepped by scuffing/sanding all surfaces.

Priming:
I began by taping off anything, I did’t want painted. Once taped, I was ready to prime. ( I am aware that there are many paints, that contain primer. I am old school, and I think that primer makes a difference.)
I am going to let you all in on a secret… SPRAY PRIMER. I love it, I do. As much as I boast being frugal, this is one item I think is worth it’s weight in gold. It creates a perfect base, with little or no streaks. Yes, it is more expensive than by-the- gallon primer, but like I said, I love it.

Paint:
I realize this doesn’t follow the pictures, but when I was making these, I was still undecided as to there ending color. SO I skipped to the next step. BUT for anyone who doesn’t struggle with commitment to color, I would strongly suggest painting now.
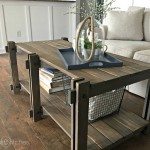
Wood Slat Top:
All the measurements will vary dependent on the size of table, below is an example of what I did for the rectangle table. I cut all the boards so that it would have a border of 1×4’s and the center would be slats. I calculated my wood pieces so that it would have 1.5″ over hang. This is a personal preference.
 Glue it Down:

As a precaution I glued all my slats down, I wanted to eliminate ANY gap under the board. (These tables are intended to endure outdoor humidity in Florida. Small crevices are gross here.) Just slather on some glue, and press all the boards in place firmly.
 Nail er’ Down:

Once all the boards are in place, I also tacked them in place with a nail gun. I didn’t want those suckers going anywhere.

Wood Filler:
No matter how perfect my measurements, there are always annoying cracks. Again, since these are intended for outdoors, I could not afford and places for water to permeate. So, I filled all of them! I filled them all twice. I was not taking any chances.

Stain:
Once the wood filler is dried, I then stained the top. I used Jacobean by Minwax.
 All in the Details:

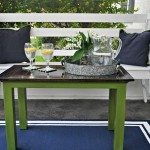
After the top was stained a dark brown, the legs of the table looked VERY, VERY green. So, I used the technique that I explained here. It helped considerably. At this point I also added the trim piece you see directly under the stained table top.

Polyurethane:
Polyurethane serves as protection to stained surfaces, so I polyurethaned the crap out of those tables. I think I did 4 coats ? Just make sure you follow the directions on your choice of Polyurethane. I always use fine steel wool in between each coat.

Overall, I think I spent $4.00 on a paint sample from Home Depot (the green) and $4.00 on 1×4’s. The rest of the materials I had on hand. So, $8.00? I would count that as a win!


In conclusion, if you have an old table sitting around, that could use a little more than just paint ? I would consider this option. It creates a little more high-end look for cheap. Anotheradvantage to using this approach ? You can easily make mis-matched tables look uniform! No one would ever know that these tables aren’t originally part of a set. Booyah
Take Luck,
Corey