• Blog
  • About
  • Press
  • Privacy

Let’s be social!

  • Skip to primary navigation
  • Skip to main content
  • Skip to primary sidebar
  • Skip to footer
Sawdust 2 Stitches

Sawdust 2 Stitches

  • Tutorials
    • Around the House
    • Organization
    • Wall Decor
    • Sewing
  • Makeovers
    • R.V.
    • Room Makeover
    • Furniture Makeover
    • Decor Makeover
  • Build Plans
    • Small Builds
    • Wall Decor
    • Dresser
    • Tables
    • Seating
    • Shelving
    • Hidden Compartment
  • Seasonal
    • Summer
    • Spring
    • Fall
    • Winter
  • Home Tours
    • First Home
    • Current Home
    • 70’s Ranch Home
  • Workshop

Ultimate Drawer Organizer

May 21, 2015

drawer organizer  sawdust2stitches

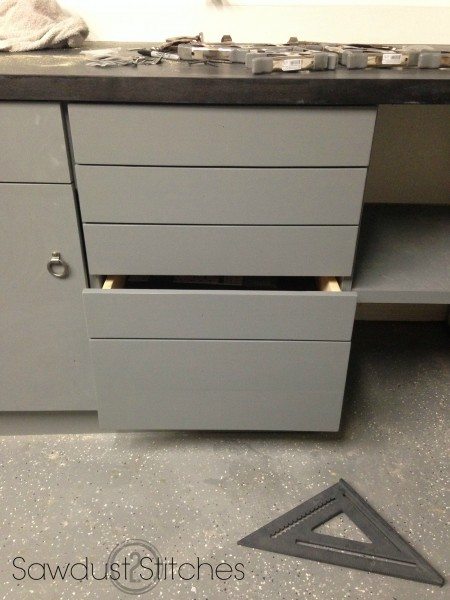
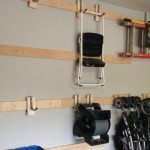
As many of you have  seen in previous posts, I have been in the process of transforming my  garage into my  “workshop”.   If you recall, I had used a plethora  of old cabinets, scrap wood, and free Craisglist finds to  create my cabinets.  ( See all the details here.)    One of the free cabinets I used as my base, was actually intended to be used as a corner piece, so it did not have a door. ( See image below.) 2015-02-24 16.47.33 SS

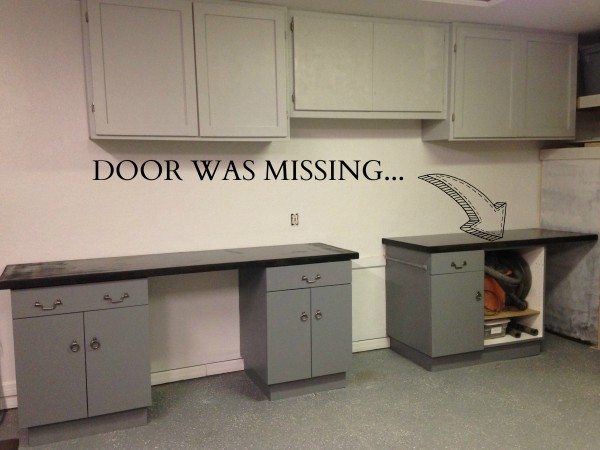
Instead of making a simple door and drawer to match the rest of the lower cabinets I had a better idea…

Have you ever been to a hardware, and seen the isle that consists primarily of rows of small  drawers,  all filled with all sorts and sizes of treasures ?  I have, and I  kind of love them. I  have always  joked to my  husband, that when we  are  independently wealthy I will NEED those drawers in my workshop.

2015-03-26 08.29.10

Well, for those who know me, I have never been a patient person…

Fate would have it that the great folks at D. Lawless hardware were willing to help out on my little renovation.

So let’s dive in.

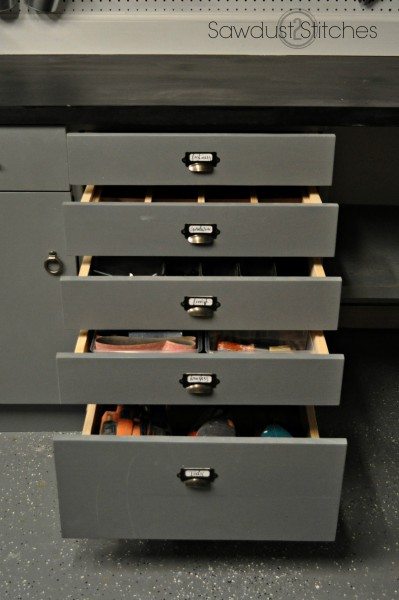
  I proceeded to make 5 drawers. (If you need help making the drawers, I would refer you to the awesome Sandra at Sawdust Girl).

I got a little excited and forgot to take pictures of the process… again.

2015-03-26 09.27.57 SS  Once my drawers were completed, I proceeded to install all of my drawer glides.

If you need help with the installation, they even have an online tutorial to help.

 My only  caution is measure,  measure, and measure. 2015-03-26 10.44.34ss

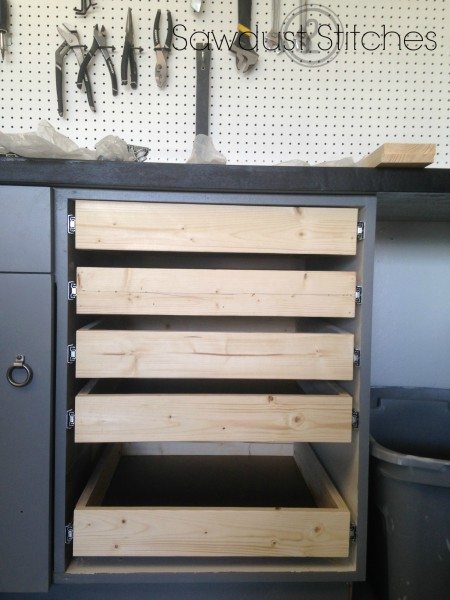
Just look at how pretty it is!  To all my OCD readers, can I get an AMEN !? 2015-03-26 10.48.03 ss

  Next I added the drawer fronts.  I usually  glue mine  and then reinforce with finishing nails from the inside.  2015-03-28 20.07.42 ss  
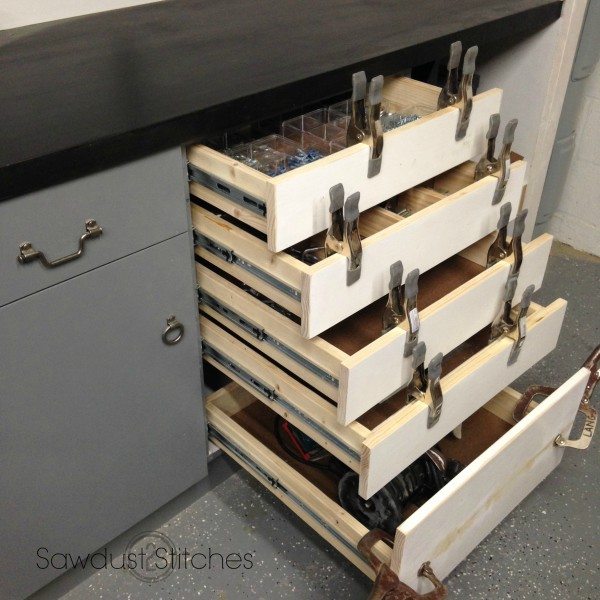
Once the drawer fronts were dry, I proceeded to paint…

NOW we are ready for the fun part!

2015-03-29 19.21.01 ss

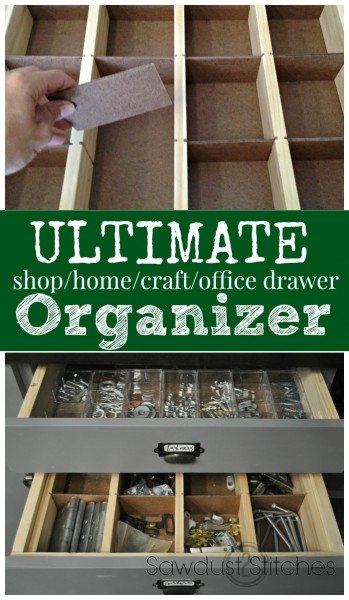
Now that I have my drawers, it is time to organize them, and not just any system will do! I wanted it to be changeable and be completely customizable…

I kept looking through Home Depot’s  tool boxes/organization caddy’s.  I kept seeing this basic design. ( I have seen this system used for all sorts of organization, for example craft organization, or fishing tackle boxes.)  The basic premise , is that you can  add and remove dividers from the rows.

Which is EXACTLY what I wanted,  but they were all far too small…0ff7c33e-0773-4ded-be1d-b1087e1c805f_400

So here is my solution…

I  began by  making  drawer dividers, using  1×3″ boards*.  I  simply measured the depth of the drawer and cut the 1×3’s to fit.

*I did plane my down a little, but this is not necessary.dividers ss

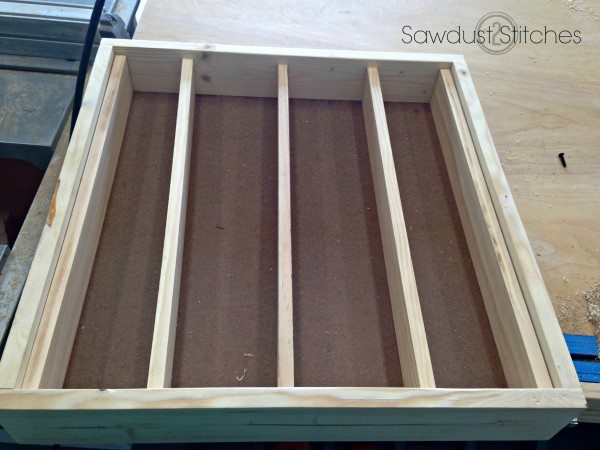
Once I had all my dividers cut to fit ,  I removed them and  marked them at the size cubbies I wanted to create.  For example mine are about 4 ” apart.  The marks will  show  where  the notches will be cut in order to accommodate  the horizontal/removable  dividers.

notch dividers

Using a table saw,  I set  my guide so the  I would hit pre-marked lines.  I  set the depth approximately 3/16″ high.

Once all of the  notches  are cut,  place  the dividers in the drawers, and space them evenly!  Make sure you take the time to measure so that all the spaces are the same, which will allow the dividers to be interchangeable.

Once  all dividers are evenly placed,  they will need to be secured.   I used a small amount of wood glue on the bottom and ends of each of the dividers ( 1×3’s).  For additional support, I nailed them in place  using 2″ finishing nails;  starting on the outside of the frame and entering into the ends of the 1/3″ dividers.


dividers ss2Re-moveable Dividers-  Measure the distance from the inside notch to the inside notch of the subsequent divider, then subtract an 1/8″.  The 1/8″ will give it  just a little wiggle room so that you can easily  remove them when needed.

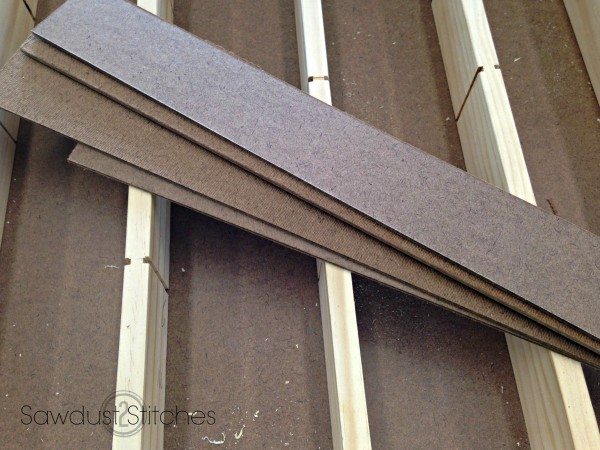
I ripped  down 1/8″ paneling board into 2.5″ strips.  Once they are in the strips, they can then be cut to the dimensions determined. (Above)

For example,  the space between my 1/3″ board dividers is 4 1/4″. I then  subtract my 1/8″  for wiggle room.  Which would make my panels/rectangles cut to 2.5″x 4 1/8″.

dividers install s2s


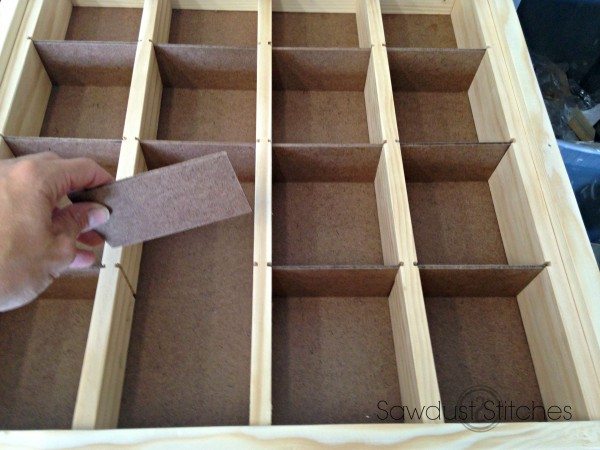
Then  you can add  dividers  depending on the supplies you have to store! As your inventory changes, so can your storage!

*sigh*

 Everything has a place, and everything in it’s place.  That is what keeps me sane.

hd drawers 

  But wait, there is more!  What would these drawers be without labeled pulls ? They are the perfect finishing touch!

 D. Lawless has them for a steal-of-a-deal here. DSC_0457 ss

DSC_0473 ss


More from my site

  • My Recycled Shop CabinetsMy Recycled Shop Cabinets
  • Secret Compartment  Jewelry CaseSecret Compartment Jewelry Case
  • Trash to Toy TrunkTrash to Toy Trunk
  • Garage StorageGarage Storage
  • Dessert Carrier/ Pie BoxDessert Carrier/ Pie Box
  • A Cabinet Makeover that will turn heads!A Cabinet Makeover that will turn heads!

in Uncategorized # Garage, Paint, Storage

Reader Interactions

you may also like
Master Bathroom Makeover
Board and Batten Island Makeover
DIY Pull Out Drawer Storage
DIY Drawer Dividers

Comments

  1. April Rutherford says

    May 21, 2015 at 11:17 pm

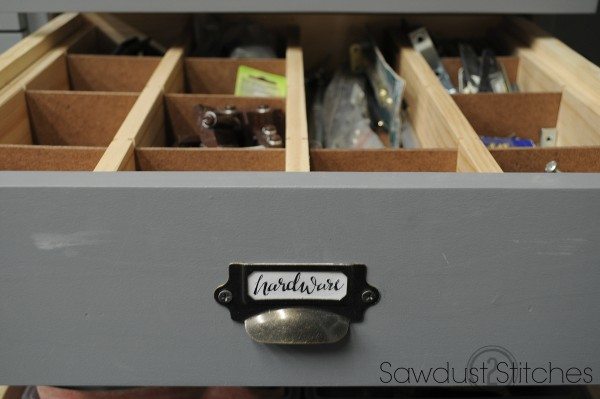
    I love this, so beautifully done. I need to organize my garage so badly, it’s out of control!

  2. LZ Cathcart@ The Summery Umbrella says

    June 8, 2015 at 6:13 pm

    This is absolutely beautiful! What a great tutorial and idea. Definitely loving all the name tags 🙂

Primary Sidebar

  • Facebook
  • Instagram
  • Pinterest
  • Twitter
  • YouTube
IMG_9167 (1).jpg fd

Popular Projects

  • How to: Faux Brick Wall
  • Cheap White Curtains
  • Ikea Cubbies into a Rustic Apothecary
  • Cabinet Transformed Into A Kitchen Island
  • Workshop Assembly Table
  • The BEST Beach Blanket ever!
DIY & Design

Meet Corey

Hi everyone, my name is Corey, and I have a problem. I can’t leave well enough alone… The best therapy usually involves a variety of power tools. So, in the few “spare” moments I am not entertaining my two beautiful, rambunctious, boys, I can typically be found hunched over a sewing machine and/or covered in sawdust. All in the efforts to create a perfect balance of aesthetics and practicality in our home.
read more

Join our mailing list!

DIY & design ideas - right in your inbox!

Top Hits!

  • How to: Faux Brick Wall
  • Cheap White Curtains
  • Ikea Cubbies into a Rustic Apothecary

Featured

Master Bathroom Makeover

Categories

  • 70's Ranch Home
  • Around the House
  • Build Plans
  • Crafts
  • Current Home
  • Decor Makeovers
  • Dresser
  • Exterior
  • Fall
  • First Home
  • Furniture Makeover
  • Hidden Compartment
  • Kitchen
  • Lighting
  • Makovers
  • Master Closet
  • Organization
  • R.V.
  • Room Makeovers
  • Seasonal
  • Seating
  • Sewing
  • Shelving
  • Small Builds
  • Smart Home
  • Spring
  • Summer
  • Tables
  • Tablescape
  • Tutorials
  • Uncategorized
  • Wall Art
  • Wall Decor
  • Winter
  • Workshop

Footer

Contact Me: Corey@Sawdust2Stitches.com

Latest ‘Grams

The bathroom reveal is LIVE! Here is just one The bathroom reveal is LIVE! 

 Here is just one small view of this new, improved, and somewhat magical bathroom.  I have been dreaming about remodeling my bathroom for years and I can finally say it was worth the work and the wait. 
 For real though, can you even get enough of this tile ?? I know I can’t get enough, but I certainly knew HOW much to get. Did you know that The Home Depot app has project calculators for a wide range of materials INCLUDING tile, so you  can know exactly how much product you  need? You better believe it!
 I have details about this feature and more reveal images on the site today. 
#linkinprofile #ThdDoerProject #HomeDepotPartner @homedepot
Sneak Peek… of our completely renovated master b Sneak Peek… of our completely renovated master bathroom!  I have put off giving our bathroom a makeover for 5 years.  I think there are a lot of reasons people put off big projects … time, money, skills, knowledge, tools?  While The Home Depot can’t completely eliminate the list, they can certainly shorten it!  With a library of “How-to Guides”, helpful resources like “Project Calculator” and a vast inventory of tools to rent The Home Depot can certainly make any daunting project more achievable. 

@homedepot #THDDoerProject #HomeDepotPartner
I have put off giving this kitchen island a faceli I have put off giving this kitchen island a facelift for 6 years! I always prioritized projects I perceived would have the biggest impact. Well, HOT DANG  I under estimated the difference a kitchen island could make!I have a full tutorial on the site today. #sponsored @dapproducts 

Photo credit: @ashleynavarrophotography
I’m on a kitchen organizing kick, and these pull I’m on a kitchen organizing kick, and these pull-out drawer are easier than ever to make using the new (extremely intuitive/user-friendly @kregjig 720 PRO.
I have a full tutorial on the site today.#linkinbio #sponsored
Photo Credit: @ashleynavarrophotography
My organizing heart could just burst!! I’m still My organizing heart could just burst!! I’m still organizing the kitchen, but so far I have fit all the contents from the existing pantry AND freed up an entire lower and upper cabinet that contained pantry items.  #winning
Would you believe me if I told you that where this Would you believe me if I told you that where this beautiful custom-built pantry sits, used to be a small builder grade closet? Talk about untapped potential!? While the closet/pantry served its purpose, the space was not well utilized and was altogether unremarkable. With the help of The Home Depot this pantry is not only extremely functional it is a gorgeous feature in my kitchen. 
Sometimes we might look past or forget the untapped potential and resources. 
For example, did you know The Home Depot has a TON of resources to help you with your projects?  Did you know that you can do image search in their mobile app? Yup! Just take a picture of the needed item scan it on your app and find the product in a flash! In fact you  can add it right to your cart and have it ready to be picked up at available stores or lockers!
#THDDoerProject #HomeDepotPartner @homedepot
Follow on Instagram
2020 © Your Blog Name
theme by soleilflare
Enter your name and email and get the weekly newsletter... it's FREE!
Your information will *never* be shared or sold to a 3rd party.