• Blog
  • About
  • Press
  • Privacy

Let’s be social!

  • Skip to primary navigation
  • Skip to main content
  • Skip to primary sidebar
  • Skip to footer
Sawdust 2 Stitches

Sawdust 2 Stitches

  • Tutorials
    • Around the House
    • Organization
    • Wall Decor
    • Sewing
  • Makeovers
    • R.V.
    • Room Makeover
    • Furniture Makeover
    • Decor Makeover
  • Build Plans
    • Small Builds
    • Wall Decor
    • Dresser
    • Tables
    • Seating
    • Shelving
    • Hidden Compartment
  • Seasonal
    • Summer
    • Spring
    • Fall
    • Winter
  • Home Tours
    • First Home
    • Current Home
    • 70’s Ranch Home
  • Workshop

Garage Storage

April 29, 2014

  Do you know what  I hate about cleaning my garage?   Well, I will tell you… it is  the “junk drawer” of my house. No matter how often I clean it, it always feels cluttered.
If I pick up something at a garage sale,  where does it go ?
 “In the garage.”
 I have 3 different strollers, that are used depending on the activity/number of kids with me,  all of which need to be readily accessible. Where do they go ?
“In the garage.”
Where do  I spend about 50% of my waking hours ?
“In the garage.”
So, for an OCD nut job it was fairly important to have it  clean and organized.
BUT, where do you put all the random stuff !?
My solution?  A really nifty storage solution!
Want to learn how to make one yourself ? …

 
 How to make a  “French Cleat” shelving system:
 
  Materials needed:
3/4″ Plywood  (not to be confused with OSB or composite)
3″ Screws
Hooks ( will vary according to project)
 
 Tools Recommended: 
Tablesaw
Drill
Countersink Drill Tip
Level/Laser Level
Miter Saw
We will begin by making the strips of wood  that will be mounted to the wall.

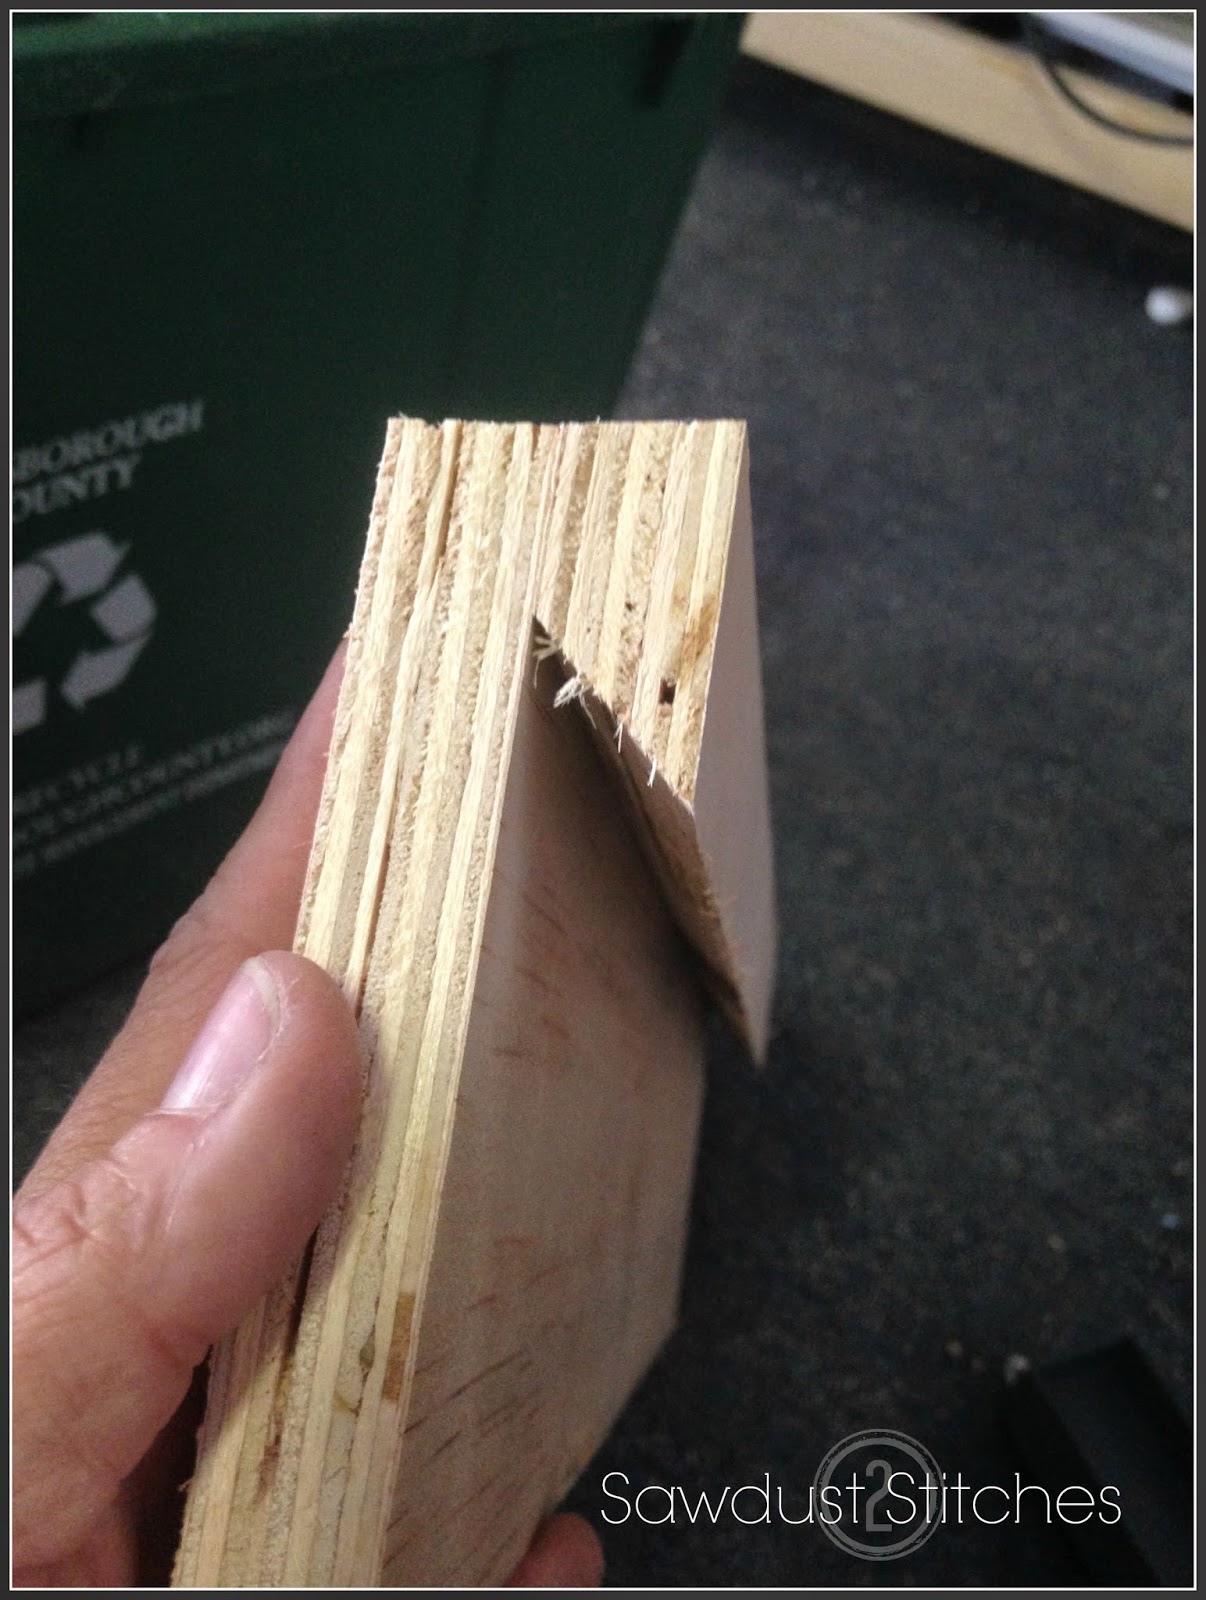
The plywood will need to be cut at 45 degree on one side.

There should be 3″ at the base. (So approximately  3 3/4″  including the 45 degree angle.)
Repeat this process as many time necessary for your project.  Also,  make a few extra feet,  you will need this for the “hangers”.

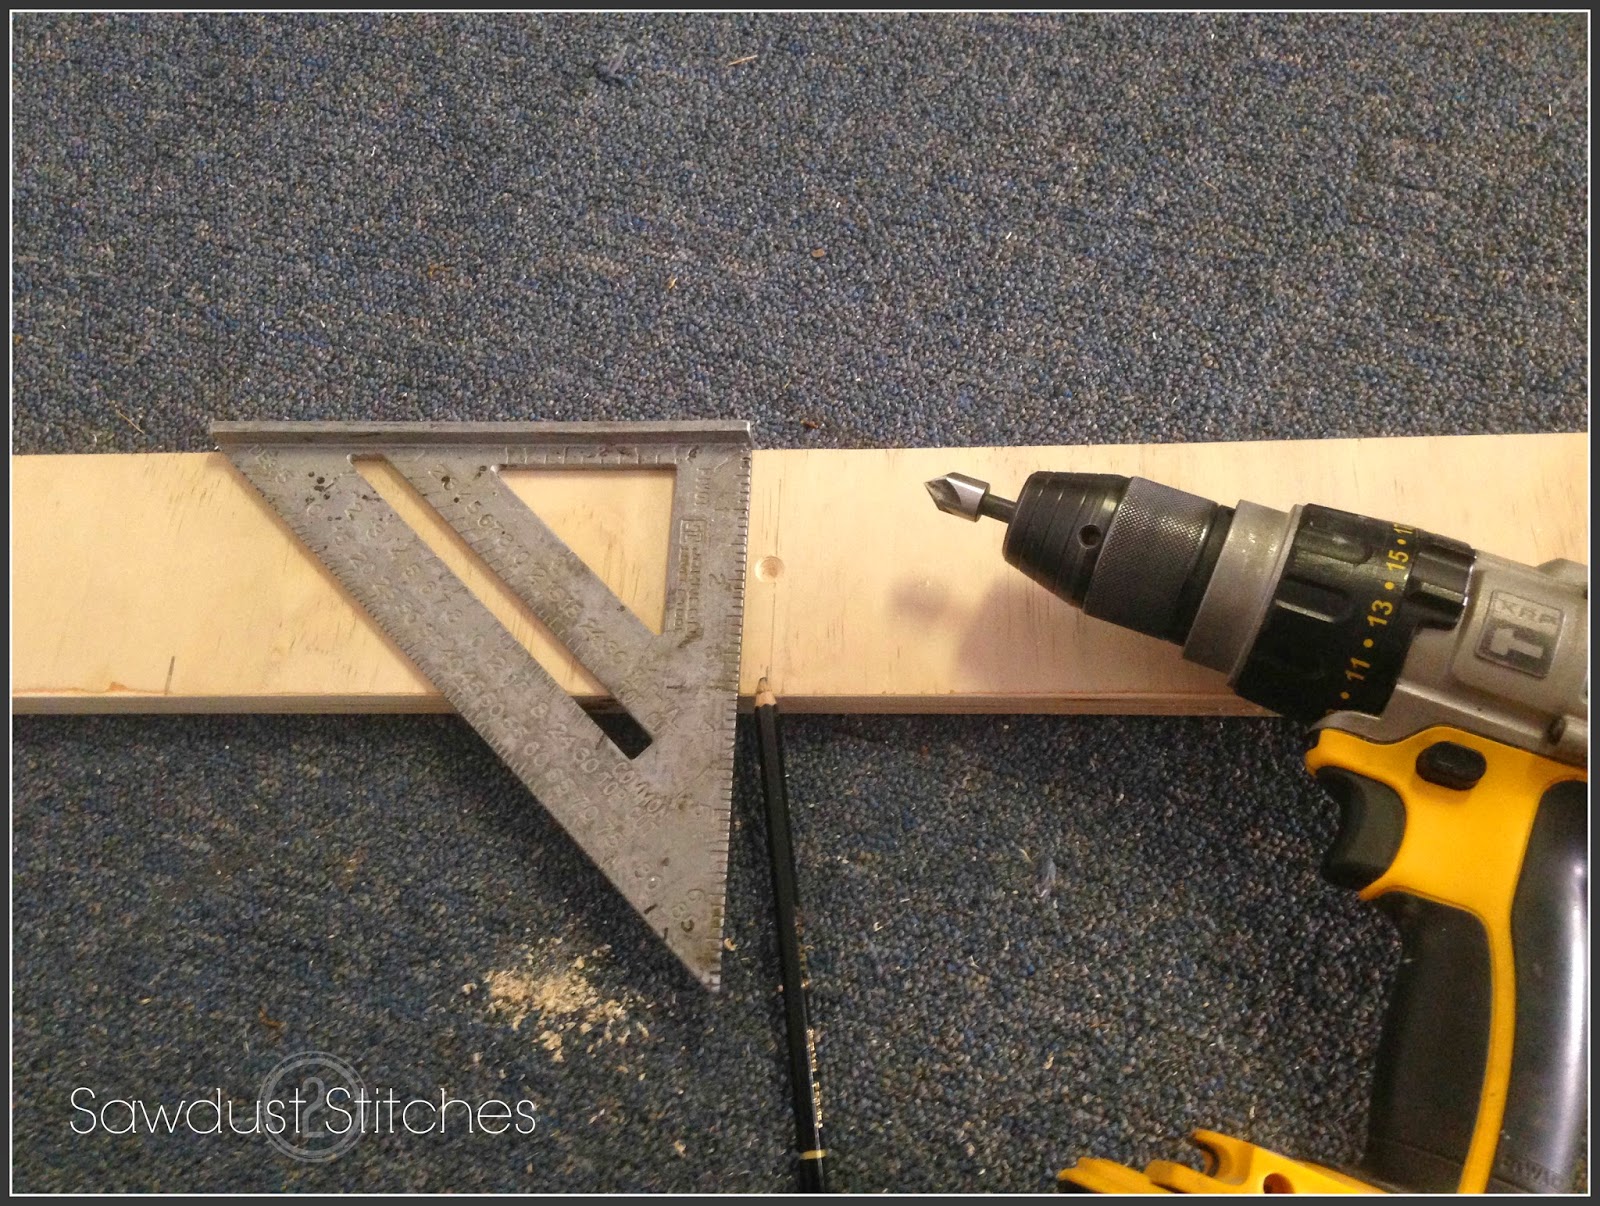
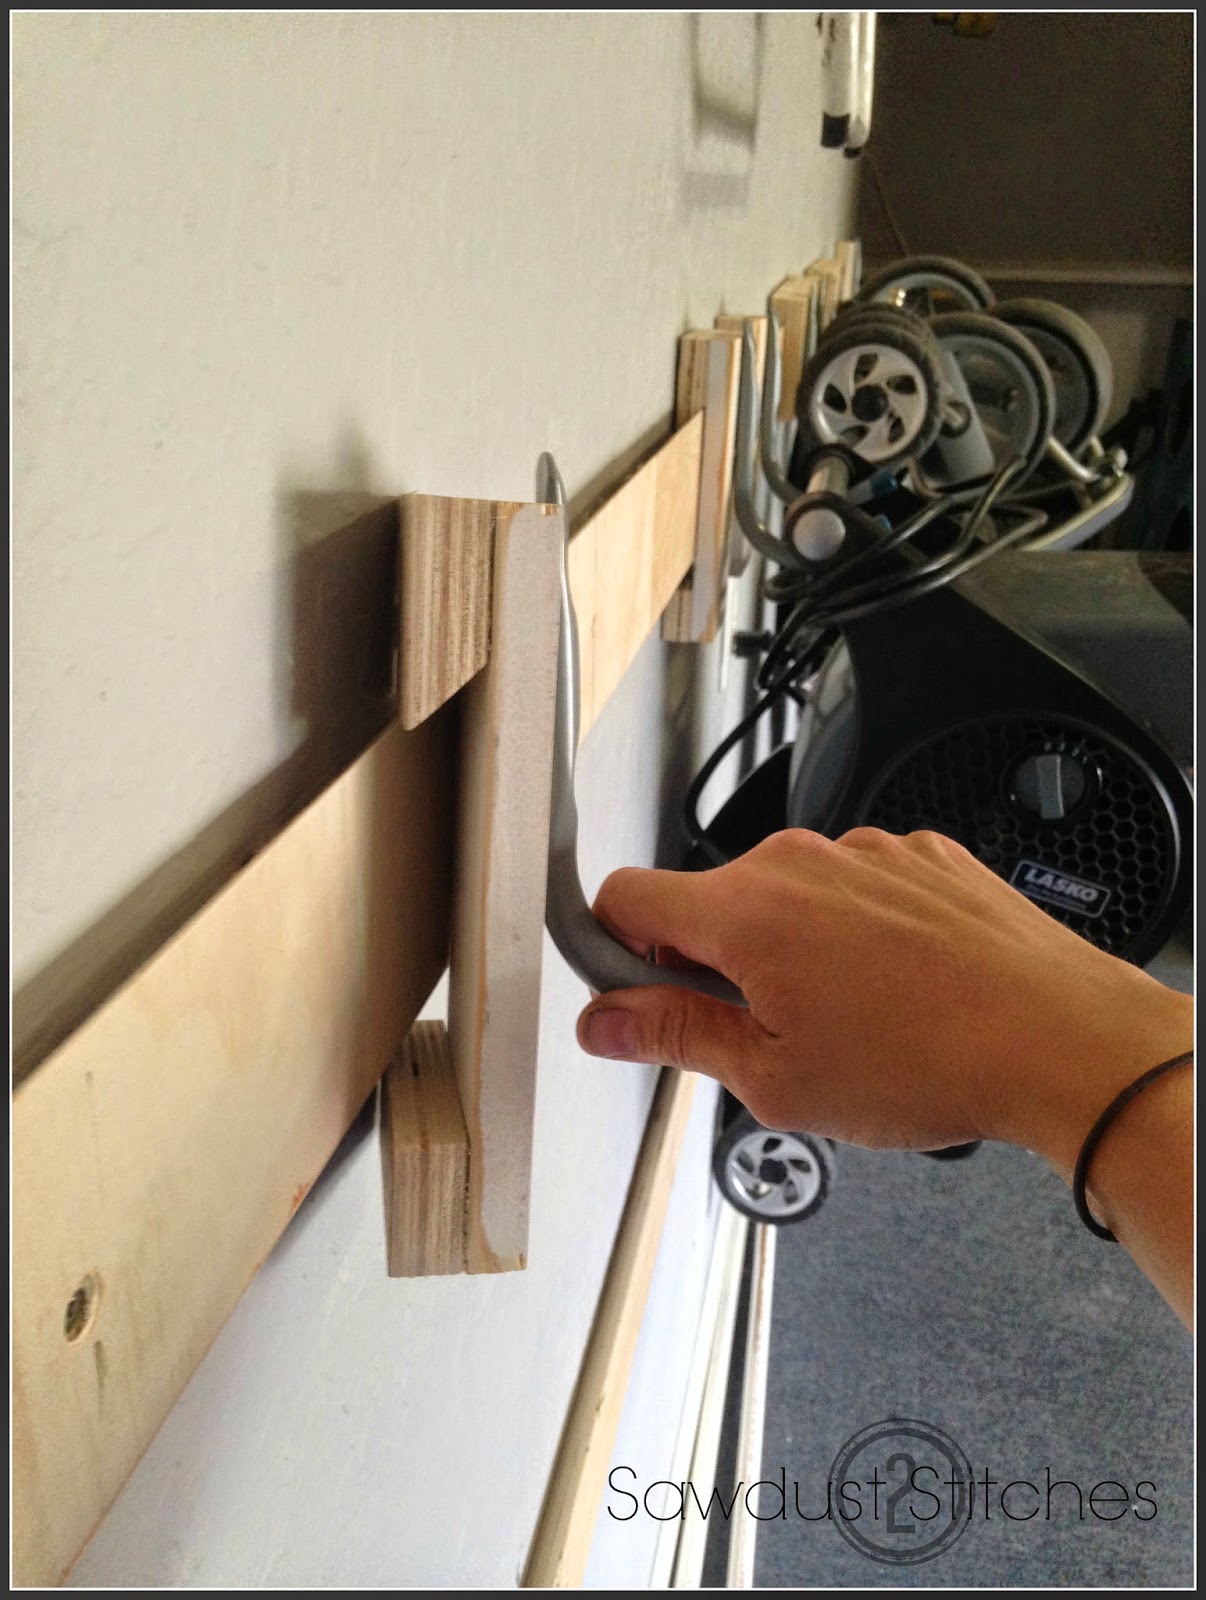
Next:  Mark where the studs will be,  I then  used a “countersink tip” so that the screw would sit  level with the board.

Next,  I used a laser level to map out where my first row would be.
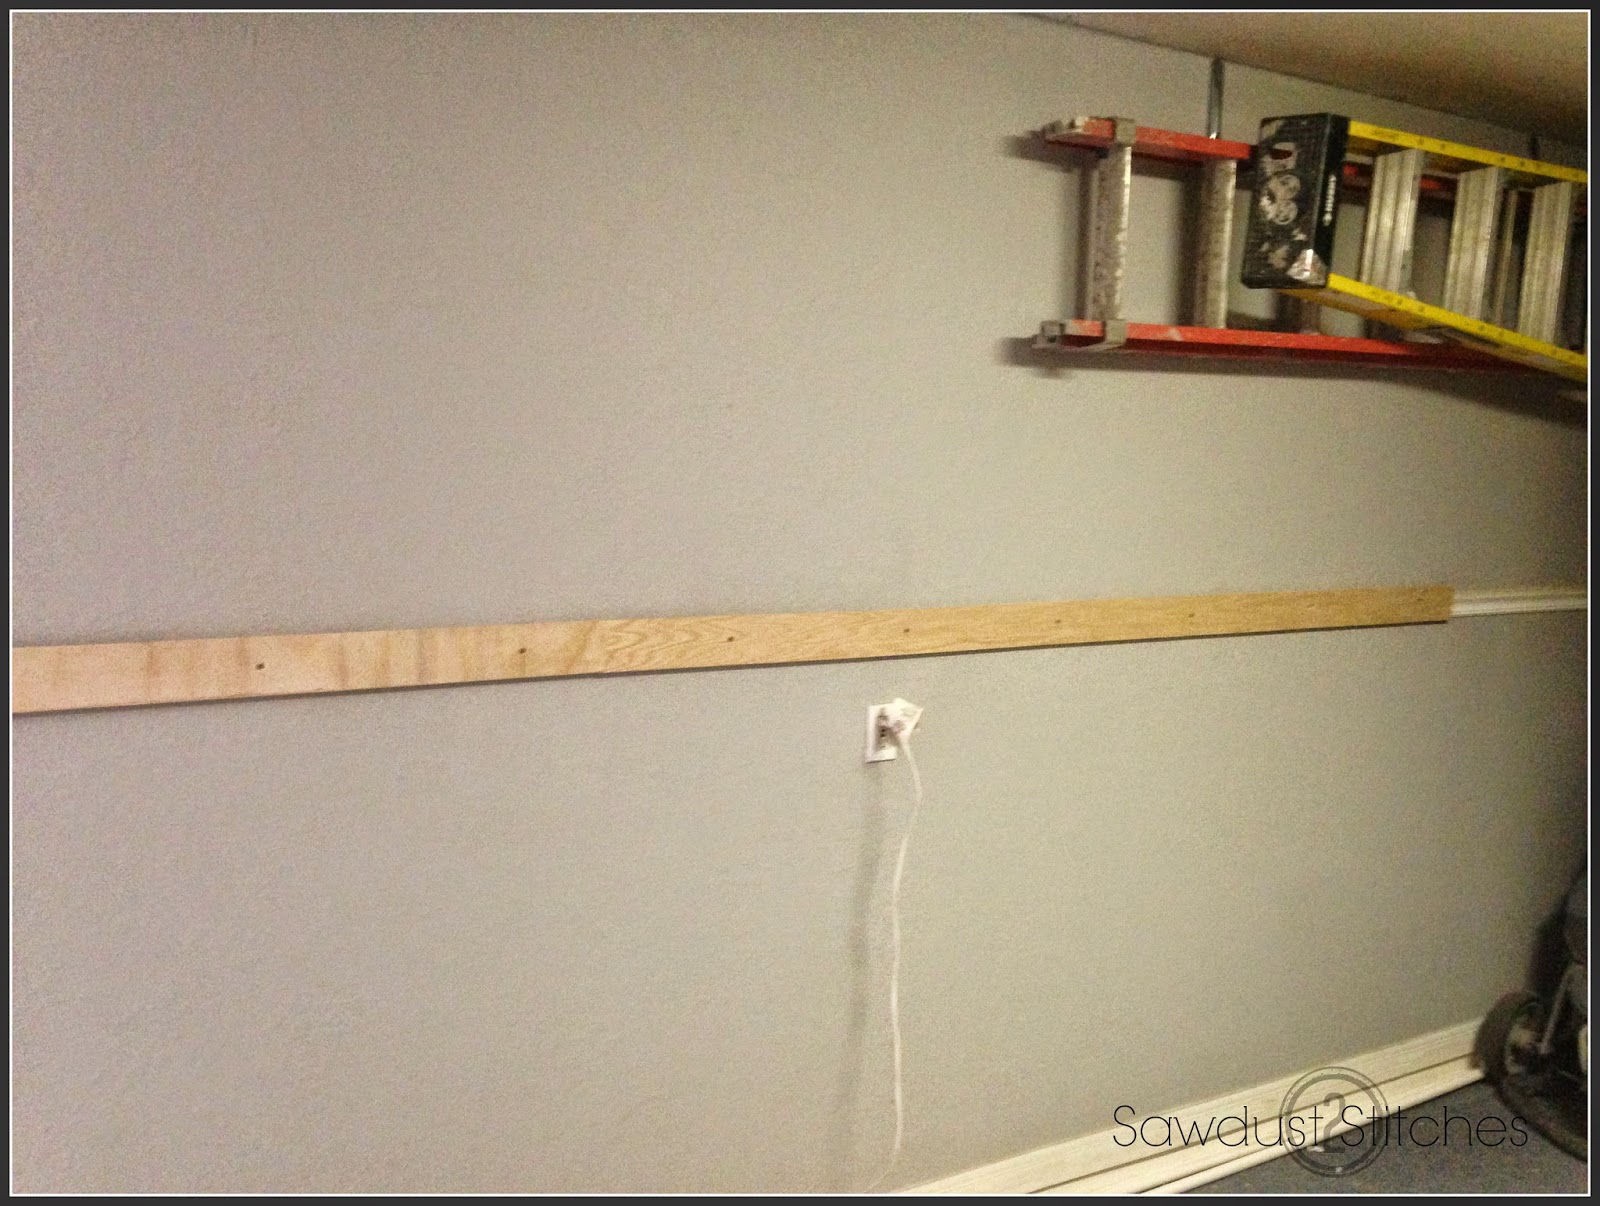
Secure board to wall using a 2.5″ – 3″ screw. Make sure you are  hitting studs!

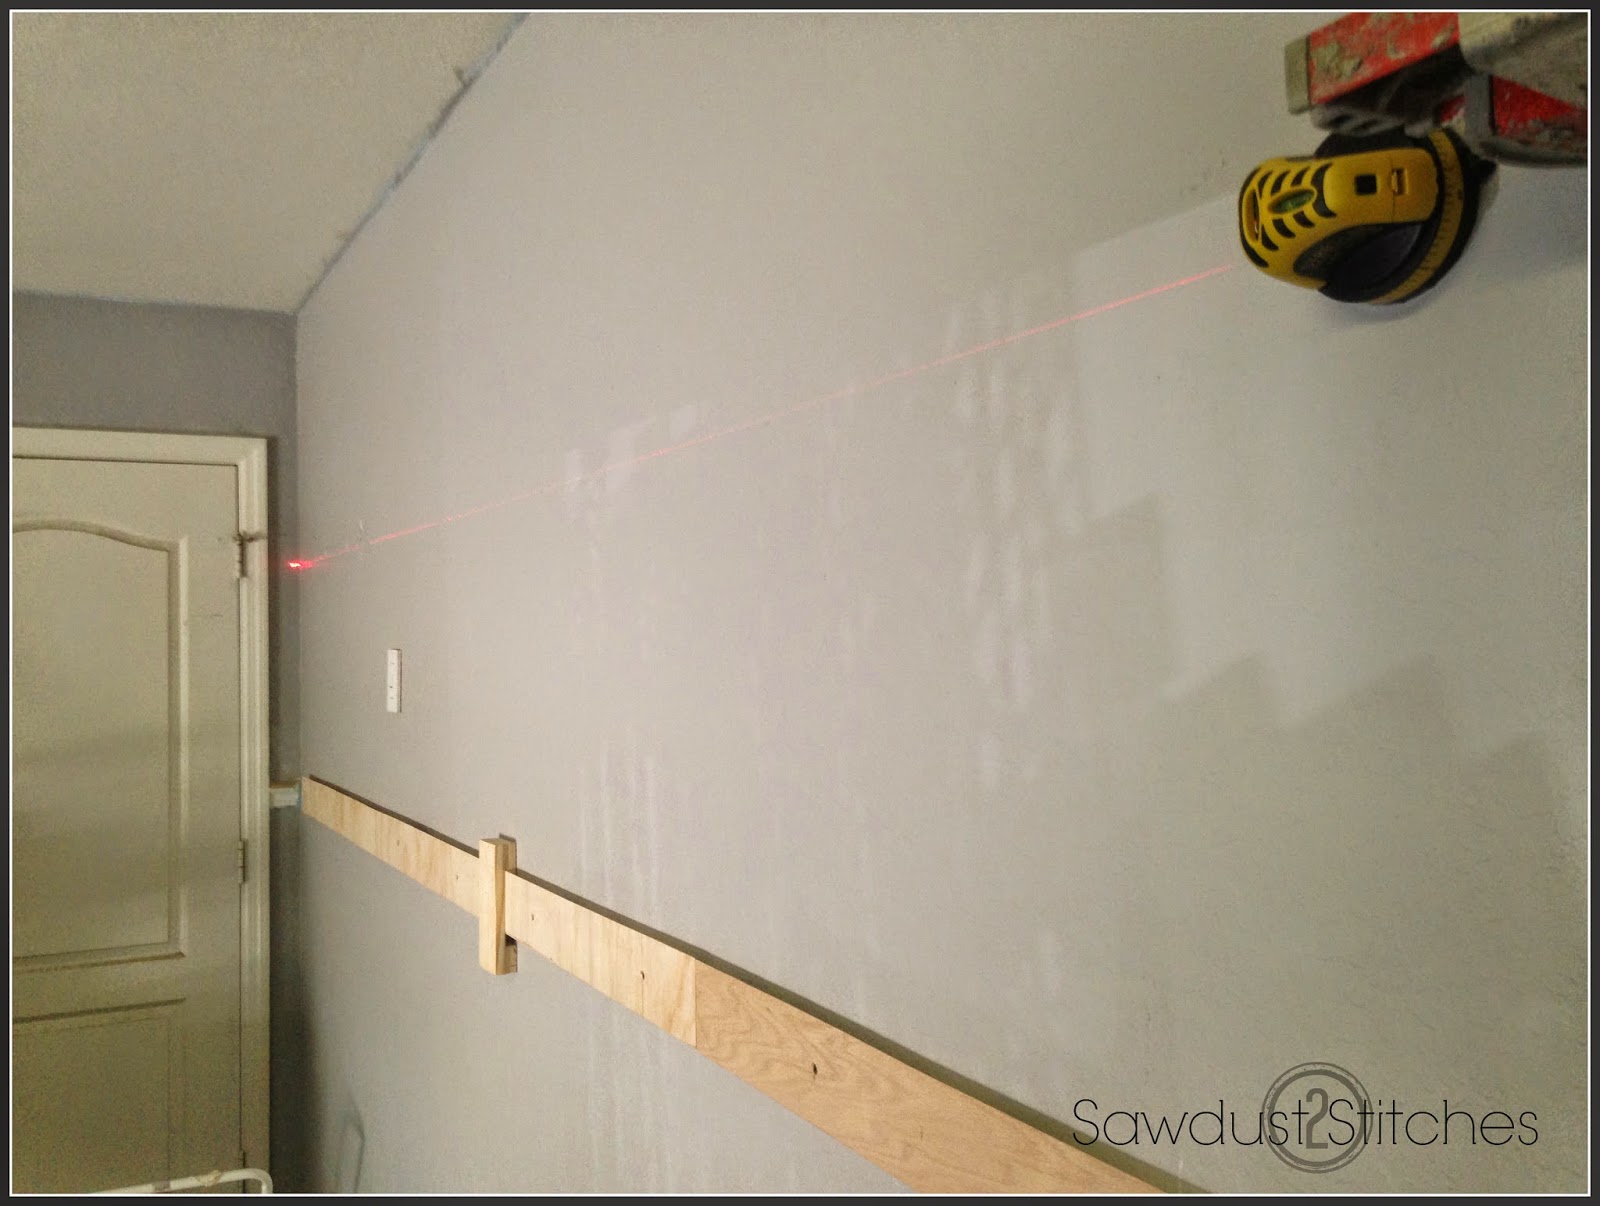
Using a laser level  map out the 2nd row. My rows are spaced out at 21″ apart.

Keep on truckin. Make as many rows as you want!  The possibilities are endless!

 To Make the Cleat Hangers:

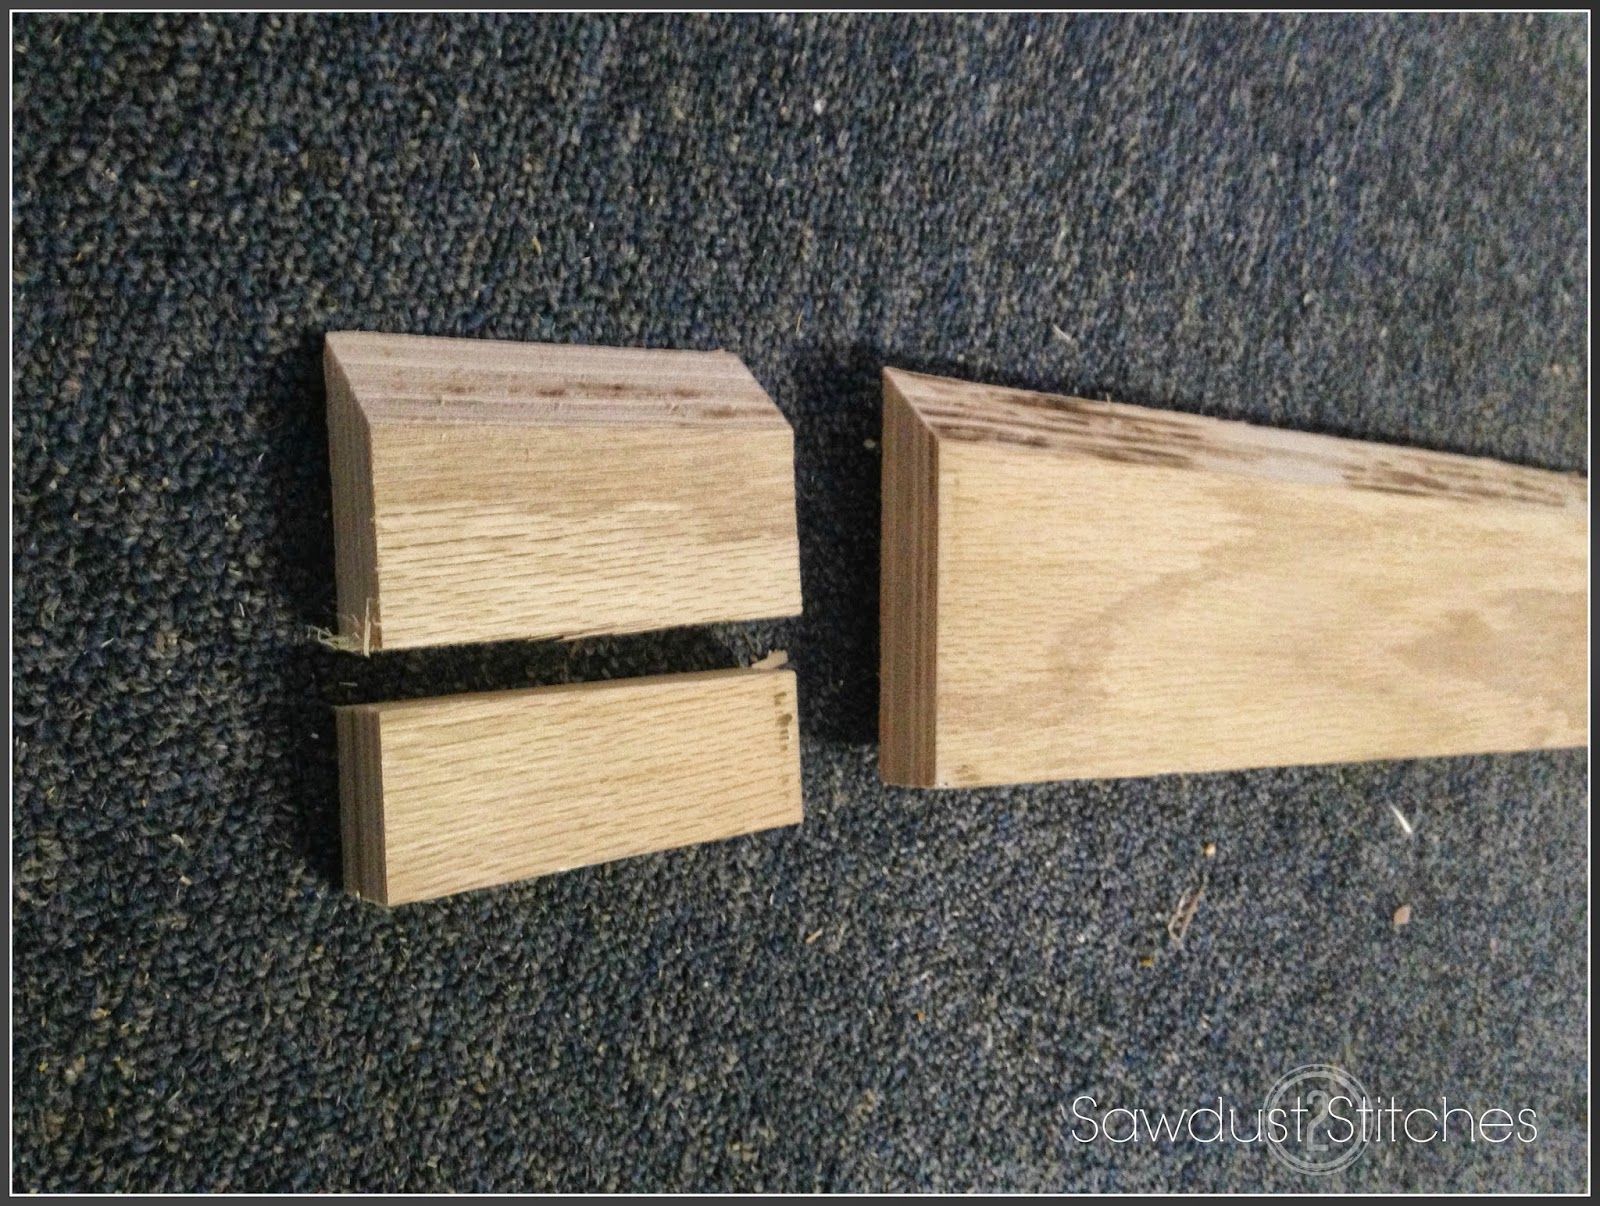
Using  the same planks that were used on the wall,  cut 3.5″ sections.  Then rotate and cut 1.5″ off the sidee that has the 90 degree edge. (See picture above.)

The piece of wood with the 45 degree angle will need to   secured to the top of the “cleat hanger”. I  used a finish nailer,  but  when I install the hook I also put a screw to make it really sturdy.

(For the actual block of wood I used  a 1×4″  cut down to 7.5″)

Take the  1.5″ block that was cut off  from the 45 degree angle and secure it to the bottom  of your “cleat hanger”.

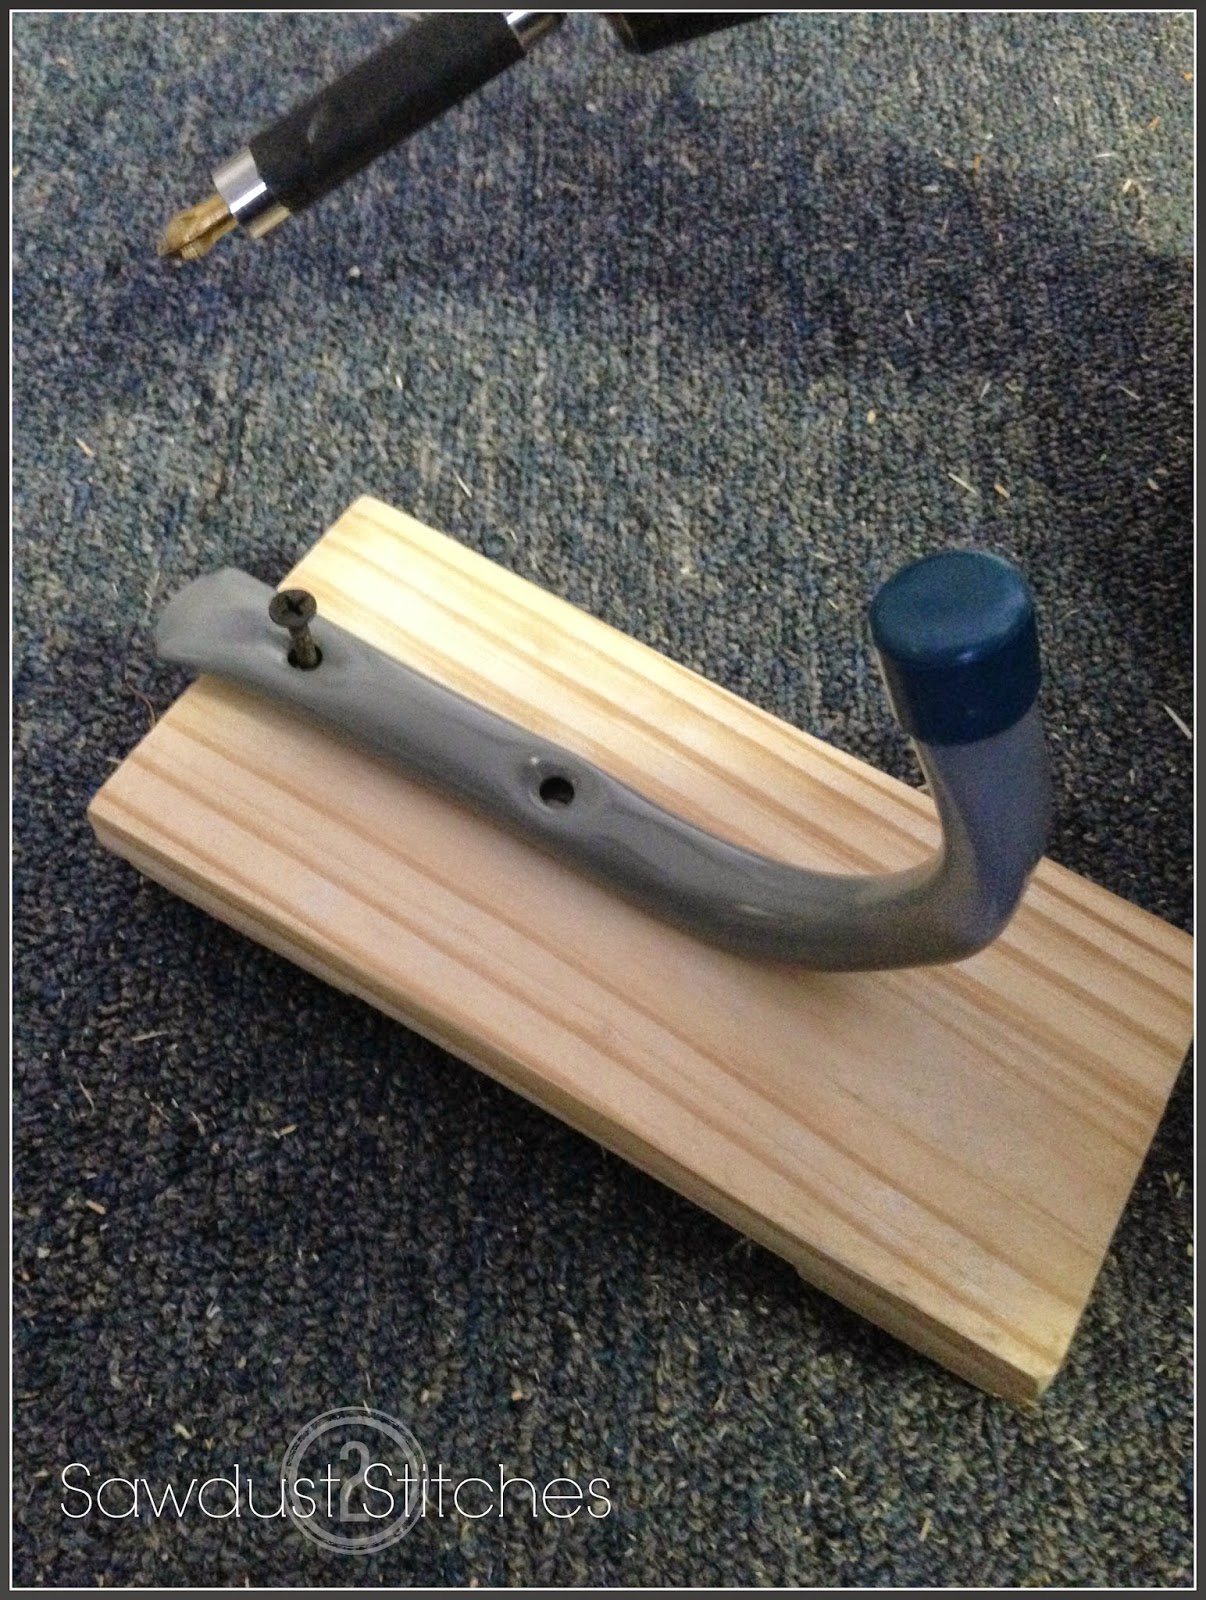
Once the board is assembled you can add hooks. The hooks I used  run about $1.50 a piece and can be found at most  hardware stores. Again, I made sure a screw went through  both the angled cleat board and the top 1×4. (This joint  will be holding a  majority of the weight.)

Then, hang them up !  I made quite a few of these,  planning on doubling them up where needed. I LOVE that these can be moved around to accommodate all of the random sized crap that was scattered all over the garage floor!

So neat, clean, and organized! My favorite part?  Totally customizable to any needs!
So once your garage is ship shape,   pop open a nice cold Diet Coke and stand back and admire your hard work!

Take Luck,
Corey

More from my site

  • Ultimate Drawer OrganizerUltimate Drawer Organizer
  • My Recycled Shop CabinetsMy Recycled Shop Cabinets
  • Spice CabinetSpice Cabinet
  • Home Office MakeoverHome Office Makeover
  • Dessert Carrier/ Pie BoxDessert Carrier/ Pie Box
  • A Cabinet Makeover that will turn heads!A Cabinet Makeover that will turn heads!

in Organization, Shelving, Tutorials, Uncategorized # Garage, Shelving, Storage

Reader Interactions

you may also like
Lazy Susan Charcuterie Board
Moody Board and Batten Guest Room
DIY Rejuvenation Light Fixture
Convert a Cabinet Into a Built-In Armoire

Comments

  1. Kieron Griffith says

    May 23, 2014 at 7:35 pm

    I know exactly what you mean. Cleaning up my garage is exactly the same, even after all the organizing, it still looks cluttered. Haha! I'm glad I stumbled upon your post. This is just what I need to keep my garage clutter free. I'm gonna try it out myself and let you know, too! Wish me luck!

    Kieron Griffith @ Power Washing Houston

  2. Corey Decker says

    May 24, 2014 at 3:59 am

    Glad to be of help! Good luck, and please do send pictures when you do! It is a total game changer for garage organization! I love it!

Primary Sidebar

  • Facebook
  • Instagram
  • Pinterest
  • Twitter
  • YouTube
IMG_9167 (1).jpg fd

Popular Projects

  • How to: Faux Brick Wall
  • Cheap White Curtains
  • Ikea Cubbies into a Rustic Apothecary
  • Cabinet Transformed Into A Kitchen Island
  • Workshop Assembly Table
  • The BEST Beach Blanket ever!
DIY & Design

Meet Corey

Hi everyone, my name is Corey, and I have a problem. I can’t leave well enough alone… The best therapy usually involves a variety of power tools. So, in the few “spare” moments I am not entertaining my two beautiful, rambunctious, boys, I can typically be found hunched over a sewing machine and/or covered in sawdust. All in the efforts to create a perfect balance of aesthetics and practicality in our home.
read more

Join our mailing list!

DIY & design ideas - right in your inbox!

Top Hits!

  • How to: Faux Brick Wall
  • Cheap White Curtains
  • Ikea Cubbies into a Rustic Apothecary

Featured

Lazy Susan Charcuterie Board

Categories

  • 70's Ranch Home
  • Around the House
  • Build Plans
  • Crafts
  • Current Home
  • Decor Makeovers
  • Dresser
  • Exterior
  • Fall
  • First Home
  • Furniture Makeover
  • Hidden Compartment
  • Kitchen
  • Lighting
  • Makovers
  • Master Closet
  • Organization
  • R.V.
  • Room Makeovers
  • Seasonal
  • Seating
  • Sewing
  • Shelving
  • Small Builds
  • Smart Home
  • Spring
  • Summer
  • Tables
  • Tablescape
  • Tutorials
  • Uncategorized
  • Wall Art
  • Wall Decor
  • Winter
  • Workshop

Footer

Contact Me: Corey@Sawdust2Stitches.com

Latest ‘Grams

Happy Holidays to all my DIY loving friends! I’ Happy Holidays to all my DIY loving friends! 
I’m going to put down the tools so I can hang with my crew. 
Merry Christmas from our family to yours! I look forward to sharing so many great projects in 2021, stay tuned! @ashleynavarrophotography
LAST MINUTE DIY GIFT IDEA!!! This Holiday Season m LAST MINUTE DIY GIFT IDEA!!!
This Holiday Season might be a little different from those we’ve seen in the in past. With many folks looking to keep costs and stress low, they are turning to a more sentimental approach to holiday gifting. 
 Handmade gifts are a great way to personalize gift giving this year. I made this serving tray/lazy susan for a friend and I know she will love it! If you want more easy-to-make, handmade gift ideas The Home Depot has many other great tutorials.

@homedepot #HomeDepotPartner #THDxHoliday #THDxDIYWorkshops
2020… it’s been a weird one. I suspect Christm 2020… it’s been a weird one. I suspect Christmas will be a little different too, but that doesn’t need to be a bad thing!  This is the perfect time to branch out and DIY your Holiday gift lists. Take this serving tray/lazy susan for example.  It was such a simple and facts option if you are gifting in a pinch!  The Home Depot has fun DIY gift ideas that your friends and family will love. Check out the link in my bio for more handmade gift ideas. 
@homedepot#HomeDepotPartner #THDxHoliday #THDxDIYWorkshops
This post is sponsored by Kilz but the content and This post is sponsored by Kilz but the content and opinions expressed here are my own.

I leaned in heavily to the dark moody feel for the guest bedroom makeover and I love it! The dark sienna  hue, coupled with my @kilzbrand #accentwallchallenge is absolutely stunning. (If I do say so myself.)
I have a room tour, wall tutorial and source links on the site today. #linkinprofile #sponsored #everyprojectisworthit
@Kilzbrand presented me their #accentwallchallenge @Kilzbrand presented me their #accentwallchallenge, and you know how much I love a good challenge!
If I am being completely honest, I feel like I rocked this challenge. It is absolutely insane how a single wall can change the entire feel of a room. 

On the site I have a full tutorial on how you too can create this look and all the fun details about my choice of color from the Magnolia Home by Joanna Gaines® paint line & the KILZ 3® Premium Primer
#sponsored #kilz #GuestRoomMakeover #AccentWallChallenge #EveryProjectIsWorthIt
Am I the only one who tackles unnecessary projects Am I the only one who tackles unnecessary projects before entertaining guests? As I was preparing the guest room for the Holidays I had an epiphany. I had a vision of what this room could be, and I just cannot let it go - this room needs an accent wall!

I am teaming up with the great folks over at @kilzbrand to create the perfect accent wall, with a gorgeous color from the Magnolia Home by Joanna Gaines® paint line & KILZ 3® Premium Primer. Stay tuned because this accent wall is going to be gorgeous. I just need to pick my accent color. What do you guys think, clay or sage?  #sponsored #kilz #GuestRoomMakeover #AccentWallChallenge #EveryProjectIsWorthIt
Follow on Instagram
2020 © Your Blog Name
theme by soleilflare
Enter your name and email and get the weekly newsletter... it's FREE!
Your information will *never* be shared or sold to a 3rd party.