Be Responsible: I have documented the process for building this case and I am super excited to share it with you today! HOWEVER, let me make this VERY clear, it is not a SAFE. It is a SECRET compartment. The fact that it is hidden and requires knowledge on how to open it is what makes this work. My children have NO clue that there is anything contained in the mirror. If you are considering making this you will need to take into account your own/family/home environment and needs. With that being said, I am EXCITED To bring you this tutorial!
Return to Part 1
Locking–
After the the moveable trim is in place, flip the entire case over so that you can easily see the inside of the case while it is closed.
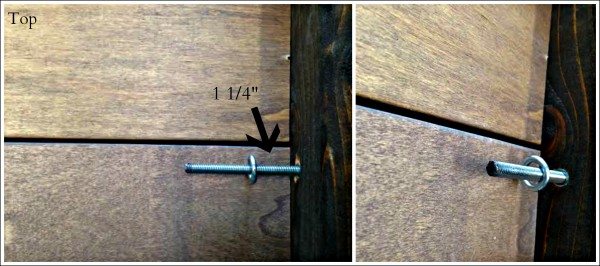
At this point we will be placing 1 1/2 ” eyelet hooks on both the upper and lower lids. These eyelet hooks are intended to be placed so that the 4″ bolt (1/4″ threaded rod) will pass through both “eyes”. I have included some measurements on the images below. However, I would make sure that the bolt will easily go in and out of the hooks, when the trim is pulled out and pushed in, before securing the hooks in place.
The first eyelet hook will be attached to the lower lid, approximately 1 1/4″ from the side.
 The second eyelet hook is a little bit trickier. I had to screw it into a piece of 1×3″ and then place the block on the upper lid in order to get the correct placement. Again, make sure that it is placed so that the bolt (1/4″ threaded rod) will easily clear it when in motion.
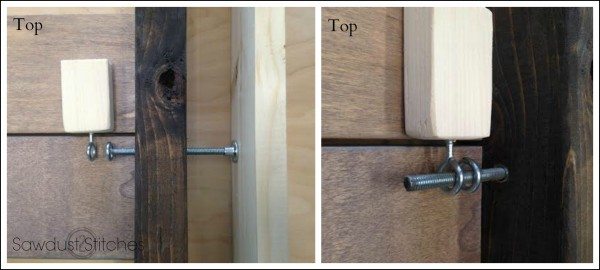
Note: The eyelet on the upper lid (the second one featured above) is not entirely necessary. If the trim piece you attached to hid the gap is secured well, it will prevent the upper lid from opening until the lower lid is unlocked. When making this I did not realized that the trim would hold it in place as well as it does. However, if you are concerned about it being more secure, add the extra eyelet hook for peace of mind.
Grid-
For the grid I used a piece of trim that is 3/4″ wide and 1/4″ deep.
Cut List:
(2 x) – 47 3/8″ long point to long point with 45 degree angles on ends
(4 x) – 47 3/8″
(41 x)- 5 1/8″
(4 x) – 5 7/8″ from the long point of a 45 to a straight cut
- Start with trim piece that will hide the gap between the 2 doors. It is the red piece in both the above and below images. It is important that this hide the gap and is attached to the LOWER lid NOT the upper lid. Make sure this is strongly secured using wood glue, and finishing nails if possible.
 Once the (red) trim piece is placed proceed to layout the rest of the pieces. I would STRONGLY suggest laying out all the pieces AND mirrors before you start attaching. Just to be safe.
- Place all horizontal trim pieces
- Place all vertical trim pieces
- Place all Mirrors

Once all pieced are placed, and fitting correctly, proceed to glue all the components in place. If possible reinforce with 3/8″ finishing nails on the trim. I used liquid nails to place the mirrors without any incidents.
Mirrors![]() – I made this around Christmas time, and during the Holidays I was able to find these mirrors at the Dollar Tree. ( They are technically for candle placement.) Tracking down 40 was not an easy feat, I enlisted a few friends to help me track these down. ( Thank you friends!) This is a large part a reason why I have put off this tutorial, I wanted to track down a new source. I still do see these at the Dollar Tree from time to time, but not steadily. After looking through MANY stores I found that the cheapest way to purchase the mirrors (other than dollar tree) was online. Here is a link to the best option I could find: Mirrors
– I made this around Christmas time, and during the Holidays I was able to find these mirrors at the Dollar Tree. ( They are technically for candle placement.) Tracking down 40 was not an easy feat, I enlisted a few friends to help me track these down. ( Thank you friends!) This is a large part a reason why I have put off this tutorial, I wanted to track down a new source. I still do see these at the Dollar Tree from time to time, but not steadily. After looking through MANY stores I found that the cheapest way to purchase the mirrors (other than dollar tree) was online. Here is a link to the best option I could find: Mirrors![]()
Install Hardware-
I used Gas Struts![]() on mine, this will allow it to have the slow open action. These are not entirely necessary. You can use a cheaper/easier method and use a basic support hinge. They are only a few dollars at your local hardware. I only used the Gas Struts
on mine, this will allow it to have the slow open action. These are not entirely necessary. You can use a cheaper/easier method and use a basic support hinge. They are only a few dollars at your local hardware. I only used the Gas Struts![]() because this was a gift for my husband, and he kind of geeks out about that kind of thing. (Follow the instructions included in your hardware when installing.)
because this was a gift for my husband, and he kind of geeks out about that kind of thing. (Follow the instructions included in your hardware when installing.)
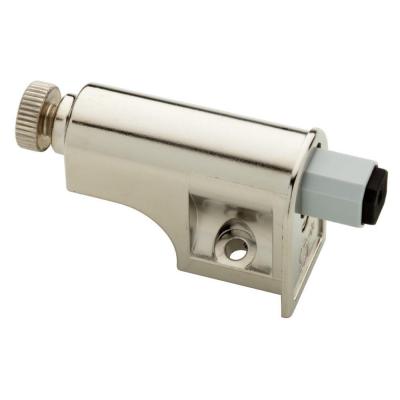
I also installed a slow close dampeners, ![]() again not completely necessary, but again, my husband finds that stuff cool. These are also available at most home improvement stores. (Follow the instructions included in your hardware when installing.)
again not completely necessary, but again, my husband finds that stuff cool. These are also available at most home improvement stores. (Follow the instructions included in your hardware when installing.)

Another “extra” was a motion sensing light. I found one that is battery operated and flips on when the door opens. Again, not necessary, and in some cases not entirely ideal. But my husband thought it was awesome!
Installing:
The last thing to consider is how and where you are planning on mounting your case. There are two options: The easier being a cleat system, using a system like this: 18″ low profile French Cleat with Hardware![]() . (2) cleats would be required for this project.
. (2) cleats would be required for this project.
Or a more secure approach would be securing it to the wall with lag screws. When I originally made this, I was playing the whole thing by ear, and making it up as I went. As a result the approach to mounting it was a little interesting. As you can see in the image below.
 I first decided where I wanted my case to be placed. I then determined where the studs where on the wall that I was mounting my case. As you can see my lag screws are not centered. This is because I placed the lag screws according to the stud placement.
I then cut 3″ blocks from a 2×3″ board. I then securely mounted these to the frame. I carefully pre-drilled with 1/4″ bit through the block. (This will prevent the board from splitting when securing the case to the wall.)
The only thing to keep in mind is that you cannot have anything in the top corners, because the supports/hydraulics will hit it.
Peg Board-
Cut List:
- 46 1/4″ x 28 5/8″
The last thing it will need is the peg board. It will require a piece of peg board that is approximately 46 1/4″ x 28 5/8″ This should fit in the notch that was cut out when first assembling the frame. Secure in place using wood glue and reinforce with finishing nails.
It is important that the peg board hooks are arranged prior to mounting to the wall. In an effort to make the case as low profile as possible there was no clearance allowed on the back side of the case. Again, the peg board hooks will gauge your wall if they are installed or moved after the case is mounted.
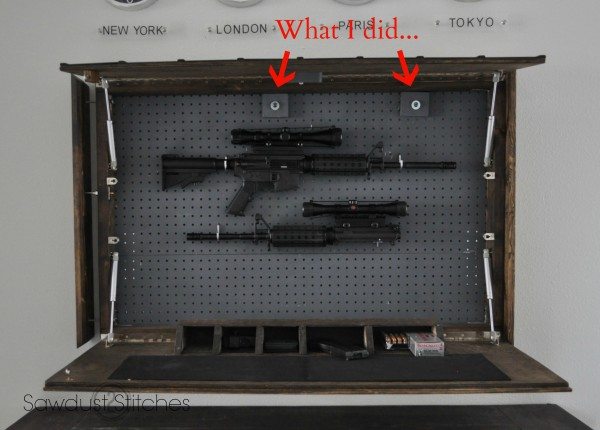
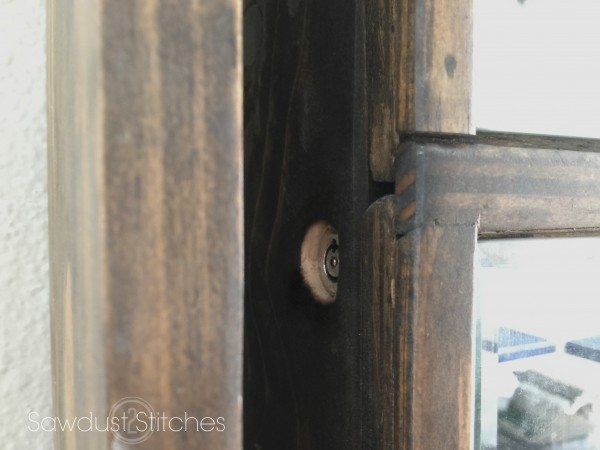
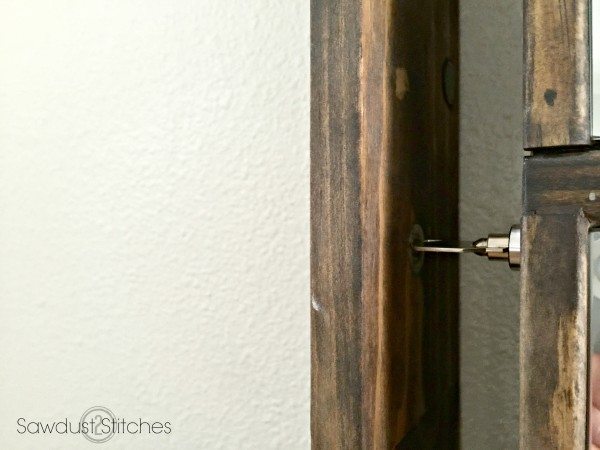
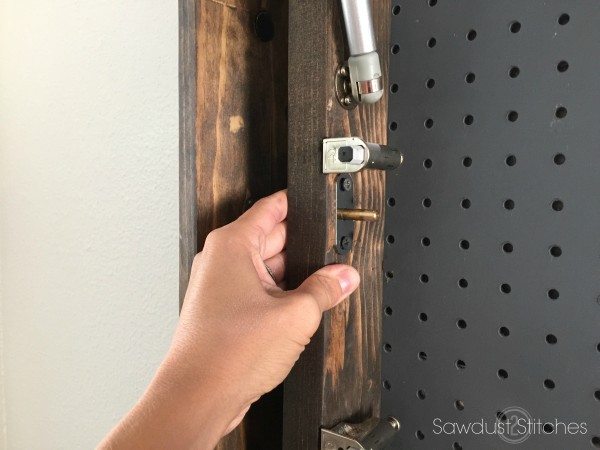
UPDATED- As my kids have gotten older, I have since added a key lock. Here is what I did to include a key lock.
That is it!
Alright everybody, I know this is not an easy build, but with some math and planning you can take this theory and apply it to any number of dimensions!
Thanks for reading, and … Take Luck!
Corey
THIS IS AN ENTERTAINMENT BLOG:
When using the tutorials, BUILD AT YOUR OWN RISK , always take necessary safety precautions! We will not be responsible for any injury or damage incurred while following a tutorial from our site. None of our posts should be considered expert advice; please consult a professional when needed, read all safety and instruction manuals, and take all safety precautions.
 Copyright secured by Digiprove © 2015-2016


OMG! I love this! I just dont think I could build it. But what color did you stain it??
Thanks so much! I used jacobean by minwax.
Hi, thanks for this tutorial!
I was wondering what type of wood you used for the 1×6″ trim boards. Pine?
Also, do you have to do pocket holes or can I just screw the frame boards together from the sides?
Is the 1/2″ plywood a specific kind?
Thanks in advance!
Bob.
For the plywood, I tried to use something a little higher quality, main reason being, the struts do add pressure to the board, and a higher quality plywood will not bow as readily. Also, I wanted mine to be stain quality.The 1×6 is pine, and yes you can do this without pocket holes, I just prefer it, it is easier to get a solid 90 degree angle.
Thank you for the reply. Sounds good. I’m well on my way now into the build. Mine will be 9 mirrors wide by 7 mirrors tall! Thanks for the inspiration.
Bob.
For all who are planning on a build, I was able to find the Hillman spacers at my local farm store (Farm & Fleet) for 89¢ apiece and also the T nuts. They were $1.79 each, 1/4 20 x 5/16″.
Thanks Bob!