• Blog
  • About
  • Press
  • Privacy

Let’s be social!

  • Skip to primary navigation
  • Skip to main content
  • Skip to primary sidebar
  • Skip to footer
Sawdust 2 Stitches

Sawdust 2 Stitches

  • Tutorials
    • Around the House
    • Organization
    • Wall Decor
    • Sewing
  • Makeovers
    • R.V.
    • Room Makeover
    • Furniture Makeover
    • Decor Makeover
  • Build Plans
    • Small Builds
    • Wall Decor
    • Dresser
    • Tables
    • Seating
    • Shelving
    • Hidden Compartment
  • Seasonal
    • Summer
    • Spring
    • Fall
    • Winter
  • Home Tours
    • First Home
    • Current Home
    • 70’s Ranch Home
  • Workshop

Blog

Wooden Doormat

March 21, 2016

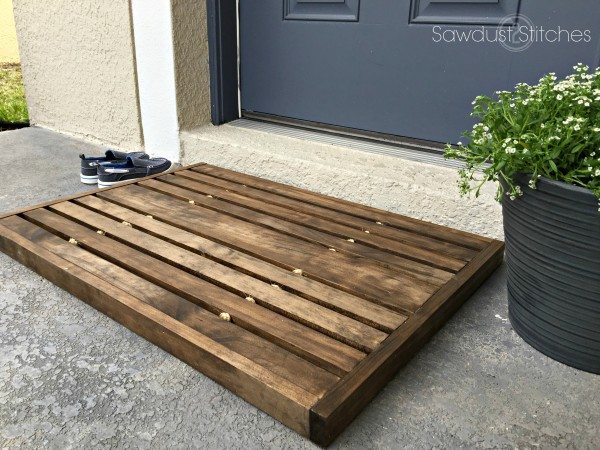
Hey there Sportsfans,  I am absolutely ecstatic about today’s tutorial.  I am teaming up with Home Depot team to bring you my own personal flair on a Wooden Doormat!  I honestly  could not be more pleased with the finished product! #diyworkshop #Sponsored


DIY Wooden Doormat


DIY_16_DoorMat_Beauty (3)

(Home Depot’s Example Wooden Doormat)

Wooden Doormat

Home Depot Offers Workshops!

  • The Home Depot offers Workshops at all of their locations for do-it-yourselfers of all ages and experience levels. If you are interested in learning more, there is more info HERE.
  • There are three types of Workshops offered – Do-It Yourself (DIY), Do-It-Herself (DIH) and Kids.
  • Customers can learn how to build décor projects, how to make easy home repairs and how to operate tools through demonstrations and step-by-step instructions.
  • Visit Home Depot to register and learn more.
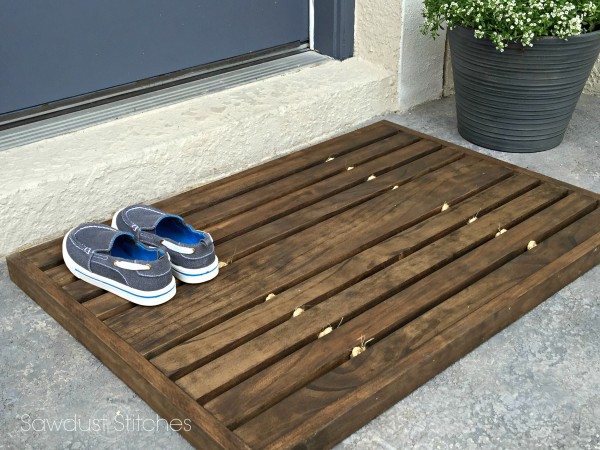
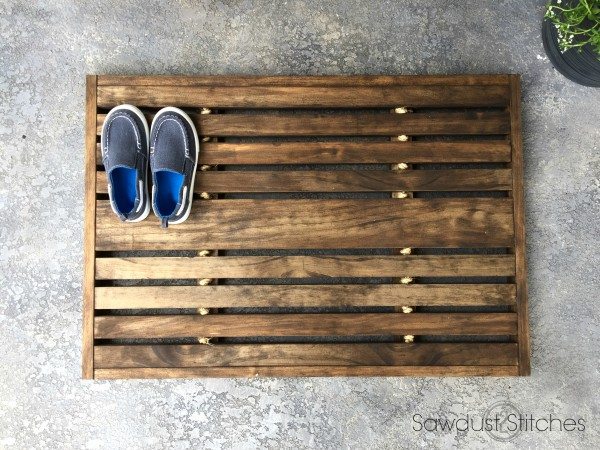
Wooden Doormat

Supplies Used:

  • (4) 1″x 2″ boards
  • (1) 1″x 4″ board
  • Sisal Rope
  • Stain (Consider weatherproofing if applicable)
  • Wood Glue
  • 2″ Nails

Tools Suggested:

  • Miter Saw
  • Drill
  • 5/16″ Drill Bit
  • Nail Gun
  • Tape Measure
  • Safety Glasses

Disclosure: Some of the links provided  are affiliate links. By purchasing through these links it supports this site and helps keep content free. You can read more about how we do this with no extra cost to you.


Step 1.

 Cut List:

1″x 2″

  • (2) @ 21″
  • (10) @ 29″
  • (2) @ 19 1/2″

1″x 4″

  • (1) @ 29″

Once all boards are cut , sand smooth.
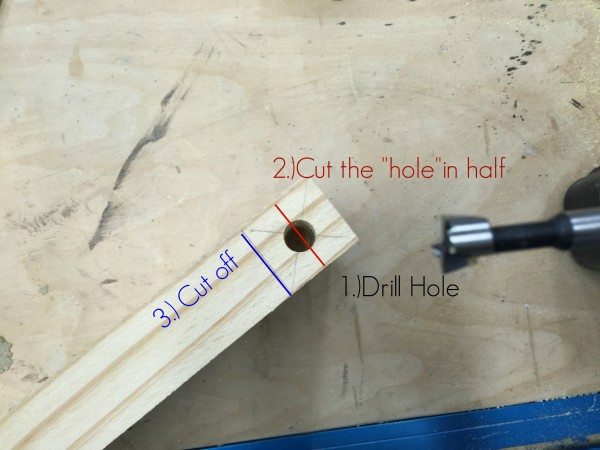
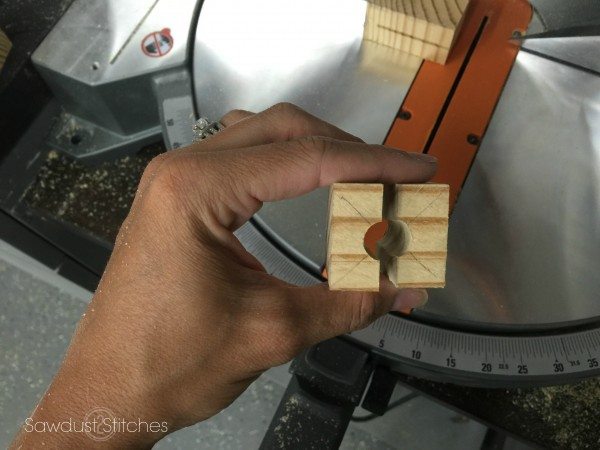

 Step 2. Drill holes

Line up (8) of the 29″ 1″x  2″ boards as well as the 29″, 1″x 4″ board.  Measure 7 1/2″ inches from each end and mark. Using a square you can ensure that they will all be uniform.Make a wooden Doormat

DIY wooden Doormat by sawdust2stitches.com

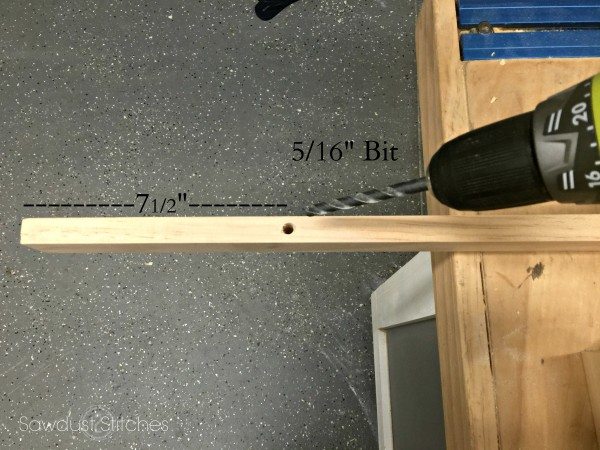
Once holes are drilled, then sand down any tear out from drilling.


Step 3. Stain

I would highly  suggest staining BEFORE assembling.  Honestly trying to stain around the rope and down in between the slats sounds like a pain in the… bum, or if  you are glutton for punishment, be my guest.

Like I said  before, if this is going to be sitting out during the monsoon season in Florida, I would suggest taking extra precautions to treat your wood. (Like put it in a Ziploc bag 🙂  Makes sense right ?  I live in Florida where we have a lot of sun and  heat… naturally.  When selecting a stain I opted for a weatherproofing stain.  I used Behr Weatherproofing Stain in “Coffee”.


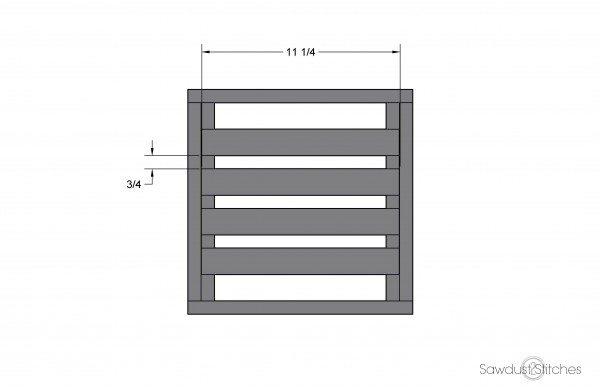
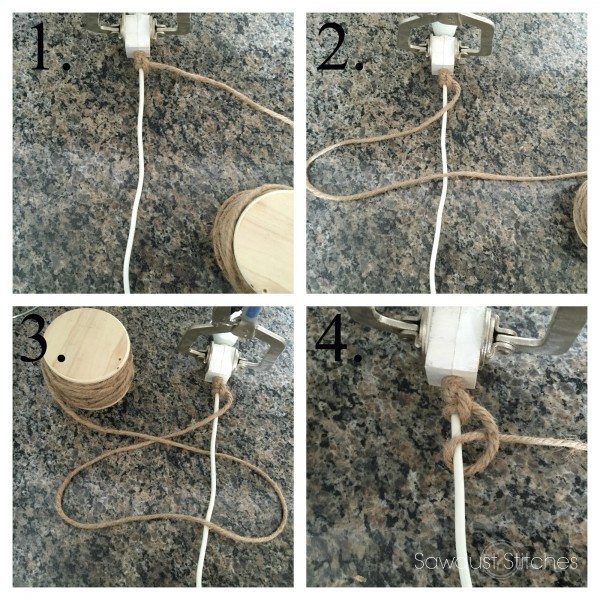
Step 4. String em’ up  Together

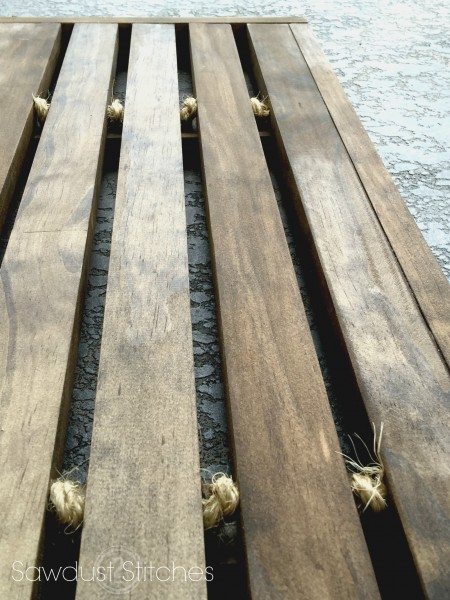
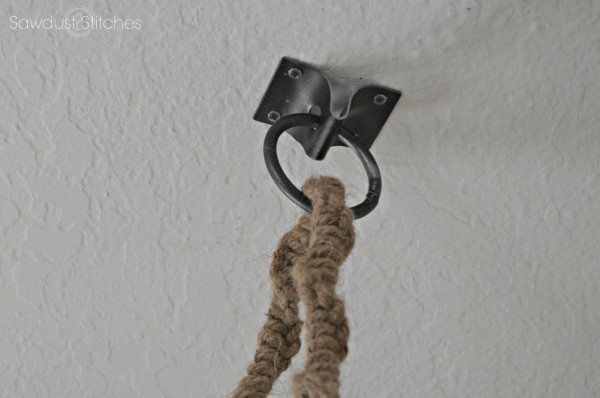
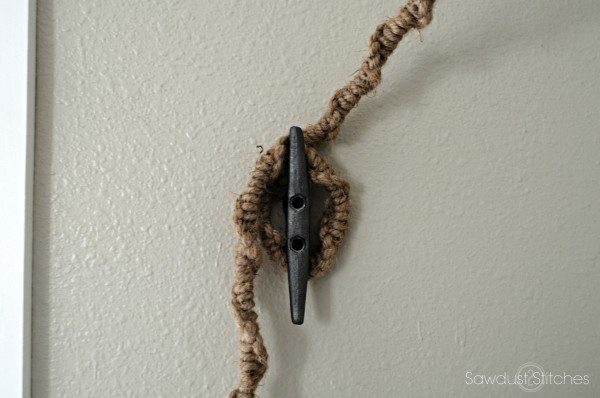
Next up,  sisal rope!  I used 1/4″ Sisal Rope. When stringing/knotting your rope, one thing to keep in mind is that the gaps between the boards needs to be 1/2″.  I used spacers to make sure I was making my knots tight/small enough.

Use the diagram below for order, and spacing.  Leave about 3/4″ rope cut off from the first and last board.  (See image in  Step 5. for reference)DIY Wooden Doormat 1


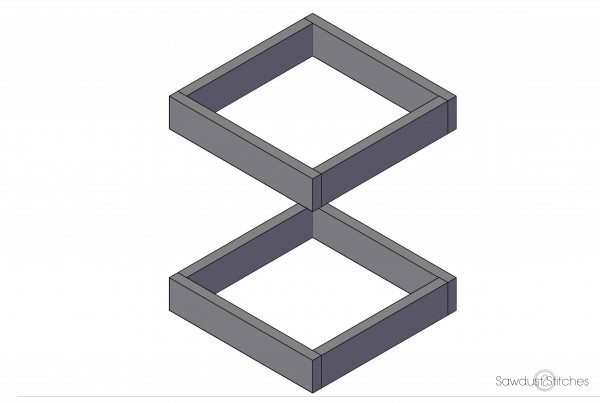
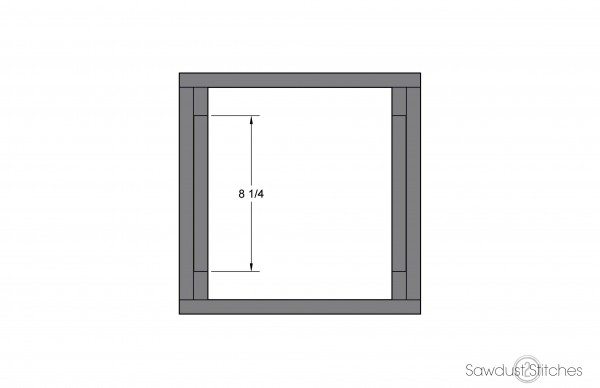
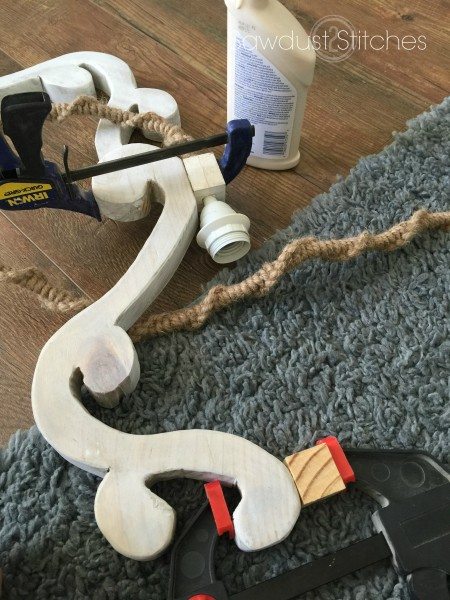
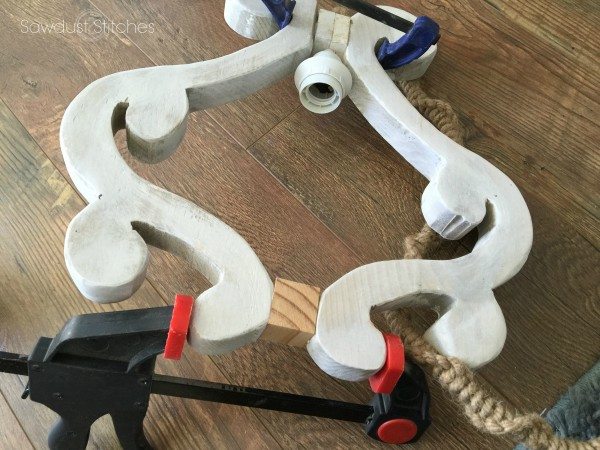
Step 5. Top and Bottom

Using the remaining (4) 29″ boards  we will make the top and bottom boards that will help frame out the door mat. Following the diagram below secure the boards together. (You will make two of these).  First glue them together, and for a little extra insurance reinforce with 2″ nails.

REMEMBER the board with the hole through it will be sitting with the 2″ side up.  (see Diagram)DIY Wooden Doormat 2

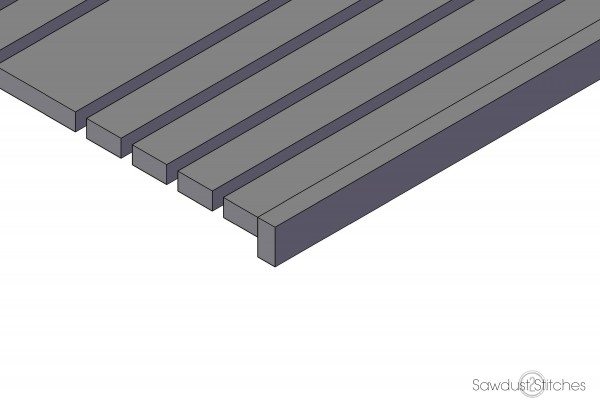
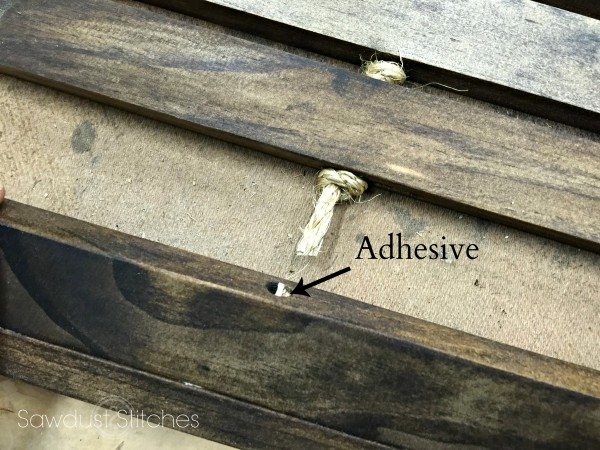
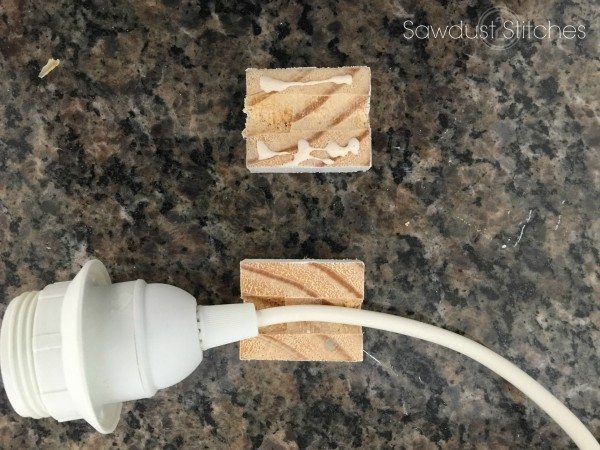
In order to hide the remaining sisal rope, I added a small amount of wood glue inside of the hole drilled into the 1″x 2″ board. Simply insert the leftover sisal rope into the drilled hole with the adhesive. The adhesive will just be a little extra insurance that the rope will not slip out.

Wooden Doormat


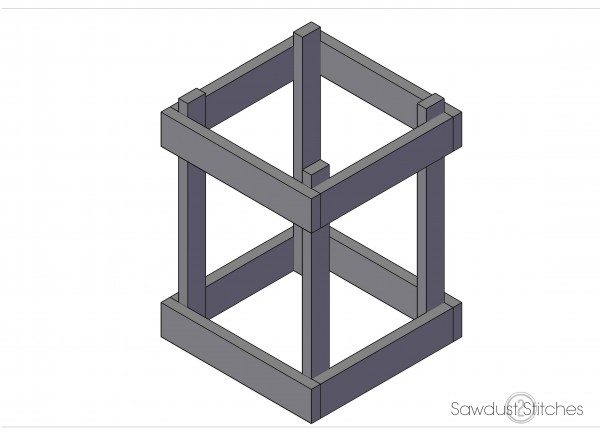
Step 6.  Attach Sides

Next I added a small amount of wood glue to the ends of all the boards.   I then attached the 21″,  1″x 2″ boards to both ends. After  making sure all of the spacing was correct, I then used a nailer and 2″ nails to reinforce .

DIY wooden Doormat 3


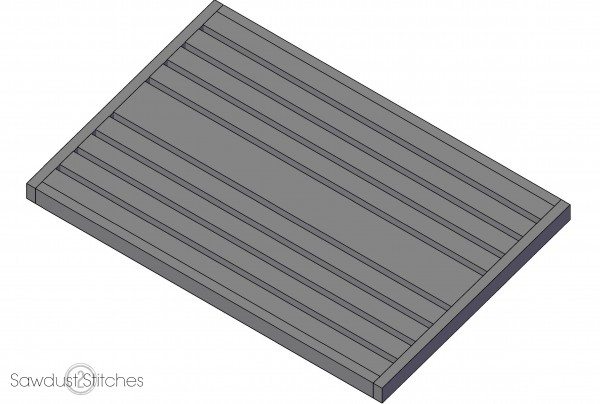
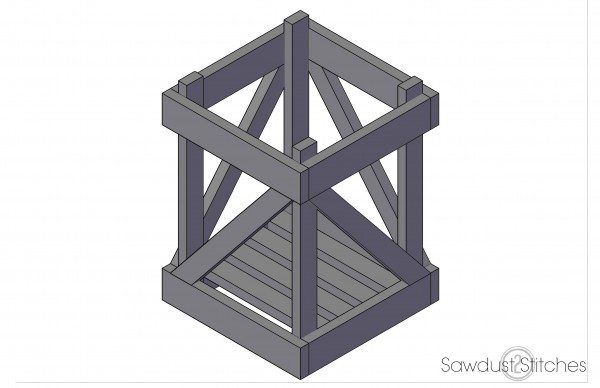
Step 7. Back Supports

Lastly, I added supports to the back side. I wanted this to add strength to the unit, but also really make the knots stand out!  I added a small amount of wood glue to the back of the slats, and then reinforced with 1 1/4″ nails.

DIY Wooden Doormat 4

There you have it folks,  a new twist on an old favorite! For sneak peeks of my upcoming projects be sure to follow me on Facebook and Instagram. You can also, follow me on Pinterest to get tons of projects plans from all around the web!


DIY Wooden Doormat

DIY Wooden Doormat

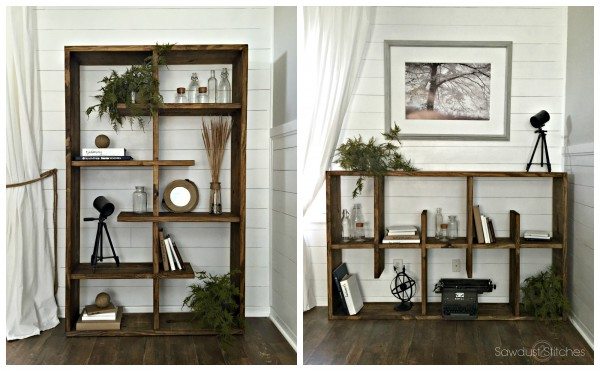
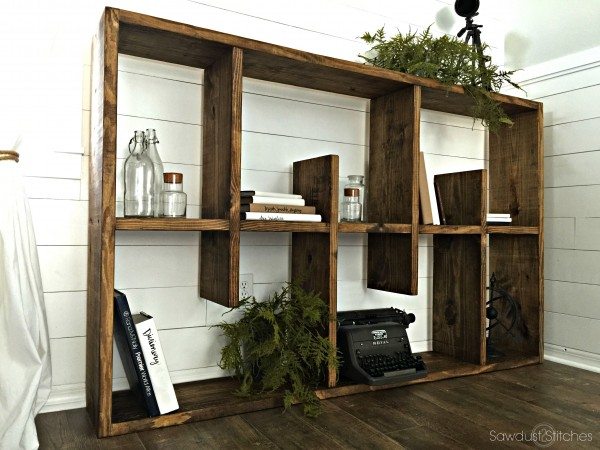
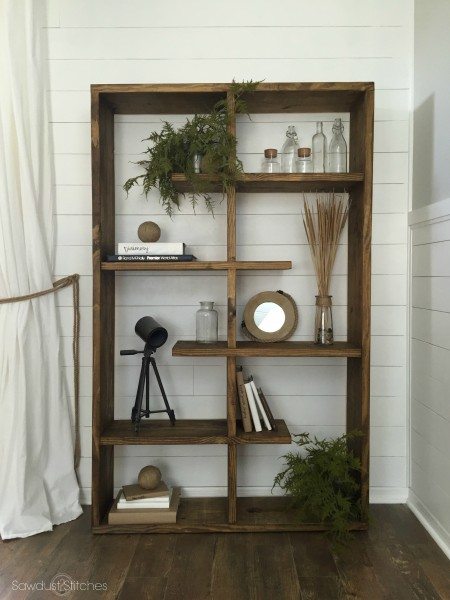
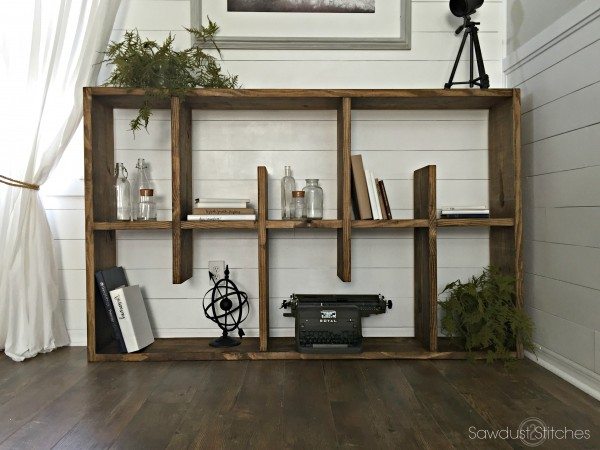
Want to see more awesome ideas !? Check out what these other creative bloggers did with their doormats!

Take Luck,

 Corey


Build Basic

My Love 2 Create

Her Toolbelt

Addicted 2 DIY

House of Wood

Shades of Blue Interiors

Place of My Taste

Bower Power Blog

Making Home Base

That’s My Letter

Ciburbanity

Brooklyn Limestone

Wills Casa

The Bold Abode

Fix This Build That

Glued N Screwed

Build It, Craft It, Love It

DIY Huntress

Sawdust To Sequins

Remodelando La Casa

The Batchelor Way

The Kim Six Fix

Heathered Nest

Creatively Living

Glass Carboy Jug and Crate

March 15, 2016

Hey there!  You may have seen sneak peeks of this  project already, but if you haven’t make sure you follow me on Instagram and Facebook  to keep up with my most recent projects!   This Glass Carboy Jug and Crate  is inspired by… my kids!  I have seen some gorgeous glass jars/jugs, and LOVE the idea of having  a freestanding one in my home.  I envision a tall ornate jar with slender delicate flowers… I  then  snap out of that daydream to the harsh  sound of something crashing/banging/thudding/cracking,  followed by an outbreak of giggles or a declaration, “Lincoln did it!”/”Wyatt did it!” depending on the severity of the situation.  A large gorgeous glass jug seemed like a dream that would have to wait until the kids move out… even then is debatable. (My boys learned their silly antics from someone, *cough* my Husband. So,  I guess that daydream would need to take a back burner. Or did it?


While browsing through pinterest I came across an antique  crated jug, it was perfect!  It was also linked to a dead ebay listing for $195 !!!  I loved it, but not that much. I would simply need to make my own!   I searched high and low trying to find just the perfect glass jar or  jug, and I FINALLY  found one that fit the bill!  I based the dimensions for this crate off of this 5 Gallon Carboy.  If this isn’t your cup of tea, or you have a jug you would like to use, then by all means!  With a little bit of math and determination these plans can be totally modified!


How to build: A Glass Carboy Jug and Crate

Supplies Used:

  • (2) 1″x 3″ boards (it is exactly 96″ so you might want to get 2 to accommodate blade width)
  • (3) 1″ x 2″ boards
  • Wood Glue
  • Stain
  • 5 Gallon Carboy

Tools Suggested:

  • Miter Saw
  • Staple Gun/Nail Gun
  • Sander

Disclosure: Some of the links provided  are affiliate links. By purchasing through these links it supports this site and helps keep content free. You can read more about how we do this with no extra cost to you.


Step 1. Prep Boards

Cut List:

1″x 3″ Boards

  • (4) @ 11  1/4”   (Top and Base)
  • (4) @ 12  3/4”  (Top and Base)

1″x 2″ Boards 

  • (4) @ 17 1/2″   (Vertical Supports)
  • (4)  @ 11 1/4″  (Base Slats)
  • (2) @ 8 1/4″    (Bottom Supports)
  • (4) @ 14 3/4  long point to short point with 39 degree angles. See Step 6. for details. (Diagonal Supports )

Once all boards are cut, then sand.


 Step 2. Assemble Top and Base

Begin by assembling (2) squares, using the 1″x 3″ boards cut @ 11 1/4”  and 12 3/4“. 
Create your own Glass Carboy Crate and Jug by Sawdust2Stitches.com  Build two of these Squares.  Secure  boards together with wood glue, and reinforce with 1 1/2” nails/staples. 


Step 3. Attach Top and Base to Vertical Supports

Next attach the two squares (assembled in Step 2.)  The first square will be at the base of the 17 1/2”  “vertical supports”.  The second assembled square will be secured 1″ from the top of the 17 1/2” “vertical supports”.  Attach with wood glue, and reinforce with 1 1/2” nails/staples.

Create your own Glass Carboy Crate and Jug by Sawdust2Stitches.com


 Step 4.  Add Bottom Supports

Next install the 8 1/4″ (1″x 2″ boards).  They will sit flush with the bottom of the crate.Attach with wood glue, and reinforce with 1 1/2” nails/staples.

Create your own Glass Carboy Crate and Jug by Sawdust2Stitches.com

(View looking directly down on crate.)


 Step 5. Insert Base Slats

Place  the 11 1/4” (1″x 2″ boards)  so that they are resting on top of the “base supports” from Step. 4.  Attach with wood glue, and reinforce with 1 1/2” nails/staples.

Create your own Glass Carboy Crate and Jug by Sawdust2Stitches.com

(View looking directly  down on Crate)


 Step 6. Install Diagonal Supports

Attach with wood glue, and reinforce with 1 1/2” nails/staples.

Create your own Glass Carboy Crate and Jug by Sawdust2Stitches.com


Step 7. Apply Finish

I knew I wanted this crate to look old, so I played around with some stain combos. If you are interested here is what I ended up using.

Weathered Barnwood Stain Create your own Glass Carboy Crate and Jug by Sawdust2Stitches.com

…and there you have it folks !  The perfect solution to my interrupted daydreams.

For sneak peeks of my upcoming projects be sure to follow me on Facebook and Instagram. You can also, follow me on Pinterest to get tons of projects plans from all around the web!


 Take Luck,

 Corey


DIY Wooden Chandelier Light Fixture

February 29, 2016

Hey all,  the awesome Brittany from Pretty Handy Girl extended an awesome challenge. She wanted to see what kind of light fixture we could build/create… Challenge accepted! I decided to stick with wood as my medium.  I present to you a DIY Wooden Chandelier Light Fixture!

Make your own DIY wooden chandelier/light fixture

DIY  Wooden Chandelier Light Fixture 

Materials Used:

  • Ikea Cord
  • 1- (8′) 2″x 8″ board
  • Wood Glue
  • Jute/Rope
  • Decorative wooden “foot”
  • Rope Cleat
  • Hitching Ring  (You can easily use a large  screw in hook)
  • Printer
  • Scissors

Tools Suggested:

  • Jigsaw
  • Scroll Blade
  • Drill
  • 1/2″ Dill Bit
  • Miter Saw
  • Large Clamps

Step 1.

Begin by  printing this PDF template. Wooden Chandelier Template

 Print both sheets, and tape them together. (Make sure you print at 100% , not “fit to screen”) Cut out the pieces, and then tape together. Trace the design on to the 2″x 8″ board. (You will need 4 total.)

Then cut them out!  I learned the hard way that it is infinitely easier if you use a scroll blade and put it on a slower setting!

DIY Wooden Chandelier by Sawdust 2 Stitches


Step 2.

I then softened the edges, and sanded all of the pieces. After they were all smooth I applied my finish.  I first stained mine “Beachwood” by Varathane. Once dry, I dry brushed it with white chalk paint. -the perfect rustic beachy finish


Step 3.

  Next, take some of the excess 2″x 8″ board.   Using this make (2) rectangles that measures  1.5″x 1.5″x 1.5″. In (1) of these rectangles drill a 1/2″ hole through the entire piece.

*or you can always cut these out of a 2″x 2″board. (They are around $1.)

IMG_9702

When completed, the one with the drilled hole should look  like this.

DIY Wooden Light Fixture

I picked up one of these lamp cords from Ikea for $5.

hemma-cord-set-white__36078_PE126952_S4

Apply a small amount of wood glue to the inside of the cut apart rectangle.  Then place the cord in the groove.

diy wooden Chandelier light fixture  Then clamp the two pieces together!  Let sit until dry. DIY wooden Chandelier Light Fixture


Step 4.

Now, to hide every trace of Ikea!  I didn’t want a plain old white cord,  I wanted something  different, unique,  and much more complicated and time consuming! Makes sense.

 If you are girl, there is a fairly  good chance you have already learned technique, while sitting in a cabin  full of girls making friendship bracelets. (If you are a guy that did it… I am not knockin’ ya.  Haha, it’s totally  a good life skill 🙂

 So… I proceeded to make (what I refer to as) the friendship bracelet from hell.  I kid, I kid, it wasn’t too bad. I knocked it out  during the last two episodes of  Grey’s Anatomy.

How to cover a cord

Complete steps 1-4, and then repeat, repeat, repeat, repeat, repeat, repeat, repeat, repeat, repeat, repeat, repeat, repeat, repeat, repeat, repeat, repeat, repeat, repeat, repeat, repeat, repeat, repeat, repeat, repeat, repeat, repeat, repeat, repeat, repeat, repeat, repeat, repeat, repeat, repeat, repeat, repeat,  almost there, repeat, repeat, repeat, repeat, repeat, repeat,  just kidding, you  are gonna be here awhile; repeat, repeat, repeat, repeat, repeat, repeat, repeat, repeat, repeat, repeat, repeat, repeat, your future grand children will really appreciate all your hard work; repeat, repeat, repeat, repeat, repeat, repeat, repeat, repeat, repeat,  You get it.

Now that you have completed your friendship bracelet of eternity; and the top inside joint of your right pointer finger is burning. (If you do this, you will totally understand.)


Step 5.

We are now ready to assemble! Reference the image below,  glue and clamp!  Allow plenty of time for it to dry before moving on.

IMG_9743

Repeat the above step.

IMG_9744  
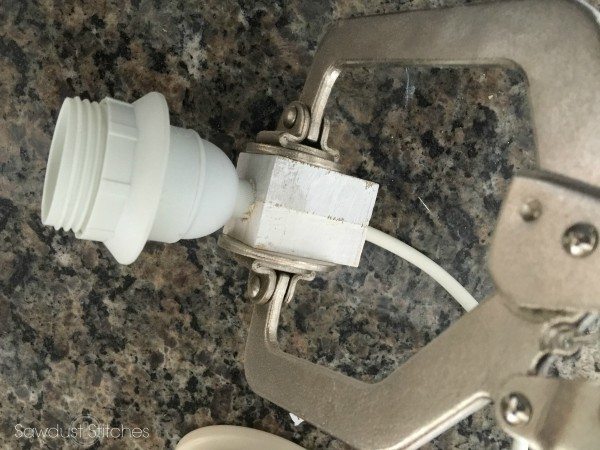
Repeat 2 more times. By then it should be looking a little something like this. If not, something has gone horribly wrong. Good luck friend. IMG_9759


Step 6.

Moving on.  Once all (4) sides of the chandelier were were in place, I felt as though it was missing something. It needed a tail!  I picked up a  decorative wooden furniture foot from Lowes for less than $2!  It was a little long, but nothing I couldn’t fix.

 I cut it down, and  then applied glue and clamped while it dried.

Wooden Chandelier by Saawdust 2 Stitches


Step 7.

 Once everything is dried, the chandelier is complete. Only thing left to do is hang it! I wanted something a little unique,so I mounted a “hitching ring” to the ceiling.

Use a hitching ring instead of a pulley for a chandelier

 I then mounted a rope cleat to the wall so that I could tie it off.

Use a rope cleat to tie off a ceiling mounted lamp!

Done and done!Make your own wooden chandelier using 2x8's and an Ikea lamp cord.

 For sneak peeks of my upcoming projects be sure to follow me on Facebook and Instagram. You can also, follow me on Pinterest to get tons of projects plans from all around the web! Make your own wooden chandelier out of wood.

Make sure you check out  these other light fixtures from more of my talented friends!

Pretty Handy Girl

The House of Wood

My Love 2 Create 

The Kim Six Fix

1656099_10153987855801908_5281053377186192280_n

 Have a light fixture you have made ?  We want to see it!  Link up below.

DIY Dr. Suess Themed Book Nook

February 22, 2016

Hi all!  It’s April back here again from UncookieCutter.  I’m excited to be back with you guys this month sharing my kiddos Dr. Suess themed book nook!

Edit 66

We moved into our older fixer upper about a year ago and we had this closet that we never used.  Our house is sort of divided into two sections.  The best we can figure is that the back part was built as a mother in law suite.  We have the kids bedrooms back there and there is a living space between, with a second front door.  Beside this door was a coat closet.  Since we never use this door, we also never used the coat closet.  That living space has become a kid area – the toy closet is here, as well as a space for them to watch movies, play Legos and just hang out.  The closet was an eye sore and I wanted to turn it into a space the kids could use.

Dr. Suess themed book nook - UncookieCutter for Sawdust 2 Stitches


A little more about me is my daughter is living with autism.  She is amazing, but reading comes hard for her.  We don’t have that lucky “my girl loves books” thing going on over here.  She loves bright, crazy colors and inclosed spaces.  And by far, some of the only books she actually enjoys are Dr. Suess books.  So, the idea for this book nook came to me after I saw this inspired space by Jennifer over at Fresh Crush.

reading-nook-kiddo-text-638x1024


Adorable.

I started by ripping out the high selves.  I wanted to build floating shelves on the side so the kids could get to their books easier.  I also had the idea to create a larger space under the bench for larger books.  I wanted to make the shelves the right size for books, since when it’s not the right size, it ends up looking like this.

Dr. Suess themed book nook - UncookieCutter for Sawdust 2 Stitches

All the time.

So, I started by building the bench.  We were leaving for Disney when I started, so we were cash poor at the time.  I randomly had a bunch of 2x4s leftover from a project and so I decided it would be cool to use them to create a bench with a ship-lap feel.  I built the top first, to fit in the closet.  I used wood glue and pocket hole screws to construct a top.

Dr. Suess themed book nook - UncookieCutter for Sawdust 2 Stitches

Dr. Suess themed book nook - UncookieCutter for Sawdust 2 Stitches

I basically did the same thing with the sides and bottom. I used one of our largest books for reference and built around that.  I created the bottom nook to have plenty of space for large books, but didn’t want the books to fall in the nooks and crannies, so I build a simple, book-sized space.

Dr. Suess themed book nook - UncookieCutter for Sawdust 2 Stitches

Like I said, I did it all with leftover 2x4s.  I thought that plywood would be better, but I really like the way it turned out.  Plus, it is crazy strong!  I did connect the sides to the wall, but didn’t have to connect anything to the floor or brick.  Drywall is easier to fix if it ever needs to come out :).

Dr. Suess themed book nook - UncookieCutter for Sawdust 2 Stitches

I built the sides and bottom like the top – with pocket holes and glue.  Then I added the back piece by piece and connected it with pocket holes from the back, making sure each one was level.  I had to build it into the closet, because I wouldn’t be able to get it into the space had I built it outside and tried to bring it in.

Dr. Suess themed book nook - UncookieCutter for Sawdust 2 Stitches

Then I brought the top and added it on.  This was the point of the project where I got sawdust all in the house and then the vacuum broke, haha.

Next, I added some floating shelves on the side.  I wanted this book nook to be filled with books.  I followed this tutorial, but had to modify a bit to fit into the space. I started by attaching a 2×4 to the wall.  There was only a stud all the way over by the brick, so I used some heavy duty drywall anchors to make sure it was super strong and would be able to hold books.  

Dr. Suess themed book nook - UncookieCutter for Sawdust 2 Stitches

 Next, I finished the supports.  It was hard to get the drill into the tight area, so I brought the side in a little bit on the sides.  

Dr. Suess themed book nook - UncookieCutter for Sawdust 2 Stitches

Dr. Suess themed book nook - UncookieCutter for Sawdust 2 Stitches

I cut some boards to fit on the top and sides.

Dr. Suess themed book nook - UncookieCutter for Sawdust 2 Stitches

And then a piece on the front.

Dr. Suess themed book nook - UncookieCutter for Sawdust 2 Stitches

Next, I painted and added some trim.  Once again, using leftovers, I had a bunch of this trim and used it to cover all the holes and gaps.  I also re-used the trim I ripped out of the closet.

Dr. Suess themed book nook - UncookieCutter for Sawdust 2 Stitches

This is great stuff to fill in any remaining gaps and holes.  It’s sandable and paintable, and works great.

Dr. Suess themed book nook - UncookieCutter for Sawdust 2 Stitches

Once I had everything filled, sanded and painted, it was time to add all the fun stuff.  Head over to UncookieCutter for details on all the DIY book nook accessories – including the handmade sign, the shoe on the wall details, where I found the cushion and pillows and the rag rug.

Dr. Suess themed book nook - UncookieCutter for Sawdust 2 Stitches

Speaking of a shoe on the wall, this is the kids favorite part of the book nook.  A little excerpt from Wacky Wednesday, which is their absolute favorite Dr. Suess book.

Dr. Suess themed book nook - UncookieCutter for Sawdust 2 Stitches

The kids love it!  They’ve been in there non stop.  It’s so much brighter and airier now, and fits much better in the kids space.  It holds a ton of books as well!

Edit 60  Edit 62


Thanks so much to Corey for letting me stop by again.  Head over to UncookieCutter for all the details on this book nook and more fun projects!

April – Uncookie Cutter

Facebook Instagram Pinterest Twitter

Rotating Shelf

February 15, 2016

Rotating Shelf by Sawdust2Stitches for BuildSomething.com

This Crate and Barrel inspired shelf is perfect for any space, literally! Whether you need to fill a wide space or a tall space, this unit has you covered. It is designed so that is can be rotated to fit your space needs. I am excited to be teaming up with the great folks over at BuildSomething.  You can find full build plans for this rotating shelf and many other FREE build plans over on their site!  Make sure you check out the plans HERE!
Rotating Bookcase ds by Swdust2stitches for Buildsomething.com Rotating Bookcase by Sawdust 2 Stitches for Buildsomething.com  rotating bookcase for buildsomethingcom  Rotating Bookcase us by sawdust 2 Stitches for Buildsomething.com

For sneak peeks of my upcoming projects be sure to follow me on Facebook and Instagram. You can also, follow me on Pinterest to get tons of projects plans from all around the web!

Dresser Makeover into a Mini Mudroom

January 28, 2016

IMG_8888

It all started on a HOT Fall Florida day. My good friend Sara and I went and hit up the community garage sale.  Let me tell you, we were victorious!  I found this wood dresser in decent condition and they only wanted $15 for it. SOLD!  Can you believe this use to be an old dated dresser! Now it is a mini mudroom complete with shoe and coat, and key storage! Full tutorial on www.sawdust2stitches.com
What intrigued me about this piece is that it was symmetrical, (the sides naturally) but also the top and the bottom of the unit were the same! Peculiar right?dd 
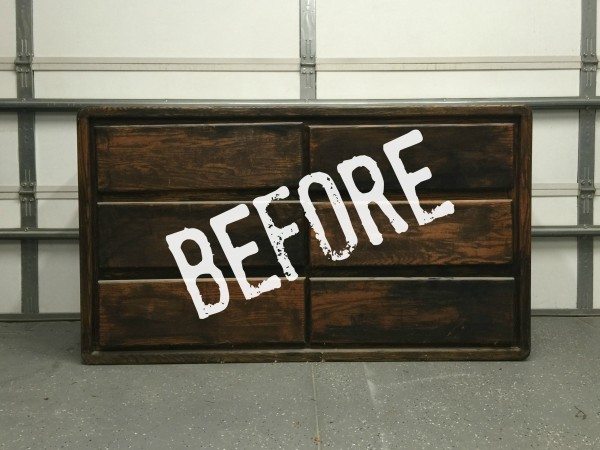
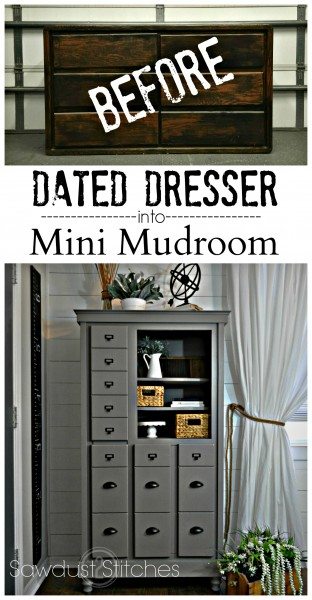
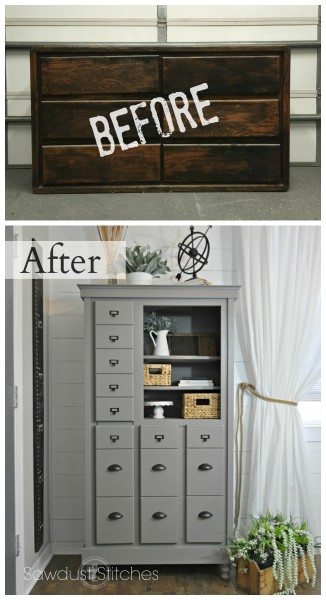
Well this unique piece ended up in my garage and began collecting dust. That was until Elisha from Pneumatic Addict extended a challenge, the “Organize Build Challenge”. Challenge Accepted!

The premise of this challenge was to create a piece that would help with organization, and also included building elements.  Lucky for me, I had this dresser just itching for a nice makeover!

…and when it comes to makeovers no one does them quite like HomeRight!  I am so excited to partner up with HomeRight on this  project,  it is through  great companies like HomeRight and affiliate links that I can continue to provide all these tutorials at zero additional cost to my readers! So a big thank you to them!  (More info. available here.)Homeright Logo2

So, let’s dive in, shall we?!

How I turned a Dresser into a Mini Mudroom

I started by throwing caution to the wind and went a little crazy!  I removed the drawers and flipped it on it’s end. MIND BLOWN, right !?

Dresser Makeover into Shoe Storage by Sawdust2stitches.com  
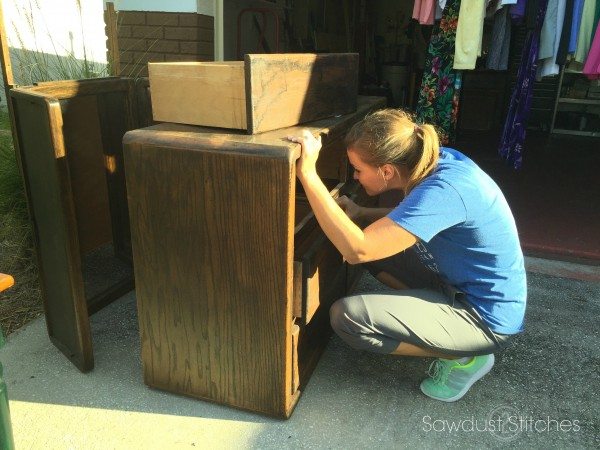
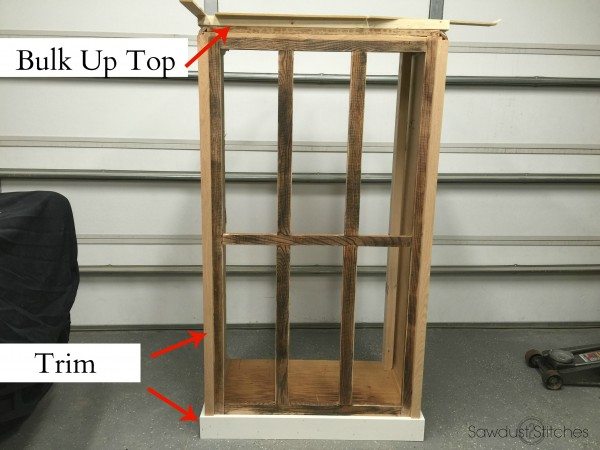
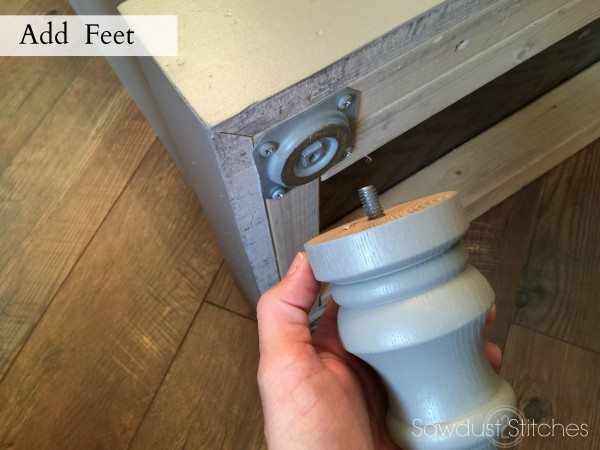
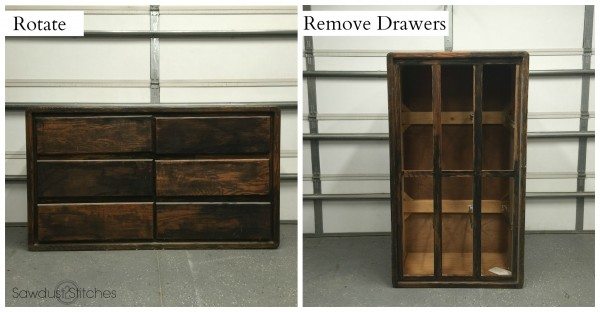
I knew I was going to need better access to the inside of the dresser, so I removed the back.  I also removed a secondary face frame from the unit. (It just made it look too bulky.)  Next, I beefed up the base using 2×3’s. dresser makeover into Shoe Storage by www.sawdust2stitches.com

The reason for beefing up the base ?  I wanted to be able to add some base trim, and also give it a little bit of visual weight.  I then proceeded to do the same to the top, first by adding the 2×3’s as a base to attach the trim to.

dresser makeover into Shoe Storage by www.sawdust2stitches.com 2

Naturally, next I added the trim to cover up the 2×3’s on the top of the unit.  After it was trimmed out,  I went a little crazy.  I cut out some of the  divider/supports! Crazy, I KNOW! ( Don’t worry I had a plan! *fingers crossed*)dresser makeover into Shoe Storage by www.sawdust2stitches.com 3

Next, I constructed a series of shelves that would be inserted and attached to the dresser.  I decided to do staggered width shelves. First for visual interest, and second  I wanted to use them for… wait for it… SHOE STORAGE! Gasp, *shock and awe*.  I know, right!?   The staggered widths would be perfect for my shoes,  boots, and would also be perfect size for my kids shoes . Also with the shorter shelves  they wouldn’t need to go fishing to reach them out of the back of the cabinet. dresser makeover into Shoe Storage by www.sawdust2stitches.com 4 
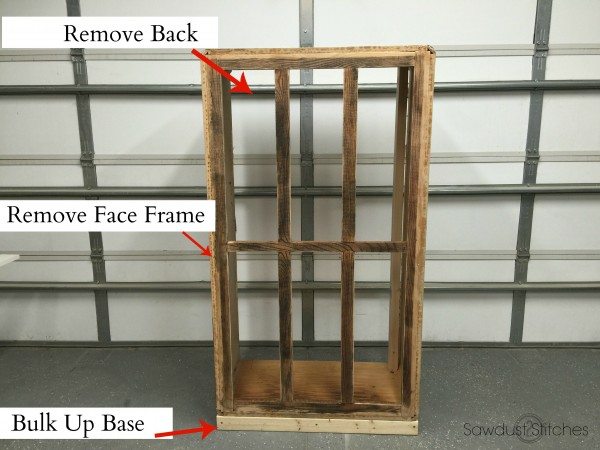
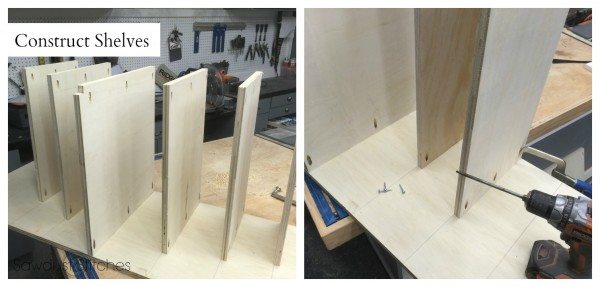
Once the shelves were attached, it really started to come together! *phew*dresser makeover into Shoe Storage by www.sawdust2stitches.com 5 
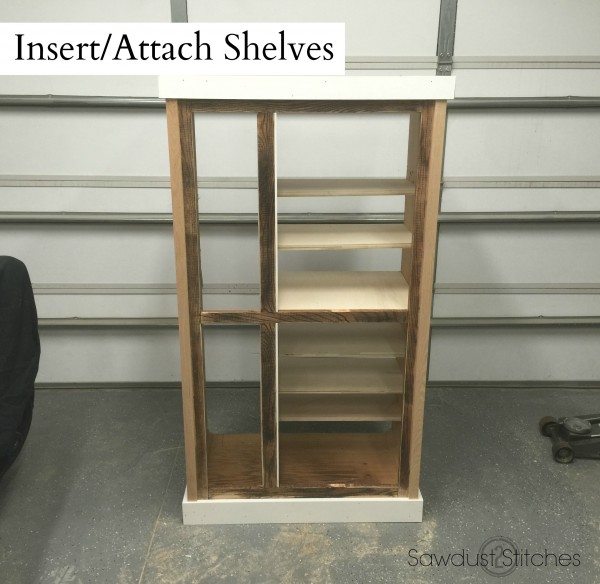
Next, I needed to add doors. So, I used what I had!  I removed the faces from the old drawers.

Dresser Makeover by Sawdust 2 Stitches  
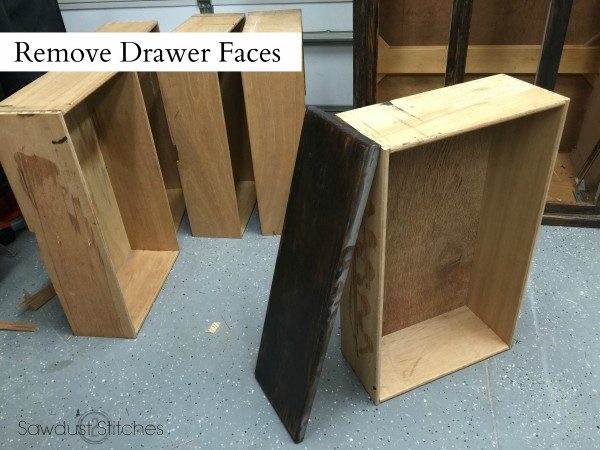
I definitely did not want this to look like a dresser that  I had flipped on it’s side. So, I decided to cut grooves in the panels to give a more rustic apothecary feel. Worked like a charm!

-Dresser repurpose into shoe storage

Once the panels were all sanded and prepped, I was ready to prime!  So I busted out my handy HomeRight Finish Max Sprayer and got to work!

Dresser Makeover shoe storage by Sawdust 2 Stitches
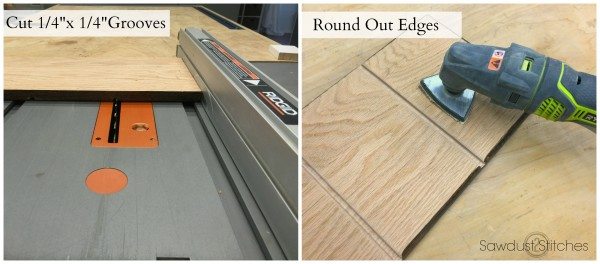
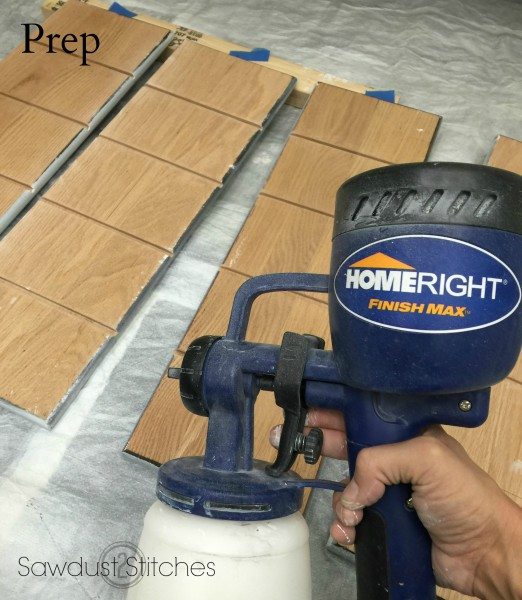
I was able to prime both my cabinet doors and the dresser/cabinet in just a few minutes!  Part of this dresser was oak so it had a really deep set grain,  so it required two coats of primer and then it was ready for paint!
IMG_9227kjh

There is something about spraying on paint that I find so rewarding!  Seriously, look at how quickly I knock out this board, with ZERO brush streaks!

Once all of my painting was done, it was time to bring it all together! I decided that I wanted to add feet, so I simply  added some adapter plates, and then you screw the feet in!  Easy Peasy.

IMG_9250 ss 
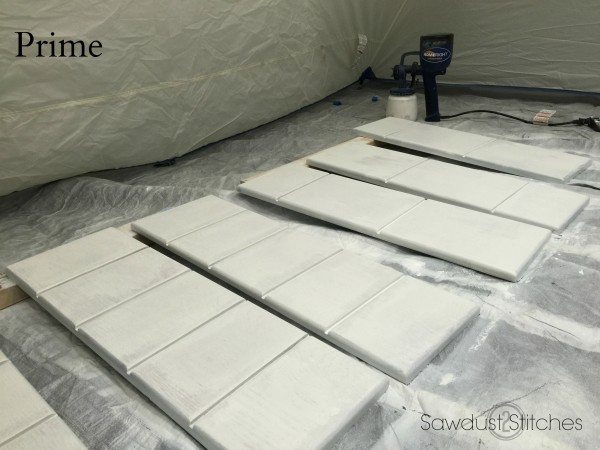
Next, it was time to face my  aversions to hinges and install the doors.  Thank goodness it went smoothly!  Also at this point I added a piece of wood to the back of  the doors to bridge the gap. (Remember we removed the dividers earlier.)  You may ask “But Corey, Why? This seems counterproductive!”

2016-01-27 08.37.14 ss 
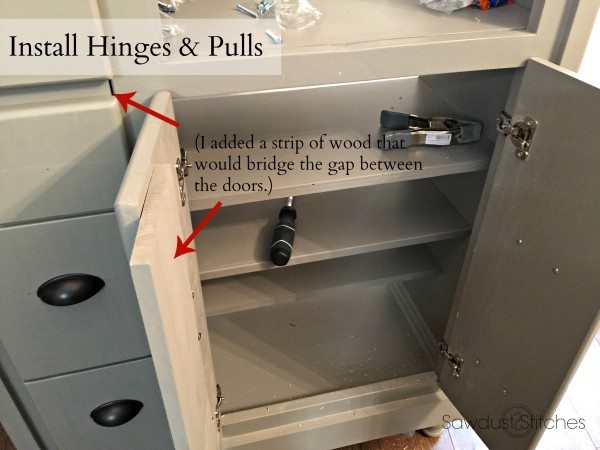
Well my friends this part of the reason. I wanted the two drawers/doors on the left side to be one continuous space…   it would serve as a place to hang jackets!  I even installed a pull out coat rack and key rack so that you can easily  find everything! Sawdust 2 stitches dresser makeover pull out rack

Dresser Makeover 3 ss sawdust2stitches  
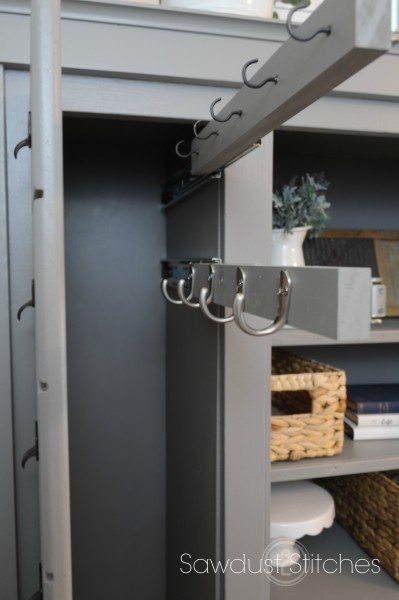
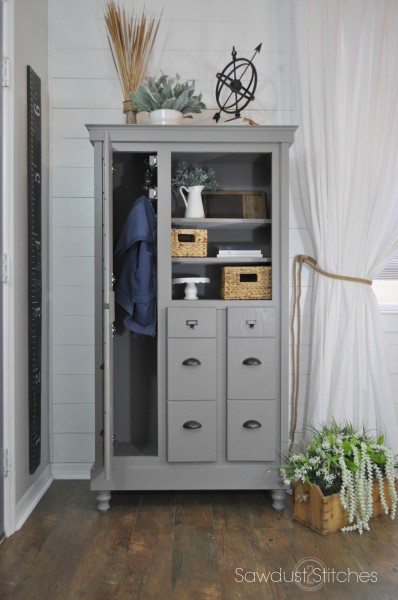
The reason I cut out the divider bar on the other spaces, is because I wanted to have easy access to the shoe storage below. ( I really didn’t want a bar right in the middle!)

Side note: I had not originally planned to have open shelving. I had installed all the doors and was preparing to install those last two, but I kept staring at it, and ultimately decided  I liked it, and that it gave it character. So  I 86’d  the two last doors. dresser makeover 2 sawdust 2 stitches  
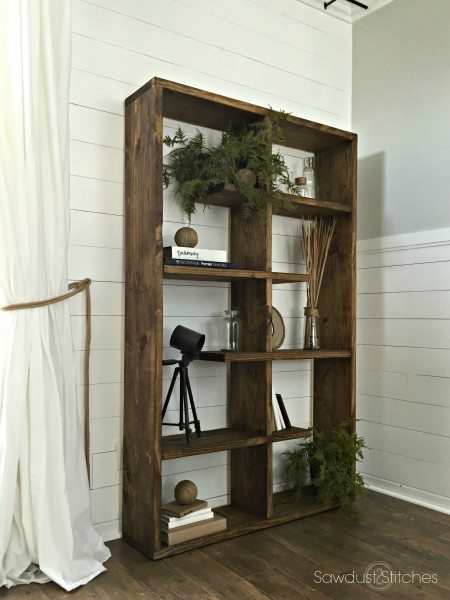
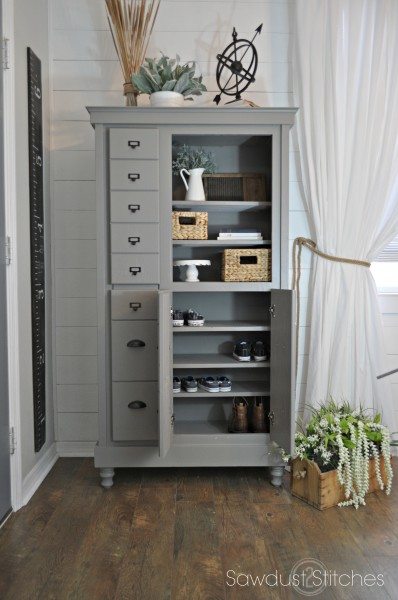
And there you have it folks, my alternative to a mudroom! It has a place for jackets, keys, shoes, and even extra cubbies for glasses etc!  All -in – all, I will call this a success!  Thanks for stopping by and make sure you see what others did for the “Organize Build Challenge” !

monthly-challenge-January-Organization

Make sure you check out these other awesome bloggers!

Funky Junk Interiors
Pneumatic Addict
 Merrypad
That’s My Letter
The House of Wood
The Kim Six Fix
My Love 2 Create
The Ugly Duckling House

For sneak peeks of my upcoming projects be sure to follow me on Facebook and Instagram. You can also follow me on Pinterest to get tons of projects plans from all around the web!

Take Luck,

Corey

Dresser makeover before and after by sawdust 2 Stitches


  • previous
  • Page 1
  • Interim pages omitted …
  • Page 24
  • Page 25
  • Page 26
  • Page 27
  • Page 28
  • Interim pages omitted …
  • Page 47
  • next

Primary Sidebar

  • Facebook
  • Instagram
  • Pinterest
  • Twitter
  • YouTube
IMG_9167 (1).jpg fd
DIY & Design

Meet Corey

Hi everyone, my name is Corey, and I have a problem. I can’t leave well enough alone… The best therapy usually involves a variety of power tools. So, in the few “spare” moments I am not entertaining my two beautiful, rambunctious, boys, I can typically be found hunched over a sewing machine and/or covered in sawdust. All in the efforts to create a perfect balance of aesthetics and practicality in our home.
read more

Join our mailing list!

DIY & design ideas - right in your inbox!

Featured

Stair Tread Makeover

Categories

  • 70's Ranch Home
  • Around the House
  • Build Plans
  • Crafts
  • Current Home
  • Decor Makeovers
  • Dresser
  • Exterior
  • Fall
  • First Home
  • Furniture Makeover
  • Hidden Compartment
  • Kitchen
  • Lighting
  • Makovers
  • Master Closet
  • Organization
  • R.V.
  • Room Makeovers
  • Seasonal
  • Seating
  • Sewing
  • Shelving
  • Small Builds
  • Smart Home
  • Spring
  • Summer
  • Tables
  • Tablescape
  • Tutorials
  • Uncategorized
  • Wall Art
  • Wall Decor
  • Winter
  • Workshop

Footer

Contact Me: Corey@Sawdust2Stitches.com

Latest ‘Grams

Follow on Instagram
2020 © Your Blog Name
theme by soleilflare
Enter your name and email and get the weekly newsletter... it's FREE!
Your information will *never* be shared or sold to a 3rd party.