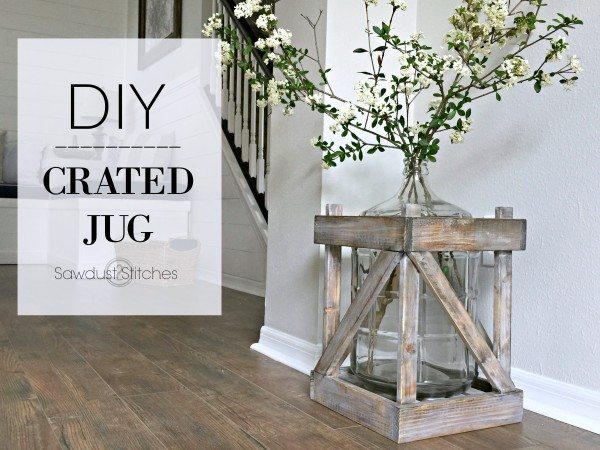
Hey there! You may have seen sneak peeks of this project already, but if you haven’t make sure you follow me on Instagram and Facebook to keep up with my most recent projects! This Glass Carboy Jug and Crate is inspired by… my kids! I have seen some gorgeous glass jars/jugs, and LOVE the idea of having a freestanding one in my home. I envision a tall ornate jar with slender delicate flowers… I then snap out of that daydream to the harsh sound of something crashing/banging/thudding/cracking, followed by an outbreak of giggles or a declaration, “Lincoln did it!”/”Wyatt did it!” depending on the severity of the situation. A large gorgeous glass jug seemed like a dream that would have to wait until the kids move out… even then is debatable. (My boys learned their silly antics from someone, *cough* my Husband. So, I guess that daydream would need to take a back burner. Or did it?
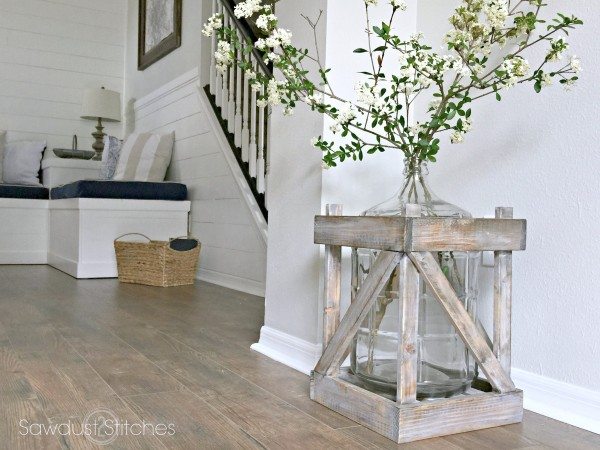
While browsing through pinterest I came across an antique crated jug, it was perfect! It was also linked to a dead ebay listing for $195 !!! I loved it, but not that much. I would simply need to make my own! I searched high and low trying to find just the perfect glass jar or jug, and I FINALLY found one that fit the bill! I based the dimensions for this crate off of this 5 Gallon Carboy![]() . If this isn’t your cup of tea, or you have a jug you would like to use, then by all means! With a little bit of math and determination these plans can be totally modified!
. If this isn’t your cup of tea, or you have a jug you would like to use, then by all means! With a little bit of math and determination these plans can be totally modified!
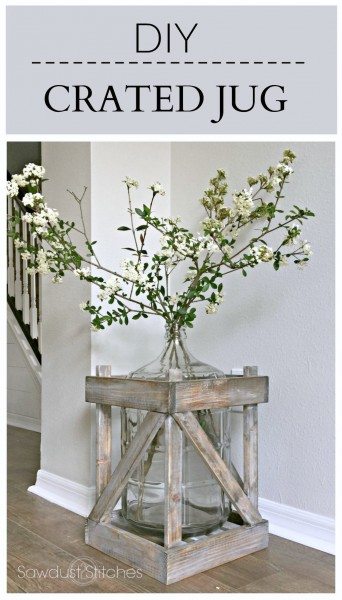
How to build: A Glass Carboy Jug and Crate
Supplies Used:
- (2) 1″x 3″ boards (it is exactly 96″ so you might want to get 2 to accommodate blade width)
- (3) 1″ x 2″ boards
- Wood Glue
- Stain
- 5 Gallon Carboy
Tools Suggested:
- Miter Saw
- Staple Gun/Nail Gun
- Sander
Disclosure: Some of the links provided are affiliate links. By purchasing through these links it supports this site and helps keep content free. You can read more about how we do this with no extra cost to you.
Step 1. Prep Boards
Cut List:
1″x 3″ Boards
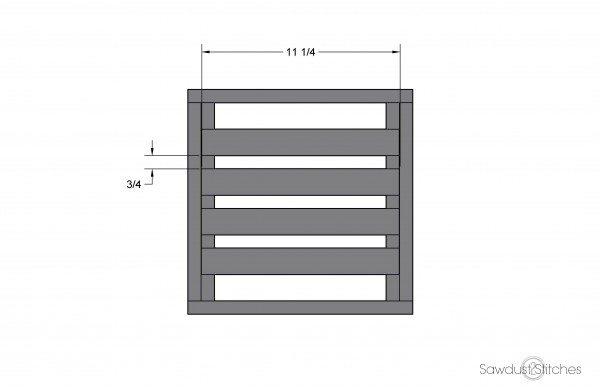
- (4) @ 11 1/4” (Top and Base)
- (4) @ 12 3/4” (Top and Base)
1″x 2″ Boards
- (4) @ 17 1/2″ (Vertical Supports)
- (4) @ 11 1/4″ (Base Slats)
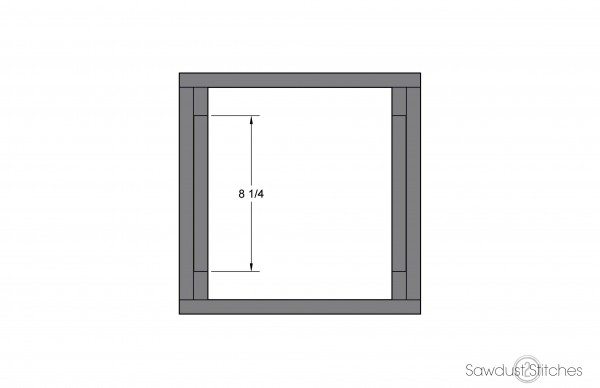
- (2) @ 8 1/4″ (Bottom Supports)
- (4) @ 14 3/4 long point to short point with 39 degree angles. See Step 6. for details. (Diagonal Supports )
Once all boards are cut, then sand.
Step 2. Assemble Top and Base
Begin by assembling (2) squares, using the 1″x 3″ boards cut @ 11 1/4” and 12 3/4“.
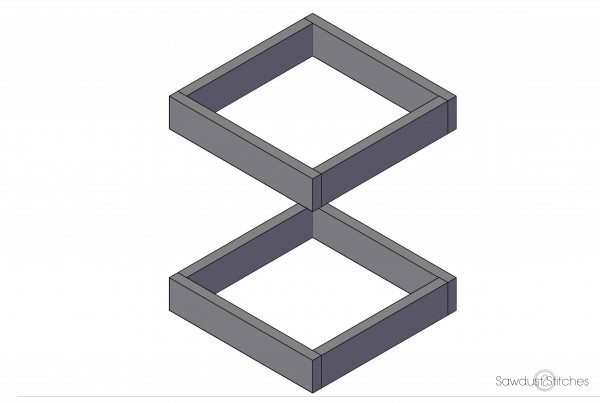 Build two of these Squares. Secure boards together with wood glue, and reinforce with 1 1/2” nails/staples.
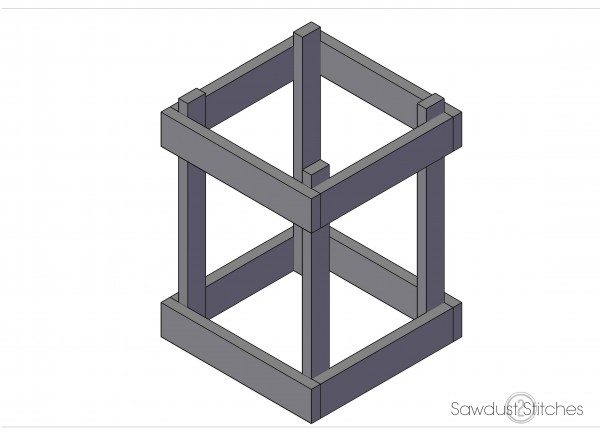
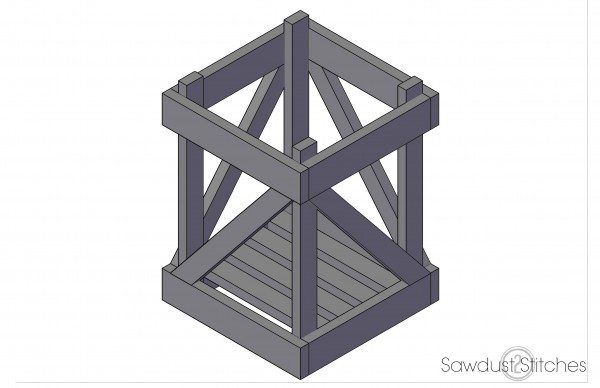
Step 3. Attach Top and Base to Vertical Supports
Next attach the two squares (assembled in Step 2.) The first square will be at the base of the 17 1/2” “vertical supports”. The second assembled square will be secured 1″ from the top of the 17 1/2” “vertical supports”. Attach with wood glue, and reinforce with 1 1/2” nails/staples.
Step 4. Add Bottom Supports
Next install the 8 1/4″ (1″x 2″ boards). They will sit flush with the bottom of the crate.Attach with wood glue, and reinforce with 1 1/2” nails/staples.
(View looking directly down on crate.)
Step 5. Insert Base Slats
Place the 11 1/4” (1″x 2″ boards) so that they are resting on top of the “base supports” from Step. 4. Attach with wood glue, and reinforce with 1 1/2” nails/staples.
(View looking directly down on Crate)
Step 6. Install Diagonal Supports
Attach with wood glue, and reinforce with 1 1/2” nails/staples.

Step 7. Apply Finish
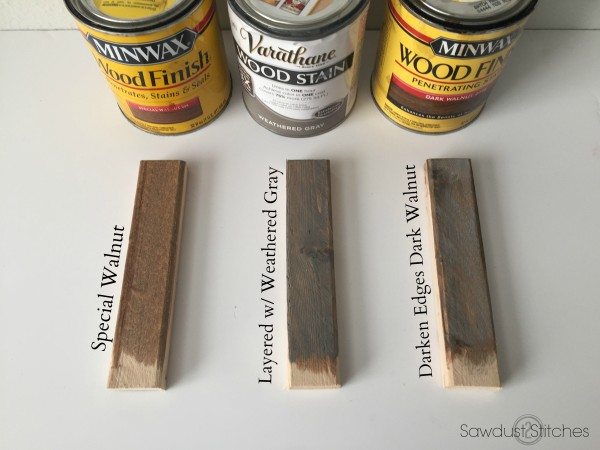
I knew I wanted this crate to look old, so I played around with some stain combos. If you are interested here is what I ended up using.
…and there you have it folks ! The perfect solution to my interrupted daydreams.

For sneak peeks of my upcoming projects be sure to follow me on Facebook and Instagram. You can also, follow me on Pinterest to get tons of projects plans from all around the web!
Take Luck,
Corey
 Copyright secured by Digiprove © 2016


Love this jug crate. Especially the finish you used.
Thanks Megs! 🙂
I love this so much, I have wanted one for a table. Your plans will make that easy now. Thanks for linking up to The Talk of the Town party!
This is genius! I have bigger kids and heck, they still play ball in the house. I don’t think I could keep something big and glass whole for long. What a great solution. It looks so good. Thanks for linking up to the talk of the town party.
So pretty! That’ll keep it from tipping over for sure! Thanks for sharing your steps on the staining process, love that weathered look. 🙂
This is SO cool! I love things that are different and make your house yours. I think making a table top version is a great idea too! Thanks for sharing!
This turned out gorgeous! Thanks for sharing at Talk of the Town – pinning it on the party board here – https://www.pinterest.com/knickoftime/talk-of-the-town-repurposed-upcycled-vintage-recip/
Omg, I immediately had to pin this! In love! Where did you find your glass jug? And are those live branches?
Sorry, just seen the link. Overlooked this in my previous comment. Excitement got the better of me 🙂
Hahah, no worries, I appreciate your enthusiasm. The branches were actually in my back yard, perfect timing. They were in full bloom!
Corey I love the whole idea! I clicked on your link to the jug and there are actually two sizes. Which did you use…the 5 or 6 gallon? Thanks!
Sorry about that Linda, I have fixed the link. I used a 5 gallon, but the 6 would work as well. The 6 gallon is just 3 inches taller.
Now I know just what to do with that carboy that’s hanging around ( hubby used to make wine)!! This is a brilliant idea and I thank you so very much.
Darn it all though that I couldn’t have come up with an idea on my own …. wasn’t thinking outside the box, lol.
Haha, I have those moments all the time! I just happened to be looking for antique jugs and saw something similar! “I can do that !!” haha.