• Blog
  • About
  • Press
  • Privacy

Let’s be social!

  • Skip to primary navigation
  • Skip to main content
  • Skip to primary sidebar
  • Skip to footer
Sawdust 2 Stitches

Sawdust 2 Stitches

  • Tutorials
    • Around the House
    • Organization
    • Wall Decor
    • Sewing
  • Makeovers
    • R.V.
    • Room Makeover
    • Furniture Makeover
    • Decor Makeover
  • Build Plans
    • Small Builds
    • Wall Decor
    • Dresser
    • Tables
    • Seating
    • Shelving
    • Hidden Compartment
  • Seasonal
    • Summer
    • Spring
    • Fall
    • Winter
  • Home Tours
    • First Home
    • Current Home
    • 70’s Ranch Home
  • Workshop

Wooden Doormat

March 21, 2016

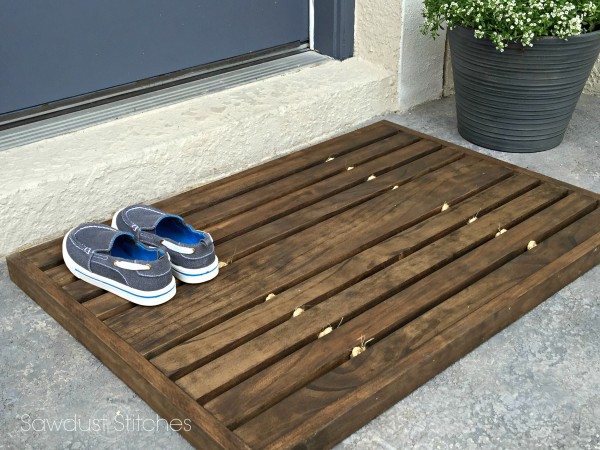
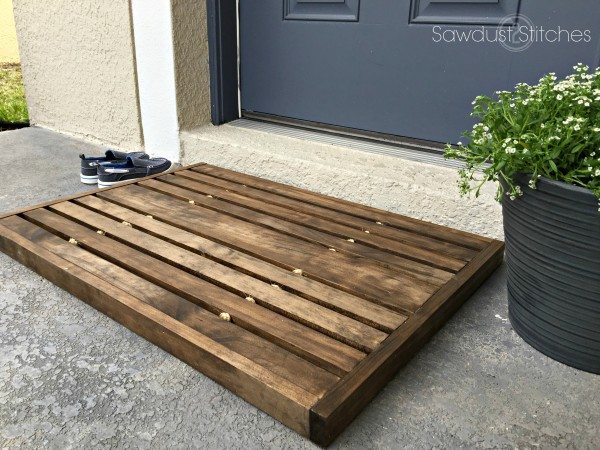
Hey there Sportsfans,  I am absolutely ecstatic about today’s tutorial.  I am teaming up with Home Depot team to bring you my own personal flair on a Wooden Doormat!  I honestly  could not be more pleased with the finished product! #diyworkshop #Sponsored


DIY Wooden Doormat


DIY_16_DoorMat_Beauty (3)

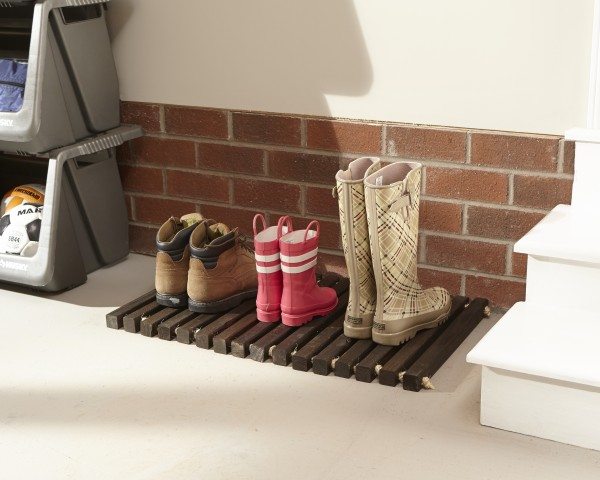
(Home Depot’s Example Wooden Doormat)

Wooden Doormat

Home Depot Offers Workshops!

  • The Home Depot offers Workshops at all of their locations for do-it-yourselfers of all ages and experience levels. If you are interested in learning more, there is more info HERE.
  • There are three types of Workshops offered – Do-It Yourself (DIY), Do-It-Herself (DIH) and Kids.
  • Customers can learn how to build dĂ©cor projects, how to make easy home repairs and how to operate tools through demonstrations and step-by-step instructions.
  • Visit Home Depot to register and learn more.

Wooden Doormat

Supplies Used:

  • (4) 1″x 2″ boards
  • (1) 1″x 4″ board
  • Sisal Rope
  • Stain (Consider weatherproofing if applicable)
  • Wood Glue
  • 2″ Nails

Tools Suggested:

  • Miter Saw
  • Drill
  • 5/16″ Drill Bit
  • Nail Gun
  • Tape Measure
  • Safety Glasses

Disclosure: Some of the links provided  are affiliate links. By purchasing through these links it supports this site and helps keep content free. You can read more about how we do this with no extra cost to you.


Step 1.

 Cut List:

1″x 2″

  • (2) @ 21″
  • (10) @ 29″
  • (2) @ 19 1/2″

1″x 4″

  • (1) @ 29″

Once all boards are cut , sand smooth.


 Step 2. Drill holes

Line up (8) of the 29″ 1″x  2″ boards as well as the 29″, 1″x 4″ board.  Measure 7 1/2″ inches from each end and mark. Using a square you can ensure that they will all be uniform.Make a wooden Doormat

DIY wooden Doormat by sawdust2stitches.com

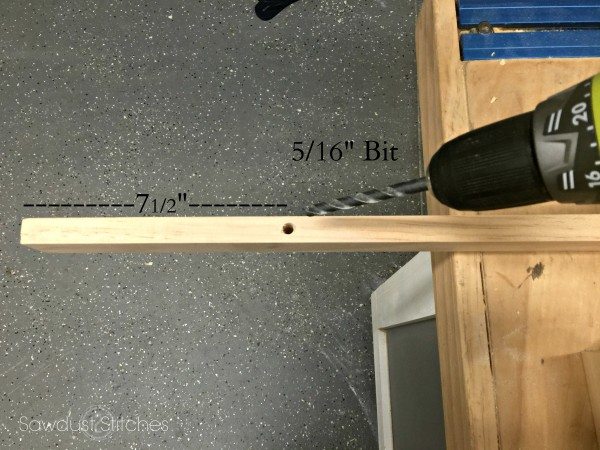
Once holes are drilled, then sand down any tear out from drilling.


Step 3. Stain

I would highly  suggest staining BEFORE assembling.  Honestly trying to stain around the rope and down in between the slats sounds like a pain in the… bum, or if  you are glutton for punishment, be my guest.

Like I said  before, if this is going to be sitting out during the monsoon season in Florida, I would suggest taking extra precautions to treat your wood. (Like put it in a Ziploc bag 🙂  Makes sense right ?  I live in Florida where we have a lot of sun and  heat… naturally.  When selecting a stain I opted for a weatherproofing stain.  I used Behr Weatherproofing Stain in “Coffee”.


Step 4. String em’ up  Together

Next up,  sisal rope!  I used 1/4″ Sisal Rope. When stringing/knotting your rope, one thing to keep in mind is that the gaps between the boards needs to be 1/2″.  I used spacers to make sure I was making my knots tight/small enough.

Use the diagram below for order, and spacing.  Leave about 3/4″ rope cut off from the first and last board.  (See image in  Step 5. for reference)DIY Wooden Doormat 1


Step 5. Top and Bottom

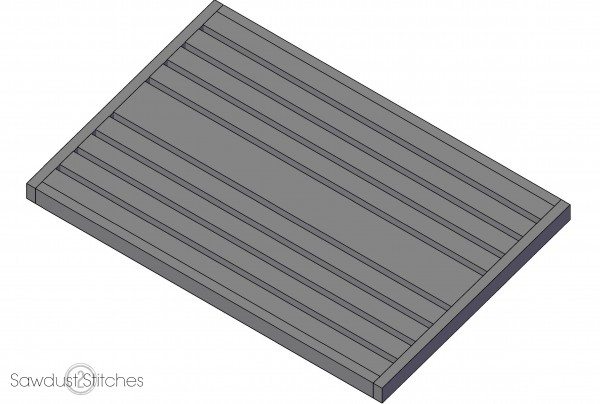
Using the remaining (4) 29″ boards  we will make the top and bottom boards that will help frame out the door mat. Following the diagram below secure the boards together. (You will make two of these).  First glue them together, and for a little extra insurance reinforce with 2″ nails.

REMEMBER the board with the hole through it will be sitting with the 2″ side up.  (see Diagram)DIY Wooden Doormat 2

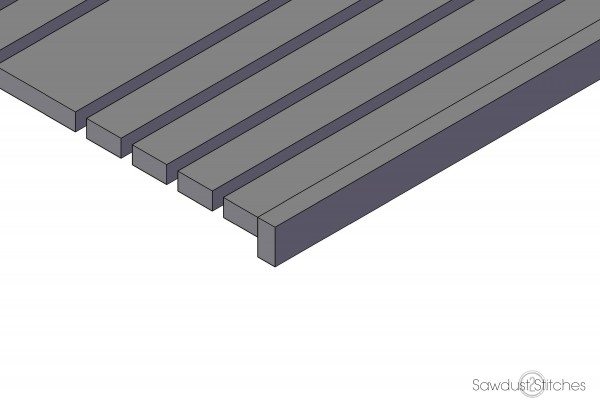
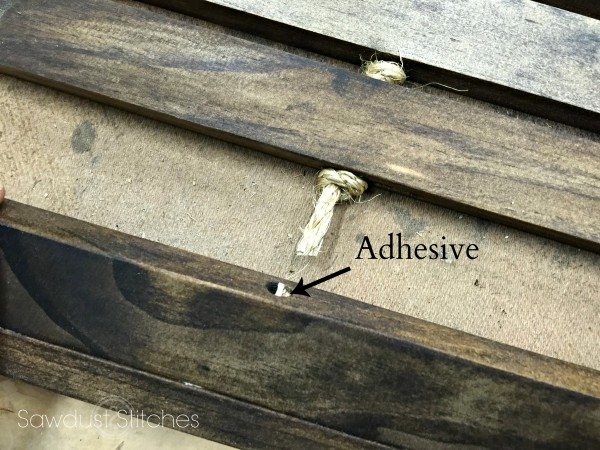
In order to hide the remaining sisal rope, I added a small amount of wood glue inside of the hole drilled into the 1″x 2″ board. Simply insert the leftover sisal rope into the drilled hole with the adhesive. The adhesive will just be a little extra insurance that the rope will not slip out.

Wooden Doormat


Step 6.  Attach Sides

Next I added a small amount of wood glue to the ends of all the boards.   I then attached the 21″,  1″x 2″ boards to both ends. After  making sure all of the spacing was correct, I then used a nailer and 2″ nails to reinforce .

DIY wooden Doormat 3


Step 7. Back Supports

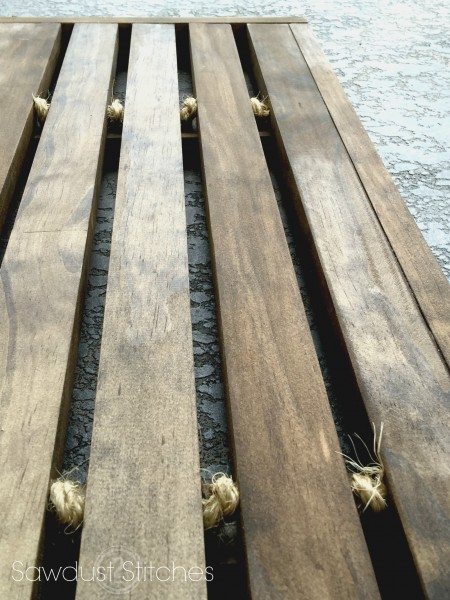
Lastly, I added supports to the back side. I wanted this to add strength to the unit, but also really make the knots stand out!  I added a small amount of wood glue to the back of the slats, and then reinforced with 1 1/4″ nails.

DIY Wooden Doormat 4

There you have it folks,  a new twist on an old favorite! For sneak peeks of my upcoming projects be sure to follow me on Facebook and Instagram. You can also, follow me on Pinterest to get tons of projects plans from all around the web!


DIY Wooden Doormat

DIY Wooden Doormat

Want to see more awesome ideas !? Check out what these other creative bloggers did with their doormats!

Take Luck,

 Corey


Build Basic

My Love 2 Create

Her Toolbelt

Addicted 2 DIY

House of Wood

Shades of Blue Interiors

Place of My Taste

Bower Power Blog

Making Home Base

That’s My Letter

Ciburbanity

Brooklyn Limestone

Wills Casa

The Bold Abode

Fix This Build That

Glued N Screwed

Build It, Craft It, Love It

DIY Huntress

Sawdust To Sequins

Remodelando La Casa

The Batchelor Way

The Kim Six Fix

Heathered Nest

Creatively Living

Digiprove sealCopyright secured by Digiprove © 2016

More from my site

  • ConverTABLEConverTABLE
  • Cafe Plantation ShuttersCafe Plantation Shutters
  • How to make a Who-ville Tree !How to make a Who-ville Tree !
  • Rustic Farmhouse Book ShelfRustic Farmhouse Book Shelf
  • R.V. Dinette and Sofa MakeoverR.V. Dinette and Sofa Makeover
  • Crib Mattress Porch SwingCrib Mattress Porch Swing

in Build Plans, Crafts, Exterior, Small Builds, Tutorials, Uncategorized

Reader Interactions

you may also like
DIY Pull Out Drawer Storage
DIY Drawer Dividers
Built-in Pantry Makeover
Lazy Susan Charcuterie Board

Comments

  1. Jaime Costiglio says

    March 21, 2016 at 11:06 am

    Corey classic and perfect. Love the stain against the rope. Nicely done my friend.

  2. Ronda Batchelor says

    March 21, 2016 at 11:32 am

    Adding that outside board makes it so stable, great idea!

  3. Mindi says

    March 21, 2016 at 2:13 pm

    I love it Corey! 🙂

  4. Katie Cleveland says

    March 21, 2016 at 4:11 pm

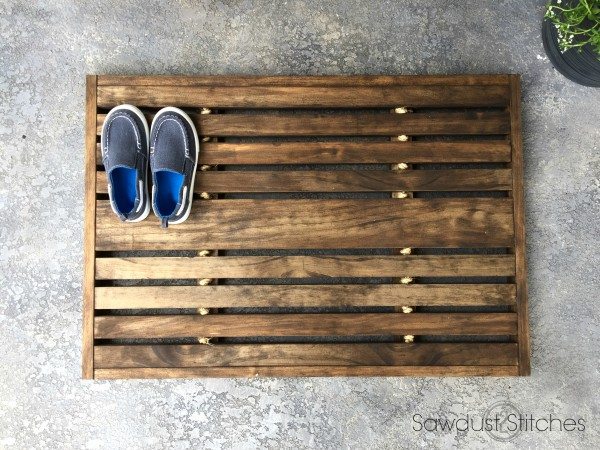
    It looks amazing. I love that you changed it up with the wider slat in the middle. Great job, friend!

  5. Amber @ Wills Casa says

    March 21, 2016 at 4:53 pm

    Love the use of a different width in the middle!

  6. Katie Bower says

    March 21, 2016 at 10:50 pm

    Looks so classic and gorgeous! I think I might need to put this at my future lake house – the one I don’t own yet but dream about 🙂
    xo – kb

    • coreydecker@gmail.com says

      March 22, 2016 at 8:26 pm

      Thanks so much Katie, your herringbone one totally blew my mind! Nice work

  7. JenWoodhouse.com says

    March 25, 2016 at 7:48 pm

    Awesome job, Corey! Love how classic it is and that stain color is beautiful!

  8. Melisa Lissa says

    April 4, 2016 at 1:01 am

    Looks so classic and gorgeous! Love the stain against the rope. Great job.

  9. Albrey Paulk says

    May 3, 2016 at 1:18 pm

    OMG Corey I look on your site everyday ! I dream about being creative as you! Hopefully I can learn soon when time loosens up for me. Hope all is well.

    • coreydecker@gmail.com says

      May 3, 2016 at 6:27 pm

      Albrey! Hey darlin, you are more than welcome to come out to the new place and learn anytime you want! So excited for you guys!

Primary Sidebar

  • Facebook
  • Instagram
  • Pinterest
  • Twitter
  • YouTube
IMG_9167 (1).jpg fd

Popular Projects

  • How to: Faux Brick Wall
  • Cheap White Curtains
  • Ikea Cubbies into a Rustic Apothecary
  • Cabinet Transformed Into A Kitchen Island
  • Workshop Assembly Table
  • The BEST Beach Blanket ever!
DIY & Design

Meet Corey

Hi everyone, my name is Corey, and I have a problem. I can’t leave well enough alone… The best therapy usually involves a variety of power tools. So, in the few “spare” moments I am not entertaining my two beautiful, rambunctious, boys, I can typically be found hunched over a sewing machine and/or covered in sawdust. All in the efforts to create a perfect balance of aesthetics and practicality in our home.
read more

Join our mailing list!

DIY & design ideas - right in your inbox!

Top Hits!

  • How to: Faux Brick Wall
  • Cheap White Curtains
  • Ikea Cubbies into a Rustic Apothecary

Featured

DIY Pull Out Drawer Storage

Categories

  • 70's Ranch Home
  • Around the House
  • Build Plans
  • Crafts
  • Current Home
  • Decor Makeovers
  • Dresser
  • Exterior
  • Fall
  • First Home
  • Furniture Makeover
  • Hidden Compartment
  • Kitchen
  • Lighting
  • Makovers
  • Master Closet
  • Organization
  • R.V.
  • Room Makeovers
  • Seasonal
  • Seating
  • Sewing
  • Shelving
  • Small Builds
  • Smart Home
  • Spring
  • Summer
  • Tables
  • Tablescape
  • Tutorials
  • Uncategorized
  • Wall Art
  • Wall Decor
  • Winter
  • Workshop

Footer

Contact Me: Corey@Sawdust2Stitches.com

Latest ‘Grams

I’m on a kitchen organizing kick, and these pull I’m on a kitchen organizing kick, and these pull-out drawer are easier than ever to make using the new (extremely intuitive/user-friendly @kregjig 720 PRO.
I have a full tutorial on the site today.#linkinbio #sponsored
Photo Credit: @ashleynavarrophotography
My organizing heart could just burst!! I’m still My organizing heart could just burst!! I’m still organizing the kitchen, but so far I have fit all the contents from the existing pantry AND freed up an entire lower and upper cabinet that contained pantry items.  #winning
Would you believe me if I told you that where this Would you believe me if I told you that where this beautiful custom-built pantry sits, used to be a small builder grade closet? Talk about untapped potential!? While the closet/pantry served its purpose, the space was not well utilized and was altogether unremarkable. With the help of The Home Depot this pantry is not only extremely functional it is a gorgeous feature in my kitchen. 
Sometimes we might look past or forget the untapped potential and resources. 
For example, did you know The Home Depot has a TON of resources to help you with your projects?  Did you know that you can do image search in their mobile app? Yup! Just take a picture of the needed item scan it on your app and find the product in a flash! In fact you  can add it right to your cart and have it ready to be picked up at available stores or lockers!
#THDDoerProject #HomeDepotPartner @homedepot
Have big plans? (Swipe to see the before.) I deci Have big plans? 
(Swipe to see the before.)
I decided that our little closet/pantry needed a little bit of help. I have big plans for a huge custom build, but first some walls needed to come down! 
A project of this size means a hefty supply run. Normally, I need my husband to make a trip to 
The Home Depot to help me load ¾” plywood. Not anymore! Did you know that many Home 
Depot stores offer curbside pickup? That means I can order my BIG (and small) orders online 
or in their app and have my order pulled, and ready for a curbside pickup. 
#THDDoerProject #HomeDepotPartner @homedepot
Happy Holidays to all my DIY loving friends! I’ Happy Holidays to all my DIY loving friends! 
I’m going to put down the tools so I can hang with my crew. 
Merry Christmas from our family to yours! I look forward to sharing so many great projects in 2021, stay tuned! @ashleynavarrophotography
LAST MINUTE DIY GIFT IDEA!!! This Holiday Season m LAST MINUTE DIY GIFT IDEA!!!
This Holiday Season might be a little different from those we’ve seen in the in past. With many folks looking to keep costs and stress low, they are turning to a more sentimental approach to holiday gifting. 
 Handmade gifts are a great way to personalize gift giving this year. I made this serving tray/lazy susan for a friend and I know she will love it! If you want more easy-to-make, handmade gift ideas The Home Depot has many other great tutorials.

@homedepot #HomeDepotPartner #THDxHoliday #THDxDIYWorkshops
Follow on Instagram
2020 © Your Blog Name
theme by soleilflare
Enter your name and email and get the weekly newsletter... it's FREE!
Your information will *never* be shared or sold to a 3rd party.