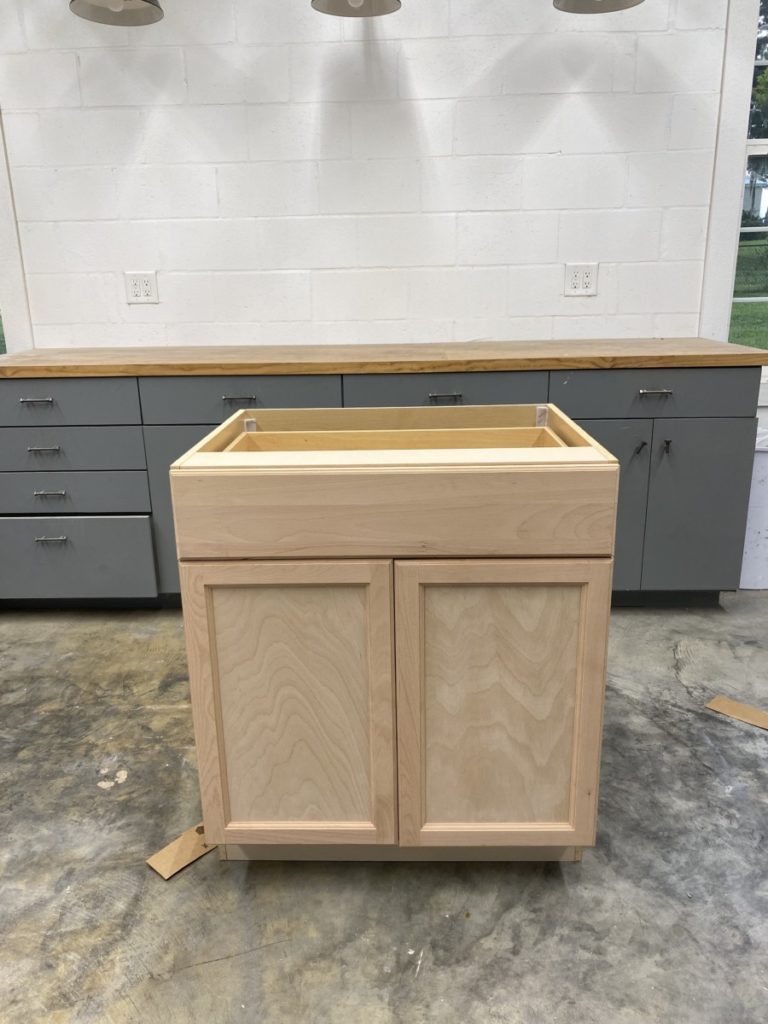
I recently gave my home office a makeover. Scratch that. I recently converted my office into a streamlined home office/ homeschool room.
The biggest hurdle when designing my office was incorporating enough desks to accommodate my kiddos and myself. I really wanted a built-in unit but that dream seemed unattainable. Or was it ? I dreamed up a crazy idea, an idea so crazy it JUST MIGHT WORK?! Spoiler alert: It TOTALLY worked and I am going to show you how.
| Tools Suggested | Materials Used |
| Circular Saw | 1×4″ Common Board |
| Tape Measure | 3/4″ Plywood (Size will vary by project size.) |
| Jigsaw | 1 1/4″ Pocket Hole Screws |
| Pocket Hole Jig | Full Extension Ball Bearing Drawer Glides |
| Pre-Drill Bit | Full extension hinge with 1/2″ overlap |
| Clamps | |
Remove Hardware
The first thing that was necessary when modifying the cabinet was removing the drawer and it’s accompanying hardware. This can be typically be accomplished using a phillips bit screwdriver/drill.
Modifying Cabinet Dimensions (opt.)
Now, if you are a little OCD and want to take this project one step further then read on. If you are perfectly happy with height and depth of your cabinets go ahead and skip to the next step.
Adjust Depth
First, determine the desired depth of your cabinet and then you measure and mark your cabinet. I set up a board that would serve as a guide to run my circular saw along. (Remember, do not place your guide on the line you need to cut, you need to consider the distance from the edge of your saw plate to the saw blade itself.)
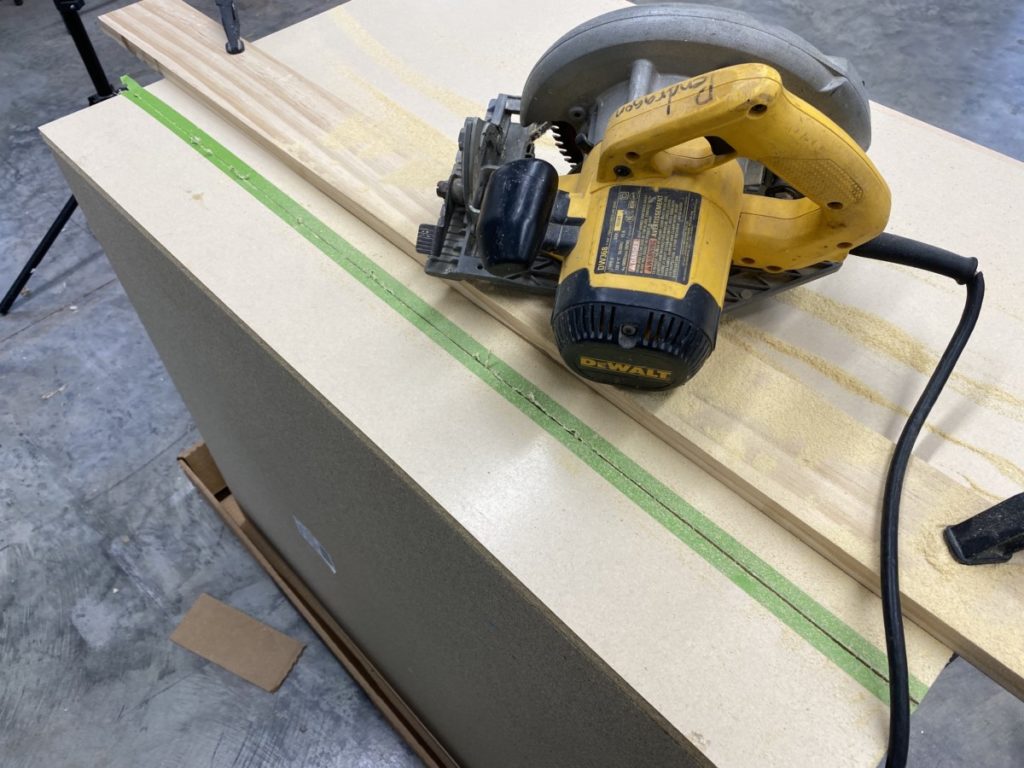
Using the guide and the marked line cut the first side of your cabinet using a circular saw. (Always wear proper safety gear!) Repeat this step on both side of your cabinet.
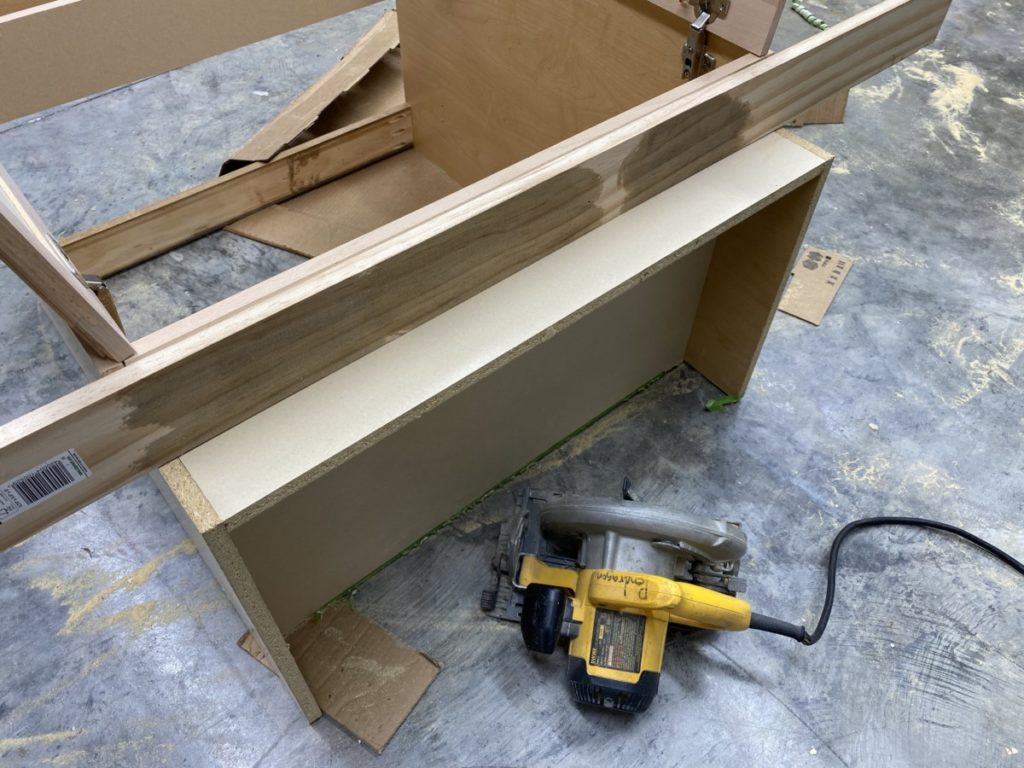
Once both sides are cut, you can flip the cabinet upside down in preparation to cut the bottom. This is where it gets a little tricky. The sides of the base block the path of the circular saw, so I needed to get a little creative. I had to use a smaller circular saw, but a jigsaw or something similar would work well too.
Using one one of the above mentioned tools will require cutting a straight line by hand. I would highly recommend drawing a straight line to use as a guide. Even if the line is a little crooked, it will be fine, this will be completely hidden.

Add Supports
Once all sides of the cabinet are cut down supports are necessary. I used a 1×3 board cut to the exact interior dimension and then drilled pocket holes on both ends to secure them.

I added a support on the very top ledge of my cabinet and also one at the base. I did leave the back of the cabinet open. This is totally personal preference. You can add paneling to the back if you prefer, just take the added depth into account when you are creating countertops and installing to the wall etc.
Adjust Height
If you would also like to alter the height of your cabinet, that is an option. Again, not necessary, but an option. If you opt to do this, just use the same method used to cut the sides of the cabinet. When I cut mine down I only removed 1.5″. I still wanted there to be a toe kick area, but the 1.5″ made a huge difference when it can to the height of the pull-out desk drawers for my kids.
Build Drawer Box
In order to create a pull out desk, I needed to create a sturdy drawer. Never made a drawer ? No worries, it is simple!
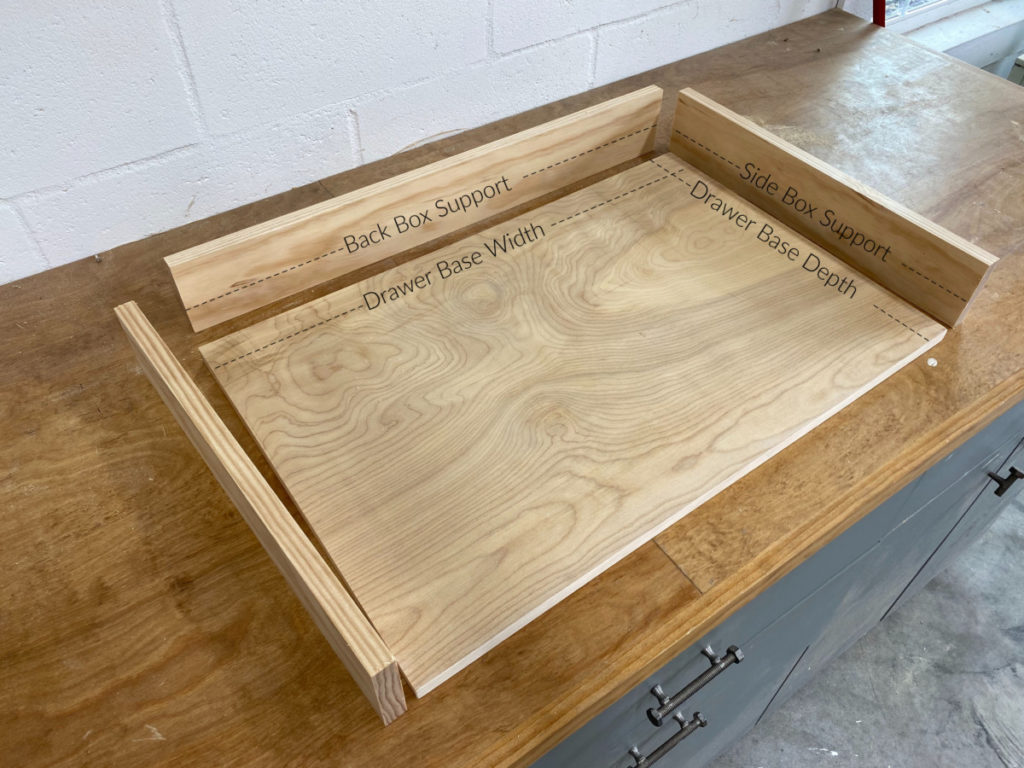
Finding Drawer Box Dimensions
How to find the dimensions for your drawer:
- Drawer Base Width= Opening drawer dimensions – 1″(drawer glides) – 1 1/2″ (1×4″ box supports)
- Drawer Base Depth = Cabinet Depth Dimension – 1″( back clearance) – 3/4″ (back 1×4″ box support)- 1 3/4″(front hinge clearance)
- Side Box Supports= “Drawer Base Depth” dimension + 3/4″ (back 1×4 box support)
- Back Box Support = “Drawer Base Width” dimension
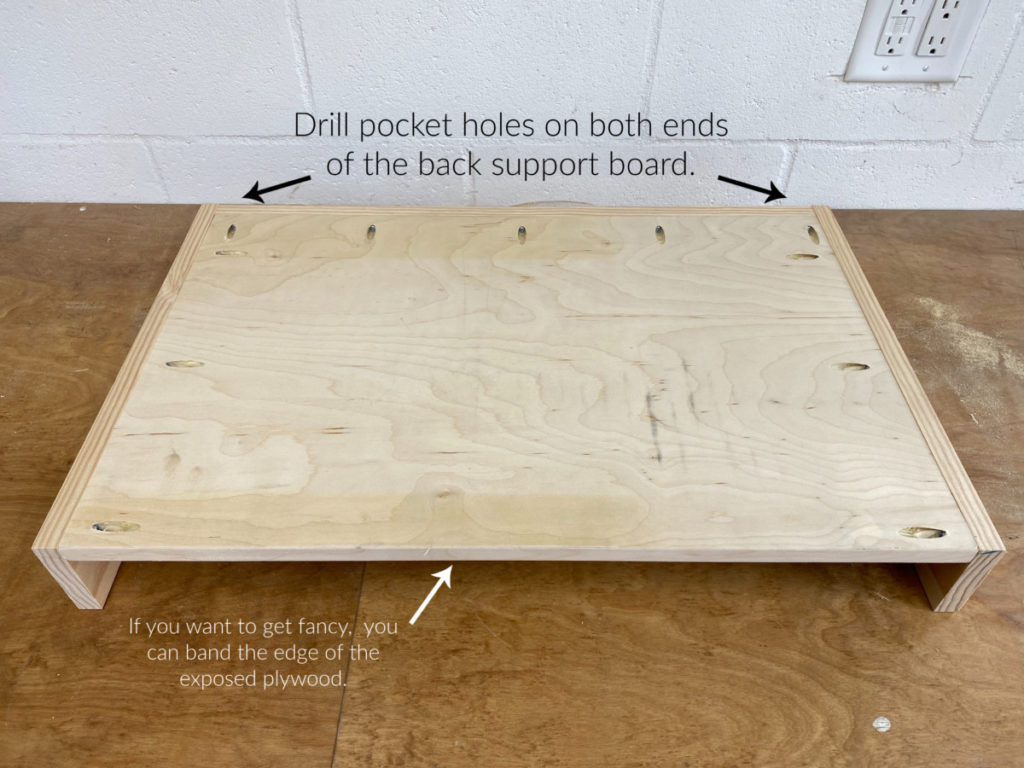
After all the necessary boards are cut, it’s time to assemble. Using a pocket hole jig drill pocket holes around the perimeter of the base. (Excluding the front ledge.) Also drill pocket holes on both ends of the “back box support” board as well.
Using 1 1/4″ pocket hole screws secure the “back box support” to the back of the base. Follow-up by securing the “side box supports” to both sides. Again securing with 1 1/4″ pocket hole screws.
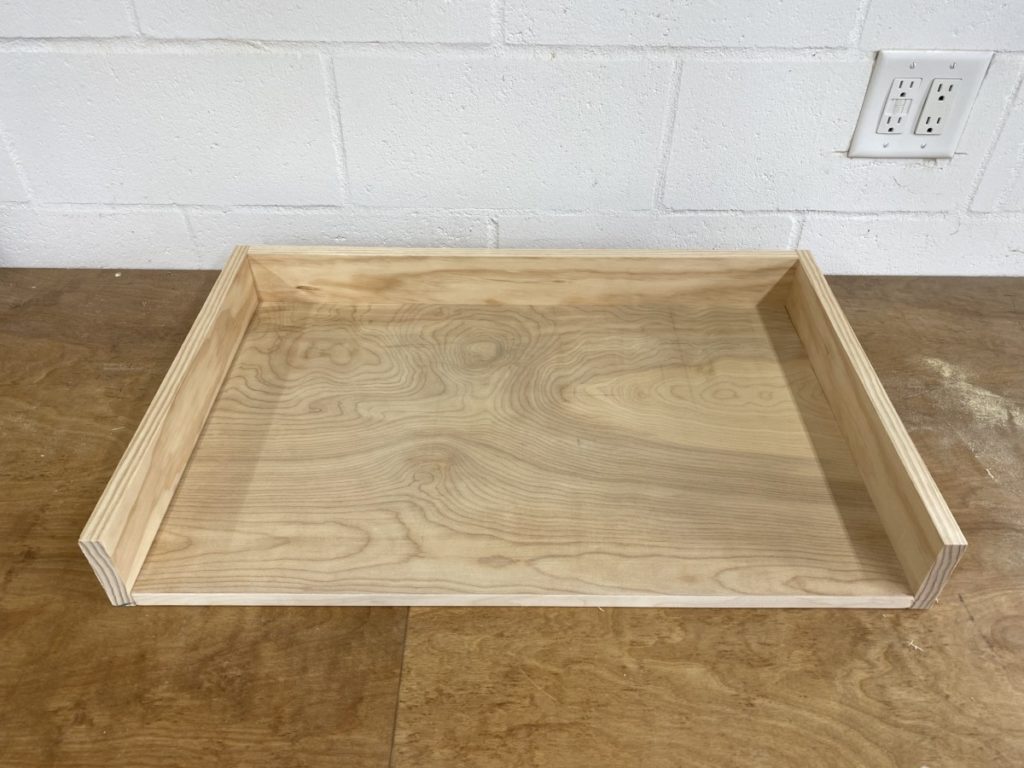
Look at that! You made a box, that wasn’t so hard now was it ? Next thing we need to do is make it mobile! Let’s add some drawer glides.
Install Drawer Front
First mark the desired location for the hinge, taking into consideration the drawer glides that will be installed. Once marked, pre-drill in the allocated spots, then use the screws that came with the hinges to install the first side of the hinge. Repeat t his process for both hinges that will be attached the cabinet base. (See below image as a reference.)
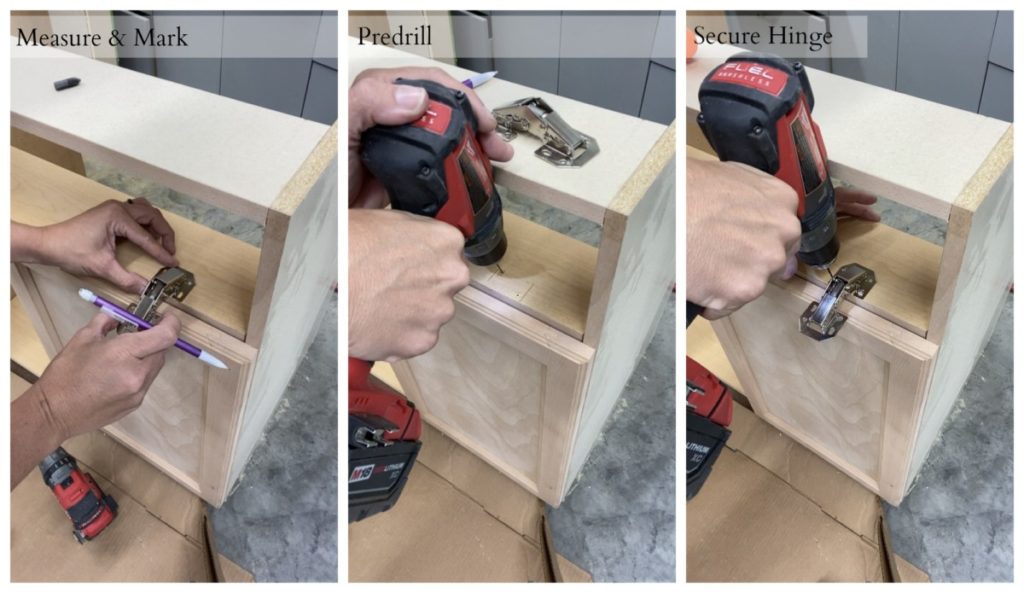
After the hinges are secured to the cabinet base I needed to attach the to my drawer front.
Something to consider: Keep in mind that the drawer will need to clear the doors that sit directly below it. Test the spacing before installing the drawer face.
When attaching the drawer front I found it easiest to clamp the drawer face directly to the front of the cabinet and then mark, pre-drill, and then fasten with a screw. It ensured that I would have perfect placement! Worked like a charm.
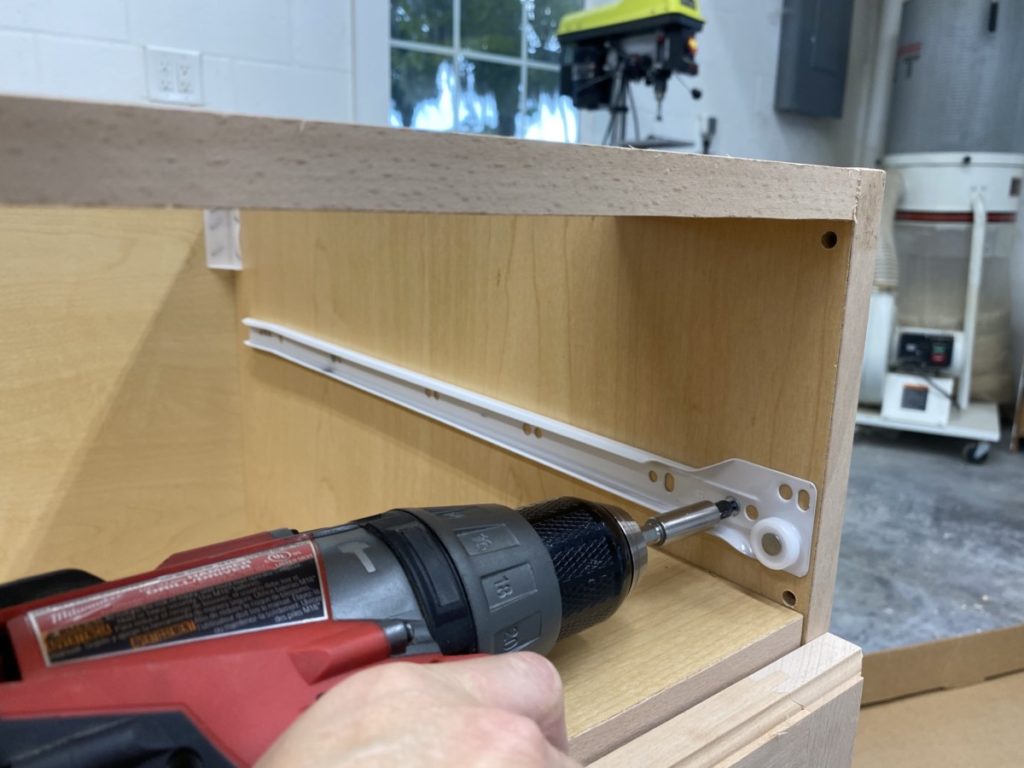
Install Glides
Mark Glide Placement
Before beginning the install process, place your drawer box in the cabinet opening and mark out a logical location fort eh glides to be installed. ( If the drawer glides are installed too high or too low there is a chance your box will not fit into the opening and will be stopped by the cabinet frame.)
Something to consider: When selecting your glides take into account the amount of weight they can hold and their length. As you saw earlier I shortened my cabinet and there fore shortened my drawer. Select a drawer glide based on the depth of your drawer box. ( Mine is an 18″ deep drawer box, so I selected an 18″ drawer glide.
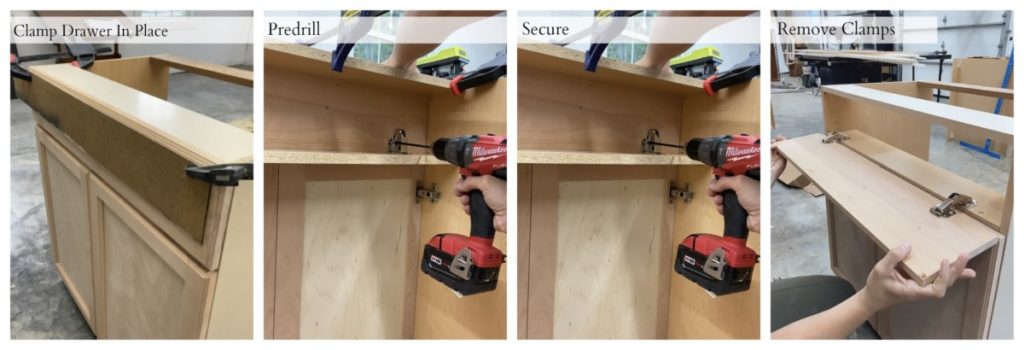
Attach Glide to box
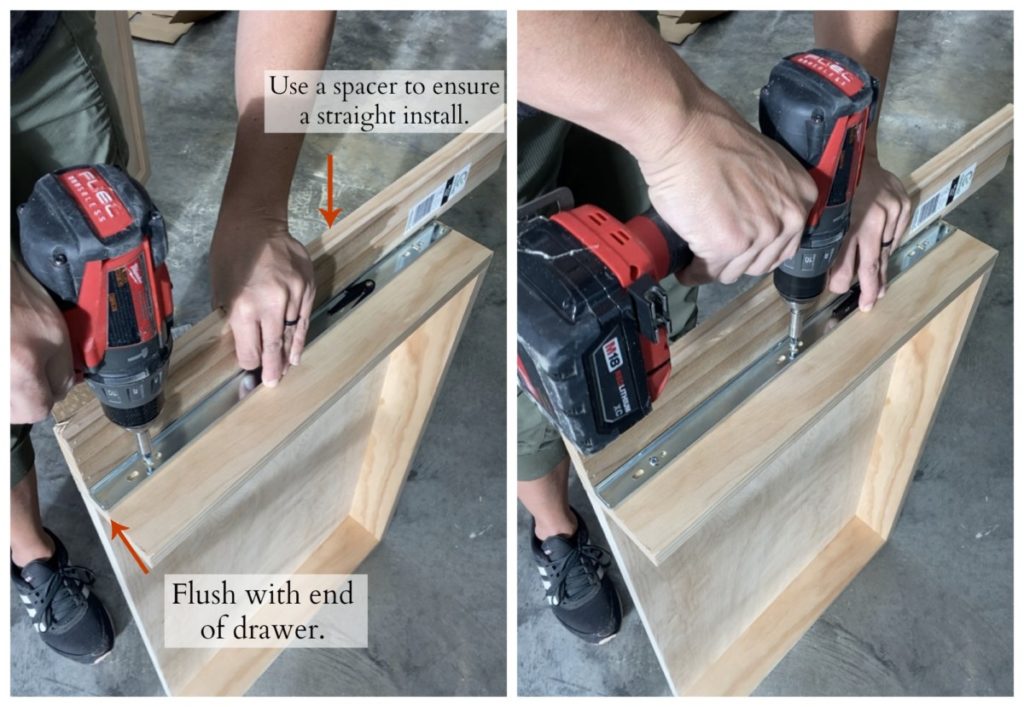
When installing drawer glides. I begin by removing the drawer glide rail and secure it to the box first. This is a fairly simple process. Place the front of the glide so that is flush with the box. Then using a spacer screw with glide rail in place using the screws provided with your glides. (See below image for clarification.)
Install Glide to Cabinet
Alright half-way through the tricky part. See that’s not so bad ? Let’s wrap this puppy up. All we need to do now is install the second half of the glide. The larger piece of the glide needs to be secured to the cabinet base.
After a few learning experiences I finally have drawer glide install down to a science and this is my favorite way to install a drawer box.
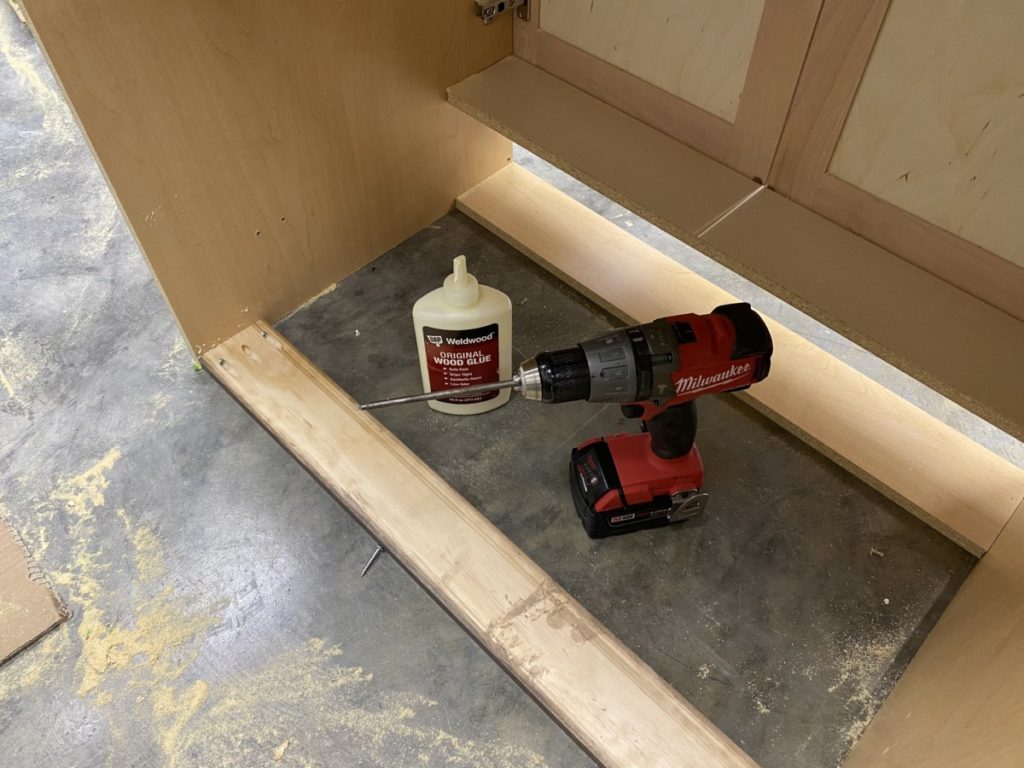
1.) Cut and Add Spacers- The spacers will need to be tall enough that your drawer box will not hit the hinges when the drawer is pulled out on the drawer glides, but also short enough that the drawer box doesn’t hit the top of the opening. I cut mine approximately 1″ thick and 20 long.
Place the guides under both sides of the drawer box.
2.) After the spacers are resting on the front drawer support (under the drawer box) clamp or secure the spacer to the cabinet so that the spacer (and thereby) the box are sitting perfectly level. Repeat this process for both spacers on either side of the drawer.
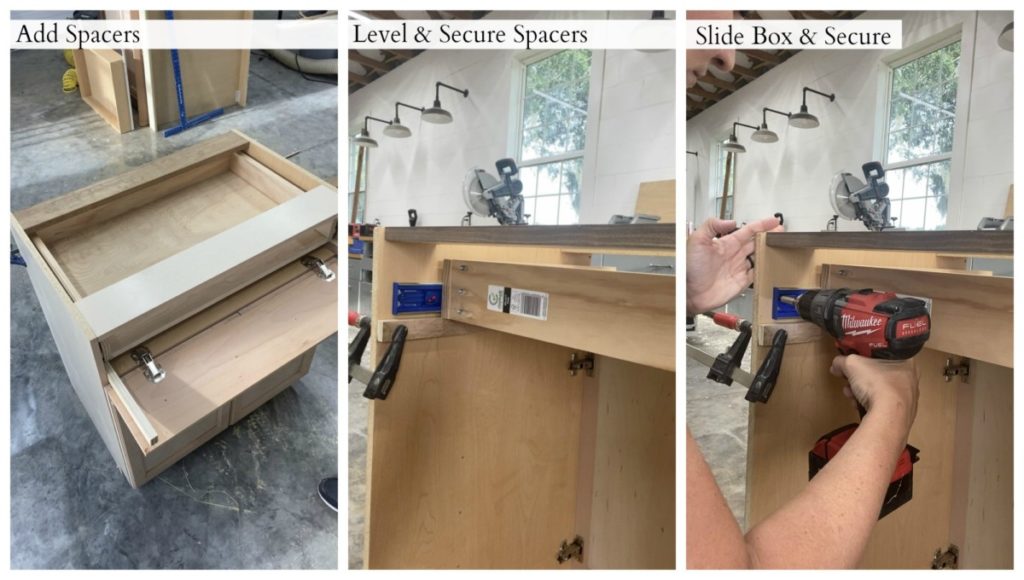
3.) After the spacer is securely attached it is time to install the drawer glide. ( As of right now the box is resting on top of the spacers with the glides already attached to the box.) Before we can install the glide we need to make sure the front hinged drawer has enough space to close. (The hinges I used required 1 1/4″ from the front ledge in order to close properly.)
Once certain of location mark where the back of your glide should be. Use this same measurement and mark it on the other side as well. Once marked, slowly slide the box forward so that the glide is extending. As the box and glide extend it should holes allocated for screws.
4.) When the holes are visible it is time to start screwing the glide to the cabinet interior. (Make sure the back of your glide is still at your pre-marked measurement. Once you have double checked go ahead and put in screws in the available hole cut outs. Repeat this same process on both sides of the box.
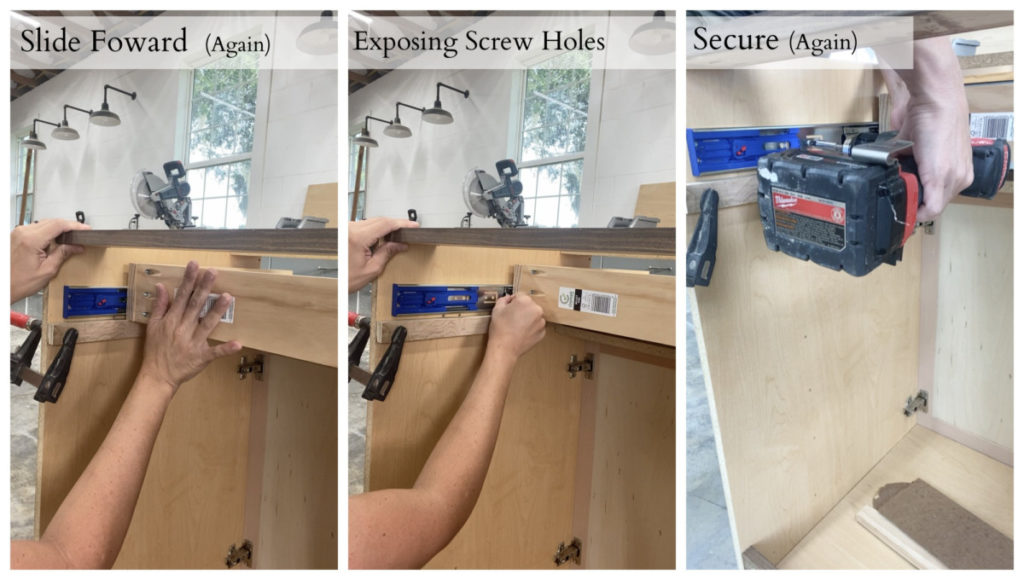
5.) Hard part is over! Gently push the drawer forward again. ( It is still resting on the spacers, but the glides should not be shifting because of the first set of screws that are installed.) As you push the drawer forward it will expose more hole cut outs, proceed to screw in the provided screws.
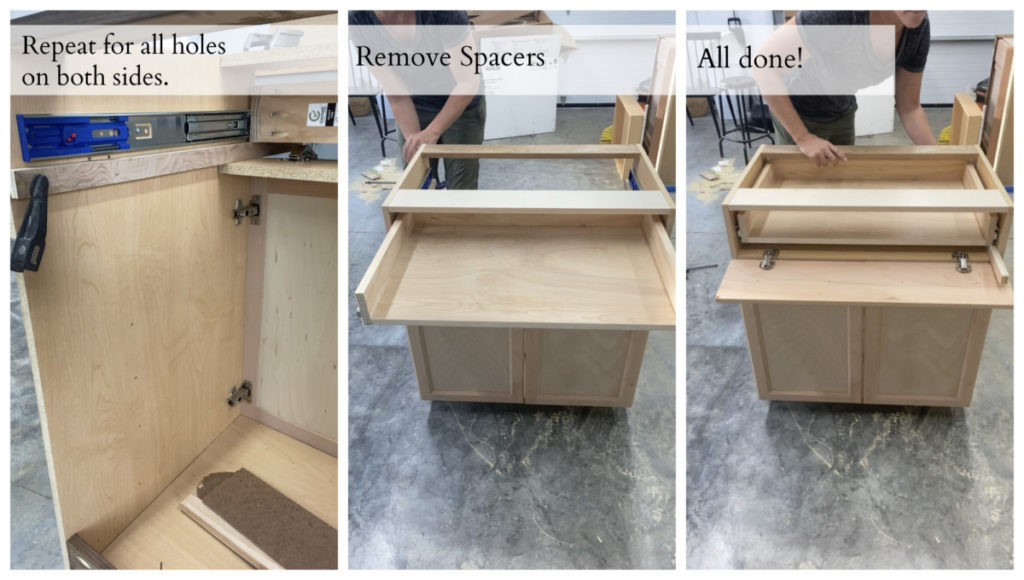
6.) Repeat step (5) until the glides are completely extended. (The box should be completely pulled out at this point.)
7.) After all the screws are in, unclamp the spacers and pull out from under the drawer.
8.) You did it! It should be a perfectly level install.
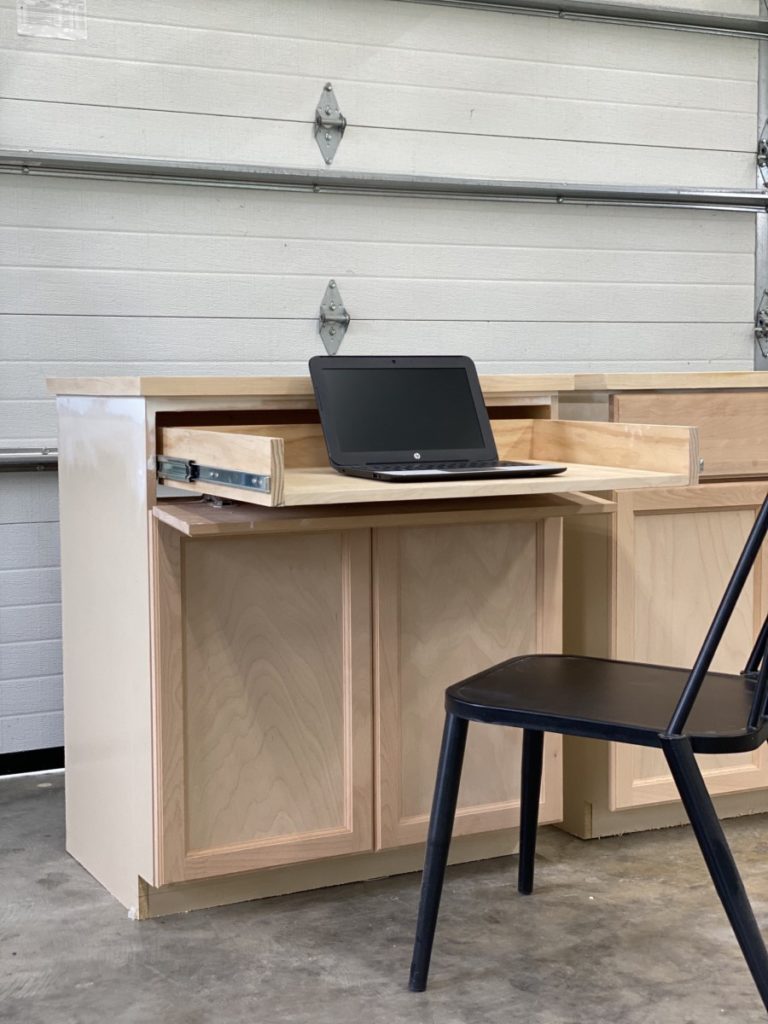
You did, pat yourself on the back. You converted a drawer into a desk! If you are interested in how I created the rest of my built in unit or the countertops make sure you check out these posts.
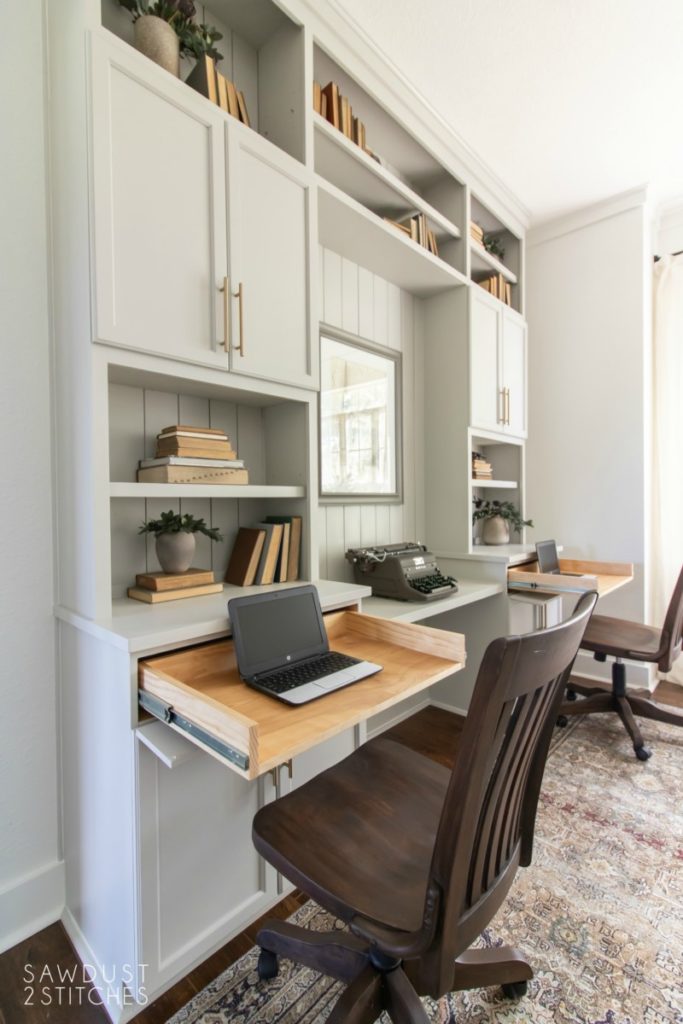


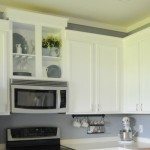


WOW!!! Who would even think that this office started out with basic, inexpensive in-stock cabinets from a big box store! It looks like you spent the big bucks and hired a cabinet maker.
I have cut down cabinets before, but it never occurred to me to do anything like this. Very inspiring, and very doable.
Yet another creatively useful idea skillfully done. A wonder to behold.
Wow, a lot of work but perfectly designed to work and so compact. Love it! Really looks lovely too, that’s so important. 🙂
Thanks for sharing your project.
Darlene
Necessity is indeed the mother of inventions. This is genius!