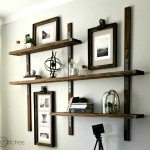
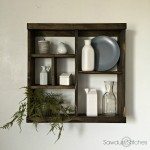
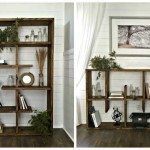
Hi all! It’s April here from UncookieCutter to share another piece of my husbands recent office makeover. Hanging shelves are so easy and they are great option if you are looking to have a little storage but don’t need heavy cabinets. For these shelves, I used a faux live edge on cheap utility shelves and galvanized wire kits for hanging. The project was cheap and took less than a day to complete.

My husband had specific wants for his desk and you can find all the details![]() on that build HERE. I wanted to use galvanized wire rope to hang the shelves because I thought it would give it a nice light feel that was a bit different and a bit masculine. We decided we didn’t need anymore cabinets in this area and wanted to let that cool plank wall shine.
on that build HERE. I wanted to use galvanized wire rope to hang the shelves because I thought it would give it a nice light feel that was a bit different and a bit masculine. We decided we didn’t need anymore cabinets in this area and wanted to let that cool plank wall shine.
My husband wanted a whiteboard to write formulas on, but whiteboards aren’t very pretty. So, instead of the whiteboard, I carefully hung a piece of plexiglass to use as a whiteboard. This allows that planked wall to show still but also gives him a place to write. Then I built the shelves around the plexiglass.

I started this project by laying out the shelves. I built the desk and measured the back edge. I wanted the shelves to stretch the entire length of the back of the desk overall, but each board I cut a little shorter than the entire length. I didn’t measure out this part, I just sort of randomly cut them. I used random cords to eyeball about where I wanted the wire to hang. This just gives it a little more dimension.

Next, I laid them on top of each other and drilled four holes in each corner of each board. I made the edges line up, then clamped them together. I drilled all the holes at once, so the edges would line up with the edge of the desk and the wire would hang straight. For the two longer shelves, I also drilled two holes on the other side for support.

Next it was time to sand and stain. I wanted to do something a bit different than just stain and I love the look of live edge furniture. I keep seeing it everywhere and it’s beautiful. The problem is, I can’t afford it and I don’t have the equipment to cut trees into nice, flat usable pieces. So, when I saw THIS post over on Remodelaholic, I thought it was genius. At first, I thought of doing this with the desk, but the way my husband wanted the desk laid out, it couldn’t get it to work. But, I could create shelves with a live edge feel. I followed her directions with the sanders. It was quick and easy to get the edges ready to go.

After getting the edges the way I wanted, I did the stain a little different from the original blogger. I had some leftover stain (I was trying to do this as cheaply as possible). I started with Minwax polyshades and used golden oak. I stained the front and back of the boards first. I didn’t worry about the stain bleeding over onto the side. It actually works out better for it to bleed onto the side in some places. In the next step, it will help add to the natural look of the wood. Immediately after I painted the golden oak on both sides, I took a small artist paintbrush and brushed on Minwax polyshades in Espresso along the beat up edge. In the place where the golden oak had bled over really worked out nice. I did two coats in this manner, and since I used the polyshades, I didn’t need another coat of poly.


Once![]() I got the boards stained, it was time to hang them. I bought galvanized wire kits at Walmart in the hardware section next to the rope. I love them, they have the wires and great little stoppers in the box. I started by hanging 4 d-rings in the correct places, right above the holes, on the horizontal board at the top of the wall. If you don’t have a board like this, you’ll want to put in a dry wall anchor to hold the weight. Next I ran then wires through the d-rings and all the holes.
I got the boards stained, it was time to hang them. I bought galvanized wire kits at Walmart in the hardware section next to the rope. I love them, they have the wires and great little stoppers in the box. I started by hanging 4 d-rings in the correct places, right above the holes, on the horizontal board at the top of the wall. If you don’t have a board like this, you’ll want to put in a dry wall anchor to hold the weight. Next I ran then wires through the d-rings and all the holes.

I hung them all first starting with the top board and putting them close![]() to where I wanted them. The wire kits come with little u shaped clips that hook on right under the board. All I did was hold the board as close to where I wanted it as I could and clip on one under each hole. Then leveled them off starting with the top board again and working down, pulling the wire taught as I went. If you end up needed more stopper clips, you can actually pick them up at the hardware store for very cheap.
to where I wanted them. The wire kits come with little u shaped clips that hook on right under the board. All I did was hold the board as close to where I wanted it as I could and clip on one under each hole. Then leveled them off starting with the top board again and working down, pulling the wire taught as I went. If you end up needed more stopper clips, you can actually pick them up at the hardware store for very cheap.

Once I had them all where I wanted, I used my new fun heavy duty bolt cutters to cut off the excess and that was pretty much![]() it! I styled it with our favorite team memorabilia and my husbands humidors, which desperately needed a home and the office seemed like the perfect spot.
it! I styled it with our favorite team memorabilia and my husbands humidors, which desperately needed a home and the office seemed like the perfect spot.

See all the details on the home office, including the hardwood looking ceramic tile I installed![]() HERE.
HERE.

Thanks![]() for reading, and see you all back here
for reading, and see you all back here![]() soon!
soon!
Pin for later!
.

April – UnCookie Cutter
Follow![]() me over on Facebook, Pinterest, Instagram & Twitter
me over on Facebook, Pinterest, Instagram & Twitter
 Copyright secured by Digiprove © 2016


Thanks so much Corey!
Great project. I am a big fan of so many of your posts, but the images in this one has some unfortunate blemishes. Roll Tide!
Haha, thanks Clayton – not Corey’s fault so don’t blame her :). War Eagle! 🙂
This is an amazing project! Love everything about the room and these shelves with the faux live edge and wire just make it.
Thanks so much Dyan!