• Blog
  • About
  • Press
  • Privacy

Let’s be social!

  • Skip to primary navigation
  • Skip to main content
  • Skip to primary sidebar
  • Skip to footer
Sawdust 2 Stitches

Sawdust 2 Stitches

  • Tutorials
    • Around the House
    • Organization
    • Wall Decor
    • Sewing
  • Makeovers
    • R.V.
    • Room Makeover
    • Furniture Makeover
    • Decor Makeover
  • Build Plans
    • Small Builds
    • Wall Decor
    • Dresser
    • Tables
    • Seating
    • Shelving
    • Hidden Compartment
  • Seasonal
    • Summer
    • Spring
    • Fall
    • Winter
  • Home Tours
    • First Home
    • Current Home
    • 70’s Ranch Home
  • Workshop

Muslin Curtains – Cheapest and Easiest Curtains, EVER!

July 10, 2013

muslin curtains

Alright people…lets talk about muslin curtains
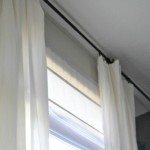
See these drapes?

muslin curtains

They are beautiful right? Flowy, light, long, and perfect.  Of course they had better be for the  $129.99 PER PANEL at Restoration Hardware.

I am going to let you in on a little secret,  you can make these same drapes for less than $15.00 for a SET of floor to ceiling drapes…

Ok, get your Joanns coupon,  and measure the height of your ceilings.

When shopping for material you will be looking for a material called “Muslin”.  This stuff is great!
They have several widths (starting at 36″  all the way up to 120″)   and traditionally, a bleached (white) and unbleached (linen).

DIY Muslin Curtains!

Pick the width  you would like your curtain to be.  I believe mine are 45″ but in retrospect I would have gone wider.  ( I think the next increment up is 90″)
I have 10′ ceilings so I needed  right around 3 1/2 yards per panel,  for a total of 7 yards.

So you have a better idea:

45″ Muslin  =  $2.99 x 7= $21.93 – (50% off coupon) = $10.46 !!!
or
90″ Muslin   = $5.99 x 7=  $41.93 – (50% off coupon) =$ 20.96 !!!  ( I should have done these…)

Ok,  so that was the cheap part, here is the easy part…

Since you bought the fabric in the width you needed ,  you do not need to cut it,  therefore you do not need to sew the edges!  Half of the reason I love muslin is it’s selvage edge (factory edge).

The only cuts you will need to make is the height.  This is a basic formula you can  use to calculate   your height:

Example:   ceiling to floor height  + 3″ for bottom hem + 4 ” (for a standard rod)= Total fabric length.

So layout your fabric and measure twice and cut (preferably with a rotary cutter),  this will ensure a nice straight cut.

( If you do not have one, and you want to become a more efficient seamstress or seamster,  I would definitely  invest in one!)

So lets start with the hem….

If you started having a panic attack,   there is a tutorial here…  ( I swear basic sewing tutorials will be up eventually).

You just completed the bottom hem, flip it over and do the exact same thing only leave 3.5″ and the .5″ folded under.   Deep breaths you can do this without a picture.

FYI make sure your hems are both facing back,  I have several times gone to hang up a panel and realized I have sewn the hem on the opposite side and had to take it out and re-do it…

Once both ends are hemmed you can either  use a rod, or attach clips to hang.
I have used both rod version and clip versions in my home…  It all depends on the look you want!

 
So lets review, less than $15.00 for a SET = CHEAP
Sewing two straight lines = EASY
Not only are they the cheapest and easiest curtains to make they rival with Anthro, Restoration, and Pottery Barn.
Sounds like a  winner to me!

Stay tuned for second way to use Muslin curtains with a twist!

Digiprove sealCopyright secured by Digiprove © 2015

More from my site

  • Cheapest and Easiest Curtains EVER. (Part 2)Cheapest and Easiest Curtains EVER. (Part 2)
  • Conduit Curtain Rod WITH  End CapsConduit Curtain Rod WITH End Caps
  • Craft Cabinet OverhaulCraft Cabinet Overhaul
  • Moody Board and Batten Guest RoomMoody Board and Batten Guest Room
  • Garage StorageGarage Storage
  • DIY Trestle Entry TableDIY Trestle Entry Table

in Sewing, Tutorials, Uncategorized # Curtains, Muslin

Reader Interactions

you may also like
Back of Door Spice Rack
Pool Patio Design
How To: Exterior Door Makeover
Out-feed Assembly Workshop Table

Comments

  1. coreydecker@gmail.com says

    February 21, 2015 at 9:10 pm

    Thanks so much Mandy, I have a great respect for quilters… haha I have attempted a few, but that requires SERIOUS patience, and skill! Kudos to you!

  2. Joy Bittner says

    March 2, 2015 at 2:54 am

    Off to Home Depot or some other hardware store…get some conduit. Spray paint it. Add a cool finial (spelling) to it. And there you have it…New Cheep Curtain rods.

Primary Sidebar

  • Facebook
  • Instagram
  • Pinterest
  • Twitter
  • YouTube
IMG_9167 (1).jpg fd

Popular Projects

  • How to: Faux Brick Wall
  • Cheap White Curtains
  • Ikea Cubbies into a Rustic Apothecary
  • Cabinet Transformed Into A Kitchen Island
  • R.V. Makeover
  • How to: R.V. Curtains
DIY & Design

Meet Corey

Hi everyone, my name is Corey, and I have a problem. I can’t leave well enough alone… The best therapy usually involves a variety of power tools. So, in the few “spare” moments I am not entertaining my two beautiful, rambunctious, boys, I can typically be found hunched over a sewing machine and/or covered in sawdust. All in the efforts to create a perfect balance of aesthetics and practicality in our home.
read more

Join our mailing list!

DIY & design ideas - right in your inbox!

Top Hits!

  • How to: Faux Brick Wall
  • Cheap White Curtains
  • Ikea Cubbies into a Rustic Apothecary

Featured

Back of Door Spice Rack

Categories

  • 70's Ranch Home
  • Around the House
  • Build Plans
  • Crafts
  • Current Home
  • Decor Makeovers
  • Dresser
  • Exterior
  • Fall
  • First Home
  • Furniture Makeover
  • Hidden Compartment
  • Kitchen
  • Lighting
  • Makovers
  • Master Closet
  • Organization
  • R.V.
  • Room Makeovers
  • Seasonal
  • Seating
  • Sewing
  • Shelving
  • Small Builds
  • Smart Home
  • Spring
  • Summer
  • Tables
  • Tablescape
  • Tutorials
  • Uncategorized
  • Wall Art
  • Wall Decor
  • Winter
  • Workshop

Footer

Contact Me: Corey@Sawdust2Stitches.com

Latest ‘Grams

Follow on Instagram
2020 © Your Blog Name
theme by soleilflare
Enter your name and email and get the weekly newsletter... it's FREE!
Your information will *never* be shared or sold to a 3rd party.