Covering Wallpaper with Faux Shiplap – This post is sponsored by DAP.

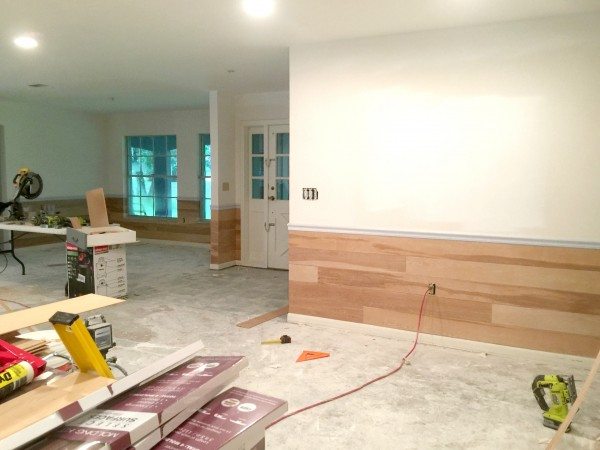
Hey All, welcome back to the 70’s Ranch makeover! If you are just tuning in, my friends and I are in the midst of a HUGE renovation. We are in the process of gutting a 1970’s ranch home. You can see all the demo/before images here. We ripped out paneling, and a few random walls… we also took down a lot of wallpaper. Most of the wallpaper was easy enough to take down, but some pieces were more stubborn than others. There was also a chair rail on the wall that followed the perimeter of the main living area and down the hall. So we were dealing with damaged walls due to the wallpaper and it’s residual residue, and then if we decided to remove the chair rail we would also have wall damage from that. So we decided to work WITH the problems. Instead of spending a lot of time and money fixing the problems, we decided work with the eyes sores!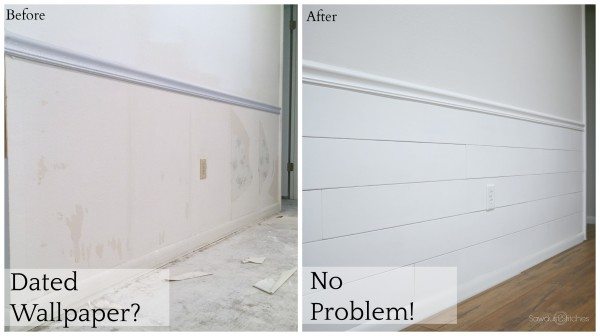
Covering Wallpaper with Faux Shiplap
It’s no secret that I love chair rail height shiplap. ( I have done it in my past two homes!) So it seemed like a no-brainer in this case. We decided to use the pre-existing chair rail and baseboards and install our own faux shiplap. It would add a ton of character, it would be cheap, it would hide eyesores, it was cheap. Did I mention it was cheap?
Anyways, I want to stress how doable this process is! Granted real shiplap boards are ideal when it comes to being user-friendly. (You can see my post on tongue and grove style boards here.) However if you are on a tight budget this is the way to go. Even a beginner can do it!
Covering Wallpaper with Faux Shiplap – Materials Used:
- 3mm underlayment (4’x8′)
- Sandpaper
- DAP DynaGrip Adhesive
- DAP Plastic Wood
- DAP Alex Flex Molding Caulk
- Finish Nails
Tools Suggested:
- Tablesaw
- Tape Measure
- Sander
- Finish Nailer
- Drill with 1/4″ drill bit
- Jigsaw
When I can say that “you can do this” I really do mean it! Take my friend Jena (homeowner) for example. Jena had never used a power tool in her life, maybe a drill, but certainly never a saw or pneumatic nailer. The DIY world was a completely uncharted territory for her. This project was her crash course for her and she did great! So if you are a little wary, don’t be, you have got this!
1.) Prepare Boards
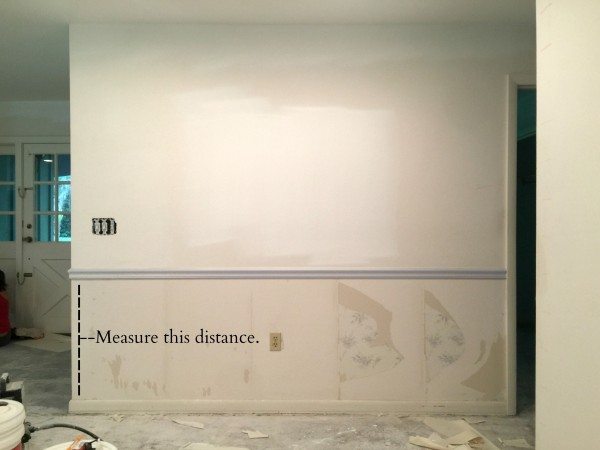
Let’s dive in. The first thing you have to do is prepare your boards. For this project, we wanted to use very thin boards, and here is why: As I said before we were working with the pre-existing baseboards and chair rail. So we selected a board thickness that would look right with our baseboards and chair rails. We selected a 3mm underlayment paneling. You can purchase these panels are The Home Depot, for about $10 a 4’x 8’panel.
Before you start cutting your boards, you will want to determine the width you would like your boards to be. Anywhere from 5″- 6.5″ wide is pretty standard. You really can’t go wrong. However, if you are trying to create a chair rail height you will need to factor your desired height. As you can see below, I measured the distance between my baseboards and chair rail. I ran some numbers and ended up dividing my (distance between baseboard/chair rail) ÷ (5)= Width of shiplap boards.
One last thing to consider when cutting your boards. Take into account the spacing you would like inbetween your shiplap boards. This is all a matter of personal opinion. We ultimately decided that we wanted little to zero space between the boards. Again all a matter of opinion!
Covering Wallpaper with Faux Shiplap – Measure and Cut
Ok, for real let’s get started. Once you know your desired board dimensions, start ripping! (Ripping is a term used to described cutting a board in the long direction.) You will need a tablesaw, OR a friend with a tablesaw, OR you are going to need to smile really nice to the guy working at Home Depot.
I set my saw’s fence and showed Jena how to use a tablesaw. This was her first try, and after getting through her first few boards she had a good handle on it.

Next sand the edges of your boards. If you have a good blade on your saw you should have minimal tear out. (“Tear Out” is the frays of board that splinters on a cut edge.) When I sand I do like to round my edges just a little bit. Again, all a matter of personal opinion, I just like the look.
2.) Attach Boards
By nature paneling boards are fairly light weight and flimsy. Which is both a pro and a con. It is flimsy so it doesn’t want to stay rigid, but because it is so light weight it is easy to work with. All you need to do to remedy the flimsiness is a good adhesive.

Covering Wallpaper with Faux Shiplap – DAP DynaGrip
When selecting an adhesive I chose to use DAP DynaGrip. This stuff is awesome! I would feel very confident saying that if you really wanted to you could get away with using only DynaGrip and painters tape to attach it to the wall. It grips really quickly, but still allows room for adjustment. It is great to work with, especially if you are trying to install solo. It is like having a second set of hands when installing.
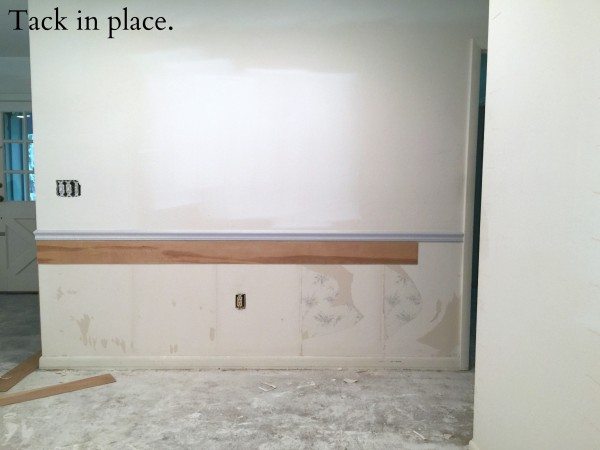
For time reasons, I used a small finish nailer to tack the boards in place. The nails aren’t necessarily to hold the board to the wall, it is just holding the board in place long enough for the DynaGrip to dry. The less nails you use the less holes you have to fill!
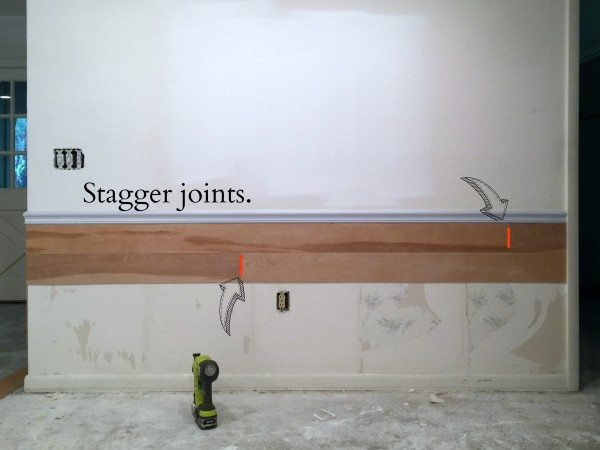
Step 3. Spacing
Another thing to consider is your joints. Make sure you stagger them! For example, don’t start every row with a full board, you will end up having all your joints lined up. Make sure you take some random cut offs to start rows. There is no math to it, just eyeball where you would logically want your next joint to be.
Covering Wallpaper with Faux Shiplap – The Gaps
P.S. As you recall earlier we talked about considering the spacing between your boards. On mine I had virtually no gap. When I sanded my boards, I rounded the edges slightly and this helped emphasize the appearance of shiplap, without having a think dark gap. (But if you like the more drastic look, GO FOR IT! I have heard of others using quarters or nickels for their spacers. Just keep it consistent.
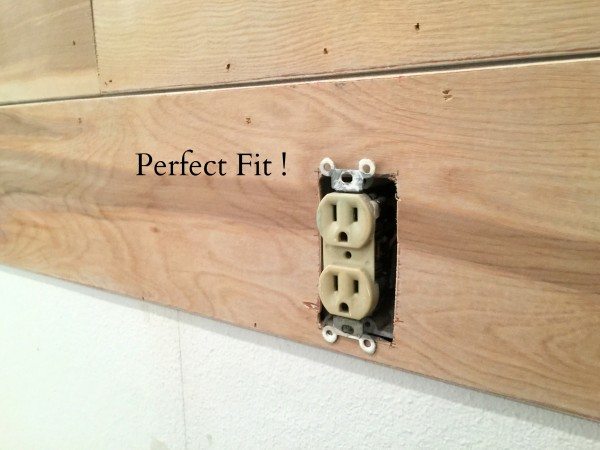
Step 4. Outlets

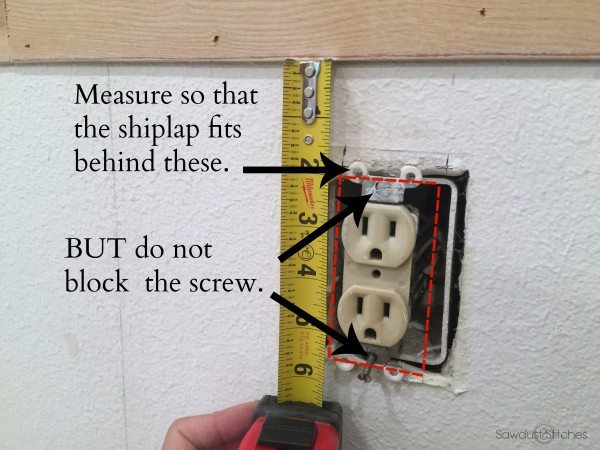
Covering Wallpaper with Faux Shiplap – Outlets
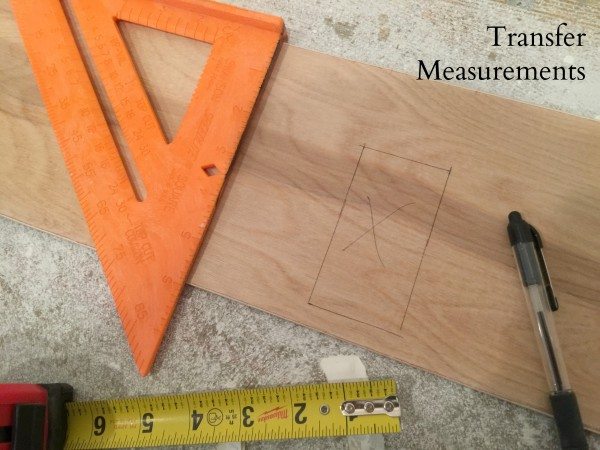
I have found that the trickiest part is when you need to incorporate an outlet, or switch. In all honesty, it really isn’t that bad. Just take careful measurements and you will be fine! Start by measuring the placement of the outlet, and transfer those measurements to your next board. (See image below)
Now, if you have never completed a cutout on your own, no worries. You can do this! I have found that the simplest way to create a cut out is by first using a drill, and a drill bit to make holes in the corners of your cutout.
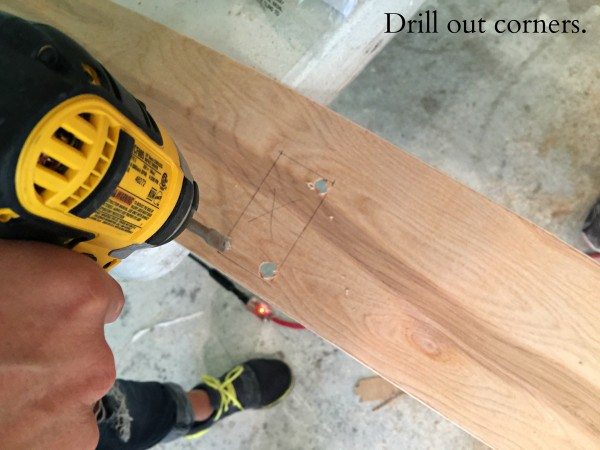
Then using a jigsaw, place the blade in one of the holes, and simply connect the dots!

Step 4.) Repeat steps 2-3 until complete.
Step 5.) Corner Trim
Once all your shiplap boards are installed you are ready to tie up a few of the loose ends. In some cases you may want to add some trim to your interior and/or exterior corners.
One option for interior corners is to use a very low profile quarter round to clean up your corners. In lots of cases a healthy bead of caulk smoothed out should do the trick.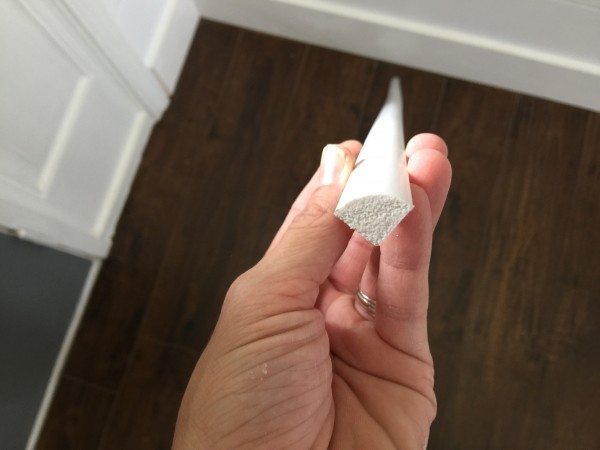
When it comes to outside corners I always opt for a low profile corner trim piece. Installation is fairly straight forward. Measure, cut, apply with DynaGrip and if necessary tack in place while the adhesive dries.

Step 6.) Fill Holes
The quickest way I have found to fill holes is using a tub of wood filler and a putty knife. Hands down my “go-t0” filler for this application is “Plastic Wood” by DAP. It comes in a short and wide tub. This is a HUGE selling point for me, I like to be able to dip my putty knife in the container and not get it all over my fingers and knuckles. Bonus it dries quick, and if you use a sharp putty knife it spreads on smoothly enough that it require minimal sanding with no shrinkage. Plus easy clean up with a wet rag.
Covering Wallpaper with Faux Shiplap – Fill in the holes
So grab a putty knife and start filling any discrepancies. Learn from my mistakes and only use a little bit of filler and scrape the applied area with your putty knife. It will remove the excess filler, and require minimal sanding!
Step 7. Sand
The purpose of sanding at this point should NOT be to smooth out the actual boards. In this step you should be spot sanding where you applied your wood filler. It should be a quick and painless process. Once you are finished sanding just give it a once over with a slightly damp clean rag. This will remove all dust and debris in preparation for paint.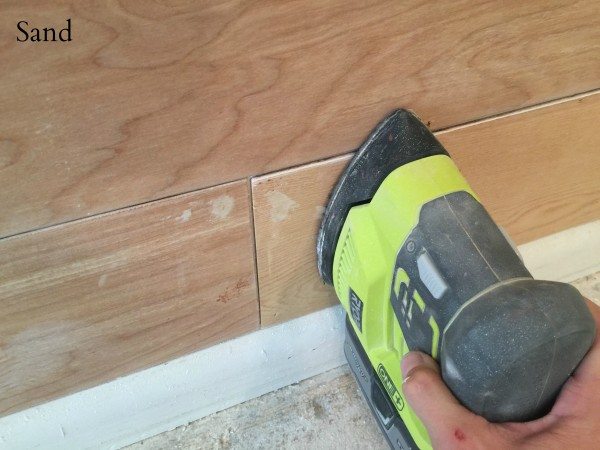
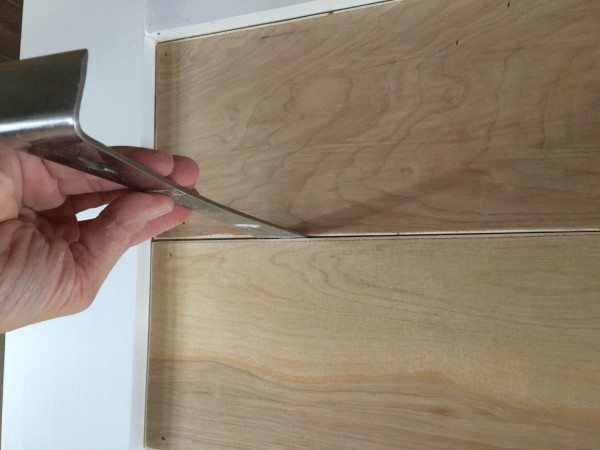
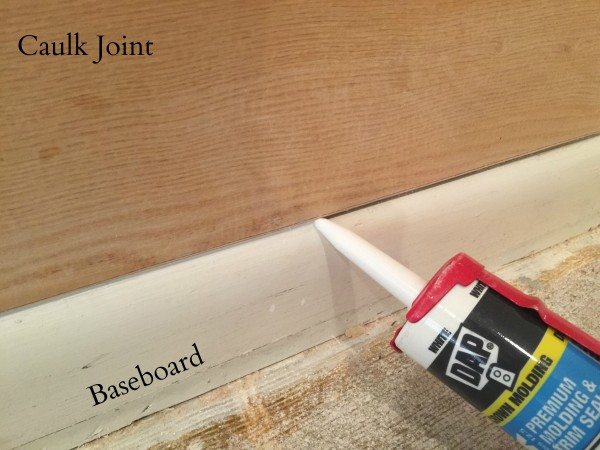
Step 8. Caulk
Inevitablly you will have some gaps and discrepencies in your work. Don’t worry that is when caulk becomes your best friend! For this application I use “Alex Flex Premium Molding and Trim Sealant”. It is easy to work with and it’s easy to clean up with water. It dries quickly and is paintable! It’s my no brainer selection when it comes to trim work.
So grab a tube and get to work. Sometimes seams won’t seem (word pun totally intended), to need filled, but once they are painted they might stand out more. (Don’t worry if you find more joints/seams that need caulk after you have painted, it is no big deal! Just caulk as normal and add some touch-up paint once completely dry.
When caulking I always make sure I hit the joint where my shiplap meets any trim boards. In this case I caulk where my chair rail board and my shiplap meet.
Covering Wallpaper with Faux Shiplap – Caulking
I also always make sure I caulk where my shiplap meets the baseboard. It always gives it a very finished look.
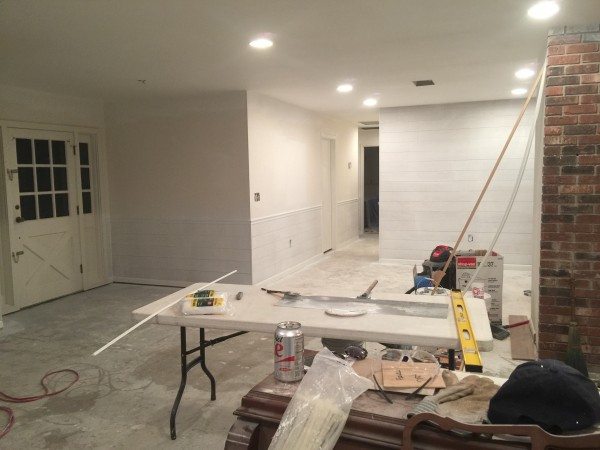
Look at the HUGE difference a few sheets of paneling can make!!! 
Covering Wallpaper with Faux Shiplap – Accent Wall
We ultimately decided to cover all the unsightly wallpaper residue with shiplap and also did a full accent wall in the family room.
Step 9. Prime and Paint
Because, we were working in a space that was completely unfinished, I opted to you use a paint sprayer to paint all the shiplap. If you don’t have that luxury you can easily use a paint brush and roller.
 Here it is all primed and ready for paint!
I like to hit my seams first with a primer using a paint brush. I have found that if you hit the seams really well with primer and a brush you don’t need to worry about the seam as much when you apply the top coat with a roller.
When rolling paint make sure you follow the direction of the boards.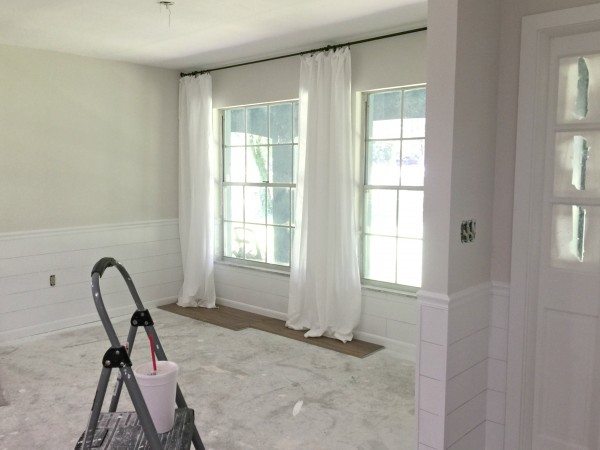

That’s it, you are done!
It is killing me to not show you the whole space, but I promise it will be worth the wait! Stay tuned because this place is coming together fast and you aren’t going to want to miss the reveal!
Take Luck,
Corey
 Copyright secured by Digiprove © 2017


[…] you have been reading along, you know that we decided to cover up all the existing wallpaper with faux shiplap. This was a HUGE improvement, and once we coupled that with new laminate flooring we had a whole […]