• Blog
  • About
  • Press
  • Privacy

Let’s be social!

  • Skip to primary navigation
  • Skip to main content
  • Skip to primary sidebar
  • Skip to footer
Sawdust 2 Stitches

Sawdust 2 Stitches

  • Tutorials
    • Around the House
    • Organization
    • Wall Decor
    • Sewing
  • Makeovers
    • R.V.
    • Room Makeover
    • Furniture Makeover
    • Decor Makeover
  • Build Plans
    • Small Builds
    • Wall Decor
    • Dresser
    • Tables
    • Seating
    • Shelving
    • Hidden Compartment
  • Seasonal
    • Summer
    • Spring
    • Fall
    • Winter
  • Home Tours
    • First Home
    • Current Home
    • 70’s Ranch Home
  • Workshop

Fall Chalkboard Sign

September 11, 2015

Home made flal chalkboard sign sawdust2stitches.com

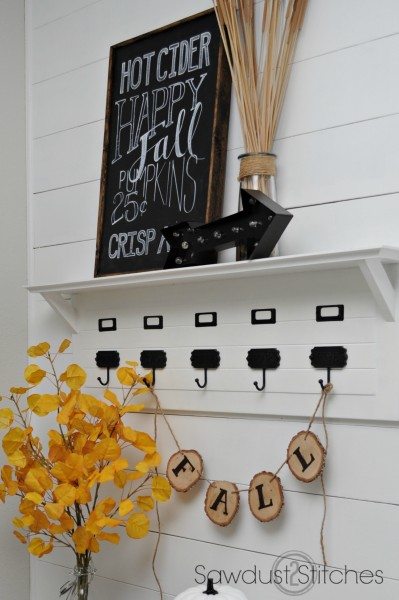
I was recently getting my home all decked out in Fall decor…   My house changes regularly, which presents a small snag when I put up seasonal decor , not everything fits where it use to! Well, I had a vacant spot on my  front entry shelf.  (You can get all the DIY details here.)

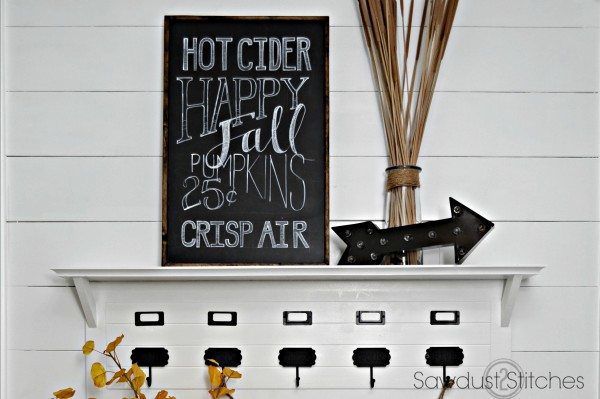
There was only one thing to be done.  It needed a customized  “Fall Themed”  chalkboard sign. (Obviously).

Materials Suggested:

  • 1/4″ paneling
  • flat black paint
  • 1/2″ board
  • White Colored pencil (prismacolor)
  • OR  white permanent chalkboard marker
  • Stain

Tools  I Used:

  •  Table Saw
  • Nail gun

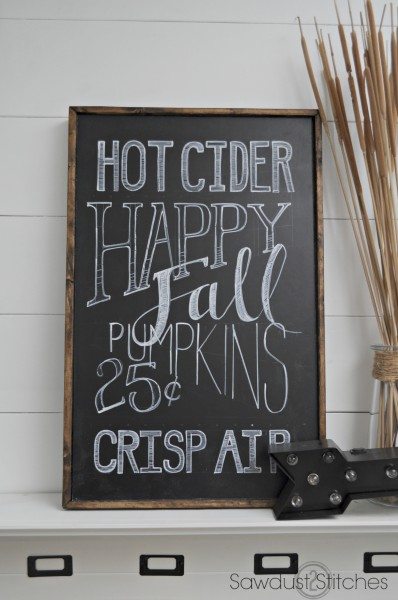
Ok, so this is just a simple walk-through of what I did. I am sorry it is not a printable… I am not that good.  Anyways, I used a piece of cheap MDF paneling and painted it with FLAT black paint.  I then proceeded to add the design to my board.

I used “prisma color” white colored pencil, and a “permanent chalk marker”.  (With all of the chalkboard rage, it seems that craft suppliers have addressed the needs for more chalk writing utensils, check at your local craft store, they are everywhere.)

If you are not the  free-handing type,  consider  using a free printable,  or designing your sign on a free service like Picmonkey.  Then  simply use transfer paper, and then trace with the white. Easy Peasy.

Here is the design I chose to do :

To really  make my sign pop, I added a rustic wooden frame.  This is a quick and easy frame.   I used a 1×2″ board and cut out a small lip on one side. (See image below)

make a fall sign sawdust2stitches.com

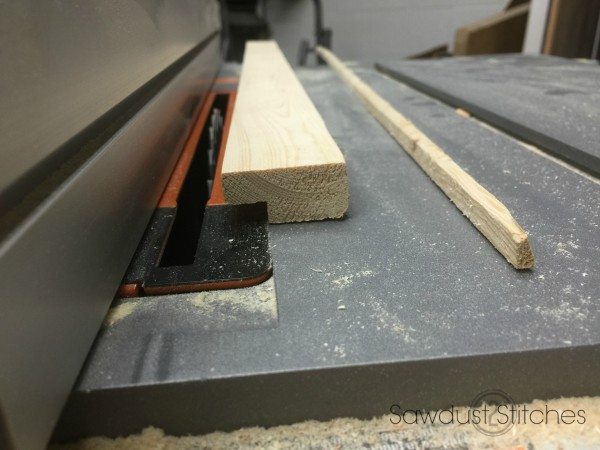
   I then measured out the size of my board and cut my 1×2’s to fit the dimensions. I cut the ends on 45 degree angles in order to create mitered corners. Make your own fall chalkboard sign sawdust2stitches.com

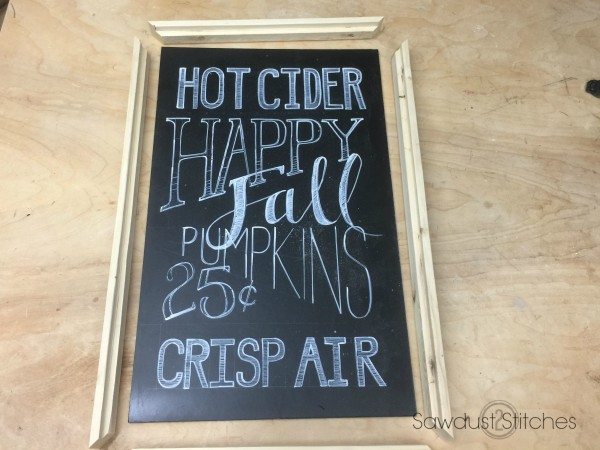
   I simply  put a dab of glue on the face of the 45 degree cut, and then tacked it in place using a finish nailer. make your own fall sign www.sawdust2stitches.com

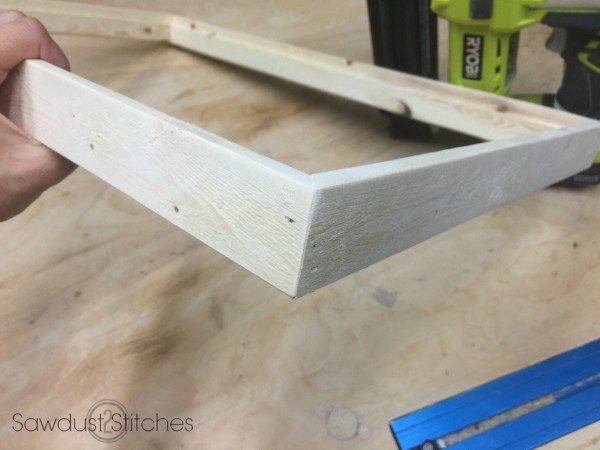
  I  then added a quick coat of stain…

make your own fall sign sawdust2stitches.com

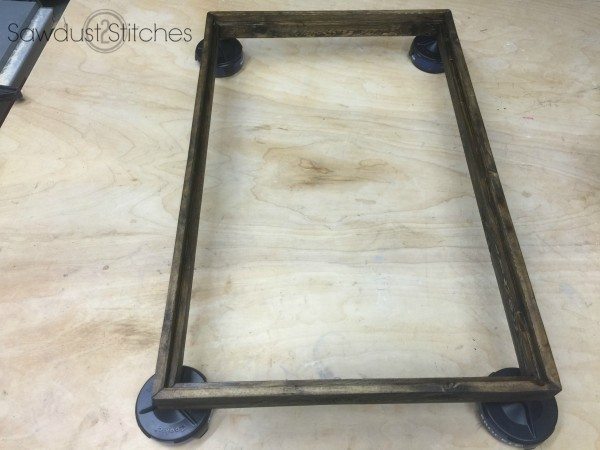
  Lastly, I added a small amount of wood glue to the back edge of the sign and then pressed it into place.

Voila.  All done.


DIY simple fall chalkboard sign by swadust2stitches

Home made fall sign by www.sawdust2stitches.com

Happy Fall Ya’ll and Take Luck All,

Corey

More from my site

  • How to: Faux Brick WallHow to: Faux Brick Wall
  • Rustic Wood Slice Fall BannerRustic Wood Slice Fall Banner
  • Secret Compartment MirrorSecret Compartment Mirror
  • Secret Compartment  Jewelry CaseSecret Compartment Jewelry Case
  • Complete Patio MakeoverComplete Patio Makeover
  • DIY Rustic FramesDIY Rustic Frames

in Fall, Seasonal # Chalkboard, Harvest, Paint, Stain, Wall Decor

Reader Interactions

you may also like
Fall Table Setting
Holiday Home Tour 2018
Modern Wreath Christmas Vignette
Jewel Tone Fall Tablescape

Comments

  1. Melissa says

    September 21, 2015 at 4:04 pm

    Very cute! Shelves with hooks are so handy for changing out decor – especially during the holidays! I might just have to build one!

Primary Sidebar

  • Facebook
  • Instagram
  • Pinterest
  • Twitter
  • YouTube
IMG_9167 (1).jpg fd

Popular Projects

  • How to: Faux Brick Wall
  • Cheap White Curtains
  • Ikea Cubbies into a Rustic Apothecary
  • Cabinet Transformed Into A Kitchen Island
  • R.V. Makeover
  • How to: R.V. Curtains
DIY & Design

Meet Corey

Hi everyone, my name is Corey, and I have a problem. I can’t leave well enough alone… The best therapy usually involves a variety of power tools. So, in the few “spare” moments I am not entertaining my two beautiful, rambunctious, boys, I can typically be found hunched over a sewing machine and/or covered in sawdust. All in the efforts to create a perfect balance of aesthetics and practicality in our home.
read more

Join our mailing list!

DIY & design ideas - right in your inbox!

Top Hits!

  • How to: Faux Brick Wall
  • Cheap White Curtains
  • Ikea Cubbies into a Rustic Apothecary

Featured

Back of Door Spice Rack

Categories

  • 70's Ranch Home
  • Around the House
  • Build Plans
  • Crafts
  • Current Home
  • Decor Makeovers
  • Dresser
  • Exterior
  • Fall
  • First Home
  • Furniture Makeover
  • Hidden Compartment
  • Kitchen
  • Lighting
  • Makovers
  • Master Closet
  • Organization
  • R.V.
  • Room Makeovers
  • Seasonal
  • Seating
  • Sewing
  • Shelving
  • Small Builds
  • Smart Home
  • Spring
  • Summer
  • Tables
  • Tablescape
  • Tutorials
  • Uncategorized
  • Wall Art
  • Wall Decor
  • Winter
  • Workshop

Footer

Contact Me: Corey@Sawdust2Stitches.com

Latest ‘Grams

Follow on Instagram
2020 © Your Blog Name
theme by soleilflare
Enter your name and email and get the weekly newsletter... it's FREE!
Your information will *never* be shared or sold to a 3rd party.