• Blog
  • About
  • Press
  • Privacy

Let’s be social!

  • Skip to primary navigation
  • Skip to main content
  • Skip to primary sidebar
  • Skip to footer
Sawdust 2 Stitches

Sawdust 2 Stitches

  • Tutorials
    • Around the House
    • Organization
    • Wall Decor
    • Sewing
  • Makeovers
    • R.V.
    • Room Makeover
    • Furniture Makeover
    • Decor Makeover
  • Build Plans
    • Small Builds
    • Wall Decor
    • Dresser
    • Tables
    • Seating
    • Shelving
    • Hidden Compartment
  • Seasonal
    • Summer
    • Spring
    • Fall
    • Winter
  • Home Tours
    • First Home
    • Current Home
    • 70’s Ranch Home
  • Workshop

Cafe Plantation Shutters

August 5, 2015

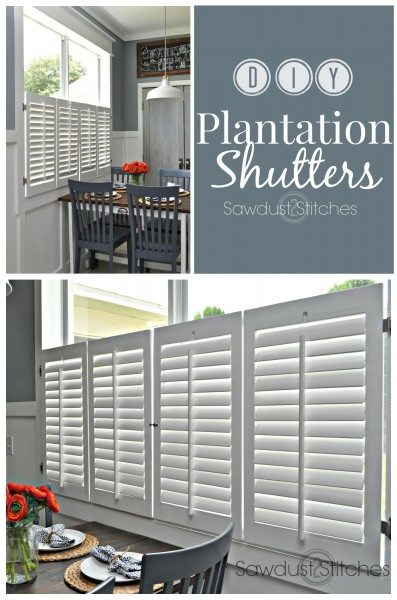
I had a dream of beautiful bright plantation shutters in our kitchen dining area.  I quickly  realized that dream was a little far fetched one I started looking into the pricing.  Hot-dang!  Those suckers are expensive!   Challenge Accepted!DIY plantation shutters www.sawdust2stitches.com

 She transforms thrift store doors into planation shutters! www.sawdust2stitches.com

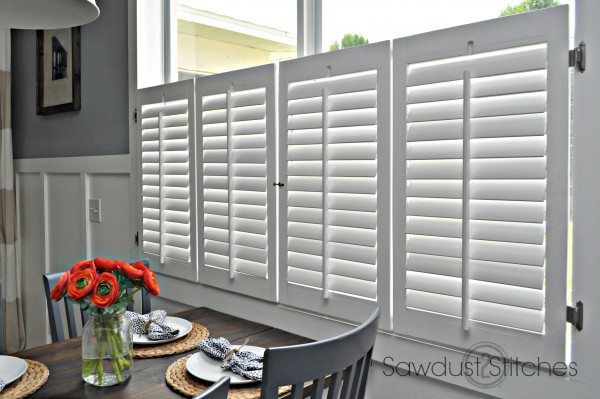
Anyone who knows me, is fairly aware I am pretty  dang stubborn.  Once I had my heart set on plantation shutters,  I WOULD figure out how to do it, within my budget.  So, I hit up our local ReStore,  I was able to find this set of plantation doors.  They weren’t the right size, but for $20  I could make them work! Plantation Shutters Makeover  www.sawdust2stitches.com

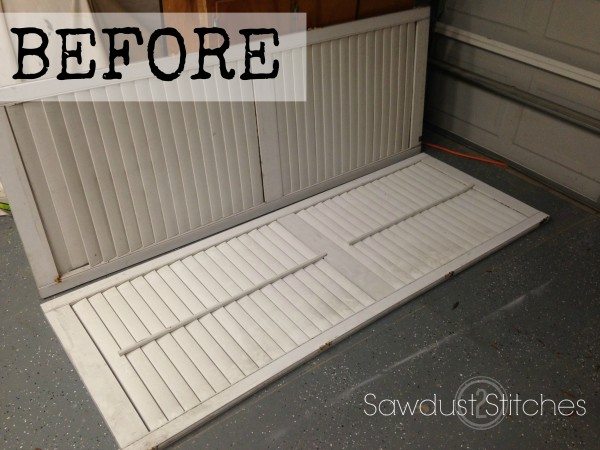
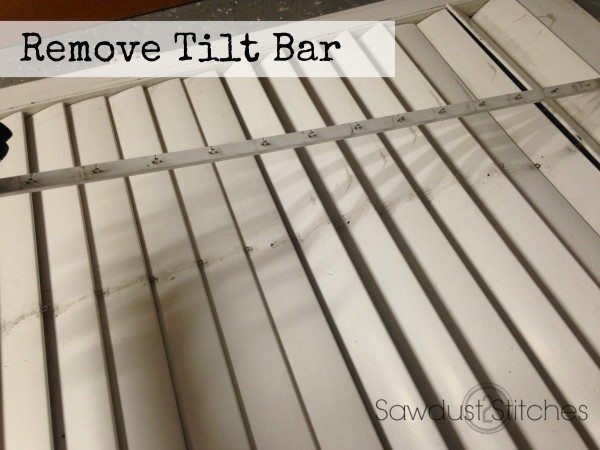
  I started dismantling them by removing the tilt bar.  I  just used snips to cut the staple.

Deconstructing a plantation shutter www.sawdust2stitches.com    After I removed the tilt bar, I proceeded to remove the Louvers.  I was surprised at how easily  they  popped out.   I also removed the “shutter pins”.  I saved these, and would use them later. plantation shutters makoever saswdust2stitches.com  
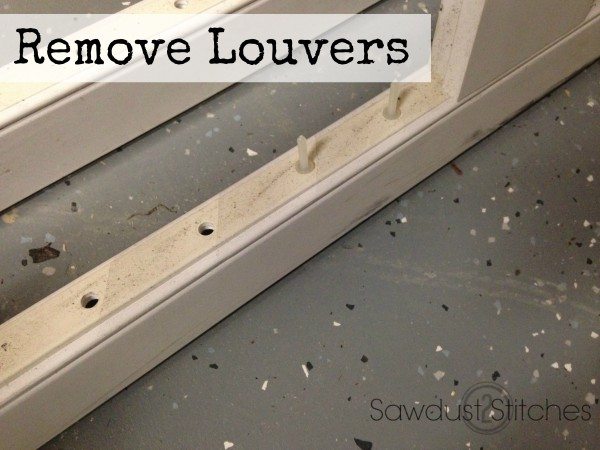
Next I needed to create new frames for my plantation shutters.  I cut “stiles” for the frame. Plantation Shutters Cut Stiles www.sawdust2stitches

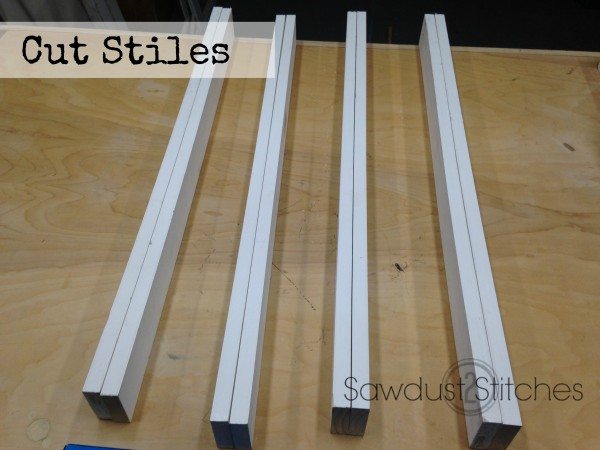
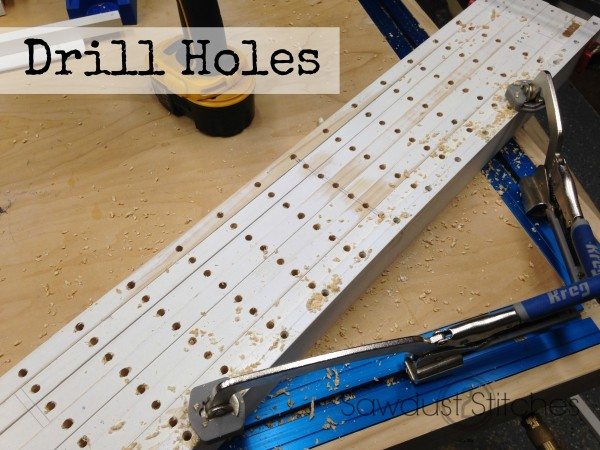
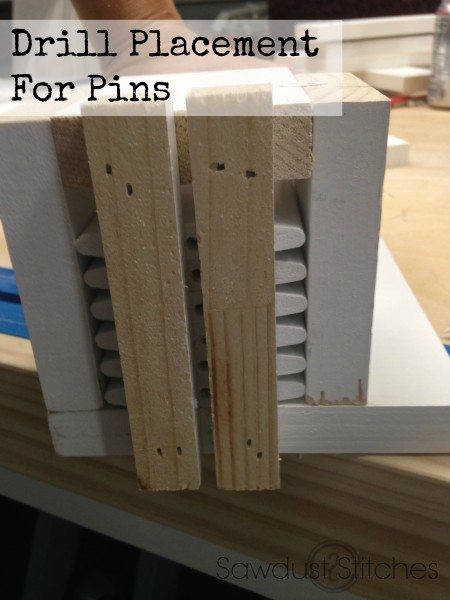
  I then drilled holes that would receive the shutter pins.

plantation shutters www.sawdust2stitches.com

 I then placed all the shutter pins. Insert shutter pins sawdust2stitches

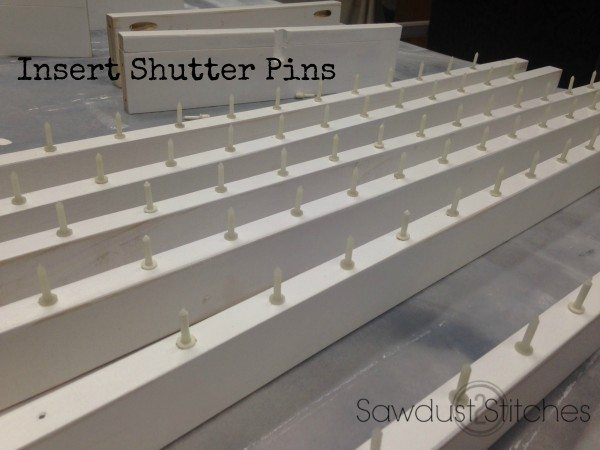
 I then cut down the louvers to fit my new frames.  I intentionally cut down from both sides so that I could keep the original center staple in place.      Plantation shutters sawdust2stitches.com

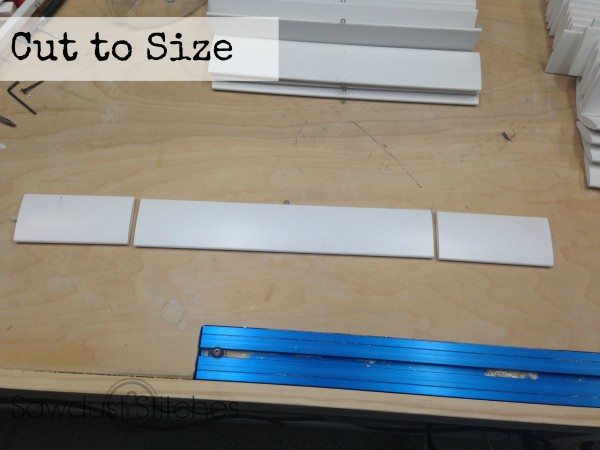
Once the louvers were cut to size I needed to drill the center hole that would receive the other side of the shutter pin.

Plantation Shutter pin sawdust2stitches

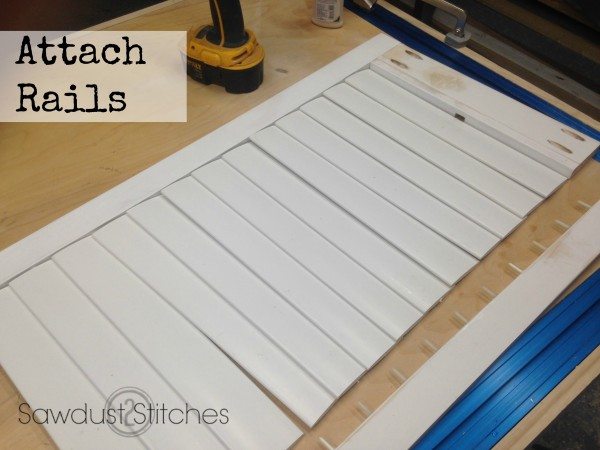
Next it was time to assemble. I partially assembled the frame using a  Kreg Jig pocket holes.

add top rails

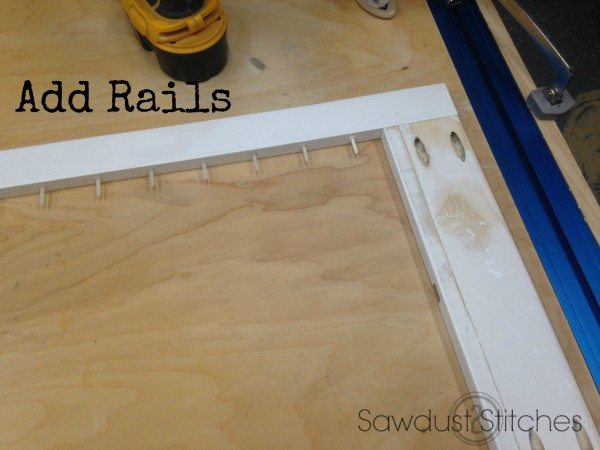
I then proceeded to slide all the louvers in place. Once all the louvers were in place I finished securing the rails to the stiles.

Attach rails on Plantation Shutters Sawdust2stitches

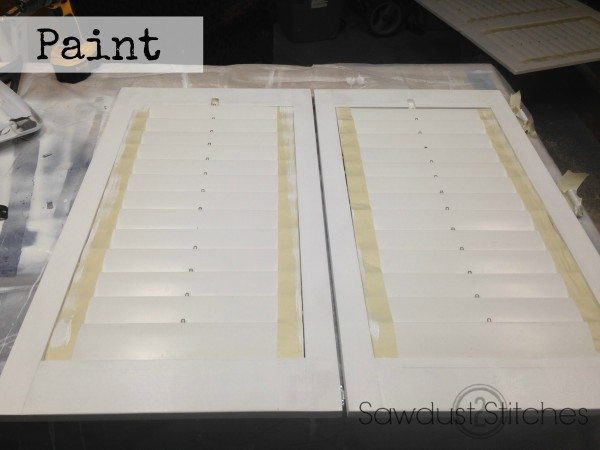
 I then gave it a final paint job.

www.sawdust2stitches.com  plantation shutters

I then needed to replace the original tilt rod. I  first cut it down to size. tilt rod sawdust2stitches.com

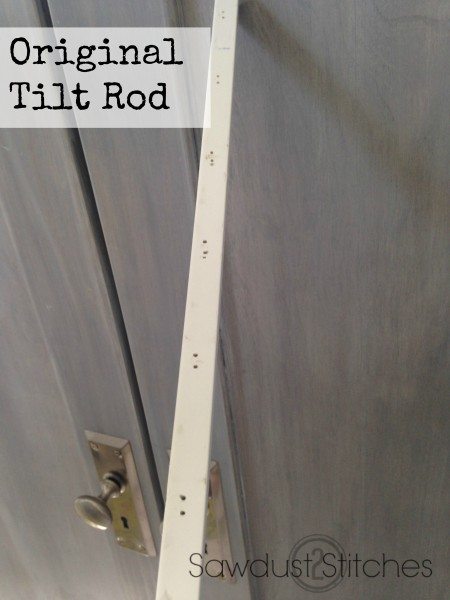
I had no clue  how I was going to get these attached, but my husband is a genius and  suggested  simply  buying the same size staples , and simply  push them back in!

Attaching tilt rod sawdust2stitches

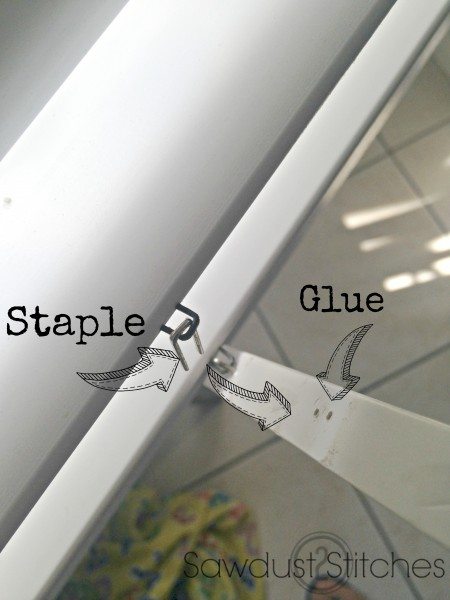
…and that is just what I did. I placed a small amount of glue in the original holes, and then placed a staple through the center staple on the louver and then pushed through into the  tilt bar.

DIY Plantation Shutters sawdust2stitches.com

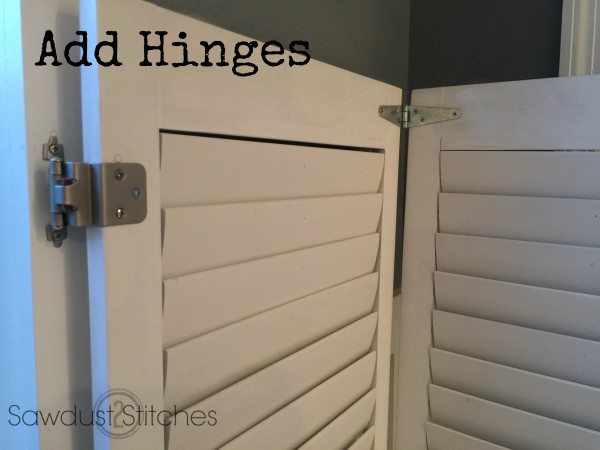
Last thing necessary was adding hinges.  My plantation shutters required two sets of hinges.  One set to connect the two doors to each other and the other st to hang the shutter on the wall.  As you can see in the above image,  I mounted the shutters to frame work around the window. ( I have seen them inset, but this is just how I chose to do it.)

… and that my friends is how I made custom cafe plantation shutters for less than $45 ! Whoot Whoot! diy planation shutters from thrifted doors sawdust2stitches.com  DIY plantation shutters www.sawdust2stitches.com

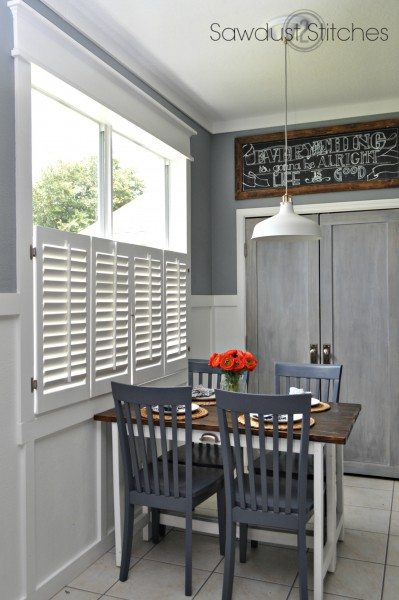
 Thanks for stopping by and take luck!

Corey

More from my site

  • Secret Compartment MirrorSecret Compartment Mirror
  • Complete Patio MakeoverComplete Patio Makeover
  • How to: Paint Black Window PanesHow to: Paint Black Window Panes
  • Vintage Map Wall ArtVintage Map Wall Art
  • How to: Faux Brick WallHow to: Faux Brick Wall
  • Dresser Makeover into a Mini MudroomDresser Makeover into a Mini Mudroom

in Kitchen, Makovers, Tutorials, Uncategorized # Makeover, Wall Decor, window treatments

Reader Interactions

you may also like
Master Bathroom Makeover
Board and Batten Island Makeover
DIY Pull Out Drawer Storage
DIY Drawer Dividers

Comments

  1. Tonya says

    August 6, 2015 at 8:28 am

    Very nice.

  2. Mindi says

    August 6, 2015 at 11:47 am

    Holy patient woman!! You are so cleaver, they look beautiful!!

    • coreydecker@gmail.com says

      August 9, 2015 at 3:46 pm

      hahah Thanks Mindi! More accurately like “holy crazy woman!” haha. Thanks!

  3. Sharon diaz says

    August 8, 2015 at 1:54 pm

    I love getting a product that I love for so little in cost! Well done.

    • coreydecker@gmail.com says

      August 9, 2015 at 3:45 pm

      Thanks Sharon! Gotta love a product with potential! Thanks for reading!

  4. Pauline Henderson says

    August 8, 2015 at 4:42 pm

    Can I just tell you how amazingly brilliant this is?…
    Because this is AMAZING AND BRILLIANT!!
    Awesome Corey.

    • coreydecker@gmail.com says

      August 9, 2015 at 3:44 pm

      hahah Thanks Pauline! I am cheap and have and obsessive nature. It was bound to happen! 🙂

  5. Ellen says

    August 9, 2015 at 12:05 pm

    Great job! Your project is brilliant. I have always loved shutters—way back to those little skinny things with the narrow louvers. Quite a few years ago, I put plantations shutters across the windows of my house—a big splurge for me—and I’ve never looked back. Those shutters are the only window treatments on the front, and I think they are especially great in small rooms. I don’t plan to ever take them down.

    • coreydecker@gmail.com says

      August 9, 2015 at 3:43 pm

      I could not agree more! I absolutely love them, and have been sizing up a few more places I would love to put them!

  6. Charisse says

    August 28, 2015 at 9:17 pm

    Utterly genius!

Primary Sidebar

  • Facebook
  • Instagram
  • Pinterest
  • Twitter
  • YouTube
IMG_9167 (1).jpg fd

Popular Projects

  • How to: Faux Brick Wall
  • Cheap White Curtains
  • Ikea Cubbies into a Rustic Apothecary
  • Cabinet Transformed Into A Kitchen Island
  • Workshop Assembly Table
  • The BEST Beach Blanket ever!
DIY & Design

Meet Corey

Hi everyone, my name is Corey, and I have a problem. I can’t leave well enough alone… The best therapy usually involves a variety of power tools. So, in the few “spare” moments I am not entertaining my two beautiful, rambunctious, boys, I can typically be found hunched over a sewing machine and/or covered in sawdust. All in the efforts to create a perfect balance of aesthetics and practicality in our home.
read more

Join our mailing list!

DIY & design ideas - right in your inbox!

Top Hits!

  • How to: Faux Brick Wall
  • Cheap White Curtains
  • Ikea Cubbies into a Rustic Apothecary

Featured

Master Bathroom Makeover

Categories

  • 70's Ranch Home
  • Around the House
  • Build Plans
  • Crafts
  • Current Home
  • Decor Makeovers
  • Dresser
  • Exterior
  • Fall
  • First Home
  • Furniture Makeover
  • Hidden Compartment
  • Kitchen
  • Lighting
  • Makovers
  • Master Closet
  • Organization
  • R.V.
  • Room Makeovers
  • Seasonal
  • Seating
  • Sewing
  • Shelving
  • Small Builds
  • Smart Home
  • Spring
  • Summer
  • Tables
  • Tablescape
  • Tutorials
  • Uncategorized
  • Wall Art
  • Wall Decor
  • Winter
  • Workshop

Footer

Contact Me: Corey@Sawdust2Stitches.com

Latest ‘Grams

The bathroom reveal is LIVE! Here is just one The bathroom reveal is LIVE! 

 Here is just one small view of this new, improved, and somewhat magical bathroom.  I have been dreaming about remodeling my bathroom for years and I can finally say it was worth the work and the wait. 
 For real though, can you even get enough of this tile ?? I know I can’t get enough, but I certainly knew HOW much to get. Did you know that The Home Depot app has project calculators for a wide range of materials INCLUDING tile, so you  can know exactly how much product you  need? You better believe it!
 I have details about this feature and more reveal images on the site today. 
#linkinprofile #ThdDoerProject #HomeDepotPartner @homedepot
Sneak Peek… of our completely renovated master b Sneak Peek… of our completely renovated master bathroom!  I have put off giving our bathroom a makeover for 5 years.  I think there are a lot of reasons people put off big projects … time, money, skills, knowledge, tools?  While The Home Depot can’t completely eliminate the list, they can certainly shorten it!  With a library of “How-to Guides”, helpful resources like “Project Calculator” and a vast inventory of tools to rent The Home Depot can certainly make any daunting project more achievable. 

@homedepot #THDDoerProject #HomeDepotPartner
I have put off giving this kitchen island a faceli I have put off giving this kitchen island a facelift for 6 years! I always prioritized projects I perceived would have the biggest impact. Well, HOT DANG  I under estimated the difference a kitchen island could make!I have a full tutorial on the site today. #sponsored @dapproducts 

Photo credit: @ashleynavarrophotography
I’m on a kitchen organizing kick, and these pull I’m on a kitchen organizing kick, and these pull-out drawer are easier than ever to make using the new (extremely intuitive/user-friendly @kregjig 720 PRO.
I have a full tutorial on the site today.#linkinbio #sponsored
Photo Credit: @ashleynavarrophotography
My organizing heart could just burst!! I’m still My organizing heart could just burst!! I’m still organizing the kitchen, but so far I have fit all the contents from the existing pantry AND freed up an entire lower and upper cabinet that contained pantry items.  #winning
Would you believe me if I told you that where this Would you believe me if I told you that where this beautiful custom-built pantry sits, used to be a small builder grade closet? Talk about untapped potential!? While the closet/pantry served its purpose, the space was not well utilized and was altogether unremarkable. With the help of The Home Depot this pantry is not only extremely functional it is a gorgeous feature in my kitchen. 
Sometimes we might look past or forget the untapped potential and resources. 
For example, did you know The Home Depot has a TON of resources to help you with your projects?  Did you know that you can do image search in their mobile app? Yup! Just take a picture of the needed item scan it on your app and find the product in a flash! In fact you  can add it right to your cart and have it ready to be picked up at available stores or lockers!
#THDDoerProject #HomeDepotPartner @homedepot
Follow on Instagram
2020 © Your Blog Name
theme by soleilflare
Enter your name and email and get the weekly newsletter... it's FREE!
Your information will *never* be shared or sold to a 3rd party.