• Blog
  • About
  • Press
  • Privacy

Let’s be social!

  • Skip to primary navigation
  • Skip to main content
  • Skip to primary sidebar
  • Skip to footer
Sawdust 2 Stitches

Sawdust 2 Stitches

  • Tutorials
    • Around the House
    • Organization
    • Wall Decor
    • Sewing
  • Makeovers
    • R.V.
    • Room Makeover
    • Furniture Makeover
    • Decor Makeover
  • Build Plans
    • Small Builds
    • Wall Decor
    • Dresser
    • Tables
    • Seating
    • Shelving
    • Hidden Compartment
  • Seasonal
    • Summer
    • Spring
    • Fall
    • Winter
  • Home Tours
    • First Home
    • Current Home
    • 70’s Ranch Home
  • Workshop

Blog

Paint a Rug

April 2, 2014

   Since the interior of my house is “mostly”  done (when I say “mostly done” I mean I have  started  re-re-decorating rooms).  So, I have now moved to the exterior of the house.  Part of the exterior is re-vamping the lanai. (Fancy term for a screened porch)
One step in said process was finding a suitable floor covering. Thus began my search for the perfect rug.

   Criteria : Cheap
                   Navy & White *gasp* (shocker I know)
                   Inexpensive
                   Weather resistant
                   Cheap
 I was having a difficult time tracking down one that fit the above criteria. So,  here is what I did.  I found this  cheapy  $20  rug at Lowe’s.   It fit the “cheap, and navy” criteria.  It was just missing the white.
 
I knew this was going to be rather time consuming process,  so  I chose a very simple line design.
 I started with a 1.5″ tape and ran it around the perimeter.
 
 Using my sewing ruler/guide I used  a 3/4″ tape followed by another row of 1.5″ tape.  Always using the ruler to ensure the lines were perfectly straight.
Once the tape was all in place,  I used and exatco knife to cut off the excess tape.
 Before painting,   make sure you smooth down your tape!
Then  grab a roller and get to work.

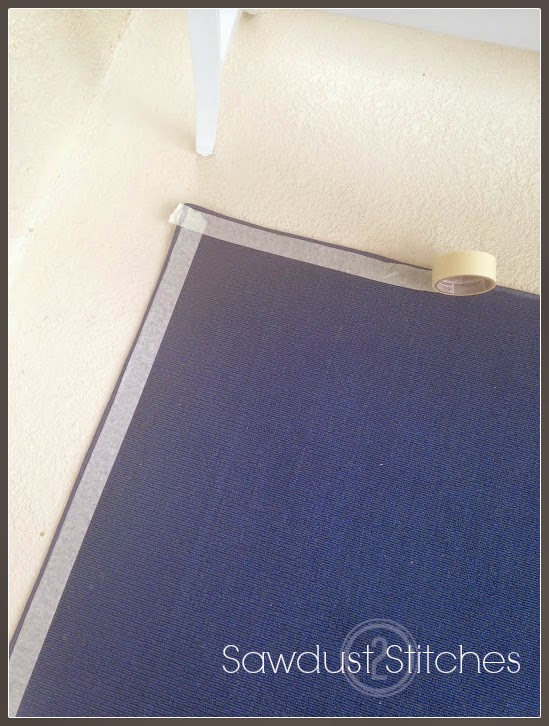
I  used light layers and tried to now push to hard on the roller, or the tape tended to shift.
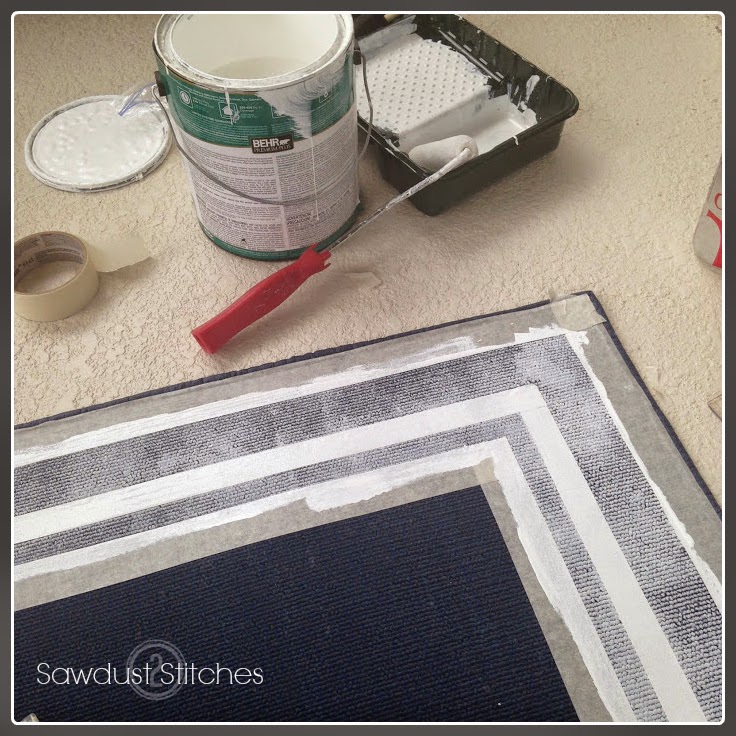
It is going to take forever,  just keep painting!

Then when you feel like you want to quit?   Keep painting…
Feel like you might go craxy because you want to rip the tape off!?   Just  keep painting.
I think I ended doing 4 coats.  ( Allow dry time in between).

Once it is FINALLY evenly coated and dry,
peel the tape off!

I was impressed with how crisp the lines were.

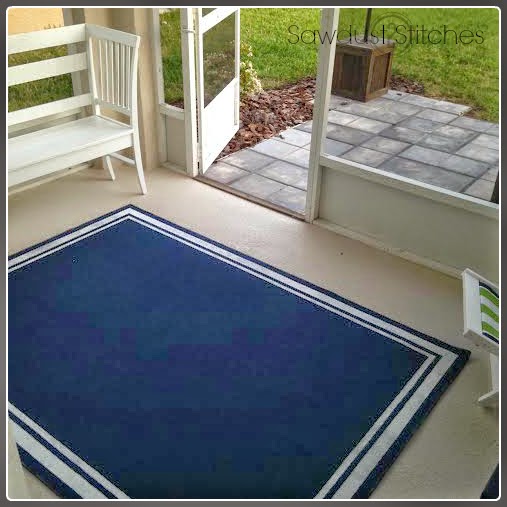
A word of warning.  Where you have painted will be very stiff.  I knew this before I began…  I chose my design so that it wouldn’t be a huge annoyance.
I have heard that you can add a “Fabric/Textile Medium”  to your paint and it will help with the flexibility.  I have also heard that  taking a electric sander to the rug can help with the texture as well.  I’m  happy with mine and did not want to compromise the paint job.

Hindsight?
I think I would consider using a primer,  I seriously think it would have sped up the process considerably. Best of luck!
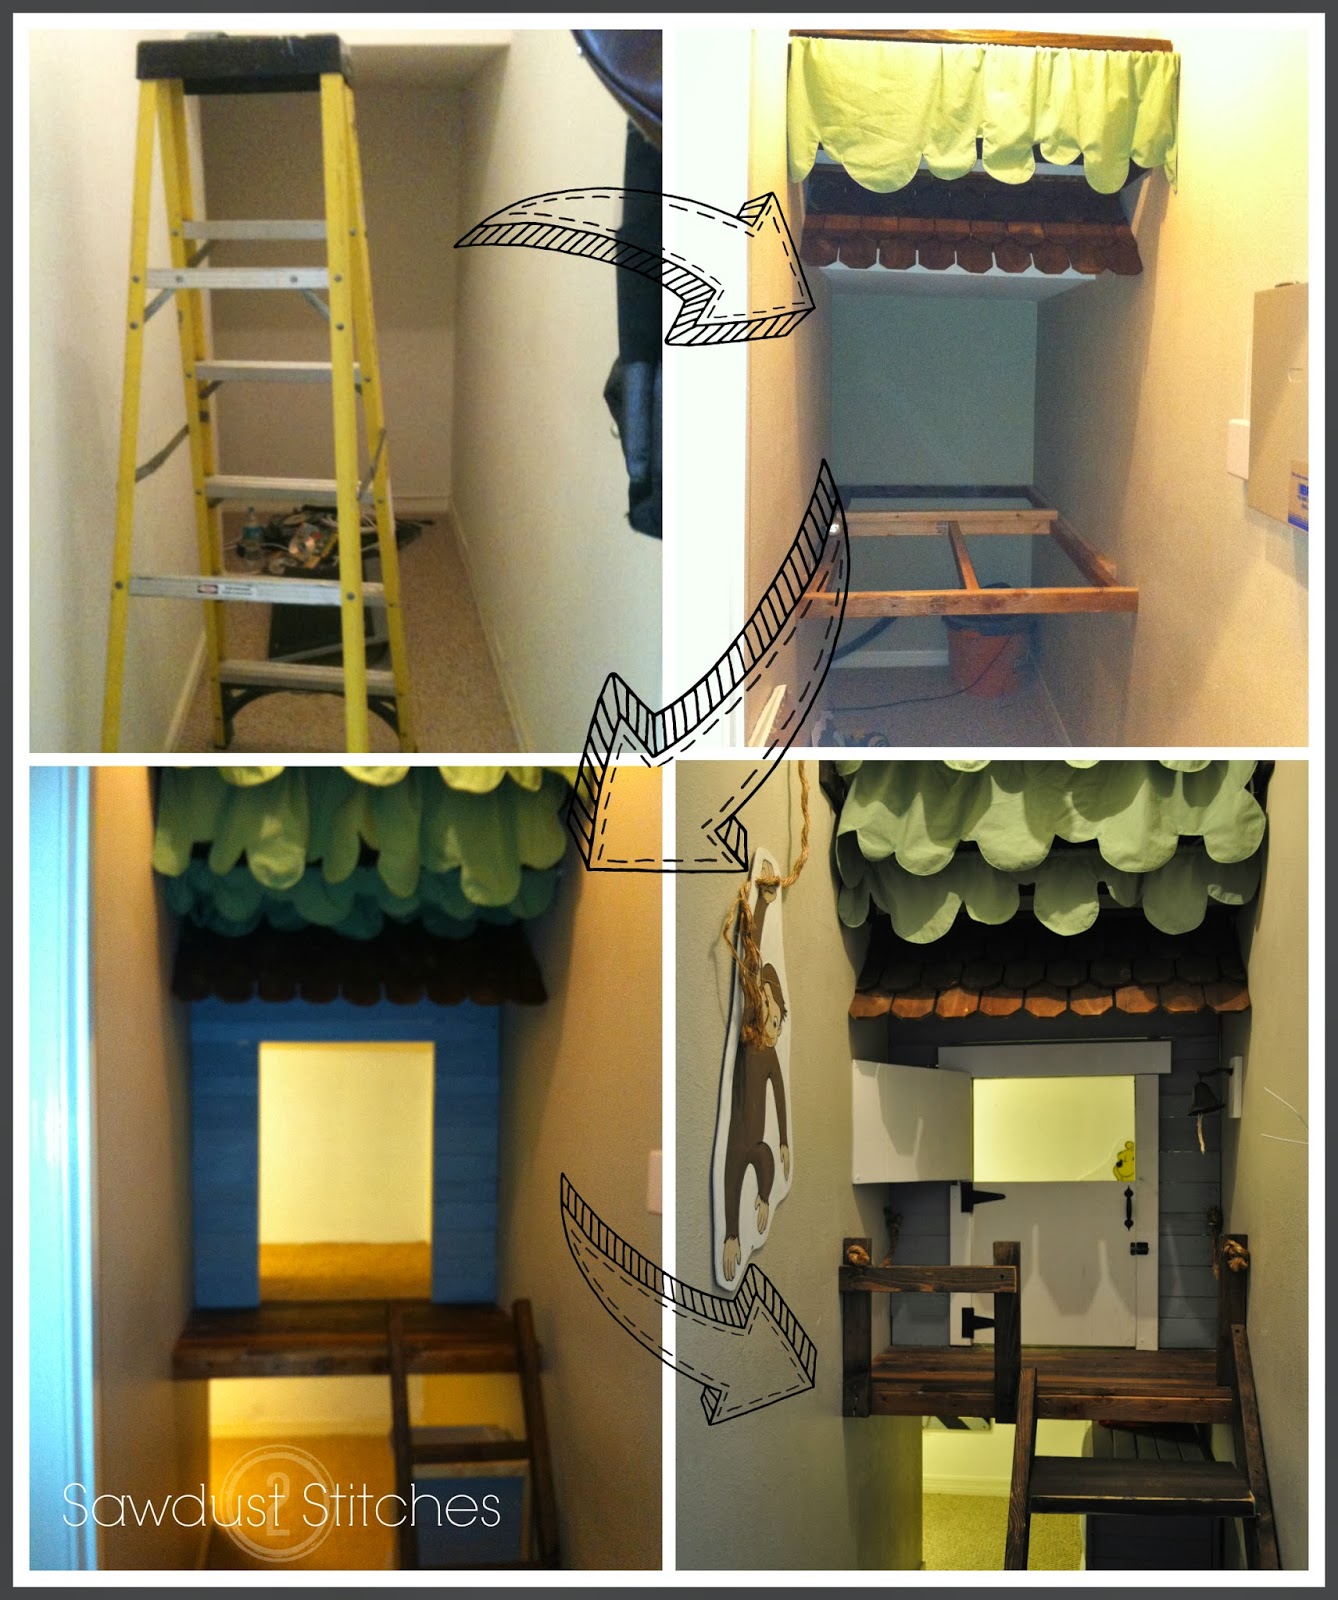
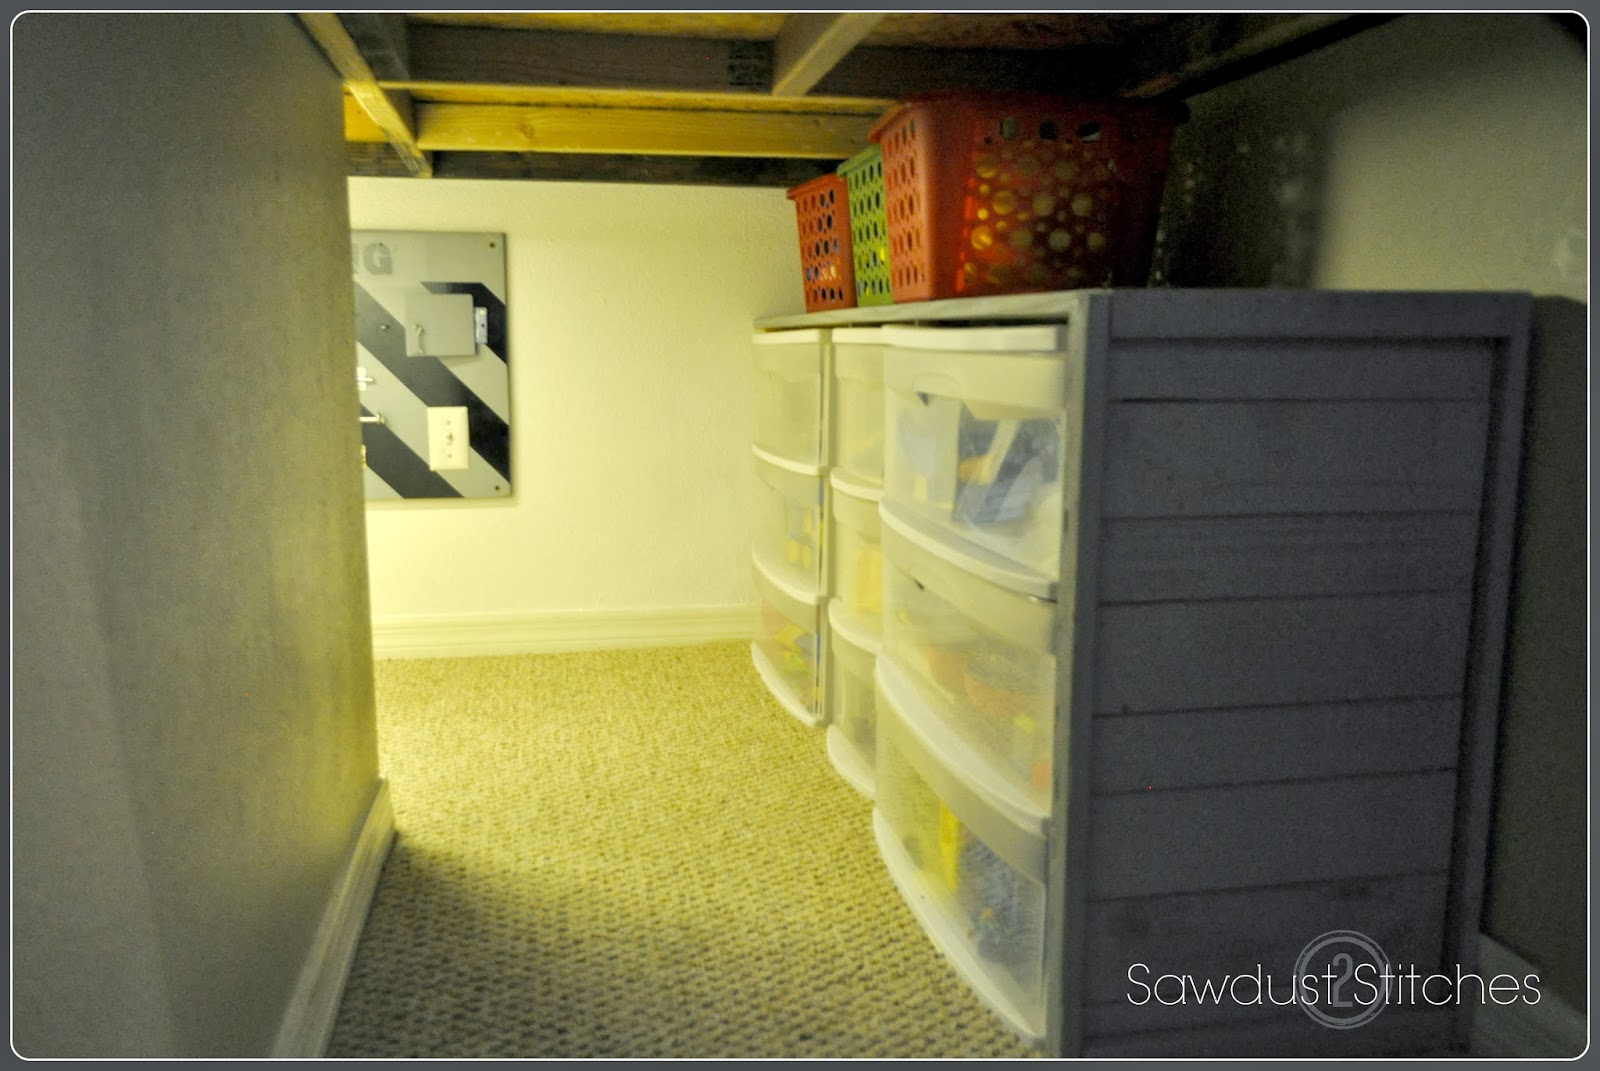
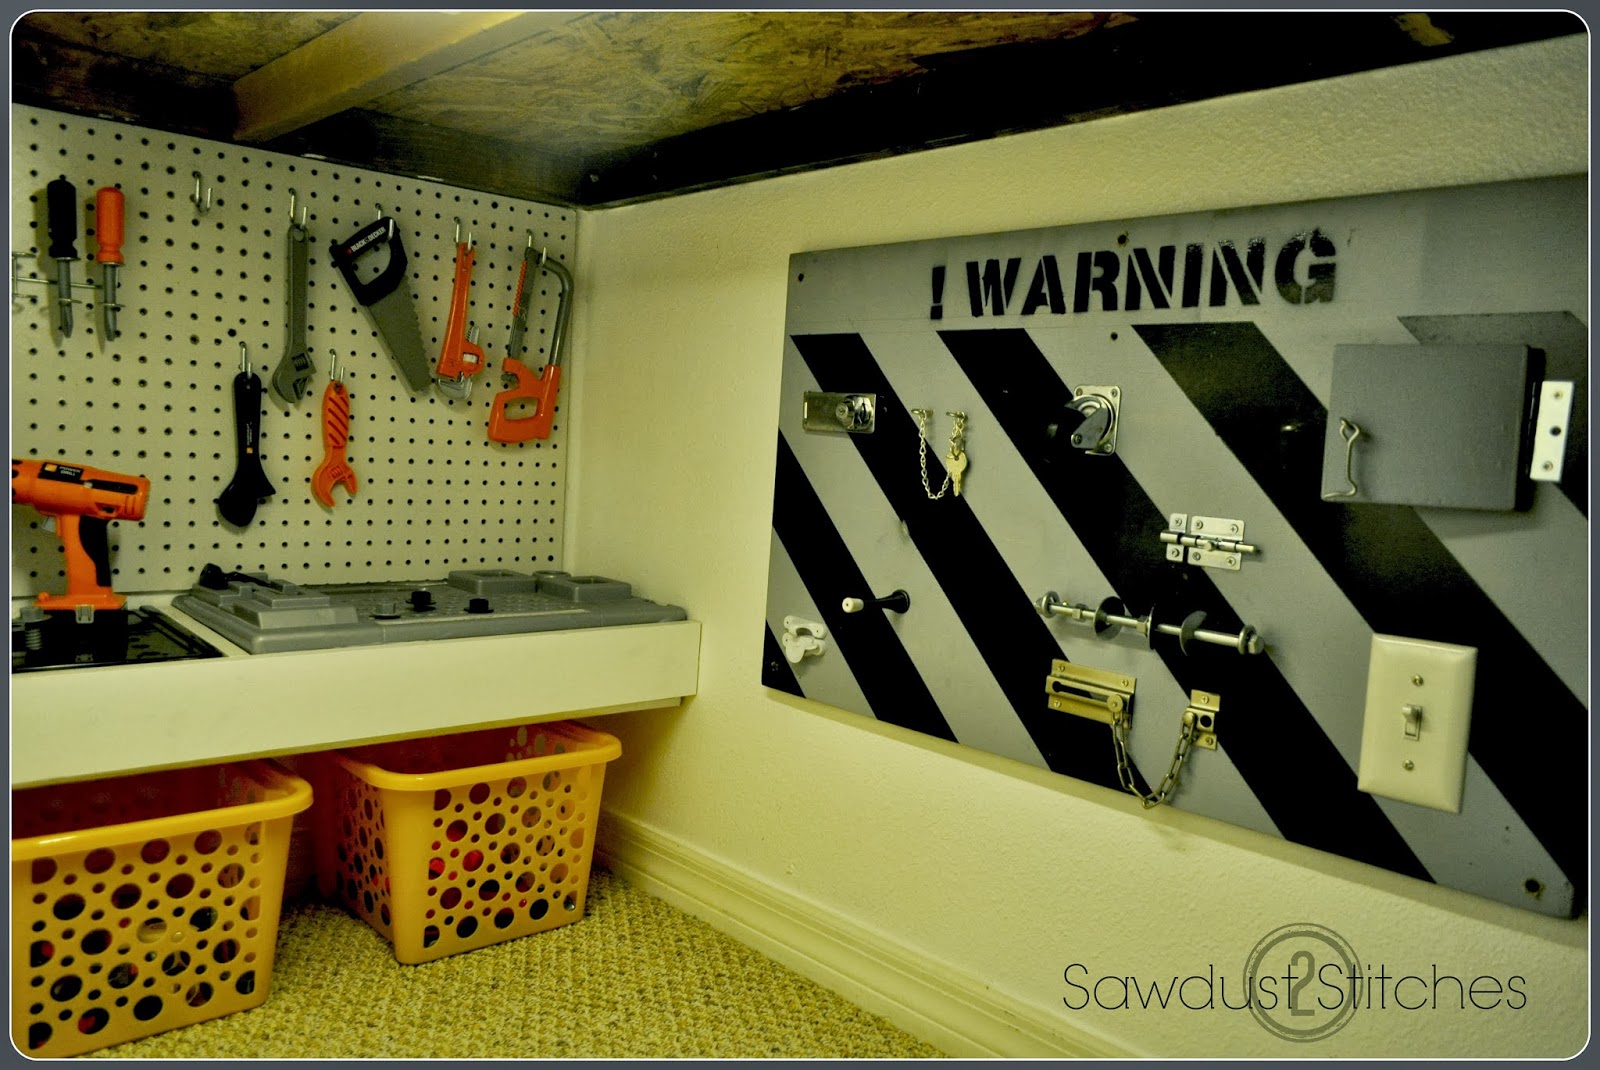
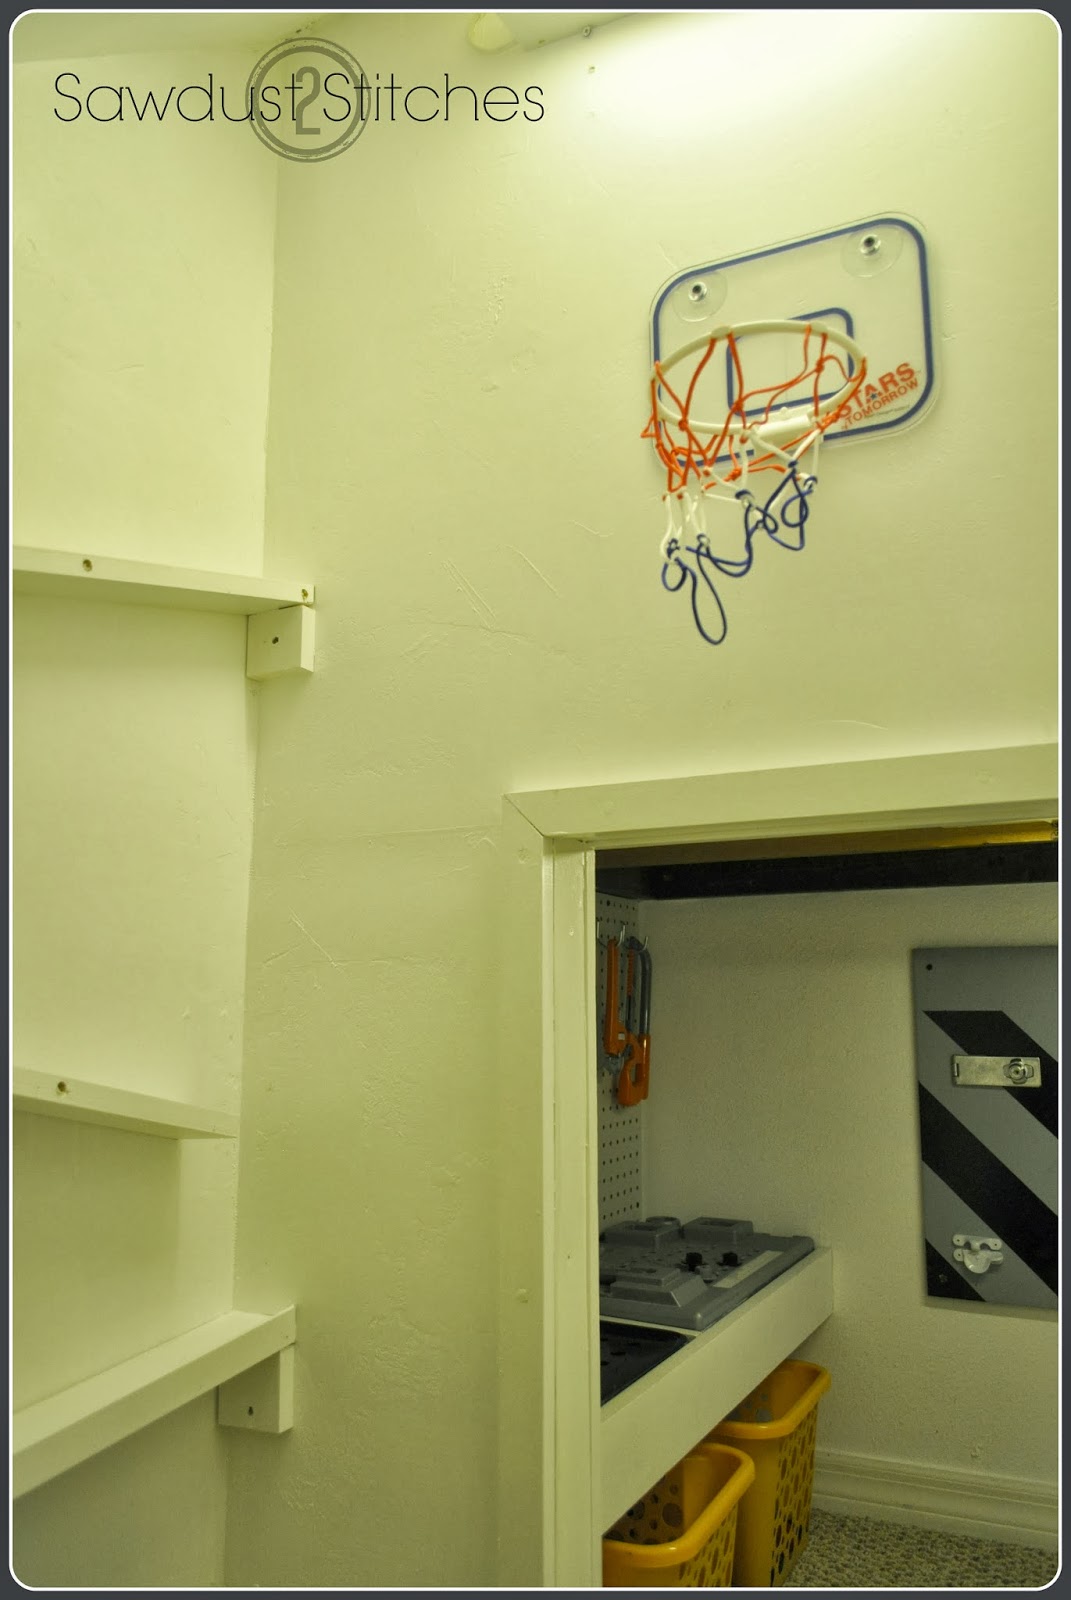
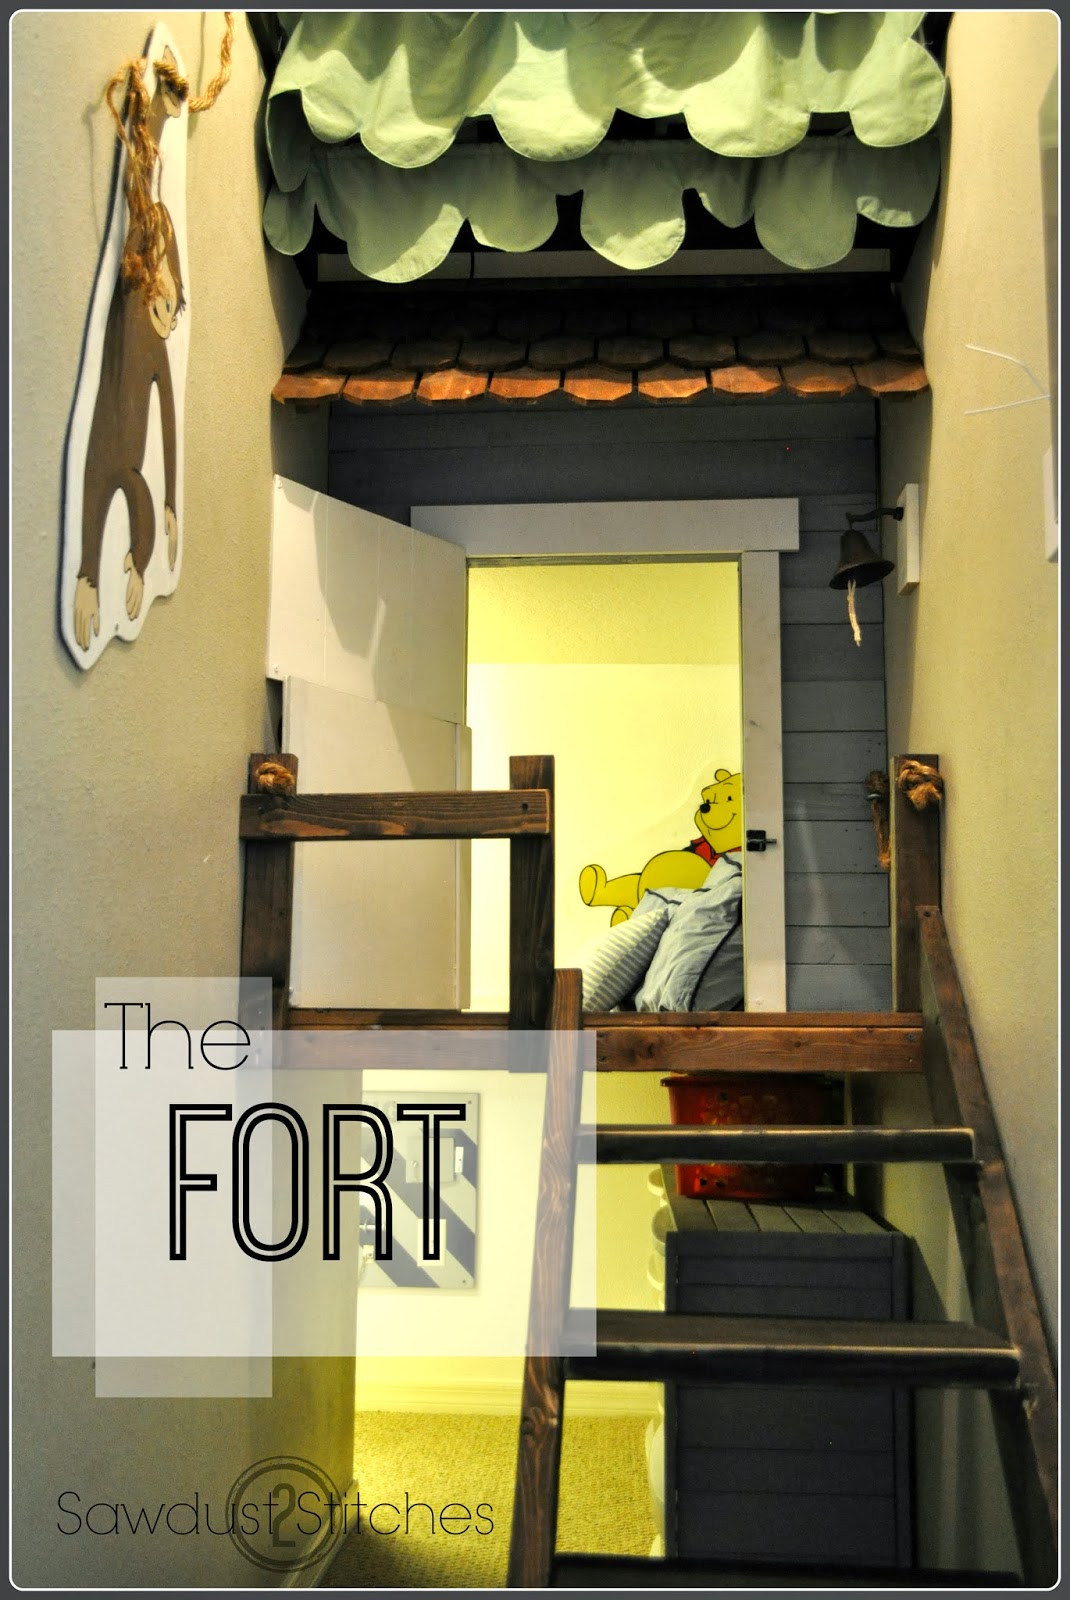
Faux Metal Vintage Sign

March 4, 2014


 Love these ? Me too.  Here is my semi-successful attempt. 

Let me premise by saying  I would love to learn to weld.  Until then,  I   will have to stick to a faux metal finish.

I  began by drawing my desired shape on a piece of OSB (Only because I happened to have it on hand. In retrospect  I would had DEFINITELY  used a smooth surface board  ie:  plywood, or paneling).

Using a jigsaw and a circular saw I  cut out my shapes (Arrow and the letters E.A.T.)    I also wanted mine to have a raised edge, so  I cut out 1.5″ wide strips  that  would go around the perimeter of  my signs.

Next,  I drilled holes in  my cutouts so that  I could insert  short carriage bolts. I thought giving it rivots would make look more realistic.  (I also think it would be really awesome to insert lights instead!)

In retrospect I would have added the carriage bolts  at this point  so that they  would get painted at the same time.  ( I added  just a dab of hot glue on each one to ensure they stayed put.)

This next part  was a little bit of trial and error,  I started by giving the wood a  base coat of “Metallic Aluminum”  spray paint.

Once the silver layer was dry  I  used a matte black and did  some eratic  dusting all over the signs (edging strips included)  in order to give it some dimension.

I then repeated  the same process with  Metallic Oil Rubbed Bronze. ( I pretty  much repeated the erratic  dusting method with any metallic spray paint I had in my arsenal),
* Like I said earlier,  in retrospect  I would have added the bolts (rivets)  before the painting process.*

Using a finish nailer  I fastened the  1.5″ wide slats of wood and tacked it to the cutout.  I just liked that it gave it dimension and created the look of a  vintage metal sign.

Once everything was secured I took a rag with a little bit of stain and added it to the creases  to give it more depth.

Overall…   I don’t think it is half bad for $4.00 in materials.

( Like  I stated earlier,  if I were to do it over I would have used a smooth board.)

Under the Stairs Fort

January 24, 2014

  When we were looking at homes to buy, I remember opening the storage closet under the stairs and saying… “This has so much potential!”  I am  fairly certain our realtor thought I was nuts…
Well, My boys birthdays are the 16th and 17th of August. So,  the week before their birthdays we locked the door  and created this little hide-away in  just 5 days!


http://sewingandsanding.blogspot.com/2014/01/tour-of-fort.html
 So, would you like a tour of  “The Fort”?
 

 The “Bottom Floor”

Instead of heading up the stairs, you can duck  under and find this little area.

The lower level of the fort is dedicated to toy and play space.  It is complete with a nice clean and convenient toy storage.  I just love organization.  (I am pretty certain my kids may be doomed to a future of OCD.)

Once you get to the end of the toy storage it splits off the left…  This always surprises everyone!  At the far end they  have  “busy board” and a built in tool bench.

What always shocks people even  more, is  secret room if you continue around the corner!

This fun hideaway has become known as the ball pit…how original.

Complete with wall maze, and basketball hoop.  I would have killed for a place like this when I was little.  In fact  I recall making a “fort”  in the dirt crawl space under our house…  yeah that was gross.


Fun fact:  While we were in the midst of  building the fort,  my husband brings in a hammer and says…
Andy-” I want to hit a hole in the wall..”
Me- ” Makes sense, Why ? ”
Andy- ” I want to see whats behind this wall” (pointing to a nicely finished wall)
Me- ” Of course you do.”

Well his odd curiosity , is what  brought about the ball pit.  We busted down the wall made a door and completely  finished off the space , that was even further under the stairs. (Yes,  this detour project was included in the 5 days we had to finish  it.)

“The Upstairs”

If you  go up the stairs to the top floor you are greeted by some of the kids favorite characters.

The evening before their birthday  I stayed up very late working on these guys.  Look how cute  Wall-e is even eating popcorn.   Why is he eating popcorn ?  Because , my dear,  they are…

watching  a movie !  Can I tell you how nice it is to NOT have to watch/hear Curious George ?  It makes all the hard work completely  worth it.
On occasion Andy and I will crawl up there with the kids and watch a movie.  It is a pretty  big space,  it can actually  fit a twin size mattress…  just ask  my  younger brother. (We may or may not have had him sleep in there.)

The dvd player is conveniently  located out side the fort in the hidden storage area behind the treetops/curtains.

My kids love it and when friends come to play,  they all just  stay in there.  It’s great.  Not to mention, all of their toys are contained to one place.  They aren’t strewn about all over the place.  I love it.

So, do you have an odd size storage space somewhere ?  Maybe you should sort through all the random books that you now have in digital copy,  and clothes that are too small, and make it into a kids hide-away.

Just a  thought. You will be glad you did.

Have a great day !

Circle Light Fixture

January 7, 2014

http://sewingandsanding.blogspot.com/2014/01/circle-light-fixture.html#more

Have  you seen these awesome light fixtures ?

I love them and started  brainstorming some ideas. As it turns out,  I am not the only one that  had the same idea.

 Continue reading…

[Read more…] about Circle Light Fixture

Guest Post – Edison Style Pendant Light Fixture

January 2, 2014

Allow me to introduce you to a wonderful couple and an amazing family.  Meet the Wilson’s from “Squeezing It All In“.

This dynamic duo is busting at the seams with talent.  They recently completed DIY light fixture, (and boy am  I a sucker for light fixtures),  and they were kind enough to share their ideas with us!

Edison style pendant light fixture 

The next is my favorite woodworking project.  It was an idea we had after researching bed side lamps.  I really wanted to use Edison style bulbs somewhere and always thought a pendant light over the sink would look nice.  So, I put the two together and built a distressed pine box, stained it dark maple, and wired it to the existing light fixture. 

I ordered most of the parts from Sundialwire, but another good site would be www.1000bulbs.com.  

Wire – http://www.sundialwire.com/W182RTBKXXMNF.aspx ($1.45 per foot) | 10 ft = $14.50
Bulbs – http://www.sundialwire.com/BS21MA30.aspx ($9.00) | 5 = $45
Socket – http://www.sundialwire.com/SKSKNK.aspx ($4.75) | 5 = $23.75

Dimensions are 10 inches wide by 40 inches long by 4 inches high.  I spaces the 5 lights evenly across the face (about 6 and 2/3 inches)

The dye I used was Transfast water soluble dye – dark mission brown. 

 Gluing up the box.
 
Box after some distressing. Right before the dye was applied.  I broke the box while distressing it, so I am repairing it too. Oops. 


Dye applied, now applying a coat (or three) of polyurethane.  I had my helpers for this part. 

Final Product.  It has a beautiful warm glow. Very relaxing at night.  Heather and I love it. 
 

Again, a big thanks to Heather and Doug for sharing. Make sure to look at all there other DIY projects, recipes and anecdotes at “Taking It All In“. 
 
 Have a Happy New Year…  FYI  updating my blog is  ranked high on my New Year’s Resolutions.  So bear with me and stay tuned. 
 
 Thanks, 
Corey

Chalkboard Stickers

December 22, 2013

Yes,  I am still here.  I  apologize, the holidays  have been a little hectic.

Well  I am sure Pinterest  has already  informed you that  chalkboard  EVERYTHING is all the rage.   I admit I have fallen  under it’s spell as well.

So, let’s take advantage of the trend and have some stylin’  gift tags. They are cute, easy,  and will take your  gift wrapping up a notch!

So  here is what you do…

Step 1:
You will need stickers, preferably with a “flat” finish.
( If you can’t find matte stickers  I would suggest these…)

Step 2:

Spray the stickers with black primer spray paint.

Step3:
Allow ample time to dry.

Step 4:
Personalize.  Keep in mind that they aren’t really chalkboards, so they are not meant to erase. I use a Prisma  white colored pencil.  They are easy to work with and do not smear.  You can get them at most craft stores.


Step 5:   Slap it on a package!

Best part?  They personalize, they are impressive, and they don’t freaking fall off.  (I don’t know how,  but I always get my presents prepped, and then mysteriously  Christmas morning, I have no idea what goes to who.) Problem solved.

Have a Merry Christmas!

  • previous
  • Page 1
  • Interim pages omitted …
  • Page 39
  • Page 40
  • Page 41
  • Page 42
  • Page 43
  • Interim pages omitted …
  • Page 47
  • next

Primary Sidebar

  • Facebook
  • Instagram
  • Pinterest
  • Twitter
  • YouTube
IMG_9167 (1).jpg fd
DIY & Design

Meet Corey

Hi everyone, my name is Corey, and I have a problem. I can’t leave well enough alone… The best therapy usually involves a variety of power tools. So, in the few “spare” moments I am not entertaining my two beautiful, rambunctious, boys, I can typically be found hunched over a sewing machine and/or covered in sawdust. All in the efforts to create a perfect balance of aesthetics and practicality in our home.
read more

Join our mailing list!

DIY & design ideas - right in your inbox!

Featured

Stair Tread Makeover

Categories

  • 70's Ranch Home
  • Around the House
  • Build Plans
  • Crafts
  • Current Home
  • Decor Makeovers
  • Dresser
  • Exterior
  • Fall
  • First Home
  • Furniture Makeover
  • Hidden Compartment
  • Kitchen
  • Lighting
  • Makovers
  • Master Closet
  • Organization
  • R.V.
  • Room Makeovers
  • Seasonal
  • Seating
  • Sewing
  • Shelving
  • Small Builds
  • Smart Home
  • Spring
  • Summer
  • Tables
  • Tablescape
  • Tutorials
  • Uncategorized
  • Wall Art
  • Wall Decor
  • Winter
  • Workshop

Footer

Contact Me: Corey@Sawdust2Stitches.com

Latest ‘Grams

Follow on Instagram
2020 © Your Blog Name
theme by soleilflare
Enter your name and email and get the weekly newsletter... it's FREE!
Your information will *never* be shared or sold to a 3rd party.