• Blog
  • About
  • Press
  • Privacy

Let’s be social!

  • Skip to primary navigation
  • Skip to main content
  • Skip to primary sidebar
  • Skip to footer
Sawdust 2 Stitches

Sawdust 2 Stitches

  • Tutorials
    • Around the House
    • Organization
    • Wall Decor
    • Sewing
  • Makeovers
    • R.V.
    • Room Makeover
    • Furniture Makeover
    • Decor Makeover
  • Build Plans
    • Small Builds
    • Wall Decor
    • Dresser
    • Tables
    • Seating
    • Shelving
    • Hidden Compartment
  • Seasonal
    • Summer
    • Spring
    • Fall
    • Winter
  • Home Tours
    • First Home
    • Current Home
    • 70’s Ranch Home
  • Workshop

Blog

Halloween Decor

October 19, 2013

I have never really decorated for Halloween before.  My kids are now starting to really enjoy ALL holidays. Honestly, I only started decorating because I felt like a bad Mom.  So,  I started trolling pinterest for ideas, and found quite a few! Here are some of them…
DSC_5621 (2)

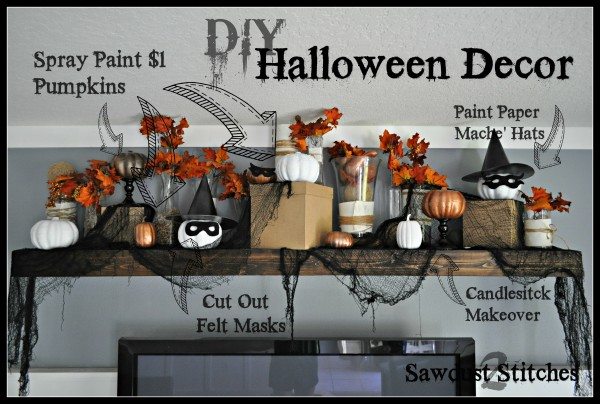
 This is  a quick and easy festive makeover.   I found all the pumpkins at the Dollar Tree ! They just needed a little bit of a makeover, (they were the most horrid neon orange color).    A few coats of spray paint quickly changed that.
     The same goes for the candlesticks.  I had some leftover candlesticks and I  gave them a  facelift  with some black spray paint.
     I happened to find paper mache’ witch hats at Michaels for $1.25 a piece!  The finishing touch  was the black  fabric,  also another Dollar Tree  find.
    All in all,  I did all the  shelf Halloween decorations for under $16.00!
Does  spray paint seem a little overly ambitious ?  Then might I suggest  this next project ?
bats close up  bats far away
 
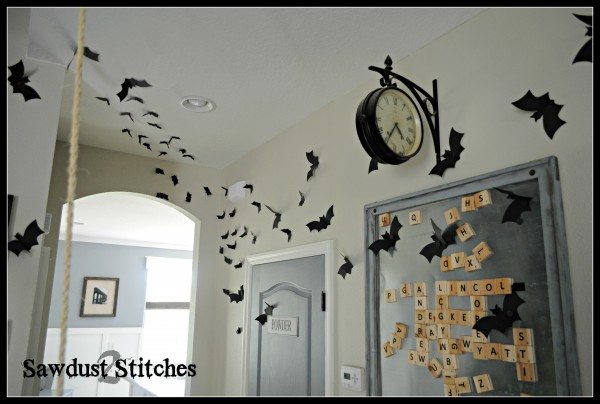
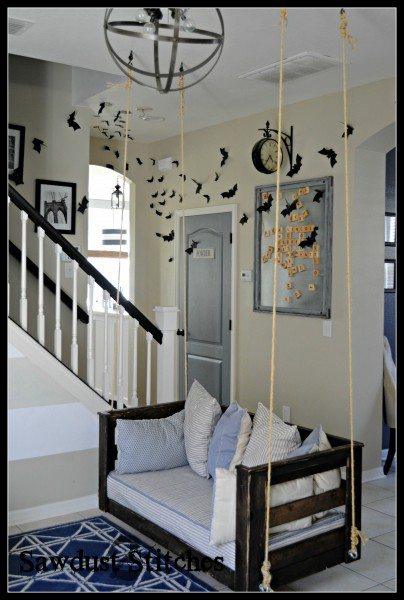
 This is a very CHEAP and very EASY  Halloween decoration.  I actually  drew my inspiration from a pin on Pinterest, I believe I saw it  here first.
You can do this for the cost of black construction paper!

Don’t  love bats ?  Well, how about a ghost ?

    This is one of my favorite  new decorations.  Is this not the cutest little ghost ever !?  This was also a pinterest craft,  you can see a full tutorial here.
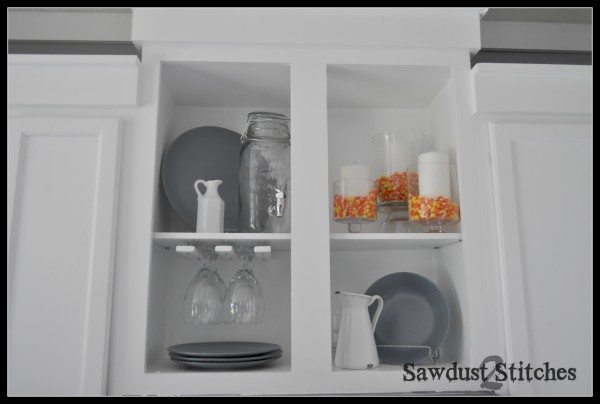
This next decorative feature requires no prep work at all!
Candy corn + glass jars + candles =Super easy and cute decor.
 DSC_5637 (2)
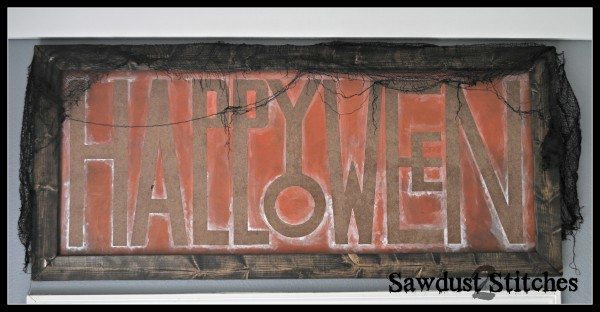
 I added this sign to my  festive decorations this year.  Honestly it was a pain in the butt.  I really don’t have any words of wisdom for those who want to give it a try.  I did it the old fashion way,  drew out the design on a piece of paneling.   After drawn.  I used painters tape to fill in the letters,  after taped,  I painted over the tape.  It wasn’t  really  quick and easy,  but,  nonetheless,  it is a  Halloween decoration, and  I LOVE  the way it turned out.DSC_5646 (2)


I know this isn’t exactly a tutorial, but  hopefully  you got a little inspiration.  Thanks for reading, and hope you have a Happy  Halloween! I have two little boys that are very excited about the holiday,  and I have two adorable costumes for them to wear.  I am excited to show their costumes soon!


Crib Mattress Porch Swing

October 5, 2013

 Porch Swing Sawdust2stitches.com
I happened to have an extra crib mattress laying around…  one thing led to another…
    The crib mattress that was collecting dust in the garage ultimately gave my front room the “wow factor”. Do you by chance have an extra crib mattress laying around ? Well my friend,  you are in luck,  you can make your very own porch swing.
 
Shopping List:
8 = 1×4’s
3=  1×2’s
3=  2×3’s
Plywood
Brad Nails
3″ wood screws
1 1/4″ Screws
4=  6″  eyelet bolt w/ bolts and washers
Rope (length varies, depending on suspended height and ceiling height,  mine was approx 35-40′)
4= swing hardware hooks
Crib Mattress
 
Suggested Materials/Tools:
Sander
Miter Saw
Table Saw ( For plywood,  you can ask this to be cut at your home improvement store.)
 Drill
 1/2″ drill bit
 Nail gun ( You can complete this by hand or with a drill if needed)
 Air Compressor if applicable.
 Brad Nails
 3″ Wood Screws
1 1/4″ Wood Screws  ( Not necessary if using a nail gun.)
Cut List:
 1×4’s
5@  52″
6@  27
2@  26.5
8@  22″
1×2’s
1@ 56″     (45 degree angles, long point to long point)
2@ 29.5″  (45 degree angles, long point to long point)
2 @ 4″      (45 degree angle ,  long point to straight end)
2@ 21″
1@ 46″
2×3’s
2@ 47.5″
2@ 26.5″
2@ 23.5″
Plywood
1 @  26.5″ x  50.5″
 Begin by prepping your wood,  and making all your cuts.  ( If you are a beginner,  I might suggest making your cuts as you go, making sure all pieces fit correctly.)
Second,  sand and stain/paint all your 1×2’s and 1×4’s.  While they are drying you can construct your   base out of 2×3’s. (Your base will not be visible.)
Use 3″ screws when constructing the base.
Next, screw and or nail 2 of the 52″ and 26.5″  1×4’s around the perimeter of the base.
 Using a square or a level fasten  your 1×4’s cut @ 22″ at each corner so that they are vertical.
 
At this point you can fasten the  remaining  52″ slats and the 27 1/4″ horizontal slats.  The top slat will be flush with the top of the 22″ vertical supports.
Next install the top finishing pieces,  which consists of the 1×2’s cut at  56″ (long point to long point) , 2@ 29.5″ (long point to long point),and 2 @ 4″ ( long point to straight cut ).

After the top rail is in place,  take the remaining 1×2’s and install directly below the top rail. (See pictures below.)  Install the 21″ pieces on the sides and the last 46″  along the back.

 Before placing the plywood in the base, we need to drill holes for the eyelet hooks.
 
 The placement of your eyelet bolt  holes will vary depending on where you are hanging it.  Mine are placed just inside the corners of my base. (You will be drilling through the 1×4″ and the 2×3″)
Once the hole is drilled insert and secure the eyelet bolt  with a locking washer, and bolt.
 I put a large washer on the outside of my swing as well, mainly because I like the look of exposed hardware.
Ok, I am not going to sugar coat it,  building the swing wasn’t too hard, it was installing the thing that is a pain in the ! You will NEED to mount  your swing hardware into ceiling joists.  I spent a good hour trying to configure measurements that would work. Just bear in mind, the closer set the ceiling hooks, the more momentum  the swing can get… Just log that one away.
(Swing hardware)
  You can use chain if you would like to suspend your swing,  I chose to use rope,  if using chain simply count out the links  before hanging. If you chose rope here is my suggestion.   Decide  how far off the ground you would like your swing to sit. Find a sturdy  item that is the same height and  rest your swing on it  while you attach the ropes.  This will make life easier, and you are assured  it will be level. Originally I  had tried to measure my rope in advance,  but it turned out to be trickier than I had anticipated.


 Now that everything is installed, you can  make it pretty!  I actually designed this swing  to accommodate a crib size mattress, BECAUSE they are considerably cheaper than buying foam to make a cushion.  Another bonus for all my sewing illiterate friends,  you can slap a crib sheet on it and call it good!

  Add some throw pillows and you are done! Now sit down,  open a nice cold Diet Coke  and relax in your new swing!

Suspended Shelving

September 18, 2013

Easy DIY shelving by Sawdust2stitches

I originally  had a frame hanging in this space in the kitchen,  but I decided I  needed the picture elsewhere.  Which left me we with a very blank wall.  No good.  So  I went into the garage, and took inventory of what  I had.  I had a leftover 2×8 board from a previous project…  a few hours later, I had some stinkin’ awesome hanging shelves!


Materials Needed:
(1 )     2×8 @ wood plank 8′
(18)    2.5″ Screw in hooks
(2)      1×2″ wood boards 8′
6′ of small link chain
Stain
Spray Paint (Optional)

Tools Suggested:
Saw (Miter Saw)  Or you can easily have your boards cut at your hardware store.
Sander
Drill
Level
Tape measure

Cut List:
(3)  2×8″ @ 33″
(4)  1×2″ @ 33″
(6)  1′ sections of chain ( I just pried open links)

First  cut, sand and paint and or stain your 2×8’s and your 1×2’s.
I chose to paint my 1×2’s the color of the wall in hopes it would blend in.  ( I think it worked fairly well.)  I stained my boards with Jacobean Minwax Stain. 
I also decided that  I didn’t want my hooks and chain to be silver toned,  so I used Rust-o-leum Oil Rubbed Bronze.

Once all your pieces are dry you can begin the installation proccess.

Using a pencil mark where  you would  like your shelf to begin and end.
Now locate the studs  within your “ideal” area. Once you have found them you will screw your 1×2″ board  into the studs, don’t forget to use a level. ( THIS DOES NOT NEED TO DECIDE WHERE THE CENTER OF THE SHELF WILL BE!) See the picture above.

 
   At this point,  I mounted all of  the 1×2’s.   I  did my spacing 14.5″ from the bottom of one support, to the bottom of the next.
  If you are doing 3 shelves, you will need 4 supports.  There will be one board that will not have a shelf resting on it.  It will be needed to support the hooks for the top shelf.

Once the 1×2’s are secured,  you can put in your hooks.  I would suggest pre-drilling a hole.  It would take quite a bit of work without it.  I chose to put mine 5.5″ in from each end.

Once you have screwed in the hooks,  you can repeat the process on the planks. Again, measure in 5.5″ to find the hook placement.

Next you will need to have 6 separate 1′ sections of chain.  I don’t have cutters,  I just  pried them apart.
You will  loop one end of your chain onto the hook mounted to the wall.  The other end will loop onto the hook secured to your shelf plank.  Rest the back of the shelf on the wall mounted board.

For good measure  I would suggest screwing the shelf to the wall mounted board.  (Just drill through the top of the shelf plank, down into the 1×2″.)

As an after thought, I took  2 spare hooks, and mounted them under a shelf  to be used as mug hooks. It just adds a little somthin’, somethin’,  don’t you think  !?

Lastly, add decor, then stand back and admire your awesome, new, cheap shelves!

Corey

PVC Pipe Shelf

September 10, 2013

  I am still on my PVC kick.  So naturally when I dreamed up a new idea I pulled out all my left over PVC pipe and joints and started playing with different possibilities. I found some dimensions I liked and got to work,  here is what  I did and what you will need.
Tools Required:
 Rubber Mallet
Sand Paper
Saw ( I would suggest a Miter Saw)
Drill
1″ Paddle Bit
Sander ( Suggested)
Materials Needed:
Spray Primer
Metallic Spray Paint
Stain
2×10 wood planks                (Amount varies by project size)
3/4″ PVC pipe                      (Amount varies by project size)
“T”  PVC Joints                    (Amount varies by project size)
 I started by using  sand paper and scuffed up all the  PVC pipe. Once they were roughed up,  I cut them down to my predetermined measurements.

Once cut,  I  put together my brackets, and then primed ALL my pieces.  I used a spray primer,  I HIGHLY suggest it.  It is cheaper than  metal spray paint,  and it coated all my pvc quickly.  Since it was all primed gray, it didn’t require as much of the expensive metallic spray paint to cover the original white PVC.

After you have primed all your pieces you need to paint all your PVC in your choice of metal finish.  I used Rustoleum’s Oil Rubbed Bronze.  Let it dry COMPLETELY.   I am warning you , once painted,  it becomes really difficult to pull the PVC pieces apart.
While the PVC pipes were drying I worked on the shelves.
For the shelves I used 2×10’s, in varying lengths.  You can adjust the length of the shelves to fit your own needs.  I used a paddle bit to drill 1″ holes that would allow the PVC to fit through.  After the holes were drilled I sanded the boards and then stained them.

I then started assembling the shelves.  I kind of made up the measurements as  I went, and what  I thought looked good.

Slowly  but surely it started to come together.  I suggest using a rubber mallet. Making the pieces fit together sometimes required a little finesse.

DSC_6639 ss

All that is left to do is add some decor!  I love the way it fills the space, and all for less than $50.00!


Hyllis Ikea Hack

September 1, 2013

Pottery Barn Ikea Hack
How many of you have  something similar to this sitting around your house.  Pantry? Garage? Closet?
     Well for about $10.00 you can turn it into a beautiful piece of functional furniture.
Here is what you need:
2 x  lattice strips 8′ (Usually in the fence lumber department the are about 1/4″ thick x 1.5″wide)
5 x  1×3’s  @ 8′
Metal Spray Paint
Liquid Nails
Metal Shelving Unit ( I used an HYLLIS Ikea Shelf)
Stain
 First, use steel wool and scuff up the entire surface of the metal shelving unit.
 Using the directions on the spray paint,  paint the entire shelf unit.
Next cut the 1×3’s to fit your shelf.

If you are using and Ikea HYLLIS unit:

16 (1×3’s)  @  23.5″
2   (lattice) @ 55.5″
 Once cut,  sand all 18 pieces, then stain. (They will be glued in place, so you can be lazy and only sand and stain one side, I did.)
Once the stain is dry take your choice of construction glue ( I favor Liquid nails),  simply glue the slats down. Yes,  just  put some glue on the back of your boards and place directly on the metal shelf.  Repeat on all tiers.
 

.

If you are using the HYLLIS shelf, there will be about and 1/8″ gap in between each board.
  I used the lattice slats, as a stabilizer as well as aesthetics.  I like the look of it!
I cut the lattice strips on a 25ish degree angle. I simply attached to unit with screws.
Hyllis Ikea Hack
 
          There you have it folks, a high end looking shelf for a fraction of the cost. Another thing  I love about this, it is  completely  customize to your own color schemes! You can use any stain color and/or spray paint color.  The possibilities are endless!


Chalkboard Calendar

August 20, 2013

  No power tools? No problem.  This post is specifically for you!

Home Depot carry a   2’x4′ panel of chalkboard for $10.    I know there are a lot of different options on chalkboard paint, but I have found this is cheaper and less labor intensive.

If you do not have your own table saw  I would suggest asking  someone in the lumber department to cut it to your desired size.  They are very helpful and will do it for free (within reason).

For the space I wanted mine to hang I  cut mine at 30″ wide and left the height at 24″.

Using a pencil and a straight edge I graphed in all the lines.  Make sure you do all of them,  even with a straight edge  it can be tricky and end up crooked.  Take it from me it is easier to make a mistake in pencil than paint!
If you are also following the same measurements as mine  there  is a  .5″ space between each  3.5″ square,  with a 1″ border on the bottom and sides, and 2.5″ space on top where the days of the week will go.

After you are content with the pencil out lines, take a paint marker and trace over your lines. For this step  I used the straight edge again, so that my lines would be nice and straight.

I then added the days of the week.  I typically freehand,  but if you are a  bit skeptical of your abilities,  you can always use  the pencil transfer method.  There is a great tutorial here.

Ta- Da, a one day project that doesn’t require a workshop, and it’s cute and practical!

Thanks for stopping by.

Corey

  • previous
  • Page 1
  • Interim pages omitted …
  • Page 41
  • Page 42
  • Page 43
  • Page 44
  • Page 45
  • Interim pages omitted …
  • Page 47
  • next

Primary Sidebar

  • Facebook
  • Instagram
  • Pinterest
  • Twitter
  • YouTube
IMG_9167 (1).jpg fd
DIY & Design

Meet Corey

Hi everyone, my name is Corey, and I have a problem. I can’t leave well enough alone… The best therapy usually involves a variety of power tools. So, in the few “spare” moments I am not entertaining my two beautiful, rambunctious, boys, I can typically be found hunched over a sewing machine and/or covered in sawdust. All in the efforts to create a perfect balance of aesthetics and practicality in our home.
read more

Join our mailing list!

DIY & design ideas - right in your inbox!

Featured

Stair Tread Makeover

Categories

  • 70's Ranch Home
  • Around the House
  • Build Plans
  • Crafts
  • Current Home
  • Decor Makeovers
  • Dresser
  • Exterior
  • Fall
  • First Home
  • Furniture Makeover
  • Hidden Compartment
  • Kitchen
  • Lighting
  • Makovers
  • Master Closet
  • Organization
  • R.V.
  • Room Makeovers
  • Seasonal
  • Seating
  • Sewing
  • Shelving
  • Small Builds
  • Smart Home
  • Spring
  • Summer
  • Tables
  • Tablescape
  • Tutorials
  • Uncategorized
  • Wall Art
  • Wall Decor
  • Winter
  • Workshop

Footer

Contact Me: Corey@Sawdust2Stitches.com

Latest ‘Grams

Follow on Instagram
2020 © Your Blog Name
theme by soleilflare
Enter your name and email and get the weekly newsletter... it's FREE!
Your information will *never* be shared or sold to a 3rd party.