• Blog
  • About
  • Press
  • Privacy

Let’s be social!

  • Skip to primary navigation
  • Skip to main content
  • Skip to primary sidebar
  • Skip to footer
Sawdust 2 Stitches

Sawdust 2 Stitches

  • Tutorials
    • Around the House
    • Organization
    • Wall Decor
    • Sewing
  • Makeovers
    • R.V.
    • Room Makeover
    • Furniture Makeover
    • Decor Makeover
  • Build Plans
    • Small Builds
    • Wall Decor
    • Dresser
    • Tables
    • Seating
    • Shelving
    • Hidden Compartment
  • Seasonal
    • Summer
    • Spring
    • Fall
    • Winter
  • Home Tours
    • First Home
    • Current Home
    • 70’s Ranch Home
  • Workshop

Crib Mattress Porch Swing

October 5, 2013

 Porch Swing Sawdust2stitches.com
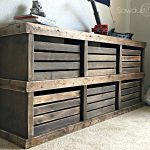
I happened to have an extra crib mattress laying around…  one thing led to another…
    The crib mattress that was collecting dust in the garage ultimately gave my front room the “wow factor”. Do you by chance have an extra crib mattress laying around ? Well my friend,  you are in luck,  you can make your very own porch swing.
 
Shopping List:
8 = 1×4’s
3=  1×2’s
3=  2×3’s
Plywood
Brad Nails
3″ wood screws
1 1/4″ Screws
4=  6″  eyelet bolt w/ bolts and washers
Rope (length varies, depending on suspended height and ceiling height,  mine was approx 35-40′)
4= swing hardware hooks
Crib Mattress
 
Suggested Materials/Tools:
Sander
Miter Saw
Table Saw ( For plywood,  you can ask this to be cut at your home improvement store.)
 Drill
 1/2″ drill bit
 Nail gun ( You can complete this by hand or with a drill if needed)
 Air Compressor if applicable.
 Brad Nails
 3″ Wood Screws
1 1/4″ Wood Screws  ( Not necessary if using a nail gun.)
Cut List:
 1×4’s
5@  52″
6@  27
2@  26.5
8@  22″
1×2’s
1@ 56″     (45 degree angles, long point to long point)
2@ 29.5″  (45 degree angles, long point to long point)
2 @ 4″      (45 degree angle ,  long point to straight end)
2@ 21″
1@ 46″
2×3’s
2@ 47.5″
2@ 26.5″
2@ 23.5″
Plywood
1 @  26.5″ x  50.5″
 Begin by prepping your wood,  and making all your cuts.  ( If you are a beginner,  I might suggest making your cuts as you go, making sure all pieces fit correctly.)
Second,  sand and stain/paint all your 1×2’s and 1×4’s.  While they are drying you can construct your   base out of 2×3’s. (Your base will not be visible.)
Use 3″ screws when constructing the base.
Next, screw and or nail 2 of the 52″ and 26.5″  1×4’s around the perimeter of the base.
 Using a square or a level fasten  your 1×4’s cut @ 22″ at each corner so that they are vertical.
 
At this point you can fasten the  remaining  52″ slats and the 27 1/4″ horizontal slats.  The top slat will be flush with the top of the 22″ vertical supports.
Next install the top finishing pieces,  which consists of the 1×2’s cut at  56″ (long point to long point) , 2@ 29.5″ (long point to long point),and 2 @ 4″ ( long point to straight cut ).

After the top rail is in place,  take the remaining 1×2’s and install directly below the top rail. (See pictures below.)  Install the 21″ pieces on the sides and the last 46″  along the back.

 Before placing the plywood in the base, we need to drill holes for the eyelet hooks.
 
 The placement of your eyelet bolt  holes will vary depending on where you are hanging it.  Mine are placed just inside the corners of my base. (You will be drilling through the 1×4″ and the 2×3″)
Once the hole is drilled insert and secure the eyelet bolt  with a locking washer, and bolt.
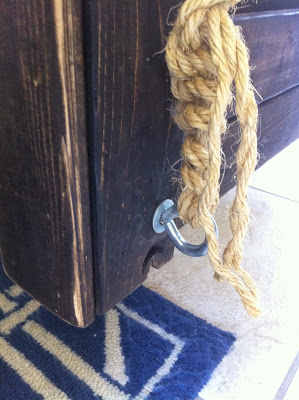
 I put a large washer on the outside of my swing as well, mainly because I like the look of exposed hardware.
Ok, I am not going to sugar coat it,  building the swing wasn’t too hard, it was installing the thing that is a pain in the ! You will NEED to mount  your swing hardware into ceiling joists.  I spent a good hour trying to configure measurements that would work. Just bear in mind, the closer set the ceiling hooks, the more momentum  the swing can get… Just log that one away.
(Swing hardware)
  You can use chain if you would like to suspend your swing,  I chose to use rope,  if using chain simply count out the links  before hanging. If you chose rope here is my suggestion.   Decide  how far off the ground you would like your swing to sit. Find a sturdy  item that is the same height and  rest your swing on it  while you attach the ropes.  This will make life easier, and you are assured  it will be level. Originally I  had tried to measure my rope in advance,  but it turned out to be trickier than I had anticipated.


 Now that everything is installed, you can  make it pretty!  I actually designed this swing  to accommodate a crib size mattress, BECAUSE they are considerably cheaper than buying foam to make a cushion.  Another bonus for all my sewing illiterate friends,  you can slap a crib sheet on it and call it good!

  Add some throw pillows and you are done! Now sit down,  open a nice cold Diet Coke  and relax in your new swing!

Digiprove sealCopyright secured by Digiprove © 2015

More from my site

  • DIY Farmhouse TrayDIY Farmhouse Tray
  • Pottery Barn Inspired Cubby OrganizerPottery Barn Inspired Cubby Organizer
  • Rustic Farmhouse Book ShelfRustic Farmhouse Book Shelf
  • Pottery Barn Inspired Crate DresserPottery Barn Inspired Crate Dresser
  • Rustic Farmhouse Coffee TableRustic Farmhouse Coffee Table
  • Rotating ShelfRotating Shelf

in Build Plans, Seating, Uncategorized # Furniture

Reader Interactions

you may also like
Lazy Susan Charcuterie Board
Moody Board and Batten Guest Room
DIY Rejuvenation Light Fixture
Convert a Cabinet Into a Built-In Armoire

Comments

  1. john patinson says

    April 16, 2014 at 12:42 pm

    It was great to see the old printshop and everyone who works there again. I am excited to see a printing business still operating and growing, great job guys
    memory foam off-gassing

  2. Pauline Henderson says

    August 8, 2014 at 1:14 am

    I love this project ! It looks amazing.

    • coreydecker@gmail.com says

      August 8, 2014 at 1:50 am

      Thank you so much for your comment, and for reading.

  3. B. Lake says

    August 18, 2014 at 1:47 am

    I am so proud of you! I have wanted a swing in my living room for the past 55 years! But… my wasbands (2) thought it was a stupid idea and told me so. Obviously, I have neither of them now, but neither do I have a swing. I’d love to come over and sit/swing a spell. You did a great job! Everyone should have a swing somewhere! I’d also like a swinging bed!

    • coreydecker@gmail.com says

      August 18, 2014 at 7:22 pm

      I absolutely love having it! Me and the kids sit and read on it often. Make sure you do it. You won’t regret it.

  4. Alex says

    September 2, 2014 at 3:56 pm

    I LOVE this, and I love that you hung it inside. I have been wanting to do something like this on my front porch. May I ask where you got the cover for your mattress? I’ve never seen a crib mattress look so comfortable. Thanks for posting..so glad I found your site.

    • coreydecker@gmail.com says

      September 2, 2014 at 4:38 pm

      Thank you so much! I would not consider myself a seamstress by any means, but I can sew. I made that cover to match the room. If sewing is not your thing, I might suggest using some batting or foam padding to give the mattress some body, and then use a crib mattress sheet as the cover. They come in a ton of patterns and colors now! Hopefully that helps, and thank you for reading!

  5. Lori says

    October 31, 2014 at 5:16 am

    You are very creative! Awesome idea!

    • coreydecker@gmail.com says

      November 1, 2014 at 6:11 pm

      Thank you so much Lori!

  6. Creighton says

    January 2, 2015 at 8:29 pm

    One note: I replaced hook swings for a fairly heavy gentleman and found that some are rated for 125 pounds each while others were for 250 pounds each (at the big box stores). One of his original hooks broke cleanly like a pretzel stick, so it must have been a cheap one. There may be even heavier duty hook swings out there, but it’s worth buying the heavier rated ones (or you may not be able to put Humpty together again).

  7. the cape on the corner says

    January 13, 2015 at 7:26 pm

    huh. now that is awesome.
    b

    • coreydecker@gmail.com says

      January 14, 2015 at 7:28 pm

      Thank you! We love it.

  8. kat says

    February 20, 2015 at 3:43 am

    Any idea how much weight it can hold? How much swing space does it need? I love this have the perfect place for this, just worried it might swing too much and hit the wall.

    • coreydecker@gmail.com says

      February 21, 2015 at 9:12 pm

      I have never tested it but me and my husband and 2 kids safely sit on it, roughly 425 ish lbs, with no problem. If you set the hardware anchors further apart, it will no permit it to swing as far. You can adjust how far apart you place them depending on the amount of space you have. 🙂

Primary Sidebar

  • Facebook
  • Instagram
  • Pinterest
  • Twitter
  • YouTube
IMG_9167 (1).jpg fd

Popular Projects

  • How to: Faux Brick Wall
  • Cheap White Curtains
  • Ikea Cubbies into a Rustic Apothecary
  • Cabinet Transformed Into A Kitchen Island
  • Workshop Assembly Table
  • The BEST Beach Blanket ever!
DIY & Design

Meet Corey

Hi everyone, my name is Corey, and I have a problem. I can’t leave well enough alone… The best therapy usually involves a variety of power tools. So, in the few “spare” moments I am not entertaining my two beautiful, rambunctious, boys, I can typically be found hunched over a sewing machine and/or covered in sawdust. All in the efforts to create a perfect balance of aesthetics and practicality in our home.
read more

Join our mailing list!

DIY & design ideas - right in your inbox!

Top Hits!

  • How to: Faux Brick Wall
  • Cheap White Curtains
  • Ikea Cubbies into a Rustic Apothecary

Featured

Lazy Susan Charcuterie Board

Categories

  • 70's Ranch Home
  • Around the House
  • Build Plans
  • Crafts
  • Current Home
  • Decor Makeovers
  • Dresser
  • Exterior
  • Fall
  • First Home
  • Furniture Makeover
  • Hidden Compartment
  • Kitchen
  • Lighting
  • Makovers
  • Master Closet
  • Organization
  • R.V.
  • Room Makeovers
  • Seasonal
  • Seating
  • Sewing
  • Shelving
  • Small Builds
  • Smart Home
  • Spring
  • Summer
  • Tables
  • Tablescape
  • Tutorials
  • Uncategorized
  • Wall Art
  • Wall Decor
  • Winter
  • Workshop

Footer

Contact Me: Corey@Sawdust2Stitches.com

Latest ‘Grams

Happy Holidays to all my DIY loving friends! I’ Happy Holidays to all my DIY loving friends! 
I’m going to put down the tools so I can hang with my crew. 
Merry Christmas from our family to yours! I look forward to sharing so many great projects in 2021, stay tuned! @ashleynavarrophotography
LAST MINUTE DIY GIFT IDEA!!! This Holiday Season m LAST MINUTE DIY GIFT IDEA!!!
This Holiday Season might be a little different from those we’ve seen in the in past. With many folks looking to keep costs and stress low, they are turning to a more sentimental approach to holiday gifting. 
 Handmade gifts are a great way to personalize gift giving this year. I made this serving tray/lazy susan for a friend and I know she will love it! If you want more easy-to-make, handmade gift ideas The Home Depot has many other great tutorials.

@homedepot #HomeDepotPartner #THDxHoliday #THDxDIYWorkshops
2020… it’s been a weird one. I suspect Christm 2020… it’s been a weird one. I suspect Christmas will be a little different too, but that doesn’t need to be a bad thing!  This is the perfect time to branch out and DIY your Holiday gift lists. Take this serving tray/lazy susan for example.  It was such a simple and facts option if you are gifting in a pinch!  The Home Depot has fun DIY gift ideas that your friends and family will love. Check out the link in my bio for more handmade gift ideas. 
@homedepot#HomeDepotPartner #THDxHoliday #THDxDIYWorkshops
This post is sponsored by Kilz but the content and This post is sponsored by Kilz but the content and opinions expressed here are my own.

I leaned in heavily to the dark moody feel for the guest bedroom makeover and I love it! The dark sienna  hue, coupled with my @kilzbrand #accentwallchallenge is absolutely stunning. (If I do say so myself.)
I have a room tour, wall tutorial and source links on the site today. #linkinprofile #sponsored #everyprojectisworthit
@Kilzbrand presented me their #accentwallchallenge @Kilzbrand presented me their #accentwallchallenge, and you know how much I love a good challenge!
If I am being completely honest, I feel like I rocked this challenge. It is absolutely insane how a single wall can change the entire feel of a room. 

On the site I have a full tutorial on how you too can create this look and all the fun details about my choice of color from the Magnolia Home by Joanna Gaines® paint line & the KILZ 3® Premium Primer
#sponsored #kilz #GuestRoomMakeover #AccentWallChallenge #EveryProjectIsWorthIt
Am I the only one who tackles unnecessary projects Am I the only one who tackles unnecessary projects before entertaining guests? As I was preparing the guest room for the Holidays I had an epiphany. I had a vision of what this room could be, and I just cannot let it go - this room needs an accent wall!

I am teaming up with the great folks over at @kilzbrand to create the perfect accent wall, with a gorgeous color from the Magnolia Home by Joanna Gaines® paint line & KILZ 3® Premium Primer. Stay tuned because this accent wall is going to be gorgeous. I just need to pick my accent color. What do you guys think, clay or sage?  #sponsored #kilz #GuestRoomMakeover #AccentWallChallenge #EveryProjectIsWorthIt
Follow on Instagram
2020 © Your Blog Name
theme by soleilflare
Enter your name and email and get the weekly newsletter... it's FREE!
Your information will *never* be shared or sold to a 3rd party.