• Blog
  • About
  • Press
  • Privacy

Let’s be social!

  • Skip to primary navigation
  • Skip to main content
  • Skip to primary sidebar
  • Skip to footer
Sawdust 2 Stitches

Sawdust 2 Stitches

  • Tutorials
    • Around the House
    • Organization
    • Wall Decor
    • Sewing
  • Makeovers
    • R.V.
    • Room Makeover
    • Furniture Makeover
    • Decor Makeover
  • Build Plans
    • Small Builds
    • Wall Decor
    • Dresser
    • Tables
    • Seating
    • Shelving
    • Hidden Compartment
  • Seasonal
    • Summer
    • Spring
    • Fall
    • Winter
  • Home Tours
    • First Home
    • Current Home
    • 70’s Ranch Home
  • Workshop

Paint a Rug

April 2, 2014

   Since the interior of my house is “mostly”  done (when I say “mostly done” I mean I have  started  re-re-decorating rooms).  So, I have now moved to the exterior of the house.  Part of the exterior is re-vamping the lanai. (Fancy term for a screened porch)
One step in said process was finding a suitable floor covering. Thus began my search for the perfect rug.

   Criteria : Cheap
                   Navy & White *gasp* (shocker I know)
                   Inexpensive
                   Weather resistant
                   Cheap
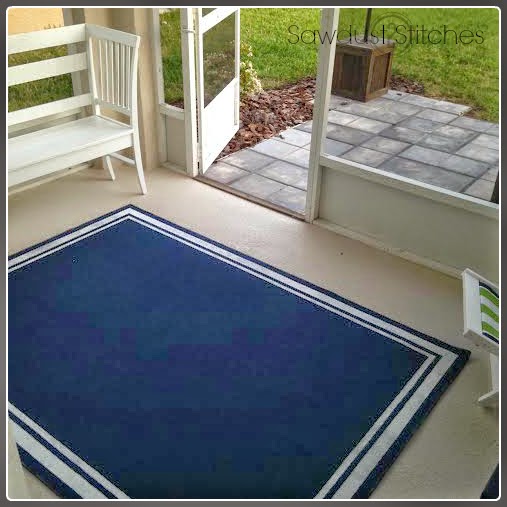
 I was having a difficult time tracking down one that fit the above criteria. So,  here is what I did.  I found this  cheapy  $20  rug at Lowe’s.   It fit the “cheap, and navy” criteria.  It was just missing the white.
 
I knew this was going to be rather time consuming process,  so  I chose a very simple line design.
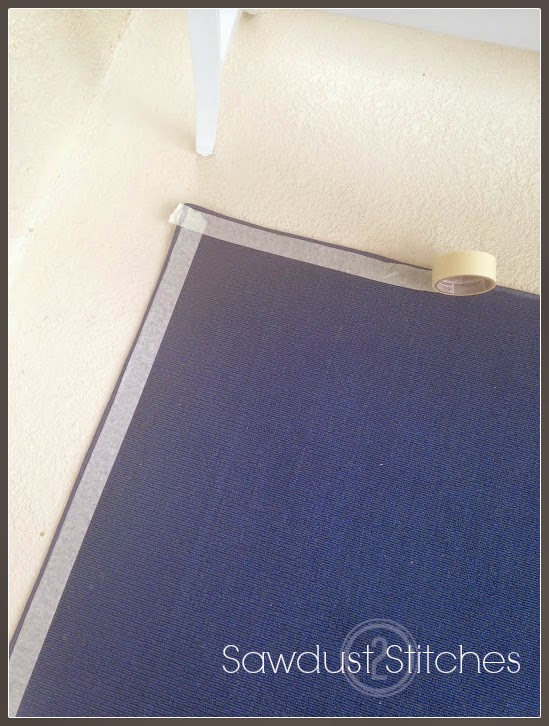
 I started with a 1.5″ tape and ran it around the perimeter.
 
 Using my sewing ruler/guide I used  a 3/4″ tape followed by another row of 1.5″ tape.  Always using the ruler to ensure the lines were perfectly straight.
Once the tape was all in place,  I used and exatco knife to cut off the excess tape.
 Before painting,   make sure you smooth down your tape!
Then  grab a roller and get to work.

I  used light layers and tried to now push to hard on the roller, or the tape tended to shift.
It is going to take forever,  just keep painting!

Then when you feel like you want to quit?   Keep painting…
Feel like you might go craxy because you want to rip the tape off!?   Just  keep painting.
I think I ended doing 4 coats.  ( Allow dry time in between).

Once it is FINALLY evenly coated and dry,
peel the tape off!

I was impressed with how crisp the lines were.

A word of warning.  Where you have painted will be very stiff.  I knew this before I began…  I chose my design so that it wouldn’t be a huge annoyance.
I have heard that you can add a “Fabric/Textile Medium”  to your paint and it will help with the flexibility.  I have also heard that  taking a electric sander to the rug can help with the texture as well.  I’m  happy with mine and did not want to compromise the paint job.

Hindsight?
I think I would consider using a primer,  I seriously think it would have sped up the process considerably. Best of luck!

More from my site

  • Complete Patio MakeoverComplete Patio Makeover
  • Whole House Color SchemeWhole House Color Scheme
  • How to: Faux Brick WallHow to: Faux Brick Wall
  • Fall Chalkboard SignFall Chalkboard Sign
  • Ultimate Drawer OrganizerUltimate Drawer Organizer
  • My Recycled Shop CabinetsMy Recycled Shop Cabinets

in Exterior, Tutorials, Uncategorized # Flooring, Paint, Rug

you may also like
Back of Door Spice Rack
Pool Patio Design
How To: Exterior Door Makeover
Out-feed Assembly Workshop Table

Primary Sidebar

  • Facebook
  • Instagram
  • Pinterest
  • Twitter
  • YouTube
IMG_9167 (1).jpg fd

Popular Projects

  • How to: Faux Brick Wall
  • Cheap White Curtains
  • Ikea Cubbies into a Rustic Apothecary
  • Cabinet Transformed Into A Kitchen Island
  • R.V. Makeover
  • How to: R.V. Curtains
DIY & Design

Meet Corey

Hi everyone, my name is Corey, and I have a problem. I can’t leave well enough alone… The best therapy usually involves a variety of power tools. So, in the few “spare” moments I am not entertaining my two beautiful, rambunctious, boys, I can typically be found hunched over a sewing machine and/or covered in sawdust. All in the efforts to create a perfect balance of aesthetics and practicality in our home.
read more

Join our mailing list!

DIY & design ideas - right in your inbox!

Top Hits!

  • How to: Faux Brick Wall
  • Cheap White Curtains
  • Ikea Cubbies into a Rustic Apothecary

Featured

Back of Door Spice Rack

Categories

  • 70's Ranch Home
  • Around the House
  • Build Plans
  • Crafts
  • Current Home
  • Decor Makeovers
  • Dresser
  • Exterior
  • Fall
  • First Home
  • Furniture Makeover
  • Hidden Compartment
  • Kitchen
  • Lighting
  • Makovers
  • Master Closet
  • Organization
  • R.V.
  • Room Makeovers
  • Seasonal
  • Seating
  • Sewing
  • Shelving
  • Small Builds
  • Smart Home
  • Spring
  • Summer
  • Tables
  • Tablescape
  • Tutorials
  • Uncategorized
  • Wall Art
  • Wall Decor
  • Winter
  • Workshop

Footer

Contact Me: Corey@Sawdust2Stitches.com

Latest ‘Grams

Follow on Instagram
2020 © Your Blog Name
theme by soleilflare
Enter your name and email and get the weekly newsletter... it's FREE!
Your information will *never* be shared or sold to a 3rd party.