• Blog
  • About
  • Press
  • Privacy

Let’s be social!

  • Skip to primary navigation
  • Skip to main content
  • Skip to primary sidebar
  • Skip to footer
Sawdust 2 Stitches

Sawdust 2 Stitches

  • Tutorials
    • Around the House
    • Organization
    • Wall Decor
    • Sewing
  • Makeovers
    • R.V.
    • Room Makeover
    • Furniture Makeover
    • Decor Makeover
  • Build Plans
    • Small Builds
    • Wall Decor
    • Dresser
    • Tables
    • Seating
    • Shelving
    • Hidden Compartment
  • Seasonal
    • Summer
    • Spring
    • Fall
    • Winter
  • Home Tours
    • First Home
    • Current Home
    • 70’s Ranch Home
  • Workshop

DIY Taped Trellis Pattern

March 22, 2013

Ugh, this room was so incredibly boring.  I wanted a pattern in here,  and a color,  but I still wanted to keep it bright. So I started by painting the cabinets white. (Tutorial coming soon).  Then  I came up with the idea of doing a nautical lattice pattern….

  I used 2 different size tapes in order to create this look.  I went through and used a pencil  and marked where all my lines would begin and end.  Then just connected the dots with tape.  I am not going to lie, this part took forever!  I would measure and remeasure, I determined the best way to do it was to use a quilters square.  Just make sure your first line is perfectly straight!  Then you can use it as a guide .
 
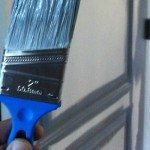
Okay now that you want to throw your roll of tape across the room,  go get your paint. I know your first instinct is to grab your new color and start painting… NOPE.   Grab the original color of the wall.  So in my case I had to get out the white. You are going to completely paint over all your tape.  Reason ?  When you paint,  no matter what brand the tape, I still get the paint bleeding through.  BUT if you paint over your tape the same color on the wall,  any bleeds  will not be visible because it is the same color. (Are you still following me ?).
 
So once my base color dried (and sealed the tape to the wall so that no blue can leak through) , you can then take your new wall color and apply it. In my case I used a grey blue.  Wait until the your topcoat is completely dry , then you can take off your tape. Inevitably, there will be some touch up spots,  but you are almost done!  Just stand back and admire your work for a while before you pull out the itty bitty brush.
 

Was this project easy ? Yes. Was is it time consuming?  You betcha.   I don’t regret it though.  I love the way it turned out. I wouldn’t suggest this for a huge complicated space,  working around the shower and mirror was not my favorite. I could see myself doing this again with a flat open wall though, perhaps an accent wall ?


More from my site

  • Modern Chair UpCycleModern Chair UpCycle
  • Spice CabinetSpice Cabinet
  • Pottery Barn Lamp  KnockoffPottery Barn Lamp Knockoff
  • That is PVC ?That is PVC ?
  • Carnival themed Birthday Party!Carnival themed Birthday Party!
  • How to Paint Paneled DoorsHow to Paint Paneled Doors

in Around the House, First Home, Tutorials, Uncategorized # Painting, Stencil, Wall Paper

Reader Interactions

you may also like
Shelf Under Cabinets
Raised Kitchen Cabinet Makeover
Back of Door Spice Rack
Pool Patio Design

Comments

  1. Rob and Steph Puterbaugh says

    March 22, 2013 at 12:42 pm

    This looks great! I always envy who have the patience to do this sort of stuff!!!

  2. Rob and Steph Puterbaugh says

    March 22, 2013 at 12:43 pm

    ugh, I didn't write a word. My mind must have been working faster than my fingers… I meant to say, “I always envy people who have the patience to do this sort of stuff!”

  3. Aaron & Nancy says

    April 1, 2013 at 2:42 pm

    Love this! You are so talented, Corey!

  4. Taylor {Sew Much Love} says

    April 4, 2013 at 2:40 pm

    GORGEOUS!! I absolutely adore your rope baskets too!!

Primary Sidebar

  • Facebook
  • Instagram
  • Pinterest
  • Twitter
  • YouTube
IMG_9167 (1).jpg fd

Popular Projects

  • How to: Faux Brick Wall
  • Cheap White Curtains
  • Ikea Cubbies into a Rustic Apothecary
  • Cabinet Transformed Into A Kitchen Island
  • R.V. Makeover
  • How to: R.V. Curtains
DIY & Design

Meet Corey

Hi everyone, my name is Corey, and I have a problem. I can’t leave well enough alone… The best therapy usually involves a variety of power tools. So, in the few “spare” moments I am not entertaining my two beautiful, rambunctious, boys, I can typically be found hunched over a sewing machine and/or covered in sawdust. All in the efforts to create a perfect balance of aesthetics and practicality in our home.
read more

Join our mailing list!

DIY & design ideas - right in your inbox!

Top Hits!

  • How to: Faux Brick Wall
  • Cheap White Curtains
  • Ikea Cubbies into a Rustic Apothecary

Featured

Shelf Under Cabinets

Categories

  • 70's Ranch Home
  • Around the House
  • Build Plans
  • Crafts
  • Current Home
  • Decor Makeovers
  • Dresser
  • Exterior
  • Fall
  • First Home
  • Furniture Makeover
  • Hidden Compartment
  • Kitchen
  • Lighting
  • Makovers
  • Master Closet
  • Organization
  • R.V.
  • Room Makeovers
  • Seasonal
  • Seating
  • Sewing
  • Shelving
  • Small Builds
  • Smart Home
  • Spring
  • Summer
  • Tables
  • Tablescape
  • Tutorials
  • Uncategorized
  • Wall Art
  • Wall Decor
  • Winter
  • Workshop

Footer

Contact Me: Corey@Sawdust2Stitches.com

Latest ‘Grams

Follow on Instagram
2020 © Your Blog Name
theme by soleilflare
Enter your name and email and get the weekly newsletter... it's FREE!
Your information will *never* be shared or sold to a 3rd party.