• Blog
  • About
  • Press
  • Privacy

Let’s be social!

  • Skip to primary navigation
  • Skip to main content
  • Skip to primary sidebar
  • Skip to footer
Sawdust 2 Stitches

Sawdust 2 Stitches

  • Tutorials
    • Around the House
    • Organization
    • Wall Decor
    • Sewing
  • Makeovers
    • R.V.
    • Room Makeover
    • Furniture Makeover
    • Decor Makeover
  • Build Plans
    • Small Builds
    • Wall Decor
    • Dresser
    • Tables
    • Seating
    • Shelving
    • Hidden Compartment
  • Seasonal
    • Summer
    • Spring
    • Fall
    • Winter
  • Home Tours
    • First Home
    • Current Home
    • 70’s Ranch Home
  • Workshop

Blog

Pottery Barn Inspired GUN CASE !

January 7, 2015

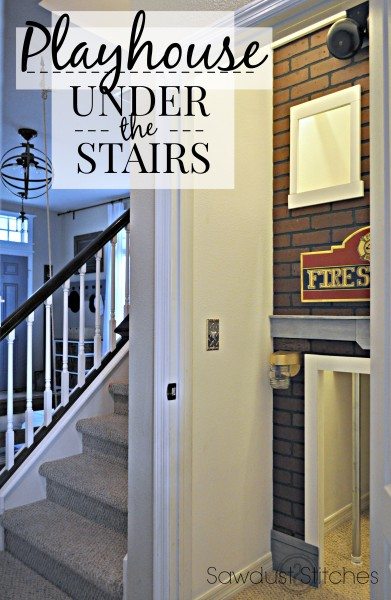
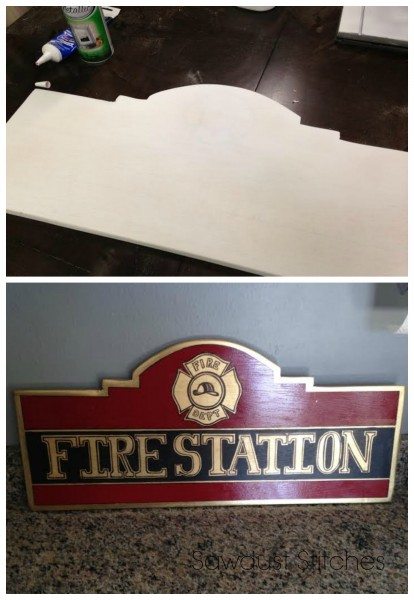
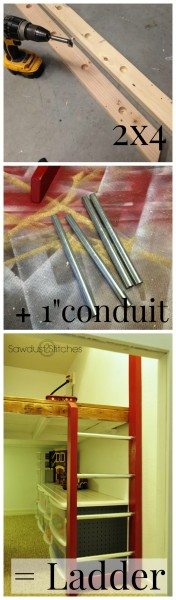
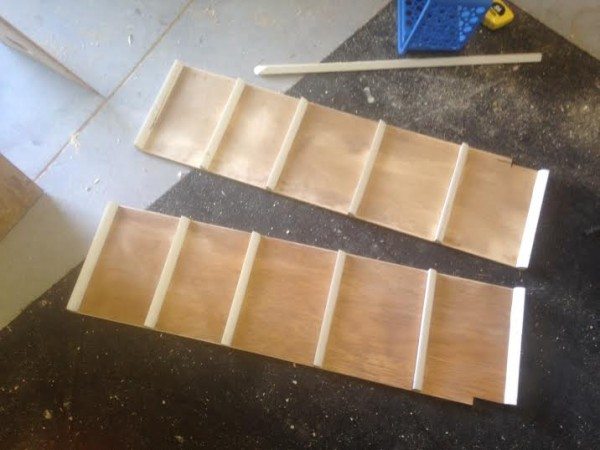
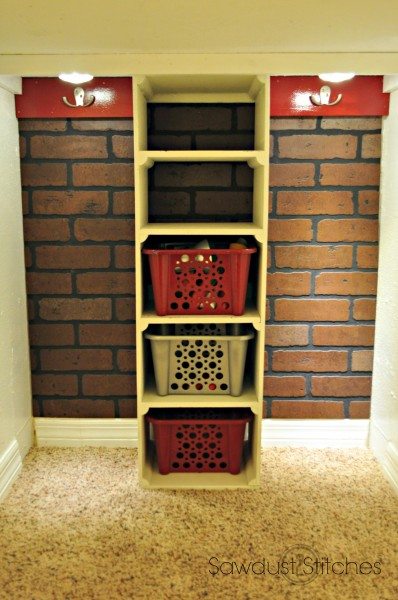
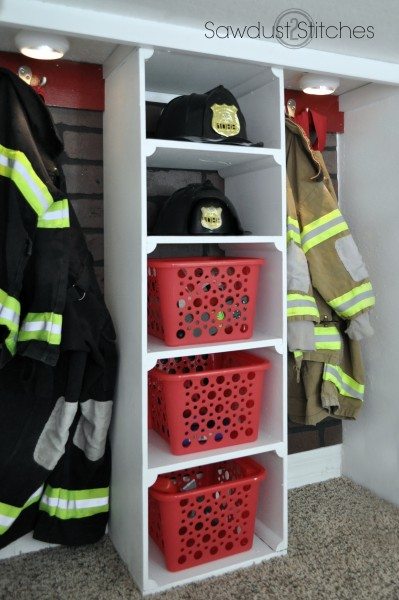
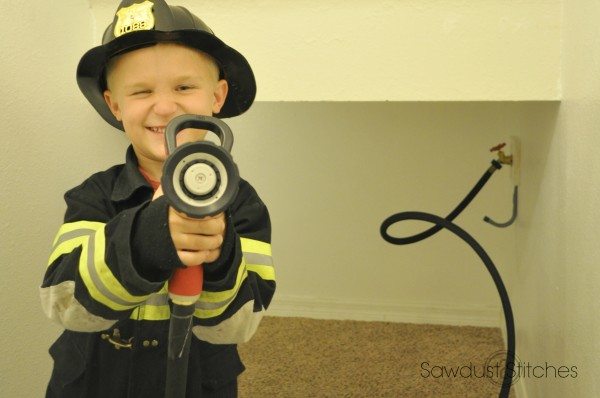
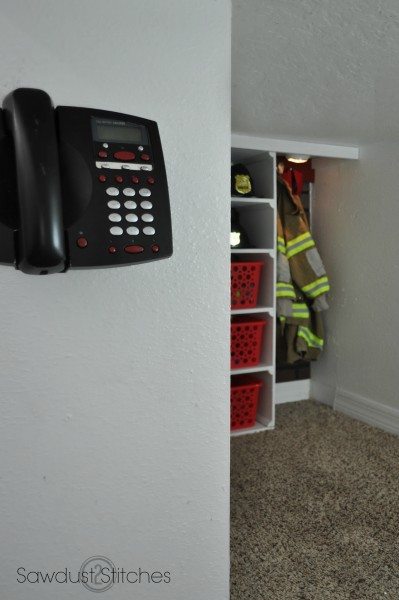
UPDATE the plans are now available HERE.Pottery Barn Mirror Hidden Gun Case Sawdust2stitches This was the year of homemade Christmas gifts.  If you recall,  my kids got their “fire station“, and Andrew (my husband)  got a mirror. Yes, a mirror.

I love Pottery Barn, my husband loves guns.  It is those two components that inspired my husband’s Christmas present, and it surpassed both of our expectations!

 I love these  mirrors that Pottery Barn makes! Pottery Barn Mirror I have seen several other bloggers make these in the past (Jamie over at “That’s My Letter”  has put together a great tutorial on on how to assemble one of these mirrors).   I had never felt like there was a place I would put it…  That was until I started this project.

DISCLAIMER: This is in NO way a complete tutorial.  It’s a straight up brag post with a few process pictures. HOWEVER, that does not mean I do not  have plans to make a tutorial someday . 😉

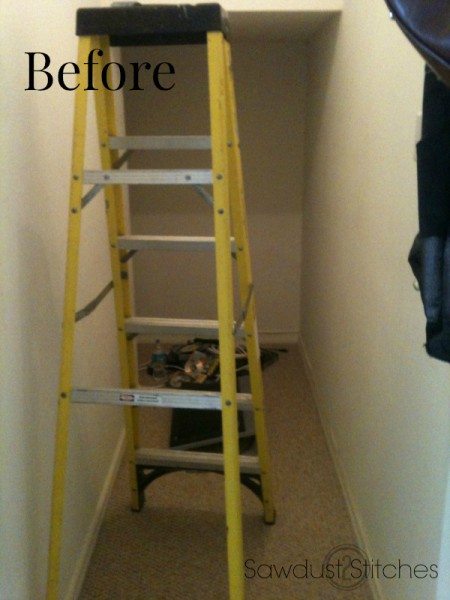
 I had approximately  2 weeks to complete a Firestation,  and this gun case, so I was in a little bit of a hurry and  didn’t document the process very well. Here are a few of the photos I did manage to snap.

Pottery Barn Mirror Gun Case 2 sawdust2stitches S2S   Started by building the frame.Pottery Barn Mirror Gun Case hinged sawdust2stitches s2s Installed hinges and doors.  pottery barn mirror gun case ammo tray Sawdust2stitches s2sAdded ammo tray!

Pottery Barn Mirror Sawdust2stitches s2s        Attached the edge trim and  grid trim. (HOLY, that took SO long!)gun case Pottery Barn Mirror Sawdust2stitches s2s Time to add the mirrors. Shout out to AMAZING  friends who scoured the Tampa Bay Area Dollar Trees trying to  help me track down all these mirrors!

Preface: before I have everyone worrying. Yes, we DO have two young children, but I designed this with a  locking system that does not require a key ( so it still allows for quick access). It has a “secret” way to open it, and unless  I show you how,  it  WILL NOT open.

Haha,  every time I make my husband a gun case ( yes, there are more),  I  challenge him to “open it” without any further instruction. He knows my building style and techniques and he still couldn’t figure out how it opened! ( I LOVE that on occasion I can stump him. He is kind of brilliant.)

So without further adieu.   I give you Andrew’s Christmas Present.Sawdust2stitches Pottery Barn mirror 2 
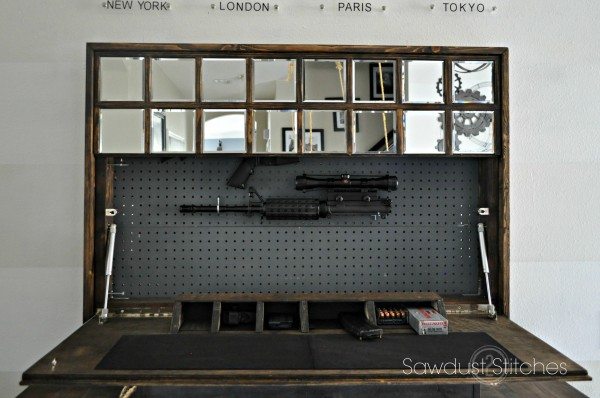
My husband loves gadgets, so on his case  I installed hydraulic supports, so it has a controlled action open.  It also features an ammo tray that is magnetically lined to prevent anything from shifting.  It was designed to open at waist height so that that lower door opens and creates a loading/assembly area.

Hidden Gun Case Sadust2stitchesWhen the top lid is opened it activates a motion sensing light! I added slow close stops as well, so that when  he shuts the doors, it will NOT slam or make a loud noise.  Pottery Barn Style Mirror Sawdust2stitches 
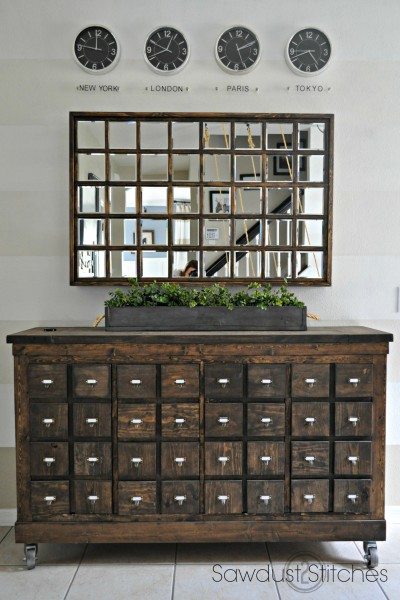
He LOVES it, and best part ?  It is pretty, and looks perfect above my Apothecary Cabinet. All in all I feel like my homemade Christmas was an absolute success!

  Corey

Under the Stairs Playhouse/Firestation

December 29, 2014

Playhouse under the stairs sawdust2stitches

You may recall a post I wrote  a while back documenting the transformation of our under the stairs closet into a “Fort” .     fort before sawdust2stitches It has been a few years, and  my kids  have grown up a bit.  The oldest is now five and the youngest is three,  and both have a small obsession with all things fire fighters.  So, for Christmas this year I decided to give their under the stairs fort a  makeover.  IT WAS A HIT!  They love it, and you can read  a little bit about the process below.  Enjoy!

 The Exterior

 I ended  up using a paneling  that was made to look like brick.  I purchased this 4×8′ sheet for roughly $25.  It saved me a whole lot of work, and was fairly sturdy!    I cut out a custom sign using a jigsaw, and painted the sign by hand.  I think it turned out adorable. Fire Station Play room Sign  
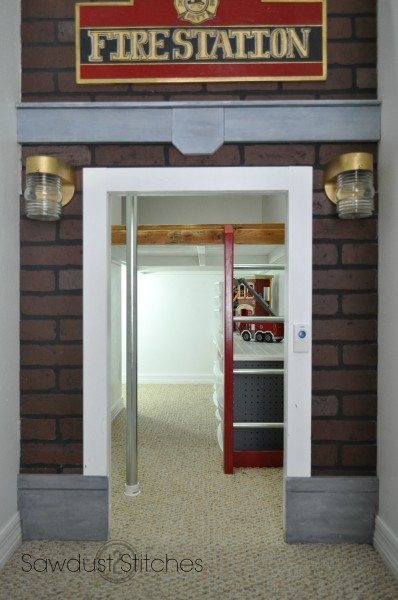
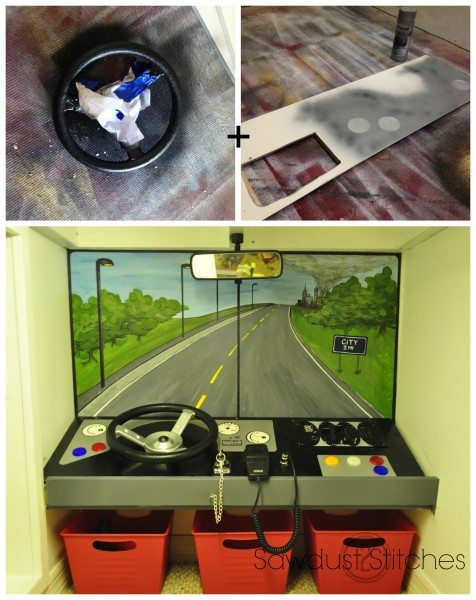
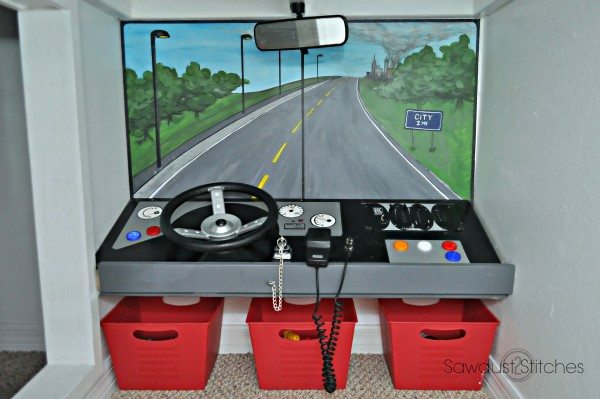
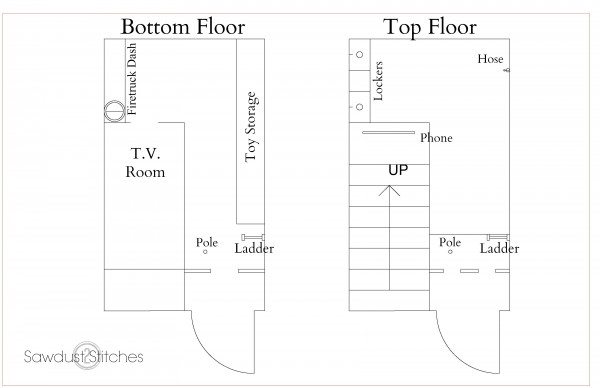
I ended up adding trim  that I painted to look like concrete accents.  I also figured it needed some windows, so I trimmed those out as well.  Love it.
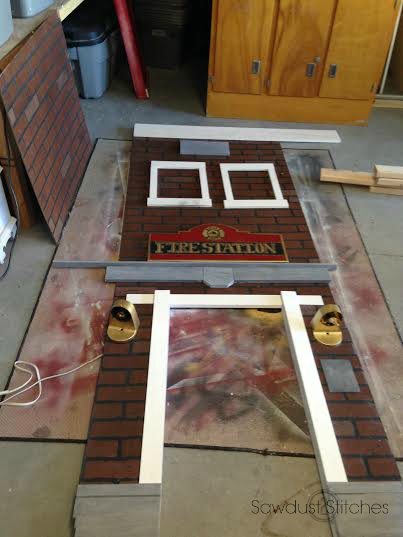
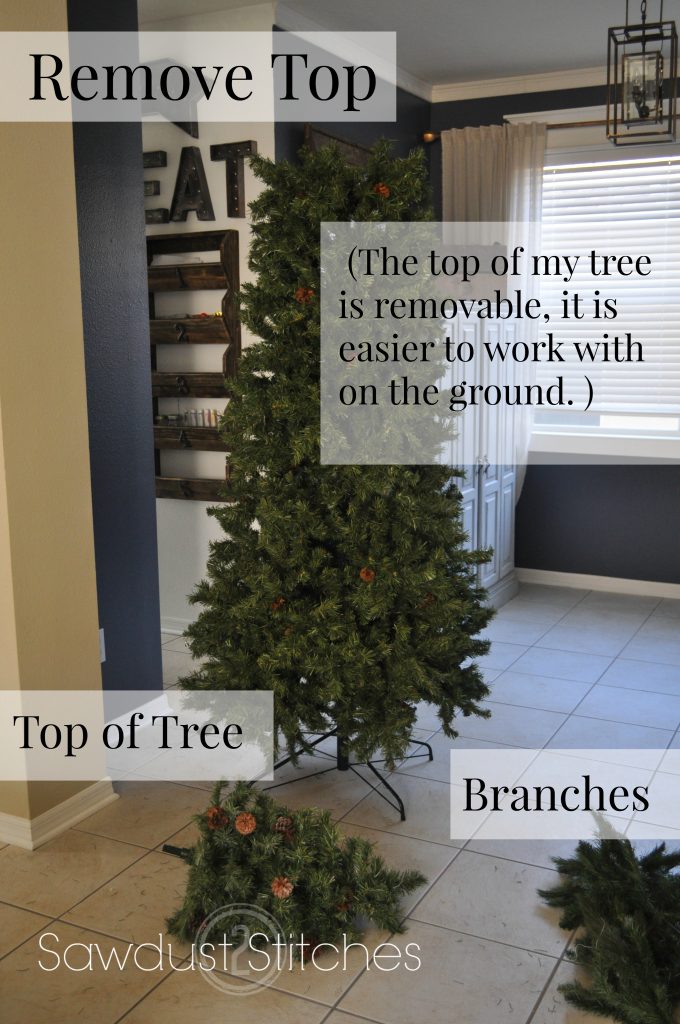
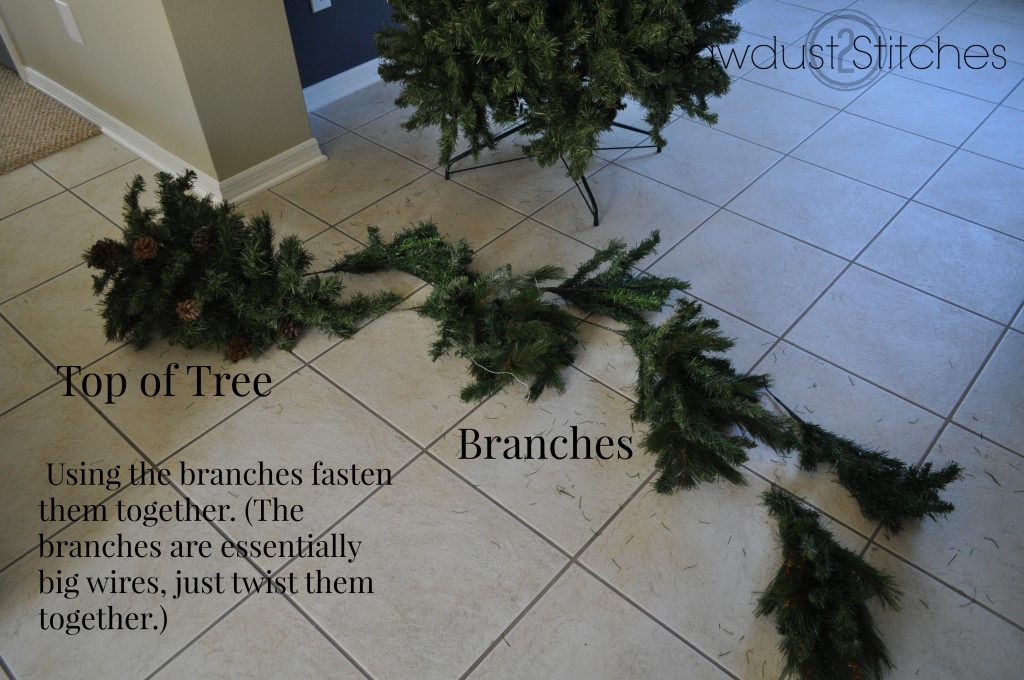
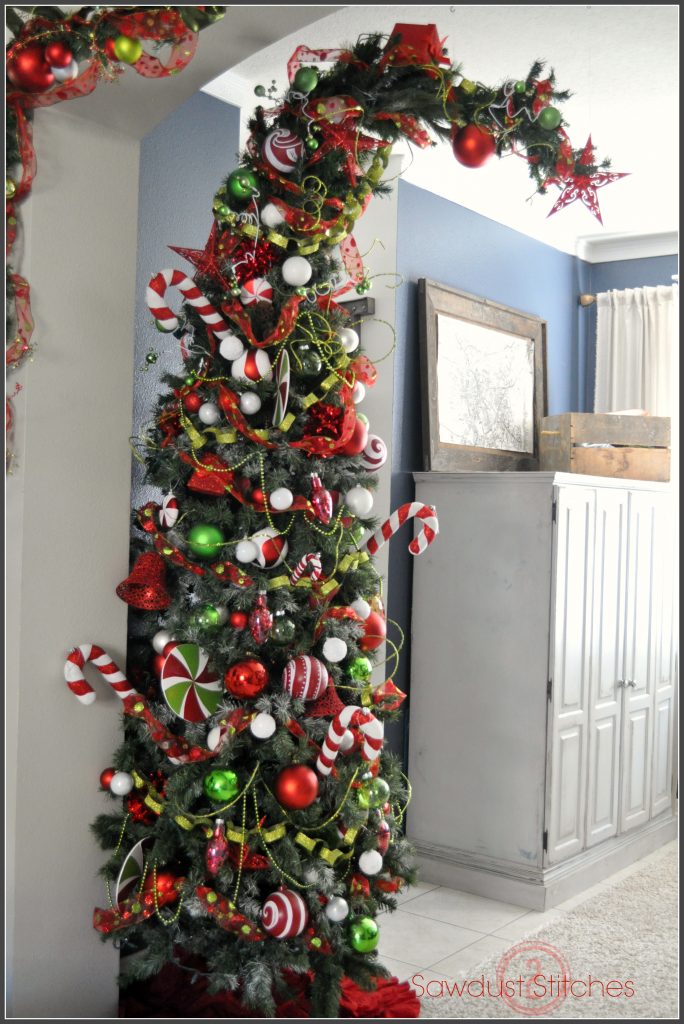
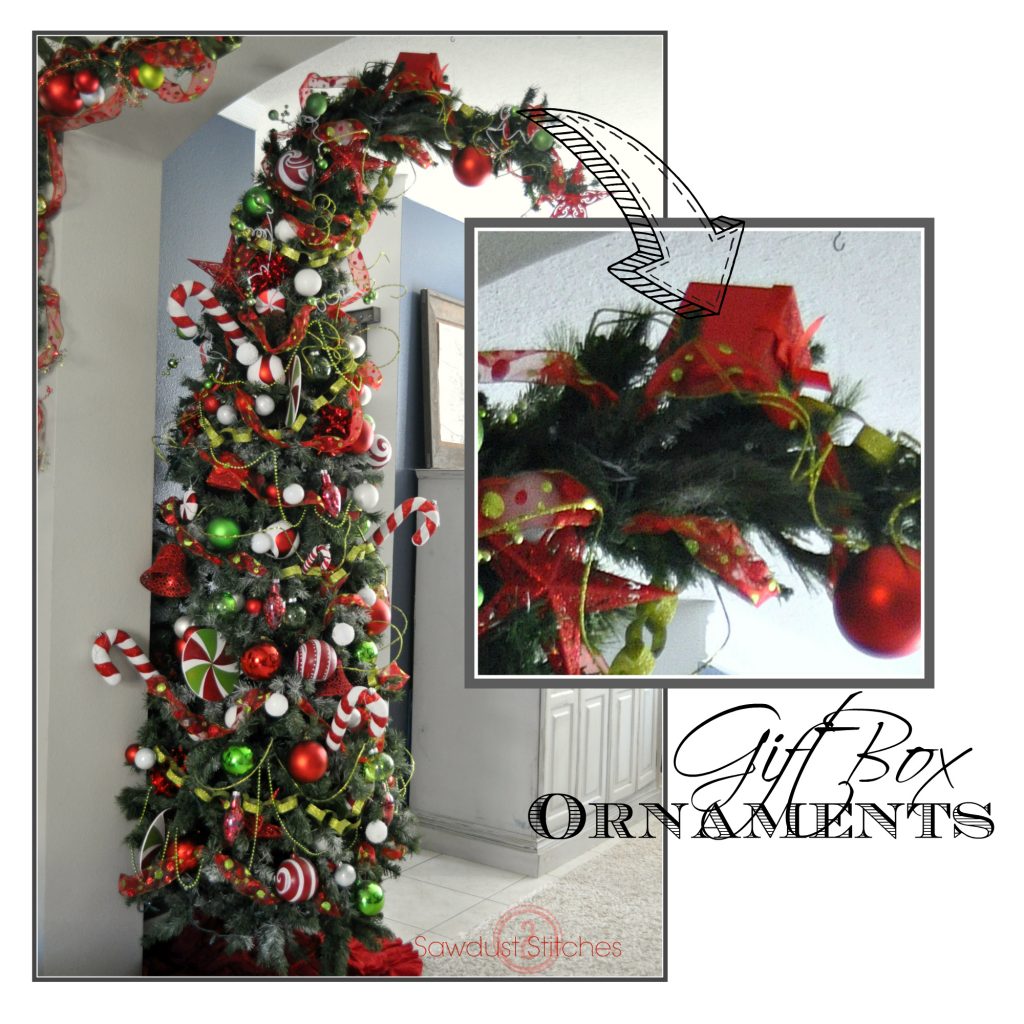
 Fire Station Playroom  Sawdust2stitches front s2sI added two lanterns,  that I purchased for $5,oo a piece and then spray painted gold.  I decided to not make these fully functioning lights. (Live wires,  and toddlers didn’t seem like the best combination.)

Sawdust2Stitches Lantern s2s 

Top Floor

In order to access the top floor  I thought a red ladder was more than appropriate, PLUS it was super easy and CHEAP  option.  All the materials only cost $7!?

Kids ladder sawdust2stitches ss  I think  my favorite part of the entire Fire Station is the upstairs “locker”.  Truth be told, I didn’t really know what I was doing with this area  until the day before  Christmas.  (Talk about a last minute gift.)

I had originally planned on just sticking to hooks on the wall for their costumes. But  then I  I got an idea…  uh-oh.  I  decided they  needed a place for their helmets, AND their firefighter accessories…  (Basically it will never ever be good enough.)

 So,  I whipped up this shelving unit with  scraps I had in the garage.  I cut two long  pieces of  3/4″ ply wood and  then glued and tacked in place support brackets.  After which I added the shelves.  It was a fairly simple build. All that was left was to sand, prime, and paint! Fire Stattijon Playroom  Sawdust2stitches Locker sides  I used some left over paneling on the back wall, and then added the hooks, and mounted the shelf.  ( To ensure it  would be secure.)   The last finishing touches were the baskets and the lights!  I got the baskets from the  Dollar Tree and spray painted them to match, and used battery operated push lights for the lighting.  It turned out better than I had ever hoped!

Fire Station locker sawdust2stitches 

My Husband ran to Home Depot  to grab a few odds and ends, and  came home with an  awesome idea!  He hooked up a water spicket, hose, and nozzle for the kids to play with!  They love it, they  pretend to put out fires for hours on end!fire house play room sawdust2stitches spicket  fire station play house sawdust2stitches

Last thing  it needed was a phone!  When  my kids are playing ” Fire Fighters”,  they inevitably receive a call about a “fire emergency!”.  For $2.00 I picked up an old phone from the thrift store and spray painted it to match.sawdust2stitches  phone makeover


 The Bottom Floor

The ladder was a great way to get up,  but coming down ?  You simply  CANNOT have a fire station without a pole.  For the pole I used a piece of  2″ conduit.  It worked perfectly, and for only $8, you can’t beat that!

Fire Station Playroom  Sawdust2stitches pole ss  

This is the view from  looking from the exterior window down.

Fire station view from the window ss

I took out some of the existing bins and added some playing space.   The white table top you see below was actually a scratch and dent Ikea cupboard door for $5. Booyah.  Now they have a cute play area, as well as a place to store their larger toys.  Perfection.

The bottom floor previously had a  tool  bench built into the wall.  The kids  never really  got into it.  They played with it occasionally, but it was never a BIG hit.   In all seriousness they have logged more play hours  with the  “fire truck” in the last 24 hours , than they  ever did with the tool bench in the last 2 years.Fire Station Playroom Fireturck Sawdust2stitches ss

In order to convert the “tool bench” into a  fire truck dash board, I used a play ground steering wheel, (that I painted to look more realistic).  Added some buttons and knob, and finished it off with an old CB radio and rear view mirror!  All it needed was a  quick mural painting and it was good to go. 

The last  area to undergo renovations  was the “hidden room”,  originally  the room did not exist. When my husband and  I were originally  making “the fort”  we discovered some unused space.  So naturally we knocked down the wall, added some drywall and carpet, and increased the kids square footage.  Naturally.

During the “fort” era, it had been a “ball pit” with a mini-basketball hoop, and various ball activities. They  loved this room for a long time,  but as they got older it  did not get as much use.The room had a dramatic slope to the ceiling ( remember we are under the stairs),  so it made it hard to use the space for play, and toy storage.  BUT it made for a perfect TV room!   I simply mounted the tv  above the entry so that the kids could lay down and watch a movie, and I didn’t need to worry about the tv getting knocked over. Win.sawdust2stitches under the stairs tv  Fire station exterior view sawdust2stitches.com  Fire Station tv room Sawdust2Stitches ss

All in all I can say the  closet, turned fort, turned fire station was a complete success!Playhouse layout sawdust2stitches

Thanks for reading and Happy Holidays!

Corey

Pottery Barn knock-off ornaments

December 13, 2014

Pottery Barn Knock off globe ornamenents pin

I saw this globe at Pottery Barn, and kind of fell in love with it. So, when I was re-decorating my tree AGAIN,   I knew I wanted to incorporate  that style on my tree. Instead of having my globe on an axis,  I decided to distinguish it by adding longitude and latitude lines. I absolutely  LOVE the way they turned out, and for $1.00 a piece, you  just can’t beat that!

unnamed

Supplies Used:

  • Sand Paper
  • Black Flat  Spray Paint
  • White “Prisma-color” or chalk pencil
  • Metallic Markers or/ paint and paint brush
  • Flat top coat or hairspray works too!
  • Large Bulb Ornaments

 I purchased the larger bulbs at the Dollar Tree!  The smaller ones, were I am guessing a  Michaels purchase.  I began by  using a sponge sanding block, and scuffed up the bulbs surfaces  just enough to create a dull surface.  I then wiped off the dust, and used a “flat” black spray paint.  (Use as directed. )

spray paint globe ornaments ss sawdust2stitches

 Spray paint large bulb sawdust2stitches ss   Once dried, I  got to work on my longitude lines.   I  used a thin stick, and place it in hole of the ornament.  I then used a small length of string and tied it to the dowel rod.  I then tied a white  colored pencil ( I have found that only Prisma Color work well.) to the string.  Holding the string taught I traced around the outside of the globe using the sting as a guide. Repeat this process as many times as needed.

sawdust2stitches  more longitude sawdust 2 stitches ss  Once all the longitude lines were complete,  I started work on the latitude lines.  Honestly,  I kind of eye balled the lines.  sawdust 2 stitches latitude ss      The bulb should look like this now. At this point,  I don’t want my lines to fade, so I would suggest  spraying it with a Matte finishing spray,  or even  hairspray! It will act as a fixative , and prevent the pencil from smudging. globe ornament sawdust2stitches Once the fixative dries,  I started the lettering.  I free-handed mine,  but  you can also use a silhouette/cricut/ or  tracing paper, in order to transfer the design. dsadsad After I  had created a basic outline,  I used metallic permanent Sharpie markers to darken the lettering!  SharpeesAnd that is all there is to it!  Imagine all the possibilities!

peace on earth  ss  Sawdust2stitches globe ornaments joy Thanks for reading, and Happy Holidays!

Corey

Pottery Barn Inspired Tablescape from Dollar Tree!

December 8, 2014


Today you can find me over at Remodelaholic, where I will be showing how you can impress all your dining guests!   I created a Pottery Barn inspired tablescape with purchases primarily from the Dollar Tree!  You can get all the details here.  sawdust2stitches remodelaholic Christmas tablescape  sawdust2stitches remodelaholic christmas table setting 5   

My Holiday Home Tour

December 5, 2014

Are you  ready for the Holidays !?  I am !… Well, that’s a lie.  I still have the exterior to decorate, shopping to do, and presents to make. BUT, the interior of my house is ready! Come and take a tour of our Home all dressed up for Christmas!Holiday  Home tour Sawdust2stitches

Front Entry 

      If you want to see how you can make your own  “Believe”  Chalkboard sign,  you can  check out this tutorial here! 


Sitting Room

        I have an awesome video showing how I made this chalkboard,  available here. Want to learn how to make your own “Who-Ville”  tree?  You should check out this tutorial here .

Family Room

   You can learn more about how I decorated this tree for CHEAP  here.

Dining Room

Entertaining guests  this Holiday season ?  I can help with that. COMING SOON a tutorial on how you  can create this Tablescape for CHEAP!  Stay tuned!

        sawdust2stitches remodelaholic christmas table setting

Kitchen

      You can get more info on this  chalkboard sign here.

 Hopefully these may  have sparked some ideas of your own, and best of luck for for all those getting ready for the Holidays!

Happy Holidays,

Corey

How to make a Who-ville Tree !

November 26, 2014


 How to make a Who-Ville/Dr. Suess Tree #sawdust2stitches

Do you love the look of a whimsical tree ?  I can show you how to take it to the next level!

who ville tree sawdust2stitches before  who ville tree sawdust2stitches remove branches    remove top who ville tree sawdust2stitches

who ville tree sawdust2stitches  top

who ville tree sawdust 2 stitches  wire Do you need help decorating ?  I can help with that.  Learn how to decorate a tree here.


 You can even  learn how to make some of these fun and funky ornaments here: Untitled gift box Gift Box Ornaments  Untitled tinsel ornaments Tinsel Ornaments  UntitledfsdaAccent Color Ornaments  

Happy Holidays!

Corey

  • previous
  • Page 1
  • Interim pages omitted …
  • Page 33
  • Page 34
  • Page 35
  • Page 36
  • Page 37
  • Interim pages omitted …
  • Page 47
  • next

Primary Sidebar

  • Facebook
  • Instagram
  • Pinterest
  • Twitter
  • YouTube
IMG_9167 (1).jpg fd
DIY & Design

Meet Corey

Hi everyone, my name is Corey, and I have a problem. I can’t leave well enough alone… The best therapy usually involves a variety of power tools. So, in the few “spare” moments I am not entertaining my two beautiful, rambunctious, boys, I can typically be found hunched over a sewing machine and/or covered in sawdust. All in the efforts to create a perfect balance of aesthetics and practicality in our home.
read more

Join our mailing list!

DIY & design ideas - right in your inbox!

Featured

Stair Tread Makeover

Categories

  • 70's Ranch Home
  • Around the House
  • Build Plans
  • Crafts
  • Current Home
  • Decor Makeovers
  • Dresser
  • Exterior
  • Fall
  • First Home
  • Furniture Makeover
  • Hidden Compartment
  • Kitchen
  • Lighting
  • Makovers
  • Master Closet
  • Organization
  • R.V.
  • Room Makeovers
  • Seasonal
  • Seating
  • Sewing
  • Shelving
  • Small Builds
  • Smart Home
  • Spring
  • Summer
  • Tables
  • Tablescape
  • Tutorials
  • Uncategorized
  • Wall Art
  • Wall Decor
  • Winter
  • Workshop

Footer

Contact Me: Corey@Sawdust2Stitches.com

Latest ‘Grams

Follow on Instagram
2020 © Your Blog Name
theme by soleilflare
Enter your name and email and get the weekly newsletter... it's FREE!
Your information will *never* be shared or sold to a 3rd party.