Hi, April here again from UncookieCutter! I’m so excited for my first year in our new home and to see how it looks for Christmas. I’ve just finished with my first Christmas project and I’m thrilled to be here sharing it with you.
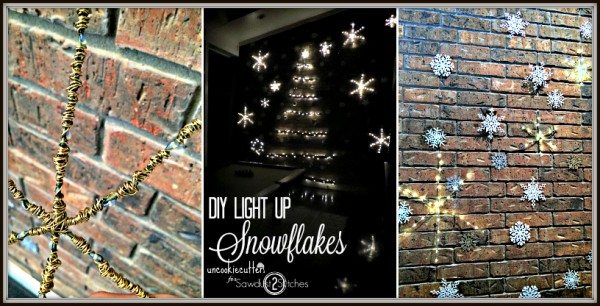
I started with my big, huge blank wall. I actually don’t mind this wall be blank for most of the year, the exposed brick is one of my favorite things about this room. But, for Christmas, I wanted to dress it up a bit.  I saw some light up snowflakes on Restoration Hardware’s site that were beautiful, but checking in at $69-129 A PIECE, I knew I couldn’t afford those. However, they did give my an idea for this wall. I thought I would try and create some easy DIY light-up snowflakes and it would be cool to have a snowy winter wonderland wall. This was a very easy project with a huge impact. I found these little LED light sets at Wal Mart for $4.44 for the small set and $6.88 for the large set and I am kind of obsessed now. They are so perfect.
They have timers, so once I turned them on the first time at 6pm, they stay on for 6 hours and then turn off for 18 hours and I don’t have to touch them again for the rest of the season. Plus, they are LED so I hope they will last a nice long time. They do take 3 AA batteries each, but again, LED uses such a small amount of energy that didn’t bother me.
I started with these little flower stem sticks, mainly because they were so cheap. I made some bigger and smaller snowflakes.

I wrapped the lights around the sticks and used them to hold them together and form the snowflakes. 
I then took jewerly wire in varying colors and wrapped it over the light strings. It doesn’t make a huge difference when the light are on, but they look much nicer when the lights are off. I recommend leaving the lights on when you are wrapping the wire. On one snowflake, the lights didn’t work when I got them all wrapped, so I had to unwrap, find the kink and then re-wrap.

To hang them, I used small finishing nails in the molding and fishing wire attached to the battery packs.
Once I got these all ready to go, I went to Hobby Lobby and since their Christmas stuff on sale for 50% off already, I got a few packs of varying snowflakes ornaments for $14 dollars all together.
I used what my friend refers to as “dorm putty” to hang them all over the wall. It’s removeable, reusable and sticks to brick. It wasn’t quite strong enough for the lit snowflakes and their battery packs, but for the little ornaments it was perfect.

I used the ornament snowflakes to cover the battery packs as well as to finish the snowy landscape.

I was excited to get them all on for the first time.

I got them all set up and then added my flat industrial Christmas tree, which you can see HERE.

They are so cool at night when all the other lights are out. I love how they reflect off the ceiling and floor.

I hope everybody has a wonderful holiday season, thanks again Corey for letting me stop by and I’ll be back again soon!

April – Uncookie Cutter

 Copyright secured by Digiprove © 2015


I love exposed brick walls too! We used to have a house with one and this would have been so cute!
Great idea! Pinning 🙂
Thank you so much Karen!
Wow! SO pretty and a great way to decorate differently!
Thanks Sarah!
wow that looked like a lot of work and it looks so gorgeous!!!
Thanks Christine!
Hi, April ~ This wall is so beautiful! If it were in my house, I’d just sit in the dark and stare at it. :0) It perfectly embodies “Winter Wonderland.” Great job!
Haha, thanks Tiffany ;).
What adorable and easy to make snowflakes! They are the perfect addition for your DIY flat christmas tree!
Thanks Ruthie!!
Lovely, how did you make the flat tree
Hi Donna, thanks so much! I have a tutorial in the link above on the Christmas tree, come on by and take a look. It was pretty easy and cheap :).
Oh wow! I love how this turned out! I wish I had a spare wall to duplicate this!
Thanks Heather!
I love that brick wall, and what a fun way to decorate it for Christmas (and really all winter). Great idea!
Thanks! I took a couple of days, not sure but I worked on it for two or three days while the kids were at school. Not to bad!
What a fabulous wall!! You did awesome!!! This would be perfect for someone living in a small apartment/house where there is no room for a Christmas tree…they could have a tree and still have room to live. I love it!! Popping over to see how you made your tree.
Thanks so much Susan! I thought this would be perfect for a rental too, especially since the dorm putty is removable. Thanks for stopping by!