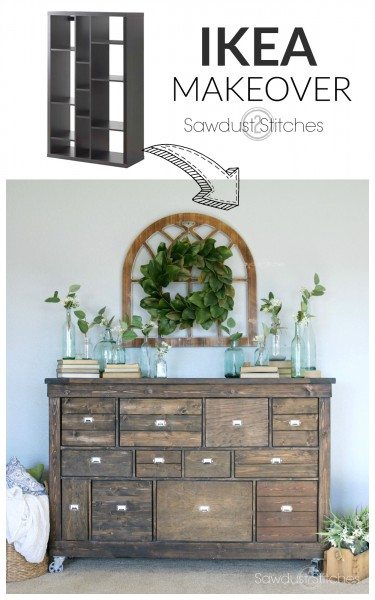
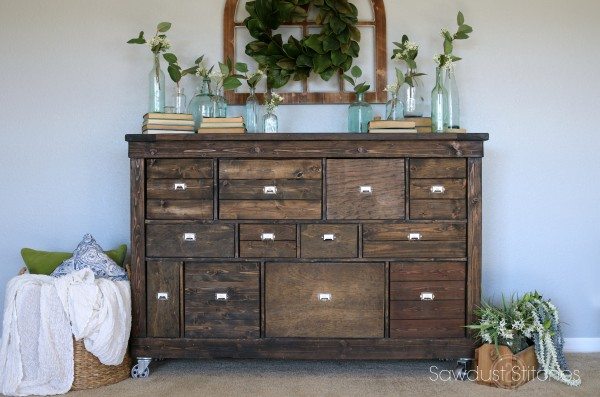
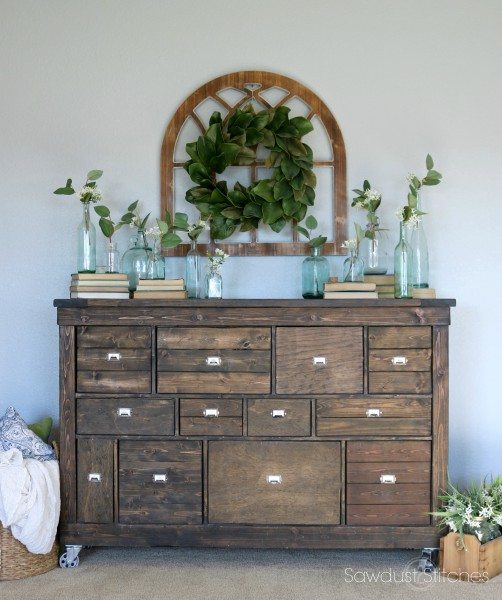
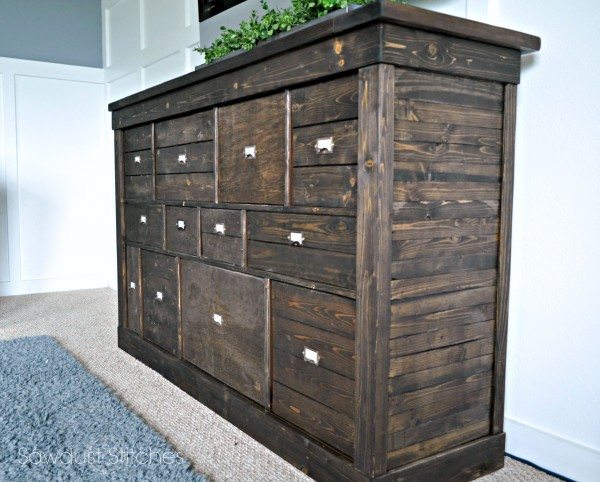
IKEA Makeover into Pottery Barn Style Apothecary
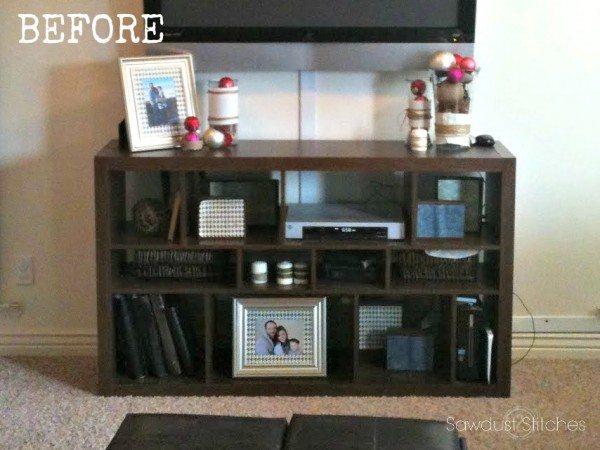
Hey All! So a little introduction to this next makeover. It is kind of a big deal to me, you see it was my first big furniture makeover. It all started when I was at IKEA browsing the “Scratch-and-Dent” bargain area about 7 years ago. That’s when I saw it, an Expedit console in the dark brown! I know this may seem odd that I was excited about it, but I was thrilled! You see, my husband and I had just moved and we were currently using a (Free) small bench as a T.V. stand. We also had a 1 year old that was now standing up and trying to grab at the T.V. We definitely needed something that would keep it out of slobbery/goldfish covered hands. So, I bought it then and there. 70% off, I couldn’t pass that up!?
Fast-forward 3.5 years, and you would find me sitting on the floor of our little condo with a hand saw, (yes HAND SAW) good old fashion hammer and nails, with wood glue trying to give my little IKEA console a makeover. (I actually ended up dismantling the original, simply because I needed to document the process. That’s commitment people! The second time around I had access to power tools.)
I had no clue what I was doing, but after staring at that boxy piece, that showcased all my kids diapers, tonka trucks, and modem wires, I had had it. Honestly, I think my husband might have thought I had snapped. THIS was my first big project and the start of a beautiful on-going relationship with upcycles. You can see more of them here.
IKEA Makeover into Pottery Barn Style Apothecary
Materials Used:
- Old Ikea shelf or something similar
- 1×2’s
- 1×4’s
- 2×4’s
- 2×8’s
- Lattice Strips
- Wood Glue
- Stain
- Foam Brushes
- Drawer Pull/Tag Pull

- Magnetic Cabinet Catch
Tools Suggested :
- Nail Gun
- Compressor
- Table Saw
- Miter Saw
- Sander
DISCLOSURE: SOME OF THE LINKS PROVIDED ARE AFFILIATE LINKS. BY PURCHASING THROUGH THESE LINKS IT SUPPORTS THIS SITE AND HELPS KEEP CONTENT FREE. YOU CAN READ MORE ABOUT HOW WE DO THIS WITH NO EXTRA COST TO YOU.
BEFORE we dive into this, please understand that these are not BUILD PLANS. I don’t have specific measurements. This tutorial is intended to be more of a general guideline that can be applied toward many different size/style pieces.
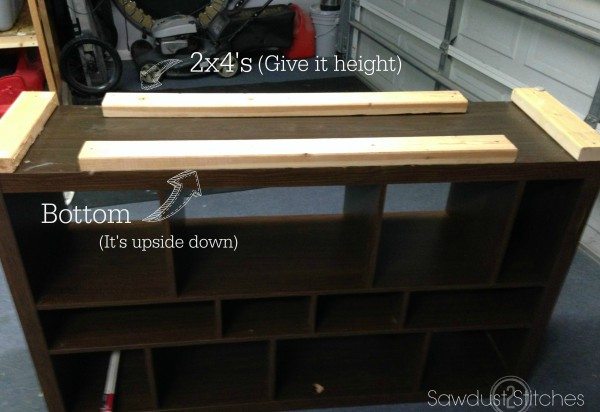
Step 1: Add Height –
I wanted to give the base some visual weight, so I began by adding height to the base. I found the easiest way was to flip it over and attached 2″x 4″ boards directly to the base of the unit.
Then turn right side up. Next task is to I cover the exposed 2″x 4″s by adding 1″x 4″ boards (trim) to the base. I cut the boards with 45 degree angles on the ends.
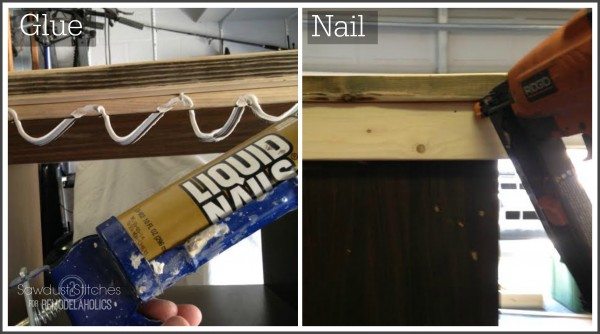
I secured the trim piece (1″x 4″ boards) with wood glue, and reinforced with 2″ finish nails. 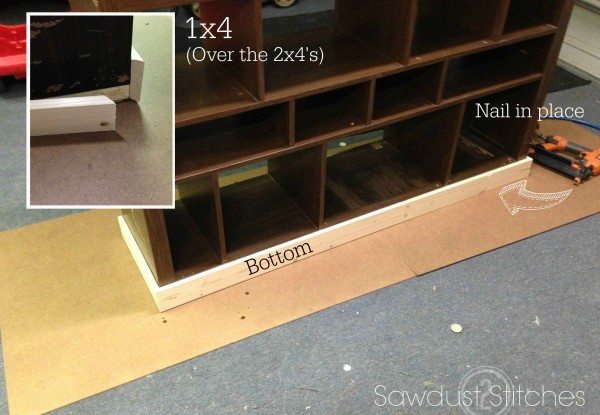
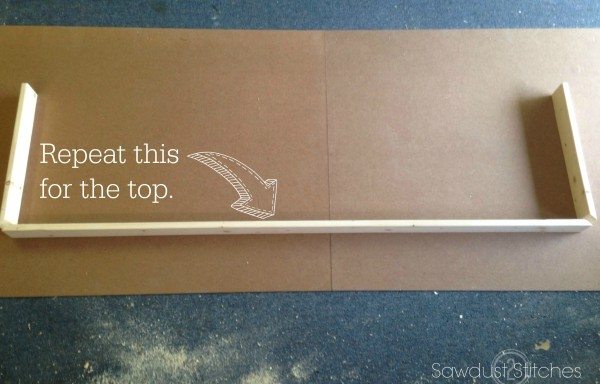
Step 2: Repeat on Top-
Now that the base is beefed up, I wanted to give the top a little more thickness as well. However I wanted it to be a little lower profile than the base, so I used 1×4’s instead of 2×4’s. Again, I just tacked it in place, giving the top some extra visual weight.
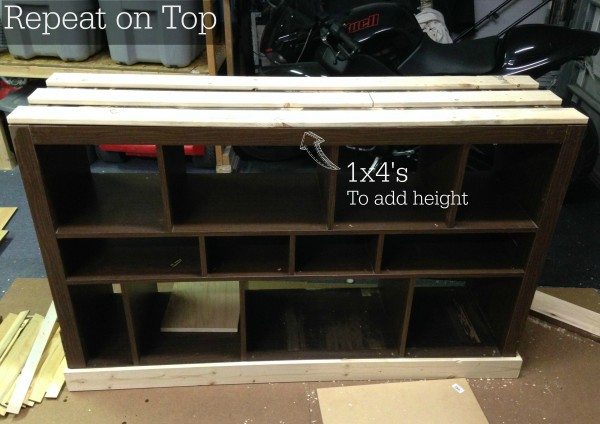
I used 2×8’s for the top. I cut them so that would hang out over the top a little bit and give it a lip. This step alone makes it look SO much better !
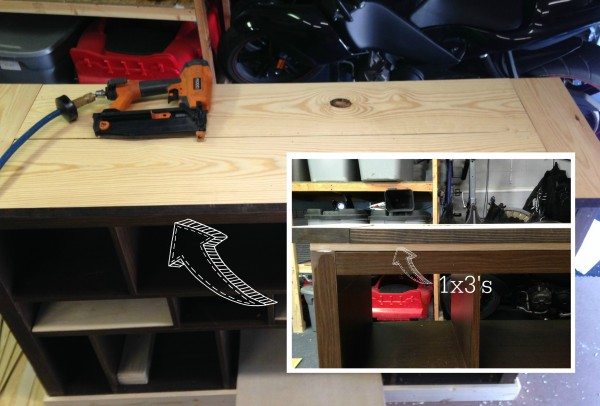
Once the top of the console was in place I trimmed out the top of the shelf. ( I basically repeated the same steps from the base. Only this time I was covering the 1×4’s.)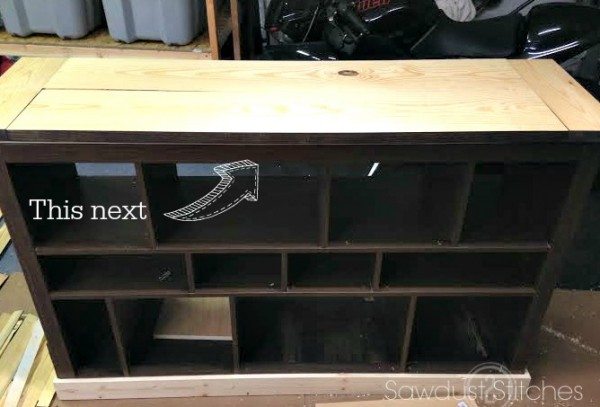
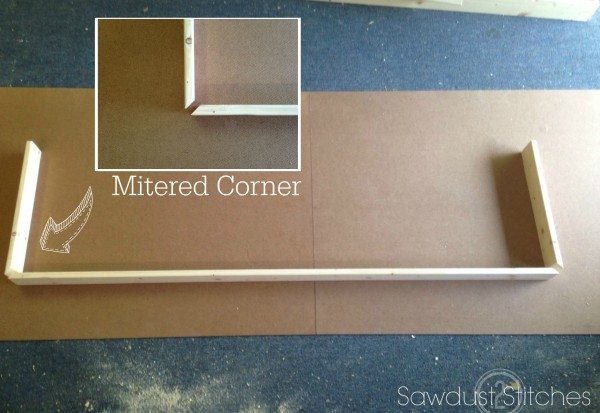
Step 3 : The Sides
Next up, sides! I decided to start in the corners.
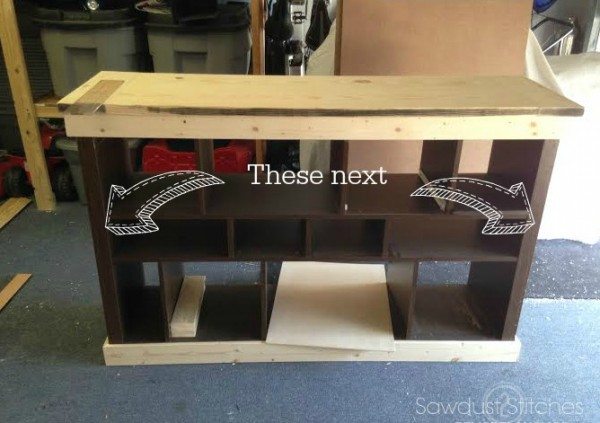
I ended up doing mitered corners, using my table saw. ( You can always just use a 1×3″ and 1×2″ and and have them butt into each other.)

It is coming together people!
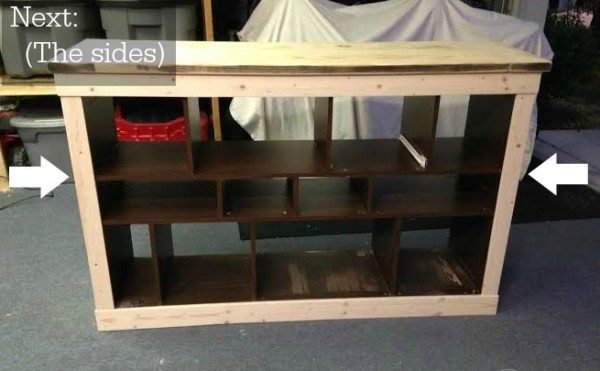
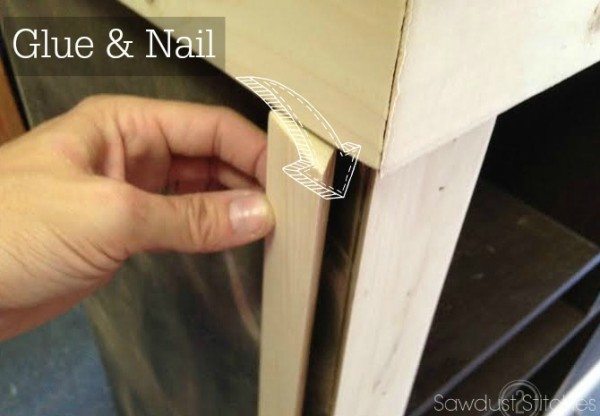
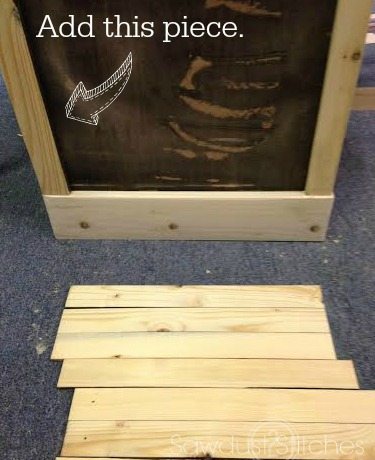
I used a 1×2 to frame in the rest of the side, leaving a large open ugly laminate area.
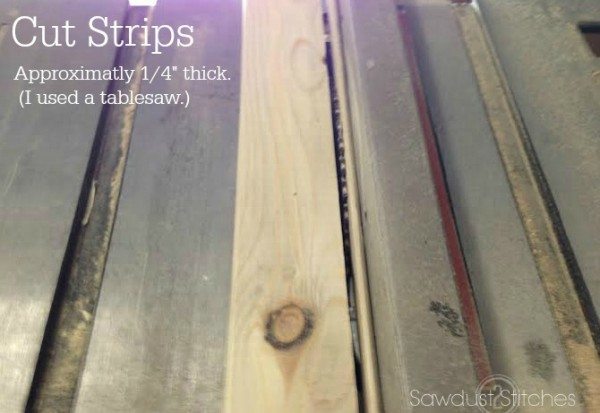
I decided to use lattice, because is has a much smaller profile and would create depth. That, and I just love the look of it, and it’s cheap!
Using a sander I scuffed up the laminate, because I was planning out using glue to help hold the lattice in place, and everything sticks better to non-glossy surfaces.
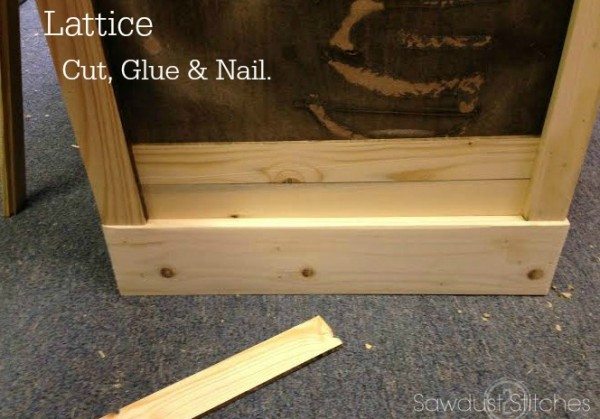
I simply measured, cut, glued, nailed, and then repeated on both sides of the console.
Step 4: Dividers
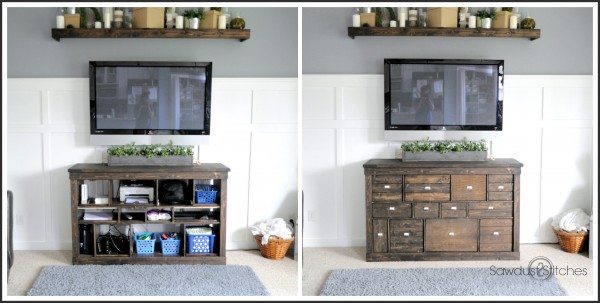
At this point you can easily call it good enough and move on to painting and/or staining. But not me. I had to go all “Corey” on it. I decided to hide any evidences of laminate. Including the shelf fronts.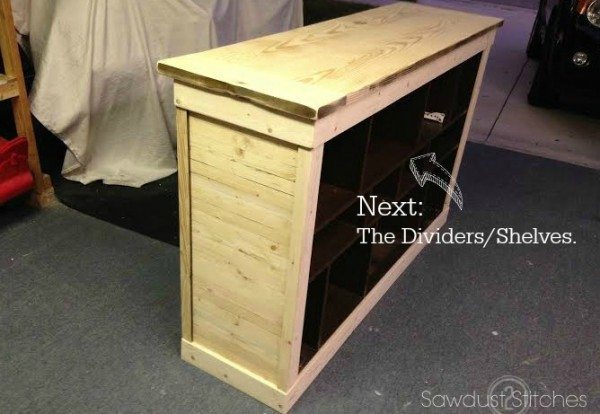
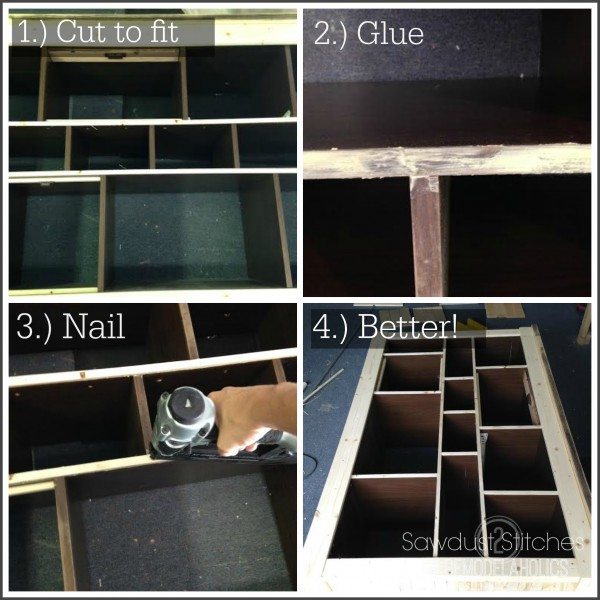
Once I had completely covered all traces of laminate, I moved on the “drawer” front.
Step 5: Drawer Fronts

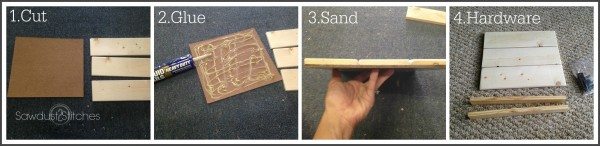
1.) I cut a piece of paneling that was the dimensions of the cubby opening. I also cut 1×4’s the same width.
2.) Using liquid nails I adhered the planks on to the piece of paneling.
3.) After it had completely dried I sanded it.
4.) It’s now ready for stain and hardware.
Once I had made all my drawer fronts, using 1×2’s I cut two strips of wood that were the same width of EACH cubby. (These will be used to install the drawer fronts. )
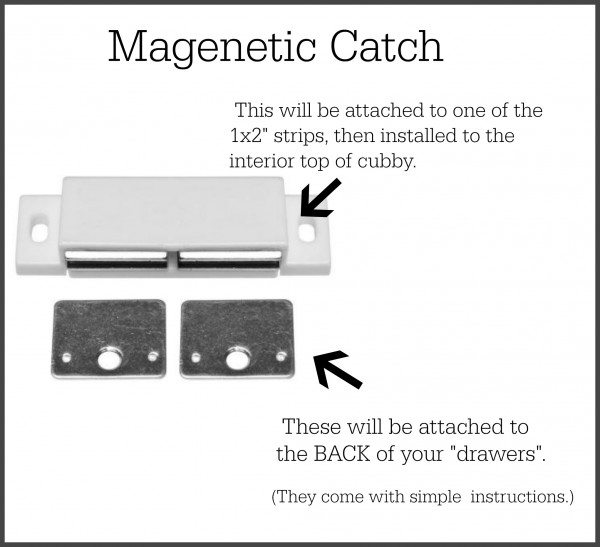
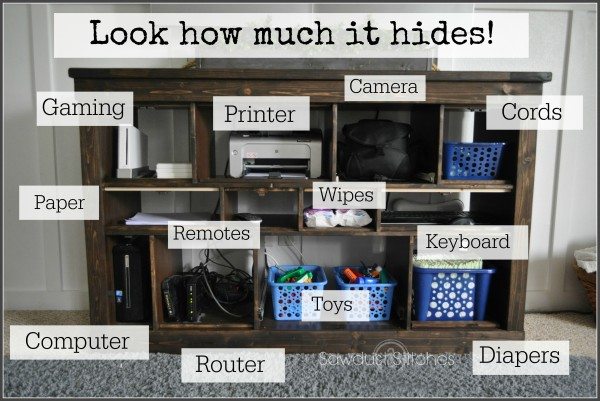
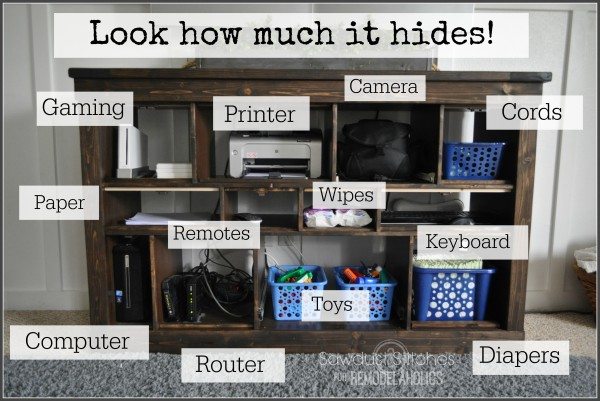
The strips of wood that I cut out of 1×2’s are used to keep the drawer front in place. The “drawer” panel will rest against the wood slats and the magnetic catch will hold it in place. This system works PERFECTLY for appliances like printers, computers, routers, etc!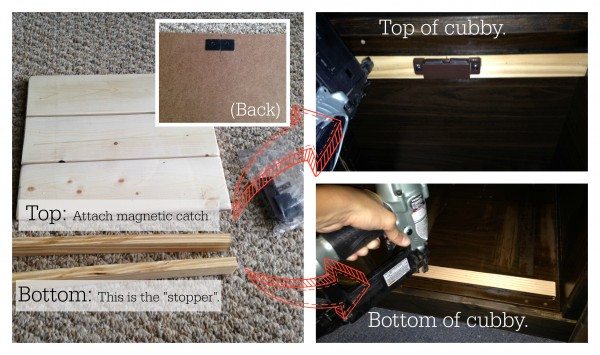
I personally did make a few drawers to hold the kids toys and diapers. (I won’t be going into that today) But if you have your heart set on it, it is totally doable.
If the idea of making drawers sounds overwhelming, maybe you should consider making some simple crates ? Possibly using decorative baskets ? Ikea also makes a whole line of baskets meant to fit their shelves. The possibilities are endless!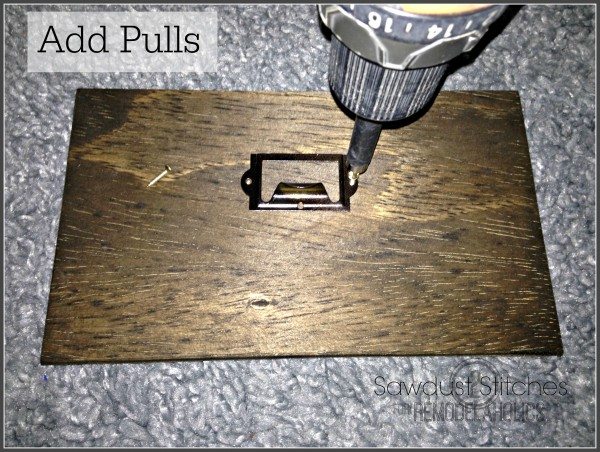
Seriously, look at how much crap those little magnetic catch doors can hide!!? There is always a way to make form and function meet. Sometimes it takes a lot of elbow grease, and seriously stubborn disposition, but it is possible!
Take Luck.
Corey
 Copyright secured by Digiprove © 2017


Wow, that was an awesome makeover!
Thanks so much Judy!
This turned out so great – you did a fantastic job and the tutorial is very detailed!
Best,
Kelly
That’s really inspiring! What stains did you use to achieve that color?
Thanks so much, it is Jacobean by Minwax.
I have no words! This is amazing and your directions are wonderfully detailed.
Excellent tutorial! We bought a new travel trailer and were perplexed at the difficulty of accessing the dinette banquet seating/storage. (Under the seat cushions). I think something like this might work if we cut a whole on the sides of each seat base. Thanks for the inspiration!
You’re amazing! What a great idea! This is going in my file as a keeper–to do . . . someday soon.
Thank you for sharing
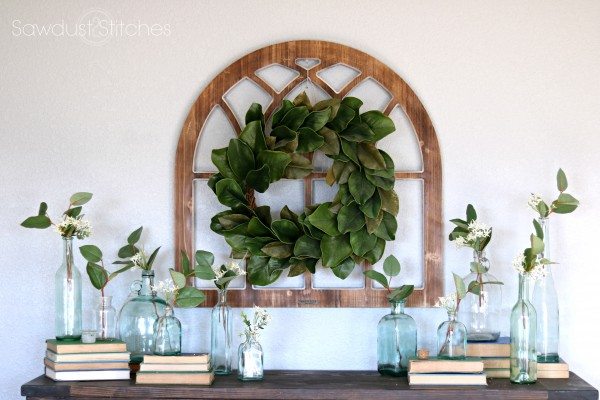
Love the piece you created! May I ask, where did you find the arched wall hanging that you show above it with a wreath in front?
Thanks! It is actually a “Magnolia Market” piece. I found it at a local boutique.
This is incredible!! I am going to walk around my house right now and look at every piece of laminate furniture I have to see if this will work! My husband will be cursing you, but I will be thrilled! Amazing job!
Looks gorgeous! Great job, thanks for sharing.
I am so impressed! Thank you for sharing! I think I will give this idea a try! Thank you!
This is absolutely Brilliant!! You have inspired me to look at the generic furniture pieces I have and customize- no more starring at shelf after shelf of DVDs! Thank you for the Inspiration and the free tutorial!! ……now to planning!